


Saito FG-20 or 21
 11-19-2014, 12:30 PM
#1751
Junior Member
My Feedback: (3)
Join Date: Aug 2011
Location: Montgomery, IL
Posts: 5
Likes: 0
Received 0 Likes
on
0 Posts
I just purchased a FG-17 that also was giving the owner problems and they could not get it to run. When I looked the engine over the valve lash was set so tight the exhaust valve was remaining open and also the intake valve pushrod was out of the rocker arm seat. I corrected these issues and set the carburetor needles to factory settings. I then started the motor with no trouble. Minor adjustments were made to the carburetor settings and the motor now runs perfectly. This is the second motor I have purchased that were problem motors for their owners that only needed proper adjustment. I hope I can get some more of these deals.


 07-25-2015, 06:50 PM
#1754

My Feedback: (24)
Join Date: Aug 2002
Location: Novi, MI
Posts: 884
Likes: 0
Received 0 Likes
on
0 Posts
OK, so I *finally* (six years later) got serious about getting my FG-20 going this spring. Got the original carb replaced by Horizon with the new revised version, and ditched the Saito ignition (which would not fit inside the cowl) with a CH Ignitions one. I mounted it in my old Sig 1/4 scale Cub (in place of an RCS 140, another nightmare), and broke it in using Evo oil at 20:1 WOT slobbering rich for 3 full tanks. I then leaned it out to run at about 8000 rpm top end with my Moki 16x8, and set it aside to fly. It took me about a month to finally get it to the field, and when I did, it started up OK, but didn't seem to run well at the top end. I leaned it one, click, and took it up. After a uneven runup, it took off, climbed to altitude, started sputtering on the first turn - then quit. Dead sticked it in, took it back to the pits, removed the cowl and fiddled with the carb setting for half an hour, then gave up, as I could not get a clear top end.
It sat for another month, and this weekend I pulled it out and tried to tune it once more. Now, it will NOT run WOT, no matter what. It starts right up at idle, and will speed up to about 1/2 throttle (at the carb, not on my radio stick), any higher and it starts to sputter and eventually stalls. The high needle setting does not seem to matter. I started at Pete's recommended 1 1/4 turns out, and it has minor effects out to about 1 3/4 turns, and there after there is no change in the behavior of the engine regardless of how far out it is turned (all the way to falling out). The low needle is set at his recommended 7 5/8 turns from closed (using his setting procedure). I fiddled with that setting also, and opening seems to make minor differences in how high of a throttle position it will run at, but not much.
I changed fuel. I changed batteries. I changed props (17x6, 15x6, 16x6). I dismounted the carb, pulled the HS needle and blew it out. None of this made one bit of difference; it runs exactly the same regardless of what I do. Fuel is getting the the carb just fine; it flows up to the carb by propping it with an electric starter for about 2 seconds when it is cold, and remains solid without bubbles as long as it's not stopped for an extended period.
I did prove one thing - this is NOT AN IGNITION PROBLEM, IT IS A FUEL SYSTEM PROBLEM. How? I noticed that if I advance the throttle to the stuttering point, then choke the carb with my thumb, the engine speed clears up. Indeed, while choked thus I can advance the throttle all the way and get about 8900 rpm with the Moki 16x8. Removing my thumb causes the motor to stop instantly.
I believe there is a fuel flow problem, but I'm puzzled why it did not show up the first time I ran the engine. I also noted that the engine set at 1/2 throttle running cleanly will sputter if the plane is tipped back (full tank). I am going to try the pressurized tank idea, and see if that helps, but otherwise I give up.
Unless there are any other thoughts out there... Pete? w8ye?
Last edited by RickVB; 07-25-2015 at 06:57 PM.
07-25-2015, 07:40 PM
#1755
Sounds like it picked up a spec of dirt in the carb. I had the same problem with the FG-11, ran like crap on the top end and would dead stick. Took the carb off and shot canned air through it backwards and reassembled it, and it ran fine after that.
07-27-2015, 09:45 AM
#1756
My Feedback: (24)
Join Date: Aug 2002
Location: Novi, MI
Posts: 884
Likes: 0
Received 0 Likes
on
0 Posts
Sorry for the interruption and later edit; I lost track of time and was late for work earlier.
Well, I had taken it off, blown it out and looked for stuff stuck in it, but I stopped short of a total teardown. Big mistake.
After that I drilled and tapped the muffler for a pressure nipple, and pressurized the fuel system a la glow. No change in behavior whatsoever.
As a last (last) resort, I once again dismounted it and this time did a total teardown (being resigned to purchasing a new one if I damaged it). Upon dismantling the pump section, I found flecks of black and yellow stuff in various internal galleries. I then removed the low speed needle, throttle barrel, and high speed needle. I found a few flecks on the barrel, so I rinsed them all in gas and blew them out thoroughly.
Then came big find. I ran a #64 drill bit (just a little smaller than the tip of the HS needle) all the way in to the fuel tube (I having a mental block and can't remember what the tube in the carb throat that the fuel is sprayed out of is called), and when I withdrew it the end was covered with black and yellow flecks, metal shavings, and what I can only call yellowish "fuzz". Three or four cycles of this removed more stuff; the particles were small enough that my phone camera was not picking them up and I was too lazy to pull out the 35mm, so I don't have photos.
I then took a sharp dental tool to the cat's eye opening, and gentle pulled it along the length of it. This resulted in another clump of fuzz, and a visibly more open cat's eye. Gas flush, blow out with compressed air, and reassemble, this time with a Sullivan Dual Screen in the line. By the way, there are no internal screens anywhere inside this carb, as I have seen in many other gasoline carbs.
The result was that the engine now runs like it originally did. It will need a round of tweaking to get it perfect, but it now runs fine full throttle (2100 low end, 7950 high end with factory needle settings and the Moki 16x8).
I'm not sure where all the garbage could have come from, the fibers were so small that I wonder if a standard screen filter would catch them. Where did they come from? Who knows, but I really have to wonder about the metal shavings... This is something all owners of this engine should look into if they are having problems with it.
Last edited by RickVB; 07-27-2015 at 04:15 PM.
07-27-2015, 09:32 PM
#1758
Senior Member
My Feedback: (4)

Join Date: Aug 2008
Location: EllinikoAthens, GREECE
Posts: 1,079
Likes: 0
Received 5 Likes
on
5 Posts
Any speck of dust / metal / dirt / particles that somehow get in the fuel system will find a good home in the carb tubes. Its Murphy's Law in this hobby.
I use rattle can carb cleaner fluid, and some tiny Q-tips made for cleaning small airbrush nozzles - I get those at a static modelling shop.
I use rattle can carb cleaner fluid, and some tiny Q-tips made for cleaning small airbrush nozzles - I get those at a static modelling shop.
07-29-2015, 10:14 AM
#1759
My Feedback: (24)
Join Date: Aug 2002
Location: Novi, MI
Posts: 884
Likes: 0
Received 0 Likes
on
0 Posts
No, the metal shavings were silvery, definitely aluminum or stainless. The yellow stuff was the consistency of lint and not shiny. The flecs kinda looked like paint.
The amount of crap that came out of the spray bar is what surprised me - it was clearly enough to pile up in the tube to the point where 1/2 of the cat's eye was blocked. We're not talking about one speck here, there were several dozen separate particles/fibers. And the fuzzy stuff was clearly not going to get flushed out easily.
I should also clarify that this stuff was very small - I was viewing it through my bench magnifier, and sometimes through my optivisor and my bench magnifier.
Any speck of dust / metal / dirt / particles that somehow get in the fuel system will find a good home in the carb tubes. Its Murphy's Law in this hobby.
I use rattle can carb cleaner fluid, and some tiny Q-tips made for cleaning small airbrush nozzles - I get those at a static modelling shop.
I use rattle can carb cleaner fluid, and some tiny Q-tips made for cleaning small airbrush nozzles - I get those at a static modelling shop.
I should also clarify that this stuff was very small - I was viewing it through my bench magnifier, and sometimes through my optivisor and my bench magnifier.
Last edited by RickVB; 07-29-2015 at 10:18 AM.
07-29-2015, 10:20 AM
#1760
Do you have a filter clunk? I use the type you can get at HD for trimmers. black plastic frame with a screen surrounding filter media. Has kept my gas motors clean. I used to have one on the filler tube in the can, but since I didn't tie it on with wire, it fell off in the can. My fuel can is actually an old glow fuel bottle, so I can see the bottom of the bottle and tell if any junk got in there. I can see the filter clunk laying there too.
07-29-2015, 12:54 PM
#1761
My Feedback: (24)
Join Date: Aug 2002
Location: Novi, MI
Posts: 884
Likes: 0
Received 0 Likes
on
0 Posts
- Disposable Filter when filling can
- Filter on line out of can
- Filter on line into can
- Did not have filter on plane (stupid me, you'd think I would have learned by now).
(This is a fairly new Jersey Modeler electric pump can too, not some Walmart cheapy.)
However, looking at some of this stuff, and based on the widespread occurrence of this very issue with this specific engine, I'm assuming that at least part of this stuff didn't originate with my fuel supply. I'm tempted to spend $92 on another carb and see what is in that pump unit and spray bar when I get it...
Last edited by RickVB; 07-29-2015 at 12:57 PM.
08-08-2015, 02:02 PM
#1762
Junior Member
Join Date: Jul 2010
Location: Edmonton, AB, CANADA
Posts: 16
Likes: 0
Received 0 Likes
on
0 Posts
Ive been fiddling with this project for quite a while now. I have the Hangar 9 P51 bluenose with FG 21 gas engine. The problem is that the plane will not run properly with the cowl on. It develops air bubbles in the fuel line. When i run it with the cowl removed it runs perfectly but as soon as the cowl goes on the air bubbles show up. Ive pulled the fuel tank and put in the sink and pressurized it.......no bubbles came out. Ive moved the fuel filling line out of the cowl and into the fuse to prevent vibration of any gas induced in the line from the cowl mounted fuel dot. Ive drilled a hole behind the diaphragm hole in the carb and there is 1mm of space between the firewall and this carb. Ive basically run out of ideas on what could be causing this issue. Im wondering if its heat related and the carb is getting vapor locked which is inducing bubbles into the fuel.
Id sure appreciate any advice anyone may have on this thing........its beginning to be quite frustrating. Has anyone got this specific plane and engine running with cowl on? Id be interested in knowing your setup
Best regards.
Clayton
Id sure appreciate any advice anyone may have on this thing........its beginning to be quite frustrating. Has anyone got this specific plane and engine running with cowl on? Id be interested in knowing your setup
Best regards.
Clayton
08-08-2015, 05:30 PM
#1763
Baffle the cowl to direct air through the head, not around it. The engine is probably overheating. Somewhere I have some pics of an FA-100 in a TF P51 showing the baffles and exit. I have had issues with cowled engines that ran like crap when the cowl was in place, but ran fine with it off. Baffling did the trick with them. Another thing that can happen is low air pressure in the cowl by the carb, which could be inducing the bubbles, baffling will help that as well.
08-08-2015, 06:28 PM
#1764
Junior Member
Join Date: Jul 2010
Location: Edmonton, AB, CANADA
Posts: 16
Likes: 0
Received 0 Likes
on
0 Posts
acdii thank you for your reply. Would you be able to post some pics of what your baffles look like and the exit? I would be interested to see how you did it and what materials you used to make the baffles from. This is my first gas engine coming from electrics so im not that familiar with the baffling concept.
Thanks a lot
Clayton
Thanks a lot
Clayton
08-08-2015, 08:33 PM
#1765
acdii thank you for your reply. Would you be able to post some pics of what your baffles look like and the exit? I would be interested to see how you did it and what materials you used to make the baffles from. This is my first gas engine coming from electrics so im not that familiar with the baffling concept.
Thanks a lot
Clayton
Thanks a lot
Clayton


 08-09-2015, 12:47 AM
#1768
Senior Member
My Feedback: (4)
Join Date: Aug 2008
Location: EllinikoAthens, GREECE
Posts: 1,079
Likes: 0
Received 5 Likes
on
5 Posts
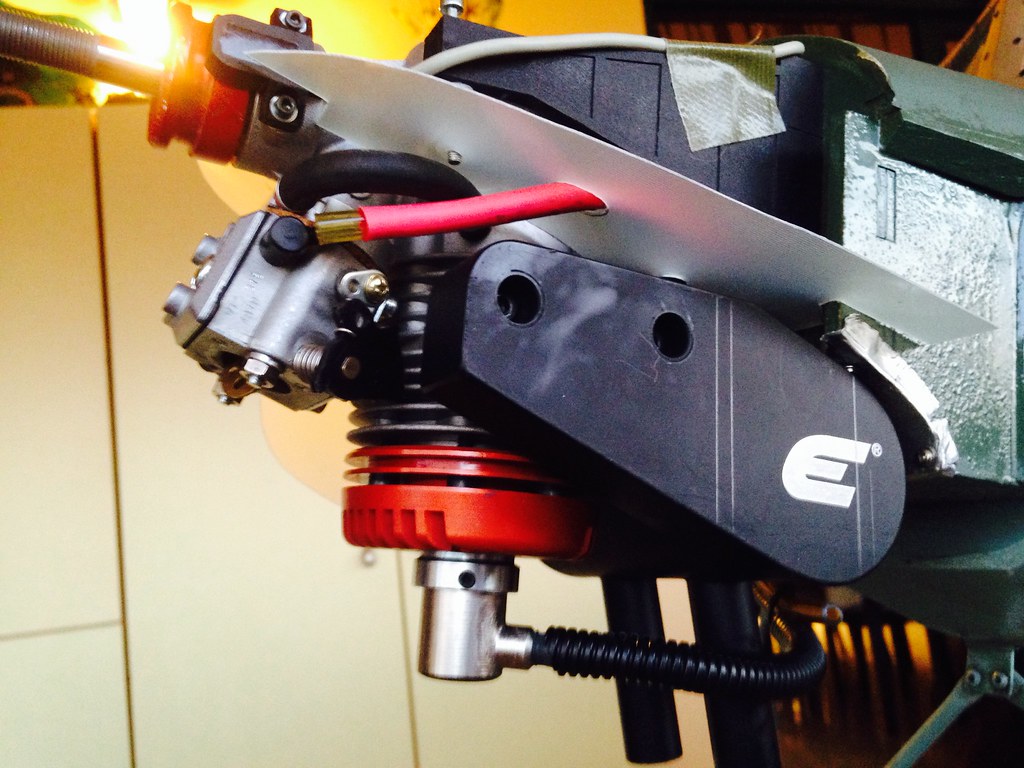
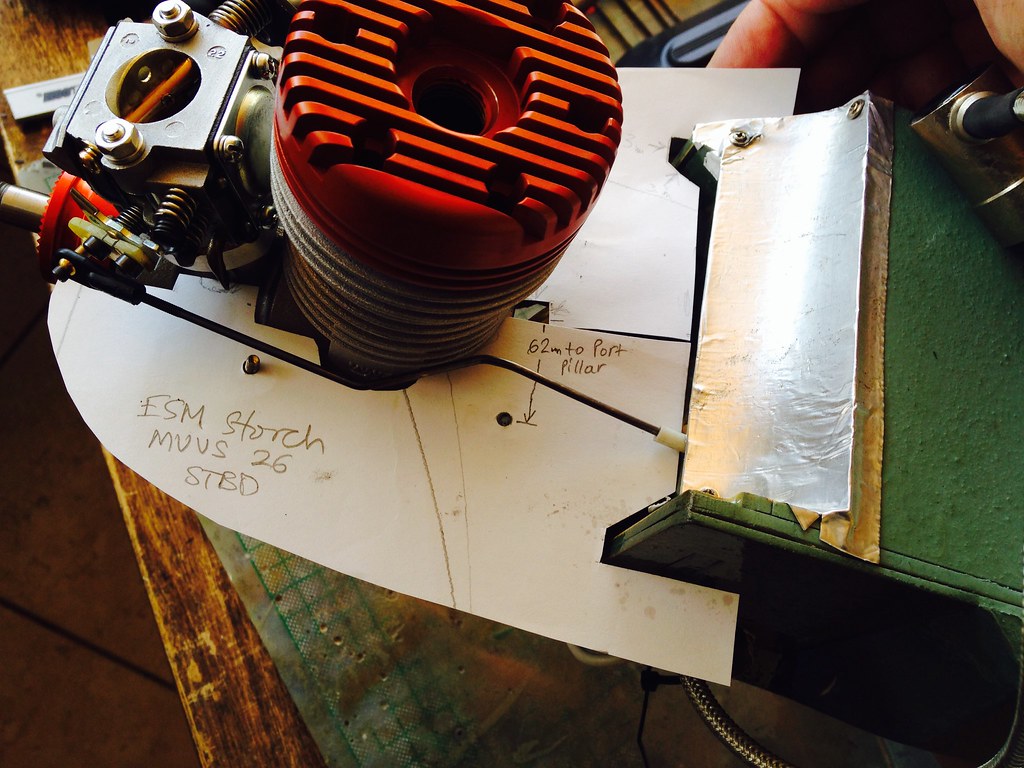
This job takes some patience, and to be really efficient I recommend investing in a contour gauge.
Baffling really DOES WORK! I was recently at a warbird meet in hot humid weather, many planes had flame outs mid-flight, my 109 kept going all day.
I also recommend grilles for hot air to be sucked out by the airstream low pressure.


Baffling really DOES WORK! I was recently at a warbird meet in hot humid weather, many planes had flame outs mid-flight, my 109 kept going all day.
I also recommend grilles for hot air to be sucked out by the airstream low pressure.
08-09-2015, 05:12 AM
#1769
Junior Member
Join Date: Jul 2010
Location: Edmonton, AB, CANADA
Posts: 16
Likes: 0
Received 0 Likes
on
0 Posts
W1nd6urfa:
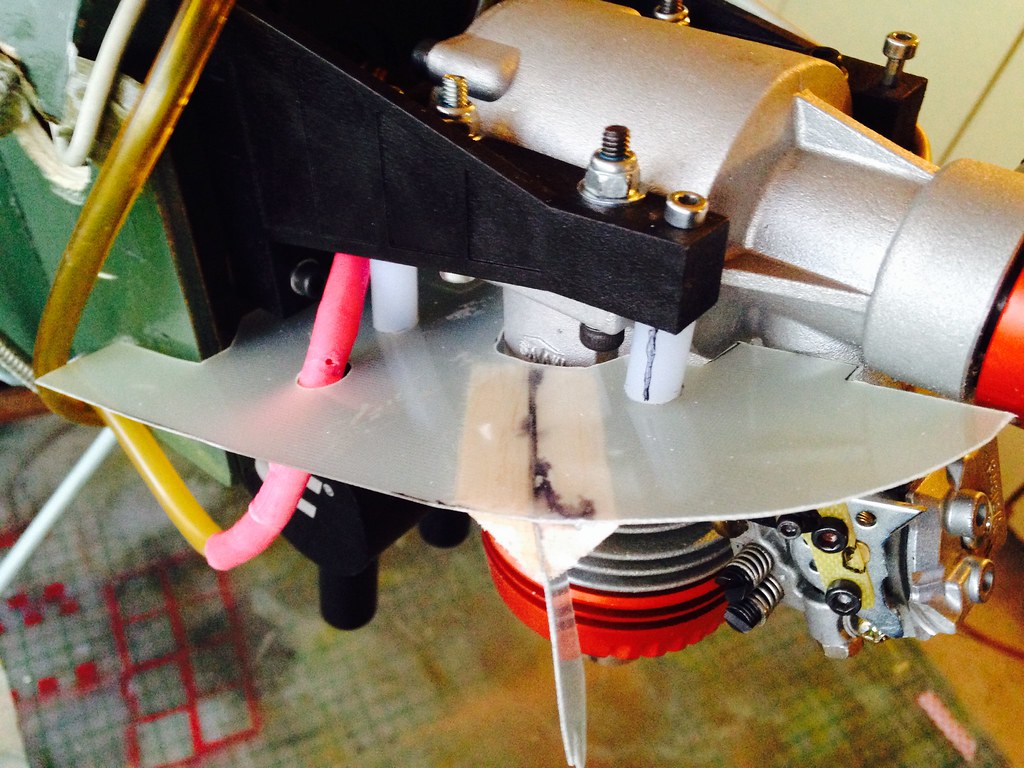
Wow, beautiful work. Thanks for taking the time to respond. What material are you using to construct those baffles? Looks like some sort of plastic sheeting. I like how its attached to the engine itself using the mounting bolts.
The grilles for allowing air to be sucked out by the air stream, are those the little scoops in the bottom of the cowl towards the back as shown in the last photo?
Where would i find a contour gauge?
Obviously this baffling works based on what your experience has been at air shows. Ill definitely have to get on this.
Thanks very much.
Clayton
08-09-2015, 05:18 AM
#1770
Junior Member
Join Date: Jul 2010
Location: Edmonton, AB, CANADA
Posts: 16
Likes: 0
Received 0 Likes
on
0 Posts
Hi Acdii
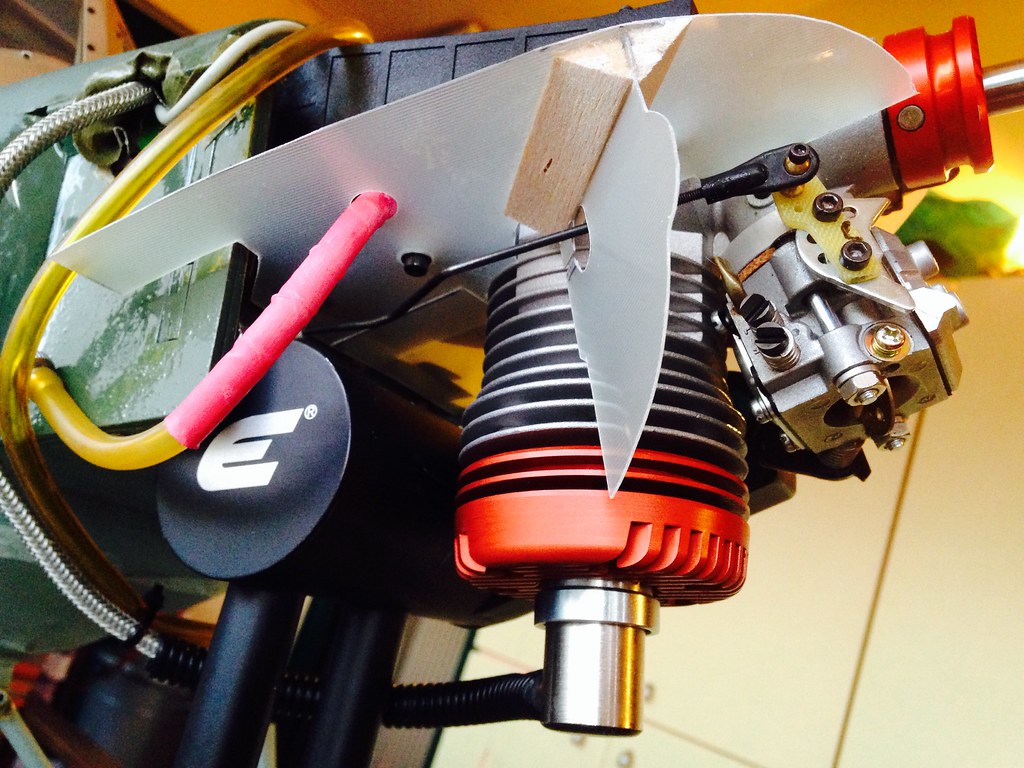
Thanks a lot for taking the time to post the pictures. They are very insightful. Nice work as well. Sorry for all the questions but are those baffle blocks made from balsa and do they actually touch the cooling fins or just get as close as you can without touching them? I was also thinking of adding a silicon exhaust deflector that you use on the end of glow exhaust to stick over the velocity stack of the carb intake. This brings the intake air from directly behind the engine to a position forward and under the crankcase. This may help as well. Any thoughts?
Best regards.
Clayton
08-09-2015, 08:31 AM
#1771
I used balsa and doped them to fuel proof them. They glue to the cowl itself with CA. They went all the way to the motor mount so the air entering flows directly through the fins and then out the opening underneath. When running you can feel the hot air flowing out. The one posted after mine are another way to do it, and actually looks easier to do than what I did, as fitting those balsa pieces were a PITA with all the trial and error fittings with putting the cowl on and off. The baffling underneath is also a good idea, though would look out of place on the Stang. They create a venturi effect pulling the heat out of the cowl with the air flow of the prop.
08-09-2015, 09:42 AM
#1772
Senior Member
My Feedback: (4)
Join Date: Aug 2008
Location: EllinikoAthens, GREECE
Posts: 1,079
Likes: 0
Received 5 Likes
on
5 Posts
I use 0.8mm epoxy sheet, HobbyKing has it but I also source it locally. Its light, stiff and needs no fuel-proofing.
For the contour gauge search on eBay, I got mine a few years back for $20 iirc
For the contour gauge search on eBay, I got mine a few years back for $20 iirc
08-09-2015, 06:52 PM
#1774
Junior Member
Join Date: Jul 2010
Location: Edmonton, AB, CANADA
Posts: 16
Likes: 0
Received 0 Likes
on
0 Posts
Thanks AC
Ill work on some baffles and hopefully that clears up the problem. I can see what you mean about it being a PITA.......trial and error fittings would take time im sure but the result it good.
Thanks again for your suggestions and help.
Ill work on some baffles and hopefully that clears up the problem. I can see what you mean about it being a PITA.......trial and error fittings would take time im sure but the result it good.
Thanks again for your suggestions and help.
08-24-2015, 04:53 PM
#1775
Junior Member
Join Date: Jul 2010
Location: Edmonton, AB, CANADA
Posts: 16
Likes: 0
Received 0 Likes
on
0 Posts
Finally got my baffles done. Havent had a chance to fire it up so hopefully this solves the problem. Also added a 3/8" glow exhaust deflector over the velocity stack of the carb which brings the intake up to the top of the cowl away from the firewall.......


