


Composite-Arf 33% Gee Bee R2 - First Flight - Pics - Videos - L@@K
 04-12-2019, 09:06 AM
#1851

The 'upgrade' of the Gee Bee kit seems to have brought interest in this airplane almost to a complete halt. Exactly the opposite of the results CARF had hoped for.
I haven't heard any feedback on the flying qualities of the new kit so can only assume very few have been built and flown.
No doubt, doubling the price put the brakes on interest as well... unfortunate.
Still the coolest airplane ever
I haven't heard any feedback on the flying qualities of the new kit so can only assume very few have been built and flown.
No doubt, doubling the price put the brakes on interest as well... unfortunate.
Still the coolest airplane ever


 . I am still looking for a video of the new one flying. Hopefully someone picks one up and post here with details.
 04-13-2019, 01:43 PM
#1853

Join Date: Oct 2015
Posts: 30
Likes: 0
Received 0 Likes
on
0 Posts
I agree with you Richard. It’s a pity that there is not more interest in this fantastic plane. I still haven’t made my maiden flight. At the moment I do some testing with a cortex pro that I would like to install in the GeeBee. I would love to see one of those GeeBee’s flying before I do my maiden so I can see what I can expect, I’ve never seen one flying, not even on an airshow. Don’t understand why CARF never bring it to a show....
04-13-2019, 02:26 PM
#1854
I agree with you Richard. It�s a pity that there is not more interest in this fantastic plane. I still haven�t made my maiden flight. At the moment I do some testing with a cortex pro that I would like to install in the GeeBee. I would love to see one of those GeeBee�s flying before I do my maiden so I can see what I can expect, I�ve never seen one flying, not even on an airshow. Don�t understand why CARF never bring it to a show....
I can tell you not to expect a huge difference in handling between the old and the new. It boils down to the pilot and proper set up of the plane.
A gyro would be a good addition.
04-15-2019, 04:55 AM
#1855
I think there is a lot of interest in the plane but I think it is overruled/overshadowed by the history of it. Even the great planes 1.20 Gee Bee had pilots scared to fly it, so I can only imagine what they are thinking with the CompArf Gee Bee new and old version. When I used to bring out my GP Gee Bee, everyone would say I would love to have that plane but...
04-15-2019, 05:54 AM
#1856

In support of rowdog's statement, and speaking as a retired sales/training manager, they should have offered a wing option. One, with the scale airfoil and a sport wing option to tame the landing speeds. Now, I can hear the high and mighty raising their objections, but without sales, the model will disappear from the marketplace. If people are afraid to fly the plane, it will go away.
04-15-2019, 06:53 AM
#1857
In support of rowdog's statement, and speaking as a retired sales/training manager, they should have offered a wing option. One, with the scale airfoil and a sport wing option to tame the landing speeds. Now, I can hear the high and mighty raising their objections, but without sales, the model will disappear from the marketplace. If people are afraid to fly the plane, it will go away.
04-15-2019, 02:02 PM
#1859
I wrote the Builder's Manual for the CARF Gee Bee... the one that comes with any kit made since 2010. I offered to update the manual for the new, improved version, since many things had changed. The offer was turned down.
I also wrote the Builder's Manual for the CARF P-47 after writing the manual for the Gee Bee. Mr. Geitz seems to be doing just fine without me!
However, the Gee Bee kit would be doing MUCH BETTER had he taken me up on my offer...
mal gewinnt man, mal verliert man
I also wrote the Builder's Manual for the CARF P-47 after writing the manual for the Gee Bee. Mr. Geitz seems to be doing just fine without me!
However, the Gee Bee kit would be doing MUCH BETTER had he taken me up on my offer...
mal gewinnt man, mal verliert man


 09-21-2019, 01:31 PM
#1868
Hi Richard. It's Mark. I've got the new version on the way from the Union City warehouse. It's a little scary to think no one on this thread has flown one yet.(new version) I'll be using a 3W 157, HiTec 5945's and 5645's. Looking forward to the build.
I'll post as I go, Mark (BTW the Bob-Tail looks great!)
I'll post as I go, Mark (BTW the Bob-Tail looks great!)
09-29-2019, 10:59 AM
#1869
OK, here goes. Received my R-2 on Fri. in excellent condition. There have definitely been changes and the manual doesn't reflect any of them. (Richard, I assume the manual I did receive is the one you wrote). These are the changes I can see so far: No more cutting and soldering the flying wires. They come complete with heavy tapped and drilled brass fittings. Also, they've opted to not use cable from the inside gear to the lower fuse, instead using the same material as the flying wires. They are beautifully made and very impressive. The engine dome is made from heavy carbon fiber, clearly marked for the top with a cap molded in where the engine mounts. A cursory examination shows the fit to be flush with no sanding required and all holes drilled with blind (T) nuts in place. The kit includes a second carbon "cap" that can be fitted over the dome to extend the mounting surface (I assume for smaller engines). They have included 4 quality plywood circles (2 for the outside and 2 for the inside for a grand total of about 11/16 firewall thickness!) There is NO rudder offset. All control surfaces now have double phenolic horns already installed. Flying wire reliefs have been done at the factory and quite frankly are larger than necessary. The stab now mounts on a carbon tube with recessed set screws to lock. The stab fillets are now molded into the fuse.
So far I've managed to mount the elevator and wing servos. It's no small trick getting the servo arm cut-outs for the elevators to line up nicely but I used a paper pattern and they came out well. I was surprised to find the aileron servo trays were all but useless. Too large for the hatches and with a hole pattern that won't work with standard servos. I opted for the hardwood block method and it worked well. Tail wheel cut-out came out perfect. I'm having trouble posting pics on this site but can text them to anyone with a cell phone. Or email.
I need to change my user name to "6th GeeBee"
Mark.
Last edited by 5th GeeBee; 09-29-2019 at 11:27 AM.
09-29-2019, 12:53 PM
#1871
OK, here goes. Received my R-2 on Fri. in excellent condition. There have definitely been changes and the manual doesn't reflect any of them. (Richard, I assume the manual I did receive is the one you wrote). These are the changes I can see so far: No more cutting and soldering the flying wires. They come complete with heavy tapped and drilled brass fittings. Also, they've opted to not use cable from the inside gear to the lower fuse, instead using the same material as the flying wires. They are beautifully made and very impressive. The engine dome is made from heavy carbon fiber, clearly marked for the top with a cap molded in where the engine mounts. A cursory examination shows the fit to be flush with no sanding required and all holes drilled with blind (T) nuts in place. The kit includes a second carbon "cap" that can be fitted over the dome to extend the mounting surface (I assume for smaller engines). They have included 4 quality plywood circles (2 for the outside and 2 for the inside for a grand total of about 11/16 firewall thickness!) There is NO rudder offset. All control surfaces now have double phenolic horns already installed. Flying wire reliefs have been done at the factory and quite frankly are larger than necessary. The stab now mounts on a carbon tube with recessed set screws to lock. The stab fillets are now molded into the fuse.
So far I've managed to mount the elevator and wing servos. It's no small trick getting the servo arm cut-outs for the elevators to line up nicely but I used a paper pattern and they came out well. I was surprised to find the aileron servo trays were all but useless. Too large for the hatches and with a hole pattern that won't work with standard servos. I opted for the hardwood block method and it worked well. Tail wheel cut-out came out perfect. I'm having trouble posting pics on this site but can text them to anyone with a cell phone. Or email.
I need to change my user name to "6th GeeBee"
Mark.
So far I've managed to mount the elevator and wing servos. It's no small trick getting the servo arm cut-outs for the elevators to line up nicely but I used a paper pattern and they came out well. I was surprised to find the aileron servo trays were all but useless. Too large for the hatches and with a hole pattern that won't work with standard servos. I opted for the hardwood block method and it worked well. Tail wheel cut-out came out perfect. I'm having trouble posting pics on this site but can text them to anyone with a cell phone. Or email.
I need to change my user name to "6th GeeBee"
Mark.
It's not that I didn't offer to rewrite the manual...
Anyway, sounds like some excellent changes to the kit. We look forward to pictures and flight reports.
10-03-2019, 02:11 AM
#1872
Got the bird on it"s mains. It appears they now have a built in stop that won't require the retaining straps. Fitted the left wing and was happy to find it only took relieving the space for the mounting bolts.....it did not require block sanding the roots for a flush fit. I use a testors paint pen to mark the gear hardware and when I slide the wing on it shows where to relieve it. Richard, your Idea about using a wood screw to hold the wing in place is very helpful. I'm about to dive in to the left side flying wires and although they have been pre-fabricated, I can tell it's going to be a tedious task. The idea of large amounts of tension on the flying wire bolts through wood bothers me so I've decided to add brass sleeves to all the mounting points.
"Everybody Crashes" ,Mark.
"Everybody Crashes" ,Mark.
Last edited by 5th GeeBee; 10-03-2019 at 02:21 AM.
10-04-2019, 07:18 PM
#1873
The pre-fab FWs have a reverse thread on one end!! That makes em turnbuckles and drastically reduces the workload of removing and adjusting them. Having said that.....It's still tedious work. In the process of locking all the settings so field assembly can be simplified. Left wing's done. They go "SPROING" when you pluck em. Tomorrow I'll finish the right side. Calling this an ARF is an exaggeration. It definitely separates the men from the boys. Very satisfying.
"Everybody Crashes"
Mark
"Everybody Crashes"
Mark
10-09-2019, 03:10 PM
#1874
Got the engine mounted. Only needed a 5/16" spacer so I stacked 10 1/32 ply and epoxied and clamped. Came out like iron. You will quickly find that you'll need a 14" ball driver to take the cowl on and off. You can get away with a six inch until you mount the baffles...then there's no way to get to the cowl socket heads without a longer tool. CARF has gone from 4mm to 3mm on the cowl and dome mounts so I'm going to add at least 3 more to the dome. I made a longer ball driver by sacrificing a T handle hex driver and torch soldering an extension using a brass joiner. It worked well and is very strong. You'd do well to make this tool before you start on the cowl. The kit comes with 2 half moon fiberglass baffles. I opted to add about a dozen vertical stringers (3/16 square basswood) to the front to stiffen and improve the look. I painted them flat black and not only do they look good but I can remove the cowl after only elongating the muffler holes slightly. I was able to position the engine on the dome by bolting the dome and cowl together and doing it on the table top. I'm always hesitant to use blind ("T") nuts to mount the engine but the 5mms included in the kit were nice and stout and they seated well with no bent tangs. Don't forget to epoxy em... nothing worse than a popped blind-nut to ruin your day. Tomorrow I start on the back of the dome. I'm waiting for a new ignition from CH for the 3W. RCXEL makes an updated version that my IMAC friends say is more reliable.
Everybody Crashes Mark
Everybody Crashes Mark
Last edited by 5th GeeBee; 10-09-2019 at 03:20 PM.
10-11-2019, 01:31 PM
#1875
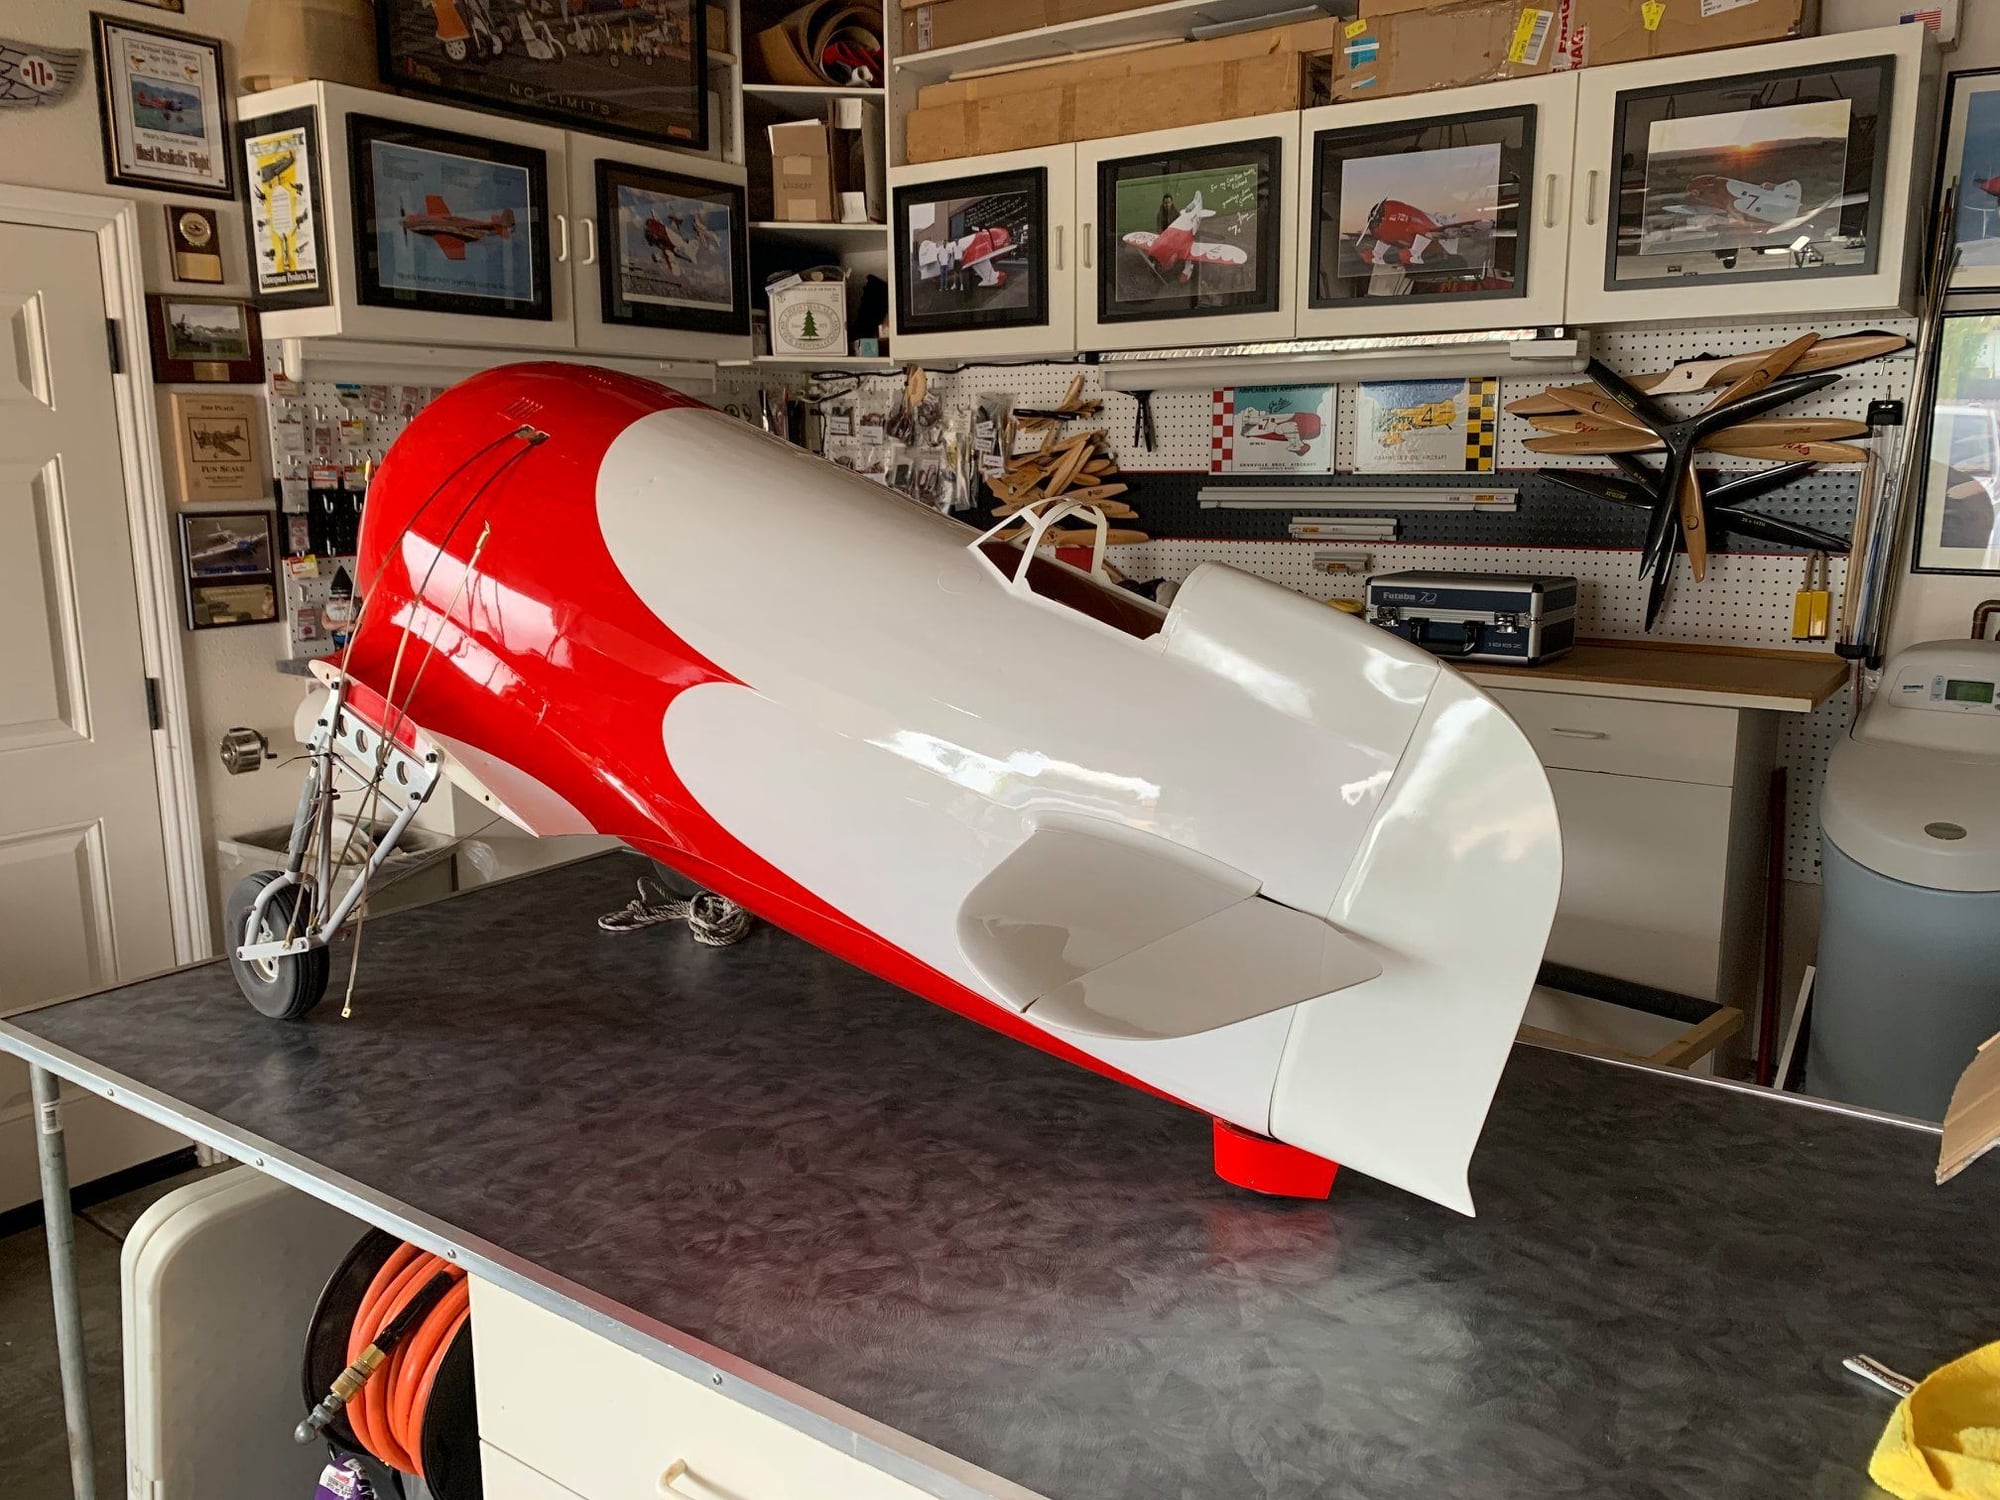
For now the Cowl is done.Installed painted baffles and reinforced. My stacked ply spacer had too much give at the bolts so I'm going back to metal standoffs. I like the space behind the engine better anyway. Waiting for a carb rebuild kit from Gherharrdt @ Aircraft Int. Knowledgeable guy when it comes to 3W. Turns out they carry Biella Wilga props and I've been wanting one for my 90" so I ordered that too. Epoxied the included dome reinforcements and will go back and add cloth just to be safe. Then I start building platforms for the ignition, throttle servo and batteries. I'm using 3 3000Mah lifes: 2 for the powersafe Rx and one dedicated for the Ignition. It will also have a 1450Mah life for the Bad Dog/ Sullivan smoke system.My plan is to mount all of them behind the dome but cg will have the final say about that.
Everybody Crashes!...............Mark.
Everybody Crashes!...............Mark.