


GIANT 150" Ziroli Stuka BUILD THREAD


 11-11-2013, 02:52 AM
#130
Senior Member
Join Date: Dec 2008
Location: pine bluffs,
WY
Posts: 485
Likes: 0
Received 0 Likes
on
0 Posts
looks like the build is comming along nicely these big projects are a kick to do I did mr.Z's skyraider 150",it took over 2 years ,landing gear-flaps and wing fold and dive breaks was all hydrolic,went with the dle 222 4 cylinder.71 pounds dry
01-16-2014, 05:51 PM
#131

Thread Starter
My Feedback: (1)

Join Date: Apr 2002
Location: Canton,
GA
Posts: 278
Likes: 0
Received 0 Likes
on
0 Posts
Well dadragon, looks like I am on the same 2 yr schedule. I am almost ready to glass. I am going with the ZDZ 210 inline twin. I am on the fence about getting it with their onboard starter. I just ordered 6 Hitec 333/440oz standard size servo's. I have never run higher than 6.0 volts, but I did just finish installing two HD switches. I will try to take some pics tonight.
01-17-2014, 08:43 AM
#132

My Feedback: (303)

Join Date: Dec 2001
Location: Lathrop, MO
Posts: 1,356
Likes: 0
Received 0 Likes
on
0 Posts
Why?? This is a WARBIRD! It does NOT need HV servos nor does it need FAST servos. Save your money and go with servos that you really need, than use the extra money to build the plane...
Well dadragon, looks like I am on the same 2 yr schedule. I am almost ready to glass. I am going with the ZDZ 210 inline twin. I am on the fence about getting it with their onboard starter. I just ordered 6 Hitec 333/440oz standard size servo's. I have never run higher than 6.0 volts, but I did just finish installing two HD switches. I will try to take some pics tonight.
01-20-2014, 11:36 AM
#133
Thread Starter
My Feedback: (1)
Join Date: Apr 2002
Location: Canton,
GA
Posts: 278
Likes: 0
Received 0 Likes
on
0 Posts
I hear you shaw, but with a plane this large, if a servo fails, this plane can do a LOT of damage. I don't care about the speed increase, just the torque. I feel much safer with 200+ oz of torque on these huge control surface, especially on a 150" 65+ pound plane. I guess it's just me.
It may not look like I have done much, but all that is left is to sheet the bottom of the center wing section (I am thinking about making a retractable siren that folds up into the wing!), remake the landing gear (somehow lighter), make the cowl and wheel pants and start glassing. I have been working on it a few hours a day and have made a lot of progress! Don't know if I will have it done by Joe Nall, but definitely by mid-summer.


It may not look like I have done much, but all that is left is to sheet the bottom of the center wing section (I am thinking about making a retractable siren that folds up into the wing!), remake the landing gear (somehow lighter), make the cowl and wheel pants and start glassing. I have been working on it a few hours a day and have made a lot of progress! Don't know if I will have it done by Joe Nall, but definitely by mid-summer.
01-26-2014, 09:24 PM
#139
Senior Member
Join Date: Dec 2001
Location: Bemis,
NM
Posts: 2,889
Likes: 0
Received 0 Likes
on
0 Posts
02-10-2014, 04:41 PM
#140
Thread Starter
My Feedback: (1)
Join Date: Apr 2002
Location: Canton,
GA
Posts: 278
Likes: 0
Received 0 Likes
on
0 Posts
I think I am going to nix the siren. Running out of channels and I want to get it finished. I even think I am going to bypass the onboard starter. The bomb drops landing light and sliding canopy may have to do. I dont want to ruin my momemtum, I have gotten a lot done recently. The outer wing panels are ready to glass and the fuse just needs a final sanding before I can glass. I made a tail wheel out of foam that I will cast and then I have to carve the foam for the landing gear mold. It would be nice to have an onboard siren, but I dont want to wait till someone has a lightweight one ready.
Starting to look at paint schemes....hehe
Starting to look at paint schemes....hehe
02-13-2014, 11:10 AM
#142
Thread Starter
My Feedback: (1)
Join Date: Apr 2002
Location: Canton,
GA
Posts: 278
Likes: 0
Received 0 Likes
on
0 Posts
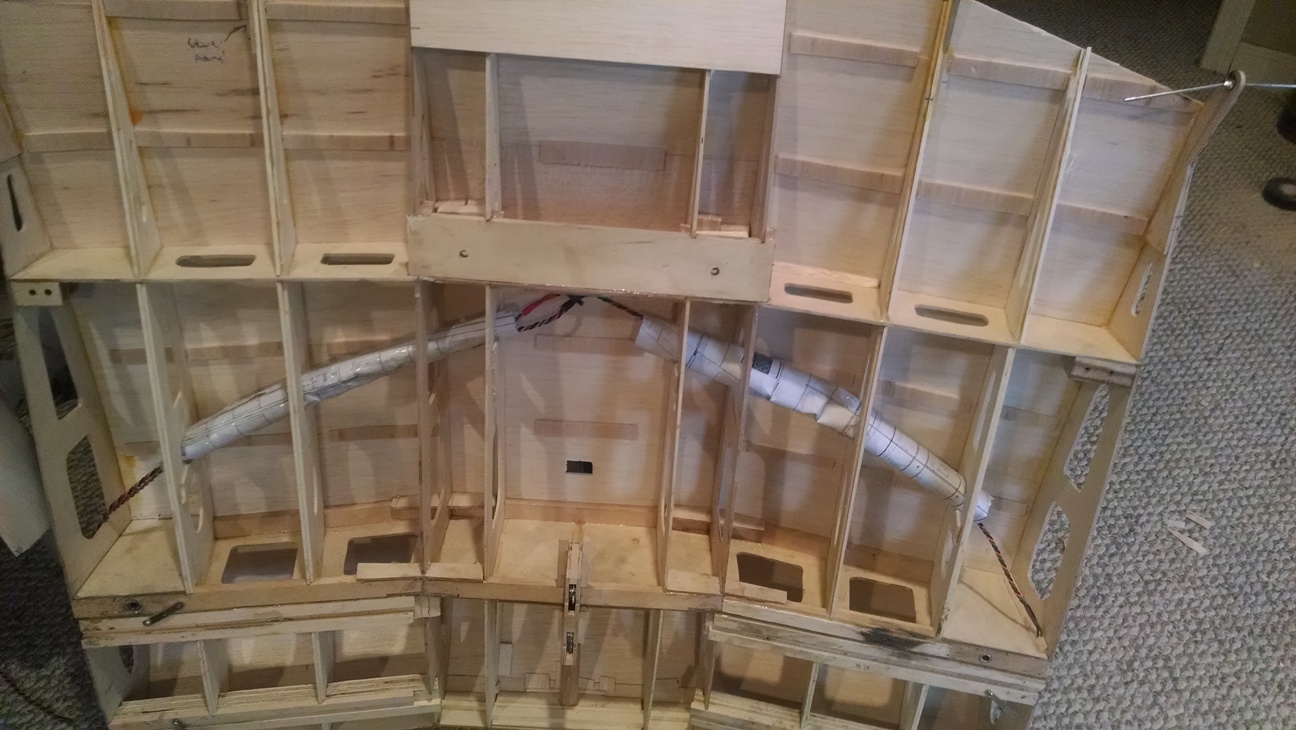
I took a few pics. All I have left is sheet the bottom of the center section, make the cowl and gear enclosures and start glassing. There is still a bit on the canopy, but that can wait till last. Still not sure if I want to make a drop down siren in the center section. Probably wont. Oh well...


02-13-2014, 06:34 PM
#144
Thread Starter
My Feedback: (1)
Join Date: Apr 2002
Location: Canton,
GA
Posts: 278
Likes: 0
Received 0 Likes
on
0 Posts
Wow, taking pictures is very motivating! I started on the gear covers tonight and I am about half way to making a plug. If anyone has experience making parts from foam, please chime in. Or if it is not too expensive, I would be happy to send them off to a fiberglass specialst company if there is such a thing. I layed my sketch on the foam and used a t-pin to make "dots" along the lines so I knew where to cut. now I just have to round them out. I think that will be exceptionally messy. Keep your fingers crossed! I also am thinking about not putting in a spring to save some weight. I never had a problem with my old stuka bouncing, it was always very smooth and stable. ...I'm 


 on the fence.
02-13-2014, 07:23 PM
#145

I made a cowl for a Hughes Racer using a foam mold. Four layers of four ounce cloth were applied with polyester finishing resin one right after the other before any of them cured. The foam was removed after the layers were cured and the inside of the cowl was cleaned off with a wire wheel on a drill. Another layer of four once cloth was applied with Z-Poxy Finishing Resin on the inside. After a good sanding on the outside a layer of two ounce cloth was applied with the Z-Poxy. A 3/8 inch aircraft plywood cowl ring was epoxied on the inside to secure the cowl to the firewall. Dan.


02-14-2014, 05:16 AM
#146
Thread Starter
My Feedback: (1)
Join Date: Apr 2002
Location: Canton,
GA
Posts: 278
Likes: 0
Received 0 Likes
on
0 Posts
Thanks Dan, that is perfect. I tried to make a fiberglass part once, but after reading your method, I think the 6oz cloth I used was way too heavy. I will definitely try your method. How did you remove the foam? did it just pop out, and if so, did you coat it with a release agent or anything?
02-14-2014, 07:56 AM
#147
Pahteek, No release agent was used. I dug out the foam with any convenient screwdriver, saw or knife. Even an offset spatula does a good job scraping it out. Do a thorough job with the drill mounted wire wheel. The cloth adheres very well to the foam and it does take a little effort to clean it out in order to get that inside layer to bond to the cloth. I also tried heavier cloth and cloth with a fine weave but they did not follow the contours of the plug even when they were saturated with the resin. I made about 15 this way. They have all held up with no problems over the years. Dan.
03-18-2014, 04:35 AM
#148
Thread Starter
My Feedback: (1)
Join Date: Apr 2002
Location: Canton,
GA
Posts: 278
Likes: 0
Received 0 Likes
on
0 Posts
Well, I finally got the gear covers done, just have to glass them. I am starting on the outline of the cowl (attached pics), but until I get the engine, I don't want to go too far down this path. I hope to have the engine in 4-6 weeks.

04-21-2014, 04:19 PM
#149
Thread Starter
My Feedback: (1)
Join Date: Apr 2002
Location: Canton,
GA
Posts: 278
Likes: 0
Received 0 Likes
on
0 Posts
Well, I am getting very close to glassing. I put everything together including servo's and it weighs 37pounds. The engine is 15.5lbs and I figure with glassing and paint (which I can do as light as monokote) gives me a dry weight of 52.5 pounds. I fugure 3pounds for the muffler and 6pounds for the glassing and paint and batteries and I am hoping for a total flying weight of 61pounds (dry).
We will see, I know it looks like I have not done anything, but I have all the electronics in and just have to mount the cowl and glass/paint. So I guess my wish of under 50 pounds is not going to happen. It definitely wont if I go with the ZDZ 210 inline twin.


...Keeping my fingers crossed!
We will see, I know it looks like I have not done anything, but I have all the electronics in and just have to mount the cowl and glass/paint. So I guess my wish of under 50 pounds is not going to happen. It definitely wont if I go with the ZDZ 210 inline twin.
...Keeping my fingers crossed!
