Community
Search
Notices
Giant Scale Aircraft - General Discuss all other giant scale aircraft here.

Q200 35% plug pix

Thread Tools
 
Search this Thread
 
Old 03-22-2015, 05:45 PM
  #51  
rick hamel
Thread Starter
My Feedback: (1)
 
Join Date: Oct 2002
Location: pittsburgh, PA
Posts: 398
Likes: 0
Received 10 Likes on 9 Posts
Default Fairing the "Q"

cut the vertical loose after fairing it into the body-started blending the wings in---what the plane will look like in inverted flight---------NOT!
Attached Thumbnails Click image for larger version

Name:	IMG_1083.JPG
Views:	251
Size:	2.36 MB
ID:	2083446   Click image for larger version

Name:	IMG_1081.JPG
Views:	226
Size:	2.06 MB
ID:	2083447   Click image for larger version

Name:	IMG_1080.JPG
Views:	283
Size:	2.18 MB
ID:	2083448  
Old 03-23-2015, 04:07 AM
  #52  
sensei
 
sensei's Avatar
 
Join Date: Jul 2002
Location: SAN ANTONIO, TX
Posts: 2,826
Received 17 Likes on 15 Posts
Default

WOW! You are really flying on this thing!


Bob
Old 03-23-2015, 01:47 PM
  #53  
TampaRC
 
Join Date: Apr 2012
Location: DETROIT, MI
Posts: 285
Likes: 0
Received 0 Likes on 0 Posts
Default

Originally Posted by rick hamel
Where in Ohio? I'm sure you know I'm in Pittsburgh
I'm in the Toledo area......
Old 03-23-2015, 04:47 PM
  #54  
rick hamel
Thread Starter
My Feedback: (1)
 
Join Date: Oct 2002
Location: pittsburgh, PA
Posts: 398
Likes: 0
Received 10 Likes on 9 Posts
Default

I think It just seems that way --everything came together all at once .
Old 03-23-2015, 05:01 PM
  #55  
rick hamel
Thread Starter
My Feedback: (1)
 
Join Date: Oct 2002
Location: pittsburgh, PA
Posts: 398
Likes: 0
Received 10 Likes on 9 Posts
Default

Toledo--how lucky can you get--makes going to the week signals show a breeze!!!!-usually takes me 4-5 hrs to make the trip
Old 03-25-2015, 05:23 PM
  #56  
rick hamel
Thread Starter
My Feedback: (1)
 
Join Date: Oct 2002
Location: pittsburgh, PA
Posts: 398
Likes: 0
Received 10 Likes on 9 Posts
Default clipped wings

I started blending the wing strakes into the fuse --still need to fab the aluminum end plates to protect the airfoil shape
Attached Thumbnails Click image for larger version

Name:	IMG_1089.JPG
Views:	218
Size:	2.29 MB
ID:	2084169   Click image for larger version

Name:	IMG_1091.JPG
Views:	200
Size:	2.12 MB
ID:	2084170   Click image for larger version

Name:	IMG_1090.JPG
Views:	207
Size:	2.12 MB
ID:	2084171  
Old 04-12-2015, 06:23 PM
  #57  
rick hamel
Thread Starter
My Feedback: (1)
 
Join Date: Oct 2002
Location: pittsburgh, PA
Posts: 398
Likes: 0
Received 10 Likes on 9 Posts
Default wing blending

made aluminum plates to protect the airfoil shape--matching plates assure good wing fit after making molds--again--these pictures are of just plugs for making molds
Attached Thumbnails Click image for larger version

Name:	IMG_1103.JPG
Views:	251
Size:	2.08 MB
ID:	2088501   Click image for larger version

Name:	IMG_1105.JPG
Views:	186
Size:	2.06 MB
ID:	2088502   Click image for larger version

Name:	IMG_1106.JPG
Views:	188
Size:	1.75 MB
ID:	2088503   Click image for larger version

Name:	IMG_1107.JPG
Views:	184
Size:	1.76 MB
ID:	2088504  
Old 04-16-2015, 04:47 PM
  #58  
rick hamel
Thread Starter
My Feedback: (1)
 
Join Date: Oct 2002
Location: pittsburgh, PA
Posts: 398
Likes: 0
Received 10 Likes on 9 Posts
Default feather fill completed

You just can't beat that feather fill--you can see in the pictures how it changes color as it is sanded-showing low spots in the surface-but unlike primer-it allows sanding until the surface levels. I also piled it on over the canopy/ windshield juncture to accentuate the edge by sanding the surface of the windshield only---fills in pin holes in a single gun pass! Wing fairings were involved but worked out.
Attached Thumbnails Click image for larger version

Name:	IMG_1111.JPG
Views:	32
Size:	2.15 MB
ID:	2089717   Click image for larger version

Name:	IMG_1112.JPG
Views:	35
Size:	2.06 MB
ID:	2089718   Click image for larger version

Name:	IMG_1109.JPG
Views:	27
Size:	2.06 MB
ID:	2089719  

Last edited by rick hamel; 04-16-2015 at 05:22 PM.
Old 04-17-2015, 02:13 AM
  #59  
sensei
 
sensei's Avatar
 
Join Date: Jul 2002
Location: SAN ANTONIO, TX
Posts: 2,826
Received 17 Likes on 15 Posts
Default

Really looks great Rick.

Bob
Old 04-17-2015, 05:02 PM
  #60  
rick hamel
Thread Starter
My Feedback: (1)
 
Join Date: Oct 2002
Location: pittsburgh, PA
Posts: 398
Likes: 0
Received 10 Likes on 9 Posts
Default

Thanks Bob---I'm playing with the wheel pant plugs now-hope to have pics tomorrow
Old 04-18-2015, 05:01 PM
  #61  
rick hamel
Thread Starter
My Feedback: (1)
 
Join Date: Oct 2002
Location: pittsburgh, PA
Posts: 398
Likes: 0
Received 10 Likes on 9 Posts
Default wheel pants

Still not sure how I want the pant to come apart--I was thinking of a side panel that mirrors the pant shape that would be removable --allowing access to the toe out adjustment and suspension install.
Attached Thumbnails Click image for larger version

Name:	IMG_1113.JPG
Views:	24
Size:	2.19 MB
ID:	2090066   Click image for larger version

Name:	IMG_1114.JPG
Views:	30
Size:	2.30 MB
ID:	2090067   Click image for larger version

Name:	IMG_1115.JPG
Views:	22
Size:	2.27 MB
ID:	2090068   Click image for larger version

Name:	IMG_1116.JPG
Views:	20
Size:	2.14 MB
ID:	2090069   Click image for larger version

Name:	IMG_1119.JPG
Views:	24
Size:	2.09 MB
ID:	2090070  
Old 04-19-2015, 02:06 PM
  #62  
rick hamel
Thread Starter
My Feedback: (1)
 
Join Date: Oct 2002
Location: pittsburgh, PA
Posts: 398
Likes: 0
Received 10 Likes on 9 Posts
Default wheel pant opening

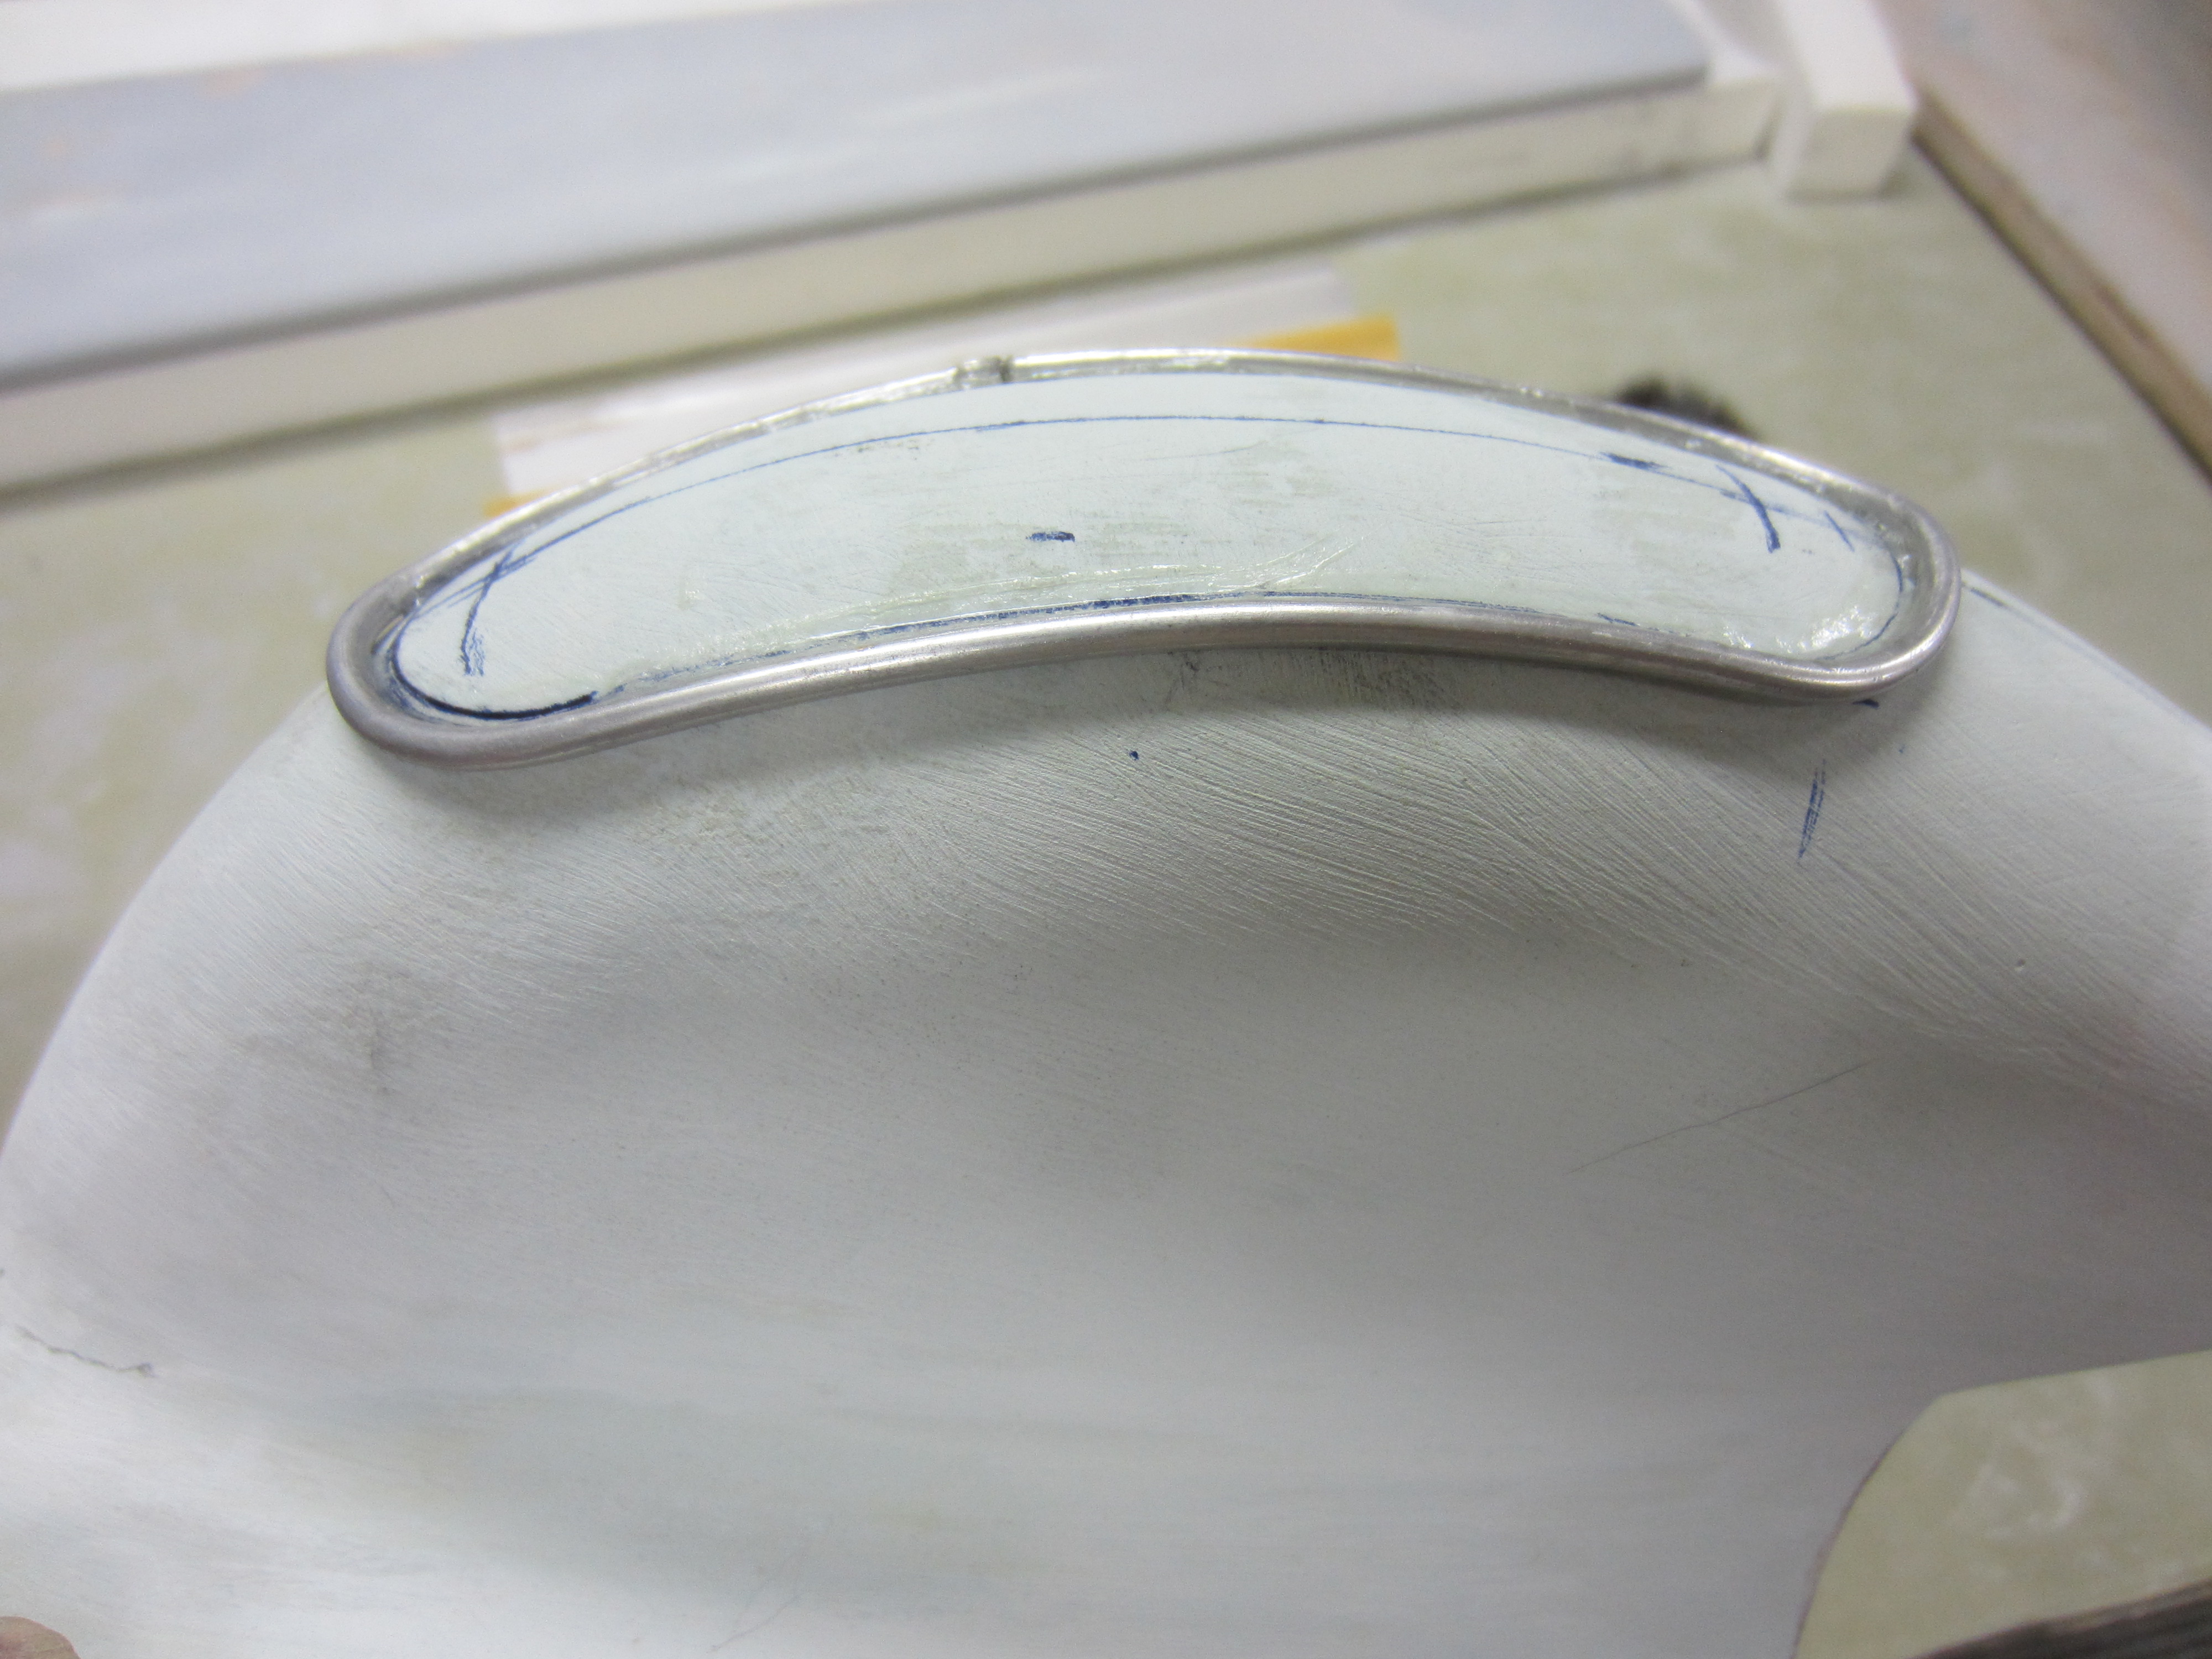
I know it's trivial but I just can't stand a raw fiberglass edge where the wheel opening occurs --decided to install an aluminum bead as part of a finished opening--again -it's a plug so that bead will appear in thefinal layup--needless to say I've got some blending to do
Attached Thumbnails Click image for larger version

Name:	IMG_1120.JPG
Views:	241
Size:	2.05 MB
ID:	2090248   Click image for larger version

Name:	IMG_1121.JPG
Views:	244
Size:	2.11 MB
ID:	2090251  

Last edited by rick hamel; 04-19-2015 at 02:09 PM.
Old 04-21-2015, 05:06 PM
  #63  
rick hamel
Thread Starter
My Feedback: (1)
 
Join Date: Oct 2002
Location: pittsburgh, PA
Posts: 398
Likes: 0
Received 10 Likes on 9 Posts
Default pant opening blending

The jury is still out on this one--I think I like it-I'll give it some time to simmer in my head--gee Bob -I'm givin away my secrets--good thing there is not much interest--I'm flyin under the radar--like that auto gyro that landed at the Whitehouse---Possibly reminds me of a alien victim with it chest burst open!
Attached Thumbnails Click image for larger version

Name:	IMG_1122.JPG
Views:	23
Size:	1.93 MB
ID:	2090995   Click image for larger version

Name:	IMG_1123.JPG
Views:	23
Size:	2.06 MB
ID:	2090996   Click image for larger version

Name:	IMG_1124.JPG
Views:	20
Size:	1.92 MB
ID:	2090997  

Last edited by rick hamel; 04-21-2015 at 05:10 PM.
Old 04-24-2015, 02:25 AM
  #64  
sensei
 
sensei's Avatar
 
Join Date: Jul 2002
Location: SAN ANTONIO, TX
Posts: 2,826
Received 17 Likes on 15 Posts
Default

I can appreciate what you are doing here Rick because I am an old composites toolmaker myself.

Bob
Old 04-24-2015, 05:43 PM
  #65  
rick hamel
Thread Starter
My Feedback: (1)
 
Join Date: Oct 2002
Location: pittsburgh, PA
Posts: 398
Likes: 0
Received 10 Likes on 9 Posts
Default new ideas

Unless you're familiar with this stuff as you are--it is probably confusing at best--What can you do------ on another note--I was bending aluminum tubing for one of the wheel pants and was looking at the canopy-had an idea--see pixit will provide an outstanding finished edge not to mention a different look!
Attached Thumbnails Click image for larger version

Name:	IMG_1128.JPG
Views:	160
Size:	1.83 MB
ID:	2091742  

Last edited by rick hamel; 04-24-2015 at 05:50 PM.
Old 04-24-2015, 05:50 PM
  #66  
DMehalko
My Feedback: (42)
 
DMehalko's Avatar
 
Join Date: Nov 2003
Location: Denver, CO
Posts: 1,493
Received 8 Likes on 5 Posts
Default

Epic build, cant wait to see it finished!
Old 04-24-2015, 05:56 PM
  #67  
rick hamel
Thread Starter
My Feedback: (1)
 
Join Date: Oct 2002
Location: pittsburgh, PA
Posts: 398
Likes: 0
Received 10 Likes on 9 Posts
Default

Thanks!----It's making me epically tired--but I'm really having fun with it--of that there is no question--finding time is the real struggle-but I manage
Old 04-24-2015, 06:09 PM
  #68  
rick hamel
Thread Starter
My Feedback: (1)
 
Join Date: Oct 2002
Location: pittsburgh, PA
Posts: 398
Likes: 0
Received 10 Likes on 9 Posts
Default Thinking ahead

I'm already picking out the paint colors--found a ford with a candy red-might look great matched up with a pearl white--decided on access panel on the side of wheel pant--panel mimics the shape of pant with 1/8 tubing--held on with a couple chrome button caps--should look cool
Attached Thumbnails Click image for larger version

Name:	IMG_1127.JPG
Views:	238
Size:	2.15 MB
ID:	2091762   Click image for larger version

Name:	Q2 paint.jpg
Views:	154
Size:	53.0 KB
ID:	2091763  
Old 04-26-2015, 04:31 PM
  #69  
rick hamel
Thread Starter
My Feedback: (1)
 
Join Date: Oct 2002
Location: pittsburgh, PA
Posts: 398
Likes: 0
Received 10 Likes on 9 Posts
Default more Q

I finished blending in the tubing around the windshield--I definitely like the look-next I'll hit it again with some feather fill when I spray the wheel pants
Attached Thumbnails Click image for larger version

Name:	IMG_1130.JPG
Views:	27
Size:	2.33 MB
ID:	2092382   Click image for larger version

Name:	IMG_1131.JPG
Views:	33
Size:	2.23 MB
ID:	2092383  
Old 04-26-2015, 06:56 PM
  #70  
TampaRC
 
Join Date: Apr 2012
Location: DETROIT, MI
Posts: 285
Likes: 0
Received 0 Likes on 0 Posts
Default

Keep up the good work!
Old 04-27-2015, 05:39 PM
  #71  
rick hamel
Thread Starter
My Feedback: (1)
 
Join Date: Oct 2002
Location: pittsburgh, PA
Posts: 398
Likes: 0
Received 10 Likes on 9 Posts
Default

Thanks---getting close to having the whole thing in primer---need an entire weekend--wish me luck with that!
Old 04-28-2015, 01:46 AM
  #72  
sensei
 
sensei's Avatar
 
Join Date: Jul 2002
Location: SAN ANTONIO, TX
Posts: 2,826
Received 17 Likes on 15 Posts
Default

The best of luck to you Rick.

Bob
Old 04-28-2015, 05:23 PM
  #73  
rick hamel
Thread Starter
My Feedback: (1)
 
Join Date: Oct 2002
Location: pittsburgh, PA
Posts: 398
Likes: 0
Received 10 Likes on 9 Posts
Default Pant acess panel molds

As usual -Thanks for the support---pulled a set of molds after scribing the access panel on the sides of the pants.
Attached Thumbnails Click image for larger version

Name:	IMG_1132.JPG
Views:	23
Size:	2.40 MB
ID:	2092900   Click image for larger version

Name:	IMG_1133.JPG
Views:	24
Size:	2.88 MB
ID:	2092901  
Old 05-01-2015, 05:20 PM
  #74  
rick hamel
Thread Starter
My Feedback: (1)
 
Join Date: Oct 2002
Location: pittsburgh, PA
Posts: 398
Likes: 0
Received 10 Likes on 9 Posts
Default front wing

finally--pants are attached to wings and ready to be feather filled---ooh joy
Attached Thumbnails Click image for larger version

Name:	IMG_1136.JPG
Views:	19
Size:	2.22 MB
ID:	2093460   Click image for larger version

Name:	IMG_1137.JPG
Views:	17
Size:	2.18 MB
ID:	2093461   Click image for larger version

Name:	IMG_1138.JPG
Views:	25
Size:	2.26 MB
ID:	2093462  
Old 05-03-2015, 06:16 PM
  #75  
rick hamel
Thread Starter
My Feedback: (1)
 
Join Date: Oct 2002
Location: pittsburgh, PA
Posts: 398
Likes: 0
Received 10 Likes on 9 Posts
Default finishing plug

Got the feather fill sprayed---now it's starting to look like something instead of all those different colors from the filler and primer--aerodynamically-it will probably trip the boundary layer along the body and screw up the airflow over the tail---just my luck-----I'm still keepin it
Attached Thumbnails Click image for larger version

Name:	IMG_1141.JPG
Views:	211
Size:	2.05 MB
ID:	2093787  


Contact Us - Archive - Advertising - Cookie Policy - Privacy Statement - Terms of Service -

Copyright © 2024 MH Sub I, LLC dba Internet Brands. All rights reserved. Use of this site indicates your consent to the Terms of Use.