


Cessna 152 - 2,7meter
 03-16-2017, 08:55 AM
#51
Senior Member
Thread Starter

Join Date: Nov 2016
Posts: 146
Likes: 0
Received 0 Likes
on
0 Posts
So that the tail beam did not work during the plating, I attached the aluminum pipe 20X20 on the bottom stringer to the molar tape.

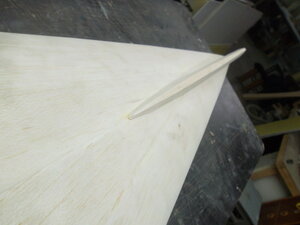
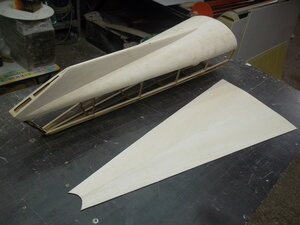
The leading edge of the forkel.

I built a pattern of paper.

On a paper pattern I prepared two halves of the skin.

Today I will only take the form of balsa, so the sheets are fixed without glue.


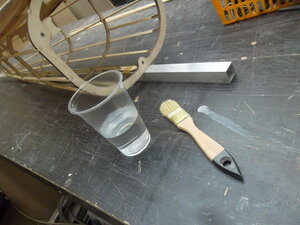
Ordinary water, applied by brush, a little and evenly.

Clothespins press the sheets of skin through the slats.


The leading edge of the forkel.
I built a pattern of paper.
On a paper pattern I prepared two halves of the skin.
Today I will only take the form of balsa, so the sheets are fixed without glue.
Ordinary water, applied by brush, a little and evenly.
Clothespins press the sheets of skin through the slats.


 03-21-2017, 08:22 AM
#54
Senior Member
Thread Starter
Join Date: Nov 2016
Posts: 146
Likes: 0
Received 0 Likes
on
0 Posts
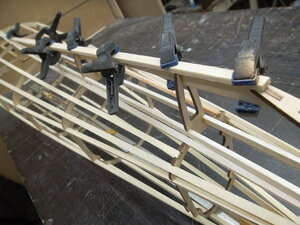
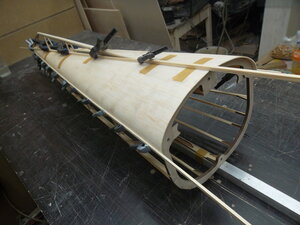
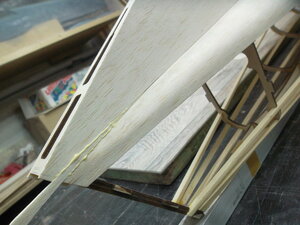
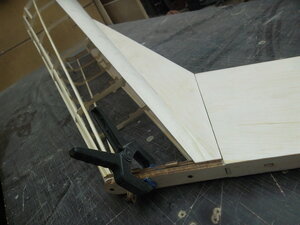
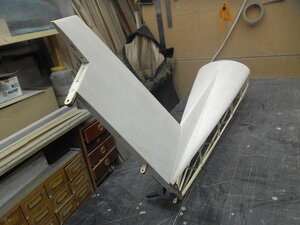
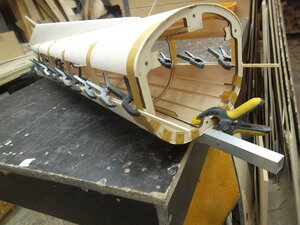
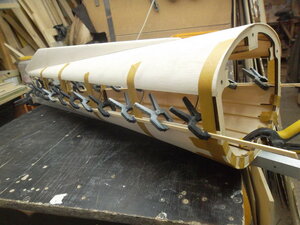
Also on the paper stencil prepared a pattern of sheathing of the tail beam.

To ensure that the beam does not bend it fixed with clothespins with an aluminum pipe 20x20mm.
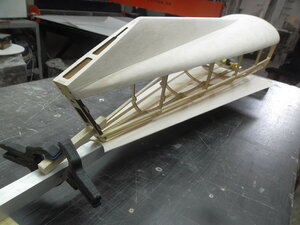
The lining is fixed without glue, to shape it was treated with water.

After the water, the balm itself lies on the bends of the frames.

Fixed the clothespins through the rail.

To ensure that the beam does not bend it fixed with clothespins with an aluminum pipe 20x20mm.
The lining is fixed without glue, to shape it was treated with water.
After the water, the balm itself lies on the bends of the frames.
Fixed the clothespins through the rail.


 03-22-2017, 11:48 AM
#56


Remarkable stuff as usual Faster Wind. This is one of the very best build thread ever seen on RCU. Outstanding craftsmanship and impeccably documented. I've been building designing and building RC models since 1971 and it's always a delight to watch a genuine craftsman in action. I'm completely at a loss why your thread is attracting so few comments. My only presumption is that the rest of the community are still struggling to assemble their latest RTF to have time to appreciate your work and pat you on the back.
03-23-2017, 07:03 AM
#57
Senior Member
Thread Starter
Join Date: Nov 2016
Posts: 146
Likes: 0
Received 0 Likes
on
0 Posts
Thank you David. Perhaps you will be interested in my other projects.
Giles 202
Sbach 342
Vertigo 2M
Grunau Baby
______________________________________
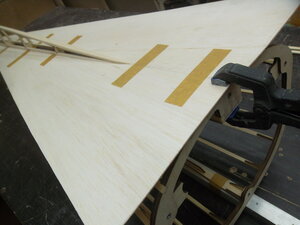
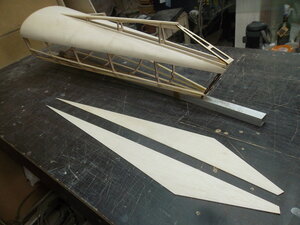
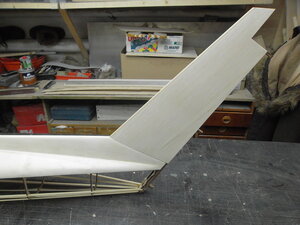
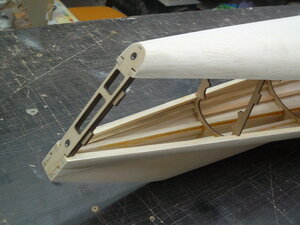
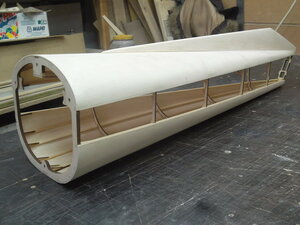
The lower part of the tail boom is sheathed.


Still have to be glued the fastening parts of the stabilizer and the balsa plates in the front part, but I will not paste them yet.
I want to first make sure that the beam is flat, so I left it for later.
Pattern on the bottom of the nose of the fuselage.

I also moistened the balsa with water.


Painting scotch is simply indispensable in such situations.

Giles 202
Sbach 342
Vertigo 2M
Grunau Baby
______________________________________
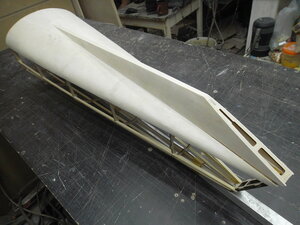
The lower part of the tail boom is sheathed.
Still have to be glued the fastening parts of the stabilizer and the balsa plates in the front part, but I will not paste them yet.
I want to first make sure that the beam is flat, so I left it for later.
Pattern on the bottom of the nose of the fuselage.
I also moistened the balsa with water.
Painting scotch is simply indispensable in such situations.
03-24-2017, 08:23 AM
#59
Senior Member
Thread Starter
Join Date: Nov 2016
Posts: 146
Likes: 0
Received 0 Likes
on
0 Posts
David, I'm glad that you liked it.
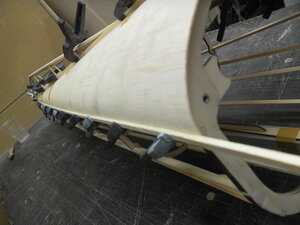
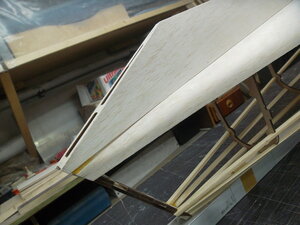
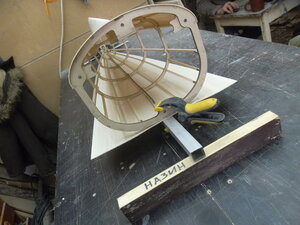
The bottom of the front has a complex shape, so I mold the patterns separately.
The first piece took shape.


After a few reflections, the excess was cut off, which went badly.

Another piece of the pattern is wetted with water, without glue.


The bottom of the front has a complex shape, so I mold the patterns separately.
The first piece took shape.
After a few reflections, the excess was cut off, which went badly.
Another piece of the pattern is wetted with water, without glue.
03-28-2017, 09:33 AM
#60
Senior Member
Thread Starter
Join Date: Nov 2016
Posts: 146
Likes: 0
Received 0 Likes
on
0 Posts
I did not even think that the covering of the bottom of the bow would take almost a week.

Well, of course, quickly collect


With the plating, the model begins to look different.


Well, of course, quickly collect
With the plating, the model begins to look different.
03-29-2017, 09:35 AM
#61
Senior Member
Thread Starter
Join Date: Nov 2016
Posts: 146
Likes: 0
Received 0 Likes
on
0 Posts
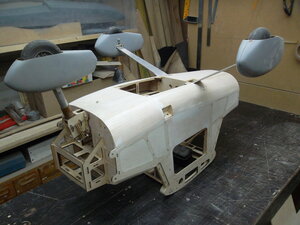
Details of balsa 3mm. Blank windows of relief.


The place of the trailer was strengthened by spacers from the pine rail.


Weight of the bow.

The weight of the tail boom, but it has not yet been completed.


Vertical tail assembly.

Horizontal plumage on the heap.

Now the weight of the fuselage with feathers 1746g.
The place of the trailer was strengthened by spacers from the pine rail.
Weight of the bow.
The weight of the tail boom, but it has not yet been completed.
Vertical tail assembly.
Horizontal plumage on the heap.
Now the weight of the fuselage with feathers 1746g.
03-31-2017, 10:23 AM
#63
Senior Member
Thread Starter
Join Date: Nov 2016
Posts: 146
Likes: 0
Received 0 Likes
on
0 Posts
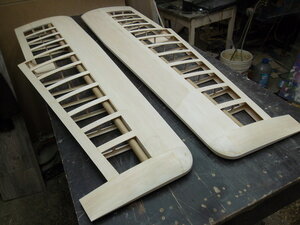
A wing without skin does not hold straight lines, the internal tension of the rails bent the console. Therefore, before the plating, I put them on the fuselage and leveled it with the help of struts between the ribs.
That the edges of the wing were perfectly even, without any bends at all.


Prepared the trailing edges. For these elements, I used a dense balsa.

КThe wing has a straight line along the upper plane,
a bottom bend from the narrowing of the profile,
so all gluing is done upside down.

I glued the front edge element, the base for the fasing of the forehead.


Before sewing the root, glued all the internal elements,
the detail for fix sevro drive the flap,
reinforcing the rings under the centroplane tube.


Patterns for plating the forehead. The root of the wing is 120mm.
And in the span of the console more than a meter, the pattern had to be glued from several parts.
On the lining of the forehead I used medium-density balsa.


And again the wing is glued upside down.


That the edges of the wing were perfectly even, without any bends at all.
Prepared the trailing edges. For these elements, I used a dense balsa.
КThe wing has a straight line along the upper plane,
a bottom bend from the narrowing of the profile,
so all gluing is done upside down.
I glued the front edge element, the base for the fasing of the forehead.
Before sewing the root, glued all the internal elements,
the detail for fix sevro drive the flap,
reinforcing the rings under the centroplane tube.
Patterns for plating the forehead. The root of the wing is 120mm.
And in the span of the console more than a meter, the pattern had to be glued from several parts.
On the lining of the forehead I used medium-density balsa.
And again the wing is glued upside down.
04-03-2017, 09:12 AM
#64
Senior Member
Thread Starter
Join Date: Nov 2016
Posts: 146
Likes: 0
Received 0 Likes
on
0 Posts
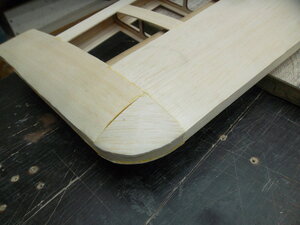
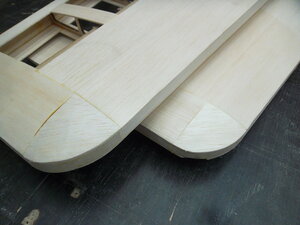
The wings cover continues.

The basis for the cladding of the wing tip, balsa 3mm.


Processed at the right angles.


Cable channels, paper tubes 18mm. diameter.

Cable channel leading to the tip is designed for wire fuse pyrotechnics.


The basis for the cladding of the wing tip, balsa 3mm.
Processed at the right angles.
Cable channels, paper tubes 18mm. diameter.
Cable channel leading to the tip is designed for wire fuse pyrotechnics.


 04-10-2017, 09:29 AM
#66
Senior Member
Thread Starter
Join Date: Nov 2016
Posts: 146
Likes: 0
Received 0 Likes
on
0 Posts
Ailerons.


Eleron is straight, but behind the ends with uneven angles. To get to the right angle, he marked and cut the balsa patterns of the skin.

First I glued one side. Can glue both halves at once, but for some reason I so wanted.

Balsa rack on the base of the control levers, the basis for sheathing.


The second halves of the skin have a cutout under the aileron control lever.


Eleron is straight, but behind the ends with uneven angles. To get to the right angle, he marked and cut the balsa patterns of the skin.
First I glued one side. Can glue both halves at once, but for some reason I so wanted.
Balsa rack on the base of the control levers, the basis for sheathing.
The second halves of the skin have a cutout under the aileron control lever.
04-12-2017, 10:47 AM
#67
Senior Member
Thread Starter
Join Date: Nov 2016
Posts: 146
Likes: 0
Received 0 Likes
on
0 Posts
Flap.


The second half of the flap sheathing.


Plywood lining in the place of fixing the front pillar, so that the fixing screw does not push balsa.

Plywood padding to the place of fastening of the float racks.

The place of attachment of the wing rails.

Bomboluk.

The contours in the rear of the fuselage are conical,
the angles of securing the racks of the floats should be arranged exactly,
to compensate for the angle there will be a conical overlay,
a blank of two plywood parts.

The second half of the flap sheathing.
Plywood lining in the place of fixing the front pillar, so that the fixing screw does not push balsa.
Plywood padding to the place of fastening of the float racks.
The place of attachment of the wing rails.
Bomboluk.
The contours in the rear of the fuselage are conical,
the angles of securing the racks of the floats should be arranged exactly,
to compensate for the angle there will be a conical overlay,
a blank of two plywood parts.


 04-19-2017, 08:15 AM
#70
Senior Member
Thread Starter
Join Date: Nov 2016
Posts: 146
Likes: 0
Received 0 Likes
on
0 Posts
Now I saw that the forum looks new, why is it so?
The bottom of the bow.
I made the cutouts under the chassis.
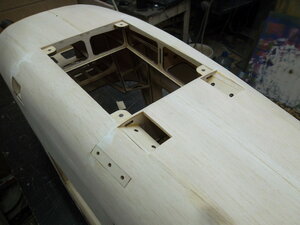
Each rack is supported by 4 M4 screws, two screws are
I fixed the front post.
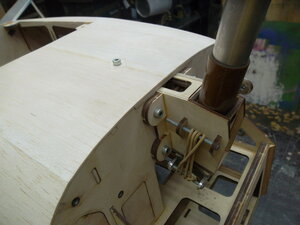
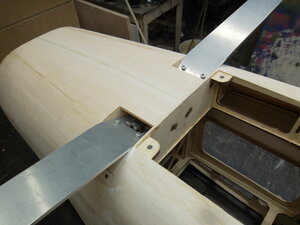
Racks of the chassis assembly.
I joined the beam.

Collected everything in a heap.


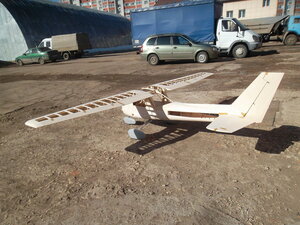
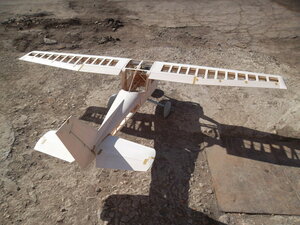
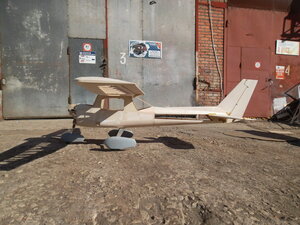
This is a test assembly before the cover.

Visually, the geometry of the model is absolutely flat.

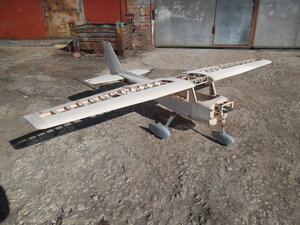
In my opinion, the appearance turned out to be quite similar.
It was not easy to do this without drawings.
Now I'm happy with the result, to be honest I was worried about this.


Weight 3900g.
The bottom of the bow.
I made the cutouts under the chassis.
Each rack is supported by 4 M4 screws, two screws are
I fixed the front post.
Racks of the chassis assembly.
I joined the beam.
Collected everything in a heap.
This is a test assembly before the cover.
Visually, the geometry of the model is absolutely flat.
In my opinion, the appearance turned out to be quite similar.
It was not easy to do this without drawings.
Now I'm happy with the result, to be honest I was worried about this.
Weight 3900g.
Last edited by Faster Wind; 04-19-2017 at 08:59 AM.
 04-21-2017, 06:32 AM
#72
Senior Member
Thread Starter
Join Date: Nov 2016
Posts: 146
Likes: 0
Received 0 Likes
on
0 Posts
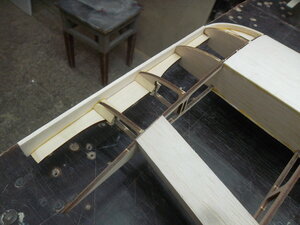
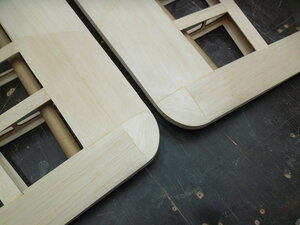
The wing stand.
By pattern marked and drilled holes 4mm.
In the future I will insert aluminum bushings, so that the hole will be 6mm.
[ATTACH]2210621[/IMG]
[ATTACH]2210622[/IMG]
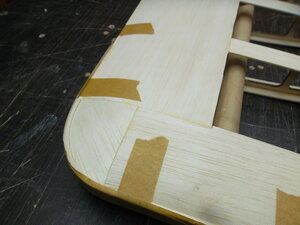
For the convenience of processing, fastened the stand to the table with self-tapping screws.
[ATTACH]2210623[/IMG]
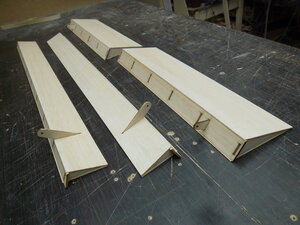
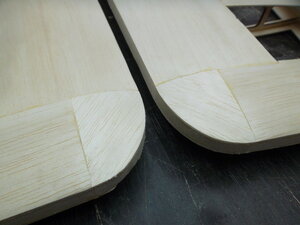
I decided to make the profile "lentils" symmetrical on all sides.
That the profile was identical and symmetrical, at first I processed faces, on edges it is easy it is possible to sustain accuracy and uniformity of processing.
[ATTACH]2210625[/IMG]
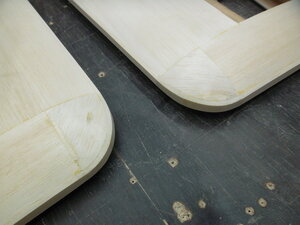
After the faces are piled up and checked for symmetry, I filled the corners and got a profile.
[ATTACH]2210627[/IMG]
Racks are completely symmetrical, when assembling a model this should simplify the process.
[ATTACH]2210630[/IMG]
[ATTACH]2210631[/IMG]
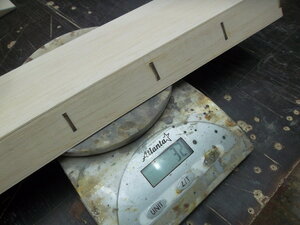
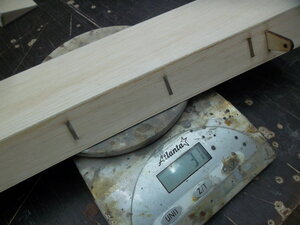
Weight of two legs, length 530mm thickness 10mm.
[ATTACH]2210633[/IMG]
The difference in weight is not significant.
[ATTACH]2210636[/IMG]
[ATTACH]2210640[/IMG]
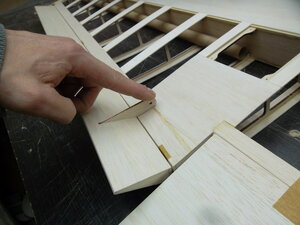
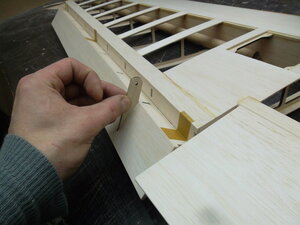
Made slots in the foreheads of the wings, for fixing the racks.
[ATTACH]2210644[/IMG]
[ATTACH]2210648[/IMG]
[ATTACH]2210652[/IMG]
[ATTACH]2210656[/IMG]
[ATTACH]2210661[/IMG]
By pattern marked and drilled holes 4mm.
In the future I will insert aluminum bushings, so that the hole will be 6mm.
[ATTACH]2210621[/IMG]
[ATTACH]2210622[/IMG]
For the convenience of processing, fastened the stand to the table with self-tapping screws.
[ATTACH]2210623[/IMG]
I decided to make the profile "lentils" symmetrical on all sides.
That the profile was identical and symmetrical, at first I processed faces, on edges it is easy it is possible to sustain accuracy and uniformity of processing.
[ATTACH]2210625[/IMG]
After the faces are piled up and checked for symmetry, I filled the corners and got a profile.
[ATTACH]2210627[/IMG]
Racks are completely symmetrical, when assembling a model this should simplify the process.
[ATTACH]2210630[/IMG]
[ATTACH]2210631[/IMG]
Weight of two legs, length 530mm thickness 10mm.
[ATTACH]2210633[/IMG]
The difference in weight is not significant.
[ATTACH]2210636[/IMG]
[ATTACH]2210640[/IMG]
Made slots in the foreheads of the wings, for fixing the racks.
[ATTACH]2210644[/IMG]
[ATTACH]2210648[/IMG]
[ATTACH]2210652[/IMG]
[ATTACH]2210656[/IMG]
[ATTACH]2210661[/IMG]
04-21-2017, 06:33 AM
#74
Senior Member
Thread Starter
Join Date: Nov 2016
Posts: 146
Likes: 0
Received 0 Likes
on
0 Posts
The wing stand.
By pattern marked and drilled holes 4mm.
In the future I will insert aluminum bushings, so that the hole will be 6mm.
[ATTACH]2210635[/IMG]
[ATTACH]2210638[/IMG]
For the convenience of processing, fastened the stand to the table with self-tapping screws.
[ATTACH]2210641[/IMG]
I decided to make the profile "lentils" symmetrical on all sides.
That the profile was identical and symmetrical, at first I processed faces, on edges it is easy it is possible to sustain accuracy and uniformity of processing.
[ATTACH]2210645[/IMG]
After the faces are piled up and checked for symmetry, I filled the corners and got a profile.
[ATTACH]2210649[/IMG]
Racks are completely symmetrical, when assembling a model this should simplify the process.
[ATTACH]2210653[/IMG]
[ATTACH]2210658[/IMG]
Weight of two legs, length 530mm thickness 10mm.
[ATTACH]2210663[/IMG]
The difference in weight is not significant.
[ATTACH]2210667[/IMG]
[ATTACH]2210671[/IMG]
Made slots in the foreheads of the wings, for fixing the racks.
[ATTACH]2210674[/IMG]
[ATTACH]2210678[/IMG]
[ATTACH]2210681[/IMG]
[ATTACH]2210684[/IMG]
[ATTACH]2210687[/IMG]
04-21-2017, 06:33 AM
#75
Senior Member
Thread Starter
Join Date: Nov 2016
Posts: 146
Likes: 0
Received 0 Likes
on
0 Posts
The wing stand.
By pattern marked and drilled holes 4mm.
In the future I will insert aluminum bushings, so that the hole will be 6mm.
[ATTACH]2210643[/IMG]
[ATTACH]2210647[/IMG]
For the convenience of processing, fastened the stand to the table with self-tapping screws.
[ATTACH]2210651[/IMG]
I decided to make the profile "lentils" symmetrical on all sides.
That the profile was identical and symmetrical, at first I processed faces, on edges it is easy it is possible to sustain accuracy and uniformity of processing.
[ATTACH]2210655[/IMG]
After the faces are piled up and checked for symmetry, I filled the corners and got a profile.
[ATTACH]2210660[/IMG]
Racks are completely symmetrical, when assembling a model this should simplify the process.
[ATTACH]2210665[/IMG]
[ATTACH]2210669[/IMG]
Weight of two legs, length 530mm thickness 10mm.
[ATTACH]2210672[/IMG]
The difference in weight is not significant.
[ATTACH]2210675[/IMG]
[ATTACH]2210677[/IMG]
Made slots in the foreheads of the wings, for fixing the racks.
[ATTACH]2210680[/IMG]
[ATTACH]2210683[/IMG]
[ATTACH]2210686[/IMG]
[ATTACH]2210689[/IMG]
[ATTACH]2210690[/IMG]