


top flite p-51 giant scale build
 01-06-2008, 11:10 AM
#726

ORIGINAL: michel gravelle
Morning All
Jan , I ain t no specialist but I believe that you need a special primer for that aluminum . If I remember , the primer comes out in a tiunted green . If I may suggest the you check with a industrial paint suppler , you may just get some help there .
Mike ........ I m in no hurry ......... pure curiosity... Thats all
Michel
With bare aluminum it is necessary to etch the surface with a mild acid solution made specifically for aluminum (the also have a solution for steel) and then use what they call a "converter" which is actually an acid neutralizer and leaves kind of a yellow/green color tint on the aluminum. It then must be sprayed with a primer suitable/approved for aircraft to seal the surface. For the most part they used and still do, zinc chromate primer on full scale although there are primers associated with the two part or epoxy type paints, which are approved for use as well. The zinc chromate comes in a number of yellow/green type colors ranging from mostly a yellowish appearance to a dark green.
Now all that etching and converting is done with the stuff rinsed in between with water, not sure how well that'd go over with the bare wood in the models.
Oh, most paint dealers I've dealt with for painting supplies on full scale stuff, don't have a clue unless they are involved with shops who do paint aircraft...

 01-06-2008, 12:14 PM
#728

ORIGINAL: Jan_Petter Happy new year to all of you P-51 constructors!
What a releaf to see that you have kept this thread going for the past months
My absence is the direct result of a total lack of motivation for all most half a
year. I run into big problems late last summer, when trying to apply the paint
scheeme to my "Old Crow". The major challenge was to find a good way of
making the primer stick to the alu skin. I have not yet found a really good
method/primer.
All you needed to do was ask us in an email. There are multiple aerosol packaged
etching primers available at your hardware store or most larger Wal-Mart type of
retailers.
However, typically these are not necessary. Which paint are you trying to use?
If attempting to paint an aluminum surface which is not primed you mask perimeter
of area you desire to paint, steel wool or scour with one of the new fine mesh scour
pads available for this. Then paint the surface by initially mist coating then depending
on chemistry of paint repeat as the directions instruct.
The etching primers are designed to provide the grip up and down to the metal. Down
to grip the aluminum and up to provide a smooth receptor for the paint. Remember that
the behavior traits of the paint remain in place regardless of the presence of primer.
If the paint is water based it will typically not have as much tactile ability as one which
utilizes solvents which out gas slowly instead of evaporating rapidly for convenience of
the applicators desire to rush the process.
Behr, Bayer, and others have european packaging of products to comply with environment
considerations... I would recommend not initially trying to use high end automotive and
aviation industry intended products because of the volume and constraints accompanying
the application process. You certainly do not have to use these products for a successfully
painted aluminum skinned model...be it Flite-Metal or construction grade aluminum product.
I recommend you contact your closest large paint retailer...a sister company to Home Depot,
Wal-Mart, Kmart, and Lowe's to mention companies which are now international. I don't know
if these products can be shipped overland by regional LTL carriers like DHL, UPS, FedEx as it
is not possible here in the US because of the solvents contained in the aerosol can.
Hope this helps to reduce your sense of frustration...
01-06-2008, 12:42 PM
#729
Senior Member

Hey Mike,
As far as installing your hinge points it is really very easy. You just want to take your time and make sure everything is lined up. (This would go for the AILE and ELEV hinge points.)
I have not tackeled the flaps yet. They are going to be a little different in where the centerline of the hinge point will be located because it is actually going to work as a rolling hinge in the flap surface so that it will roll out of the coved inset in the wing. So the hinge point has to actually be located into the center of the flap radius.
As far as the AILE and ELEV:
(1) You need to locate the center of each hardpoint. Locate over the plan for the wing and stab. {Make sure you have both the flap and AILE taped down to the wing with the appropriate spacing.}
(2) Now just mark the top of both the wing and the AILE at the center of the hardpoints where the hinge point will be mounted. You can do the same thing for the STAB / ELEV.
(3) Now locate and mark the center location on both the TE of the wing and LE of the AILE for each hard point by extending the vertical line you did in step 2 to an intersecting Hort. line for your center point. For the AILE this will be easy because it will be right at the bevel point or "V". For the wing TE Hort. centerline you can measure or Goldberg and Great Planes has nice adjustable parallagram in order to find the center.
(4) Once everything is located drill the appropriate size hole in each surface and pre-fit. Adjust as necessary. Make sure the center pin on the knuckle is lined up with the hinge centerline.
(5) I use Gorilla glue now on all my hinges. It works great....expands into the hard point and it is quite strong. Prep the hinge point by dropping a little drop of 3-1 oil into the knuckle area. The Gorilla Glue will not stick to anything that has oil on it...so keep it off the shaft of the hinge. Clean the rest of the hard point with some alcohol.
(6) Mask off over each hard point hole with 1" masking tape. Now cut out just around the hole to be able to insert the hinge point.
(7) Use a Q-tip (you'll have to take about 1/2 of the cotton off) and dip it in water and swab the inside of each hole. [The water actually helps to start the expansion process) Now use another Q-tip to feed the glue into the hole and spread some on just the barbed hinge shaft. Insert the hinge point aligning the pin to the hinge centerline. wipe off the excess glue. You will have to kind of baby sit it for about 30min. while the expansion process takes place, wiping off the excess as it comes puffing out from around the hinge. Once it starts to cure keep working the hinge back and forth a bit to keep it lose. Once everthing dries you can peel the tape back and cut away any excess glue from around the hinge.
(8) IMPORTANT Do one surface at a time. Do not try and assemble the 2 mating surfaces until one is dry. But as your monitoring one surface you completed, you can always go to the other AILE, etc and proceed with the same process.
That's it in a nut shell actually....Its worked out great for me. My hinges on my New Edge 540T will be assembled the same way....execpt the hinge holes are already located for me.....LOL....... ............
Good luck guys....let me know if there something there that doesn't make sense. Hope it helps!!
Mike
As far as installing your hinge points it is really very easy. You just want to take your time and make sure everything is lined up. (This would go for the AILE and ELEV hinge points.)
I have not tackeled the flaps yet. They are going to be a little different in where the centerline of the hinge point will be located because it is actually going to work as a rolling hinge in the flap surface so that it will roll out of the coved inset in the wing. So the hinge point has to actually be located into the center of the flap radius.
As far as the AILE and ELEV:
(1) You need to locate the center of each hardpoint. Locate over the plan for the wing and stab. {Make sure you have both the flap and AILE taped down to the wing with the appropriate spacing.}
(2) Now just mark the top of both the wing and the AILE at the center of the hardpoints where the hinge point will be mounted. You can do the same thing for the STAB / ELEV.
(3) Now locate and mark the center location on both the TE of the wing and LE of the AILE for each hard point by extending the vertical line you did in step 2 to an intersecting Hort. line for your center point. For the AILE this will be easy because it will be right at the bevel point or "V". For the wing TE Hort. centerline you can measure or Goldberg and Great Planes has nice adjustable parallagram in order to find the center.
(4) Once everything is located drill the appropriate size hole in each surface and pre-fit. Adjust as necessary. Make sure the center pin on the knuckle is lined up with the hinge centerline.
(5) I use Gorilla glue now on all my hinges. It works great....expands into the hard point and it is quite strong. Prep the hinge point by dropping a little drop of 3-1 oil into the knuckle area. The Gorilla Glue will not stick to anything that has oil on it...so keep it off the shaft of the hinge. Clean the rest of the hard point with some alcohol.
(6) Mask off over each hard point hole with 1" masking tape. Now cut out just around the hole to be able to insert the hinge point.
(7) Use a Q-tip (you'll have to take about 1/2 of the cotton off) and dip it in water and swab the inside of each hole. [The water actually helps to start the expansion process) Now use another Q-tip to feed the glue into the hole and spread some on just the barbed hinge shaft. Insert the hinge point aligning the pin to the hinge centerline. wipe off the excess glue. You will have to kind of baby sit it for about 30min. while the expansion process takes place, wiping off the excess as it comes puffing out from around the hinge. Once it starts to cure keep working the hinge back and forth a bit to keep it lose. Once everthing dries you can peel the tape back and cut away any excess glue from around the hinge.
(8) IMPORTANT Do one surface at a time. Do not try and assemble the 2 mating surfaces until one is dry. But as your monitoring one surface you completed, you can always go to the other AILE, etc and proceed with the same process.
That's it in a nut shell actually....Its worked out great for me. My hinges on my New Edge 540T will be assembled the same way....execpt the hinge holes are already located for me.....LOL.......
............Good luck guys....let me know if there something there that doesn't make sense. Hope it helps!!
Mike
01-06-2008, 01:08 PM
#730
Senior Member
Ed,
Can you suggest the type of piants that have worked out well when applying them to the Flite Metal with either the steel wool or priming method? Which method do you perfer when applying your trim colors? Also what is your recommendation on paint manufacture?
This is kind of important right now, sense I have kind of extend the project completion time in order to incompass the application of the Flight metal and other changes.
Thanks for the information
Mike
01-06-2008, 01:57 PM
#731
All typical modeling paints used today will work well...
All automotive single and two part paints will work well...
All water based paints will work well...
It is in the surface preparation where the retentive attribute
of all paints is satisfied to the requirement of each either in
its chemical or mechanical grip to any surface.
I do not recommend any brand as brands are not sold over
our customer base with equal availability. We ship over 20%
per month outside of North America.
My best answer is to say I have not found a paint used in this
hobby which does not work. The lack of surface preparation
is the single greatest inhibiting factor to paint adhesion.
The second greatest issue is contamination of the surface by
either mold release, handling of the model without regard for
either oil from a modeler's hands or literally oil from an engine
or mechanical item onboard the model.
One example would be if you install and cycle the landing gear
repeatedly before you finish your model. IF you utilize either a
wet or dry lube in the retract air supply to facilitate ease of the
valve or piston movement it can easily spread across the surface
contaminating it with either oil or silicone.
All too often in a rush to install and get things settled in...we all
make the mistake of airing up and cycling our gear before we've
painted. Too few of us realized why we were experiencing orange
peel or fish eye on some but not all areas of our model.
This is something that all too often is an issue cloked during a
build which returns to haunt us later as we want to paint.
01-06-2008, 02:30 PM
#732

Hi
Thanks Mike ( Snaer810 ) , For sharing that instruction about hinging . Although I am skeptical about the drilling of the holes . How do you get to keep all the holes straight with each other . I mean perpendicular to the edge . It sounds like a good procedure . I will follow it to the letter
Michel
01-06-2008, 02:59 PM
#733
There is a Robart Hinge Point centering jig available to assure the holes are centered.

Part # 319 Hinge Point Drill Jig Includes 1/8" & 3/16" Drill Bushings

Part # 320 1/4" Drill Jig Bushing For #317 & #318 Super Hinge Point Pockets
However if you need to place them above or below mean center of control surface
this does not help you.
Part # 319 Hinge Point Drill Jig Includes 1/8" & 3/16" Drill Bushings
Part # 320 1/4" Drill Jig Bushing For #317 & #318 Super Hinge Point Pockets
However if you need to place them above or below mean center of control surface
this does not help you.
01-06-2008, 03:46 PM
#734
Hi
Thanks ED , I ve got all that stuff . I think that the problem is between my ears .its something that I ve always been nervous about , because I do not do it very often
Thanks again
Michel
Thanks ED , I ve got all that stuff . I think that the problem is between my ears
.its something that I ve always been nervous about , because I do not do it very often Thanks again
Michel
01-06-2008, 03:50 PM
#735
Member
Join Date: Feb 2007
Location: Enon Valley, PA
Posts: 59
Likes: 0
Received 0 Likes
on
0 Posts
Hey Michel
To keep the hinges in line along the trailing edge either use a long straight edge or a string line would work too.
As far as keeping them perpendicular I was thinking about using a small square. Anyone else have a technique?
To keep the hinges in line along the trailing edge either use a long straight edge or a string line would work too.
As far as keeping them perpendicular I was thinking about using a small square. Anyone else have a technique?
01-06-2008, 04:12 PM
#736
You have to be careful that you are always traveling (read as moving) the hinge at right angles to the
centerline if you are working with 50/50 aileron hinge mounting...which is typically NOT scale : ) But
that is another whole story unto itself.

Hinges can be and often are hung from "behind" the trailing edge...or even behind the leading edge of
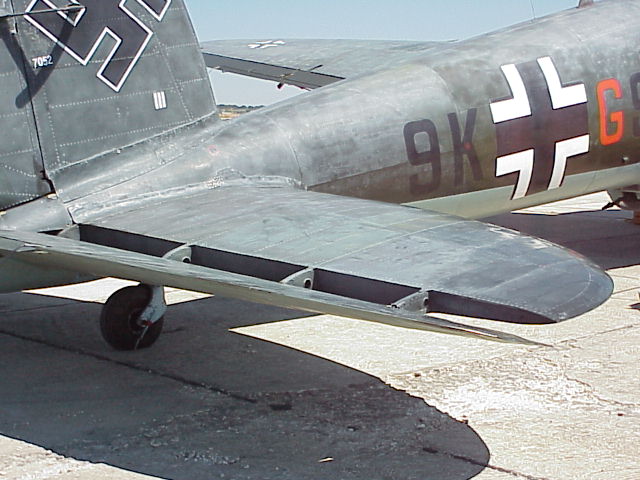
the control surface. Below is the CASA 2111.e elevator.
centerline if you are working with 50/50 aileron hinge mounting...which is typically NOT scale : ) But
that is another whole story unto itself.
Hinges can be and often are hung from "behind" the trailing edge...or even behind the leading edge of
the control surface. Below is the CASA 2111.e elevator.
01-06-2008, 04:20 PM
#737
Hi Upton
For making my center line I use t-pins at each end and put my straight edge against them , works great .
Those are some great pictures ED , thanks a lot , great help .
Michel
For making my center line I use t-pins at each end and put my straight edge against them , works great .
Those are some great pictures ED , thanks a lot , great help .
Michel
01-07-2008, 08:08 AM
#738
Senior Member
Morning Mike,
Ed is exactly right on the locations of the control surface hinges. That is what I was describing per the Flaps....they are a bit different on the actual hinge pin location because they will be inset into the flap LE allowing it to roll out of the Coved TE on the wing. The way TF has there AILE setup is not to scale...it is a common AILE installation. But again this is really a sport scale model. I have seen some guys modifying this to the same way the Flap installation is being completed.
The device that Ed desibed is what I was talking about in step (3). They are quite inexpensive and you should be able to pick them up at your LHS. When I drill the Wing or Stab TE's I will level the structure at the TE to the edge of the work bench and secure it. I then will use a Square lined up against the TE, slide it up against the bit to square it to the TE and then use the small bubble level that's on top of drill to level it vertically. (Drill the hole.....) Its worked quite well.
Usually where things go haywire is when I start to rush things because I want to see it all together......[:@]
I'm not sure about the string or straight edge thing....I believe as long as you have the centerline scribed or use the tool, etc. you can find the center of each hinge and they should all line up perfectly.
As for the AILE or ELEV I use a small "V" jig that I made (pretty simple). It has two adjustable verticals to set the surface in and to hold it in place as you drill. I center it on the jig, adjust the verticals up around the surface (top & bottom) and drill using my drill press. It puts the bit perfectly perpendicular to the control surface.
Hope this helps
Talk to guys later
Mike
Ed is exactly right on the locations of the control surface hinges. That is what I was describing per the Flaps....they are a bit different on the actual hinge pin location because they will be inset into the flap LE allowing it to roll out of the Coved TE on the wing. The way TF has there AILE setup is not to scale...it is a common AILE installation. But again this is really a sport scale model. I have seen some guys modifying this to the same way the Flap installation is being completed.
The device that Ed desibed is what I was talking about in step (3). They are quite inexpensive and you should be able to pick them up at your LHS. When I drill the Wing or Stab TE's I will level the structure at the TE to the edge of the work bench and secure it. I then will use a Square lined up against the TE, slide it up against the bit to square it to the TE and then use the small bubble level that's on top of drill to level it vertically. (Drill the hole.....
) Its worked quite well. Usually where things go haywire is when I start to rush things because I want to see it all together......[:@]
I'm not sure about the string or straight edge thing....I believe as long as you have the centerline scribed or use the tool, etc. you can find the center of each hinge and they should all line up perfectly.
As for the AILE or ELEV I use a small "V" jig that I made (pretty simple). It has two adjustable verticals to set the surface in and to hold it in place as you drill. I center it on the jig, adjust the verticals up around the surface (top & bottom) and drill using my drill press. It puts the bit perfectly perpendicular to the control surface.
Hope this helps
Talk to guys later
Mike
01-07-2008, 04:39 PM
#739
Member

Join Date: Jan 2006
Location: Fenstad, NORWAY
Posts: 91
Likes: 0
Received 0 Likes
on
0 Posts
Thanks all for the very good advice on my painting issues!
But first of all, just to be clear, I blame no other than my self on this topic. I have asked around, but should of course done a more thorough investigation before I hit the wall.
This is what I have experienced so far:
I ordered some quite expensive pre-cut special made masking for my Old Crow painting details. As you know, when the masking is put on, you only have one go. If it fails, the masking is not re-usable. Based on that knowledge, I claim to have put quite an effort in the surface preparation. I used both fine sanding pads and also steel wool to create what I thought would be a good grip. Before applying the primer, I cleaned the area with denaturated alcohol. After testing different primers, I ended up using an automotive primer. After applying the primer, the area was once again rubbed with at fine sanding pad.
I then applied "Warbird Color", which is a water based paint (US) intended for air brushing. So far, everything is all sing and dance, and looking very promising. However, when removing the masking in double or trippel layer painting, the result was quite disapointing. I used a small pencil to touch up most of the damage, but it is far from perfect.
For the remaining parts, I would really like to test the etching primers, just to see if it makes any difference.
I post some pics to show some of the failed tests.
Anyway, I am learning every day
But first of all, just to be clear, I blame no other than my self on this topic.
I have asked around, but should of course done a more thorough investigation before I hit the wall.This is what I have experienced so far:
I ordered some quite expensive pre-cut special made masking for my Old Crow painting details. As you know, when the masking is put on, you only have one go. If it fails, the masking is not re-usable. Based on that knowledge, I claim to have put quite an effort in the surface preparation. I used both fine sanding pads and also steel wool to create what I thought would be a good grip. Before applying the primer, I cleaned the area with denaturated alcohol. After testing different primers, I ended up using an automotive primer. After applying the primer, the area was once again rubbed with at fine sanding pad.
I then applied "Warbird Color", which is a water based paint (US) intended for air brushing. So far, everything is all sing and dance, and looking very promising. However, when removing the masking in double or trippel layer painting, the result was quite disapointing. I used a small pencil to touch up most of the damage, but it is far from perfect.
For the remaining parts, I would really like to test the etching primers, just to see if it makes any difference.
I post some pics to show some of the failed tests.
Anyway, I am learning every day
01-07-2008, 10:17 PM
#740
Who's to say this doesn't look correct? What you end up with in the end is a work of art...learning being the key to better and better art!
01-08-2008, 02:00 PM
#741

My Feedback: (47)
Join Date: Feb 2002
Location: NEBRASKA CITY, NE
Posts: 220
Likes: 0
Received 0 Likes
on
0 Posts
I used a combination of modelmaster spray paints(from a hobby shop) and made my own decals off of my printer. I sanded the area to be painted with 220 wet paper and then cleaned the area with alcohol. I used rubber mask on the checkerboard and masking tape for stripes. On the top I cleared with model master flat clear. On the bottom I cleared with lusterkote flat to protect the finish from my moki glow fuel. Many flights with no paint issues. The numbers are decals and clear coat as well. Jim
01-08-2008, 03:46 PM
#742
Member
Join Date: Jan 2006
Location: Fenstad, NORWAY
Posts: 91
Likes: 0
Received 0 Likes
on
0 Posts
Nice pics, did you use Flite Metal? No problems with peeling off?
A few more pics of my paint "battle"[ ] My first attemp on the nose job failed (of course), and I had to redo the checker board. Never mind the sad look, the spinner is only temporarely "mounted"
BTW: I think I've cleaned that airbrush at least 1000 times [:'(]
A few more pics of my paint "battle"[
] My first attemp on the nose job failed (of course), and I had to redo the checker board. Never mind the sad look, the spinner is only temporarely "mounted" BTW: I think I've cleaned that airbrush at least 1000 times [:'(]
01-08-2008, 03:55 PM
#743
My Feedback: (47)
Join Date: Feb 2002
Location: NEBRASKA CITY, NE
Posts: 220
Likes: 0
Received 0 Likes
on
0 Posts
The only areas I had a problem with flite metal were where the front of the wing slide up into the fuselage. Repeated attaching of the wing would over time cause the flite metal to gather up. Easy enough to reply some new pieces. Not really the fault of the flitemetal either. Iron on covering wears off over time and so does paint in that same area. Jim
01-10-2008, 05:15 AM
#745
Member
Join Date: Jan 2006
Location: Fenstad, NORWAY
Posts: 91
Likes: 0
Received 0 Likes
on
0 Posts
Ed,
I don't think I've yet found the perfect mix of method/primer/paint for doing demanding and detailed paint jobs on FM coated surfaces. By demaning I mean small, detailed and multi-colored objects, such as the swastikas on my P-51 (kill marks). This is not only related to the FM surface.
I found that the paint I use, which is the water-based polyurethane WarbirdColor, tends to leave a rather viscous coating allmost like a thin plastic film. When peeling off the masking, the coat of paint tends to not "break" at line of the masking, but often comes off in one piece. I only use water as a thinner, maybe I should try something else to try to make the paint a bit more crisp? The paint is applied with an airbrush, normally through 5 - 8 thin layers of coat. After the paint has dried, I have some times tried to cut along the the masking with a razor blade to overcome the proble, but not a very good solution. Larger single-colored areas have turned out less of a problem, and the result is normally OK.
So, to summarize:
1) I have successfully covered my first model with Flite Metal. It's a learning curve, but it ended up easy to apply and the result is far beyond my expectations. I have allready received FM for my other project, the TF DC-3/C-47/Dakota.
2) The paint job on my "Old Crow" will turn out OK, but it will be far from perfect, i.e. only partial success. But, I have learned a lot, and I know that my next project will be even better.
PS: I have still to test the etching primer, maybe that's the winning recipe.
01-10-2008, 11:36 AM
#746
I'll throw this out for your consideration;
While it's been some time since I did paint work on a model, on full scale stuff, cars or whatever, we usually try to cover in three coats. A light frosting, a color coat which will look kind of flat if done correctly, if you get it shiny it's too much and will likely run sometime after you've quit spraying, then a final gloss coat which you use just enough paint to get it to gloss. You don't let the paint completely dry between coats and remove the tape as soon as practical after spraying the final coat.
Generally the solvent/thinner used in each subsequent coat will soften the layers underneath a bit and so the paint is actually still a bit soft when the tape is removed and it will usually come off with a clean line. In my experience, the quality of the tape you use also has a bearing on whether or not it'll come off with a clean line. I'm not sure what you have access to over there, but here 3M company makes some nice masking tape for lines that has kind of a plastic feel to it. It's much easier to work with when applying it, especially to curves and it comes off much cleaner than regular masking tape. I forget what they call it but it's kind of a pale olive green color and it does cost quite a bit more than regular masking tape.
If the paint is completely dry and has multiple coats, it's going to be tough to get it off with a clean line in my experience. The thicker the coating, the more difficult it will be to get a clean line, especially if the paint is completely dry.
Just my .02 from experience with painting bigger stuff tho....[8D]
01-10-2008, 11:44 AM
#747

That would be 3M Fine Line Tape. The same tape we recommend in our instructions for Flite-Metal. It is a hard edged polypropylene so you can burnish up against it and make a clean cut. Too many people try to use painters tape for every type of paint. Some paints do behave best with the mauve green Fine line. Believe its a 3M 200 series product available in Europe as well. Online its around $4 USD a roll. Below is the 1/8" packaging
 01-11-2008, 01:47 AM
#748
Junior Member
Join Date: Nov 2006
Location: woodstock, ON, CANADA
Posts: 16
Likes: 0
Received 0 Likes
on
0 Posts
I am about to get the RTC mustang.
If anyone could tell me how the guy with the yellow mustang did the 2 piece wing and tail setup I would really appreciate it.
This plane will not fit in my car and i need to keep it reletively compact for my house as well.
It is my dream plane and I want it to be a successful ordeal.
Any help would be .........well ...........AWESOME!!!!!!!!!!
I am so excited to get this going.