


Hellcat Build with 250cc Radial


 08-26-2009, 01:58 AM
#127
Senior Member
My Feedback: (6)

Join Date: Dec 2003
Location: babylon,
NY
Posts: 1,001
Likes: 0
Received 0 Likes
on
0 Posts
Hey Lou, nice to see that it is all finished. Did you fly it this past Sunday or Monday.
I went to the field on Monday evening (late) and put flight No. 4 & 5 on my new twin (cessna 310).
I also know what you mean with model maintenance. 24 is always in my hanger in the always "ready" state.
gunny
I went to the field on Monday evening (late) and put flight No. 4 & 5 on my new twin (cessna 310).
I also know what you mean with model maintenance. 24 is always in my hanger in the always "ready" state.
gunny
08-26-2009, 08:39 AM
#128
Hi Gunny:
Yep. I was out on Monday and after all the delays I flew the Bearcat. On my first attempt last week I discovered that I had the vent and fill lines swapped on my fuel tank. Then I figured I would at least start the engine to trim it out on the new JR 12x. No ignition. The module was dead. I sent it to CH and got it back within the week.
Then I took it out on Sunday and did some taxi tests. It was a good thing because the left wheel sized up. It rolled so free I forgot to put any oil in the bushings. Also the anti rotation pins on both gear were so loose that I almost lost them. Fixed that and got it flying on Monday. The old Brison 4.8 really has a lot of power. It is not a streamlined model like the P51 but it was really clocking.
My latest project is to pull the Moki 50 cc 4 stoke out of the Spad and put an old Brison 2.4 that was never used. After repairing the damage from the last dead stick I had two more on Monday. Got the engine installed with new machined mounts and a prop extension. I stll have to make a muffler but It should be ready to go in a few days.
I am just on way to the field. Are you going?
08-26-2009, 03:21 PM
#129

My Feedback: (20)
Join Date: May 2008
Location: Van Nuys, CA
Posts: 31
Likes: 0
Received 0 Likes
on
0 Posts
Lou,
I am building the standard scale Ziroli Bearcat using Robart retracts. Do you remember how the single bottle performed with the Robarts on your Bearcat?
The Sierra gear you retrofitted on your F8F looks great! Your work is excellent. Also thanks for the photo help. Here are some pics of my progress.
08-26-2009, 09:40 PM
#130
Hi Dave:
Nice job: Robart has a small medium and large size air tank. I used one large tank. You are using the same Robart gear that I originally had. I also have the air retract tail wheel. I am pretty sure that I got about 10 cycles out of it with 100 PSI at the start.
One word of caution is that the stabilizer is set on the plans to be one degree of down incidence relative to the main wing. This is equal to quite a bit of up elevator. My advice is to make the stab incidence equal to the main wing. If you already have it in place then adjust your elevator to have about 1/4" of down elevator for your first flight. What has happened to first time pilots is that the plane will leap off the runway the first time you takeoff and go up at a very high angle. That is quickly followed by a stall there is little chance of saving it. I have a rather large engine on mine and when it happened to me on my first flight I went to full power and saved it. I used a lot of down elevator to trim it out. it also has a tendency to nose over on take off and landing so hold a little up elevator when it is up on the mains.
08-27-2009, 11:20 AM
#131
My Feedback: (20)
Join Date: May 2008
Location: Van Nuys, CA
Posts: 31
Likes: 0
Received 0 Likes
on
0 Posts
Lou,
Great! I will stay with the one large tank.
I saw your Bearcat first flight video so I will definitely comply with your word of caution. Thanks.
Great! I will stay with the one large tank.
I saw your Bearcat first flight video so I will definitely comply with your word of caution. Thanks.
03-23-2012, 07:35 AM
#132

Join Date: Mar 2007
Location: Bountiful, UT
Posts: 112
Likes: 0
Received 0 Likes
on
0 Posts
ORIGINAL: flyn2high
I have posted high res images of the 3 views in ZIP file format at:
http://www.liskyhawks.org/images/hel...s_Drawings.zip (3.3mb file)
Here are lots of Hellcat photos I took at the Air and Space Museum in Washington DC
http://www.liskyhawks.org/images/hel...ace_Museum.zip (128mb file)
Other photos I found on the web that show some of the close up detail of the Hellcat:
http://www.liskyhawks.org/images/hellcat/Hellcat_Full_ Size_Photos.zip (15 mb file)
Below are the books I purchased that I found very helpful. They are listed with my favorites first
1. F6F Hellcat by Adam Jarski, Waldemar Pajdosz. It is an Aircraft Monograph 20 book by AJ Press. ISBN 83-7237-176-8
2. Walkaround F6F Hellcat by Richard Sl Dann. This is a Squadron/Signal Publication. ISBN 0-89747-079-6.
3 Hellcat Aces of World War 2 by Barrett Tillman. This is an Osprey Aircraft of the Aces #10 publication. ISBN-10: 1-85532-596-9 and ISBN-13: 978-1-85532-596-8
4. The Maru Mechanic No. 40. All of the text is in Japanese which I can not read but the fold out 3 view, illustrations and photos are really great. I ordered it on the web from the Japan. I do not see the link to the book any longer but I sent an email to [email protected] (in English) and asked for the THE MARU MECHANIC book for the F6F Hellcat. I paid with PayPal. The cost including postage was $25.00.
A very good plastic model I also got for reference was by Hasegawa titled the F6F-3/5 Hellcat. It is 1:32 scale. It is very detailed. I do not plan to build it but it is great to be able to see the detail you are duplicating in 3D.
Lou, thanks for sharing so much detail in your build log. You've inspired me and I'm learning a lot. Do you know if the resources linked above are still available on the liskyhawks website (or elsewhere)? I get errors that the files don't exist on the server when I click the links. Any more progress on your great hellcat build? Thanks again for sharing your many talents with us!
03-23-2012, 08:25 AM
#133
Hi hessian123
Sorry about that. I no longer have access to the the server that it was on. I will move it shortly to a different one and post new links. By the way I made a lot of progress on the Hellcat but now with the building season nearly ended I will probably not get back to it until the fall.
Best regards:
Lou
03-24-2012, 06:30 AM
#134
Join Date: Mar 2007
Location: Bountiful, UT
Posts: 112
Likes: 0
Received 0 Likes
on
0 Posts
Lou,
thanks for getting the links back up, I appreciate it. Do you have any photos of your progress that you can share? I'm sure I'm not the only one who's dying to see them!
Thanks again,
Aaron
thanks for getting the links back up, I appreciate it. Do you have any photos of your progress that you can share? I'm sure I'm not the only one who's dying to see them!
Thanks again,
Aaron
ORIGINAL: flyn2high
Hi hessian123
Sorry about that. I no longer have access to the the server that it was on. I will move it shortly to a different one and post new links. By the way I made a lot of progress on the Hellcat but now with the building season nearly ended I will probably not get back to it until the fall.
Best regards:
Lou
03-24-2012, 10:26 AM
#135
Here are the new links. Let me know if you have any trouble with them.
I have posted high res images of the 3 views in ZIP file format at:
[link=http://www.gtweb.net/Lou/hellcat/3_Views_Drawings.zip]http://www.gtweb.net/Lou/hellcat/3_Views_Drawings.zip[/link] (3.3mb file)
Here are lots of Hellcat photos I took at the Air and Space Museum in Washington DC
[link=http://www.gtweb.net/Lou/hellcat/Hellcat_Air_&_Space_Museum.zip]http://www.gtweb.net/Lou/hellcat/Hellcat_Air_&_Space_Museum.zip[/link] (128mb file)
Other photos I found on the web that show some of the close up detail of the Hellcat:
[link=http://www.gtweb.net/Lou/hellcat/Hellcat_Full_ Size_Photos.zip]http://www.gtweb.net/Lou/hellcat/Hellcat_Full_ Size_Photos.zip[/link] (15 mb file)
I put the Hellcat aside for a bit as I am building a new 2m Skymaster ViperJet which should not take long and I have a Ziroli Corsair right behind it to build. I probably will get back to the Hellcat full steam in the fall. In the mean time I will bring this up today with my progress shortly. One of the really cool tasks is how the strut covers operate. There is a hinged flap in the front and then a small rotating section in the middle and then the main lower strut cover. I have a video showing how it operates as well as one for the tail hook.
03-25-2012, 05:17 PM
#136
Join Date: Mar 2007
Location: Bountiful, UT
Posts: 112
Likes: 0
Received 0 Likes
on
0 Posts
Lou,
I was able to download everything without any problems. Thanks again for sharing such great material. I'm looking forward to seeing you continue making progress with your hellcat build!
Aaron
I was able to download everything without any problems. Thanks again for sharing such great material. I'm looking forward to seeing you continue making progress with your hellcat build!
Aaron
10-05-2013, 06:15 AM
#137
Junior Member
Join Date: Nov 2009
Location: orleans, ON, CANADA
Posts: 3
Likes: 0
Received 0 Likes
on
0 Posts
Hi my name is Mike, i'm building a zoroli hellcat. I was interested to know how you did your ailerons (how you rounded the leading edge) and made it fit. is the curve the same from rib w14 to w12 .
I would appreciate any pic and help you could give me.
I will give you my email address [email protected] .
Thanks Mike
I would appreciate any pic and help you could give me.
I will give you my email address [email protected] .
Thanks Mike
10-05-2013, 10:10 AM
#138
Hi Mike:
After some interruptions I am actually back on the Hellcat project again. I thought I could do a comp arf MiG-15 in 3 months but it turned into well over a year project. I could not resist attaching a photo.
I have made quite a bit of progress since my last post and I plan to update the forum with new pictures soon.
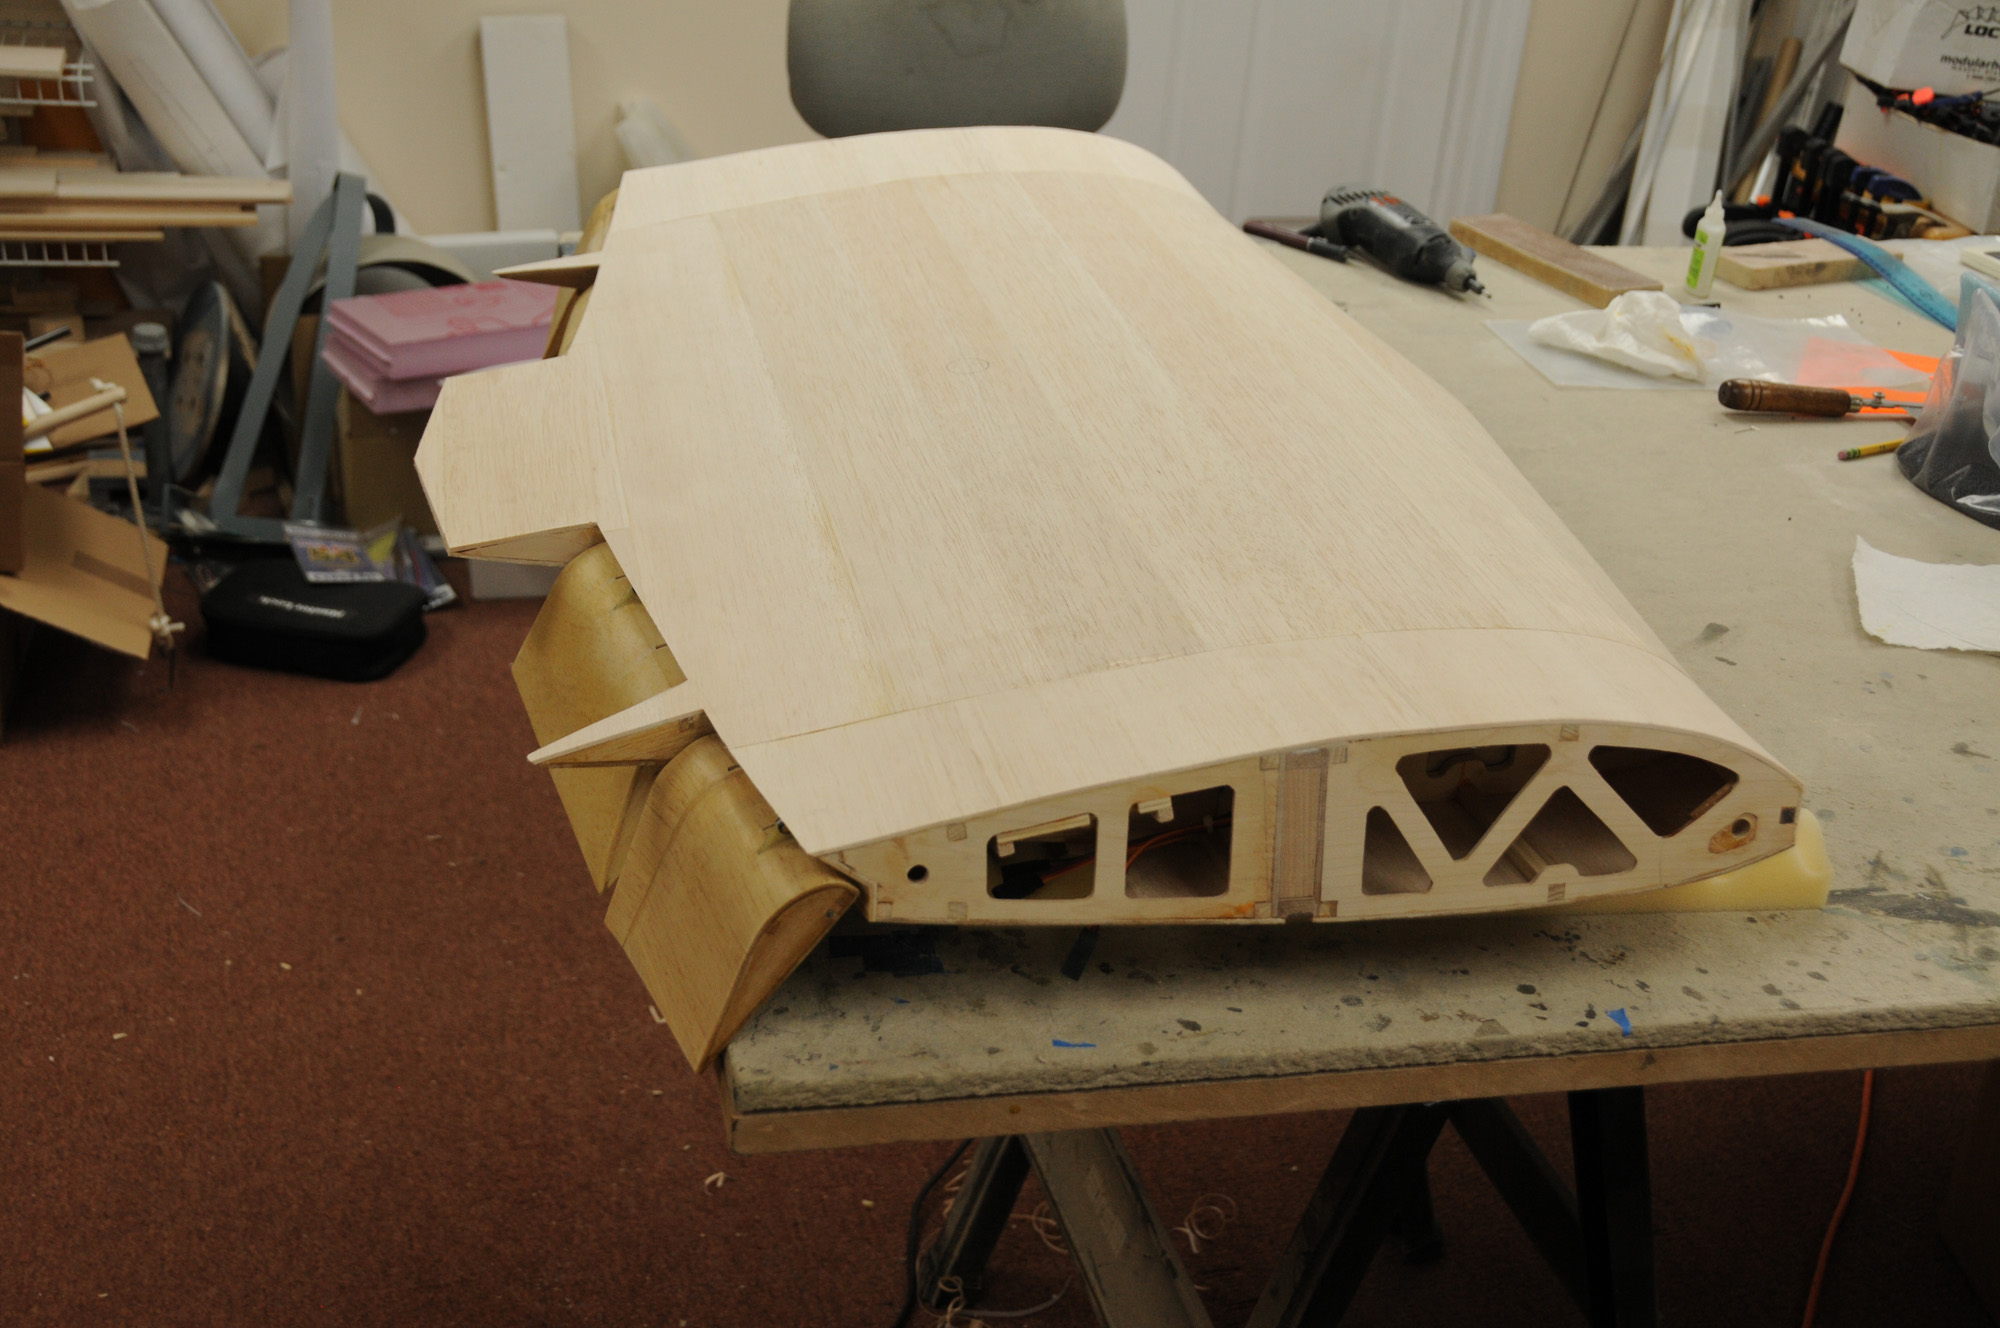
My wing is all finished up to the point where it is glassed and ready for primer. To answer your question I attached is a solidworks file showing the cross-section of the aileron and wing rib showing the curvature of the inner and outer ends. After cutting the aileron free from the wing I curved the aileron ribs to the correct shape and sheeted it with 3/321 balsa soaked in fantastic cleaner. I also took some photos of the aileron and the wing where it is mounted.


After some interruptions I am actually back on the Hellcat project again. I thought I could do a comp arf MiG-15 in 3 months but it turned into well over a year project. I could not resist attaching a photo.
I have made quite a bit of progress since my last post and I plan to update the forum with new pictures soon.
My wing is all finished up to the point where it is glassed and ready for primer. To answer your question I attached is a solidworks file showing the cross-section of the aileron and wing rib showing the curvature of the inner and outer ends. After cutting the aileron free from the wing I curved the aileron ribs to the correct shape and sheeted it with 3/321 balsa soaked in fantastic cleaner. I also took some photos of the aileron and the wing where it is mounted.
10-06-2013, 09:19 AM
#140
Junior Member
Join Date: Nov 2009
Location: orleans, ON, CANADA
Posts: 3
Likes: 0
Received 0 Likes
on
0 Posts
Big thank you Lou for the pic.This will help me alot with my build.I also saw the hinges you made,real nice, I made mind out of 1/16 G10,(I ad some on my 1/6 corsair )they work well and they are super strong .
Great MiG-15
Mike
Great MiG-15
Mike
10-06-2013, 09:46 AM
#141
Hi Mike:
G10 would be a much better option. i made mine out of 1/16 thick 304 Stainless Steel. Boy is this tough stuff to machine. I have a small CNC Milling machine and I must have gone though several carbide cutters to make all the hinge parts for the ailerons and flaps. I was probably using the wrong speeds and feeds at the time. I know better now but since then I have made many parts on the mill from G-10 with my carbide cutters and they are supper strong and much easier to machine. By the way McMaster-Carr is a good source. Are you building the standard size or the larger 108" one?
G10 would be a much better option. i made mine out of 1/16 thick 304 Stainless Steel. Boy is this tough stuff to machine. I have a small CNC Milling machine and I must have gone though several carbide cutters to make all the hinge parts for the ailerons and flaps. I was probably using the wrong speeds and feeds at the time. I know better now but since then I have made many parts on the mill from G-10 with my carbide cutters and they are supper strong and much easier to machine. By the way McMaster-Carr is a good source. Are you building the standard size or the larger 108" one?
10-09-2013, 07:59 AM
#143
Hi Mike.
It is http://www.mcmaster.com/ They are an industrial supplier and have every thing that machine shop would want in the way of tools and material. For me it is a good source because I can order up to 4 pm and it will be in the next days UPS delivery since I am in a one day zone. A friend of mine built the 97" version and he used the smaller Moki 150 radial. It sounds and flies great.
It is http://www.mcmaster.com/ They are an industrial supplier and have every thing that machine shop would want in the way of tools and material. For me it is a good source because I can order up to 4 pm and it will be in the next days UPS delivery since I am in a one day zone. A friend of mine built the 97" version and he used the smaller Moki 150 radial. It sounds and flies great.
03-23-2014, 06:04 AM
#144
As I mentioned I made a lot of progress on the Hellcat and it is almost finished painting. I saved the photos from the build and will try to continue where I left off.
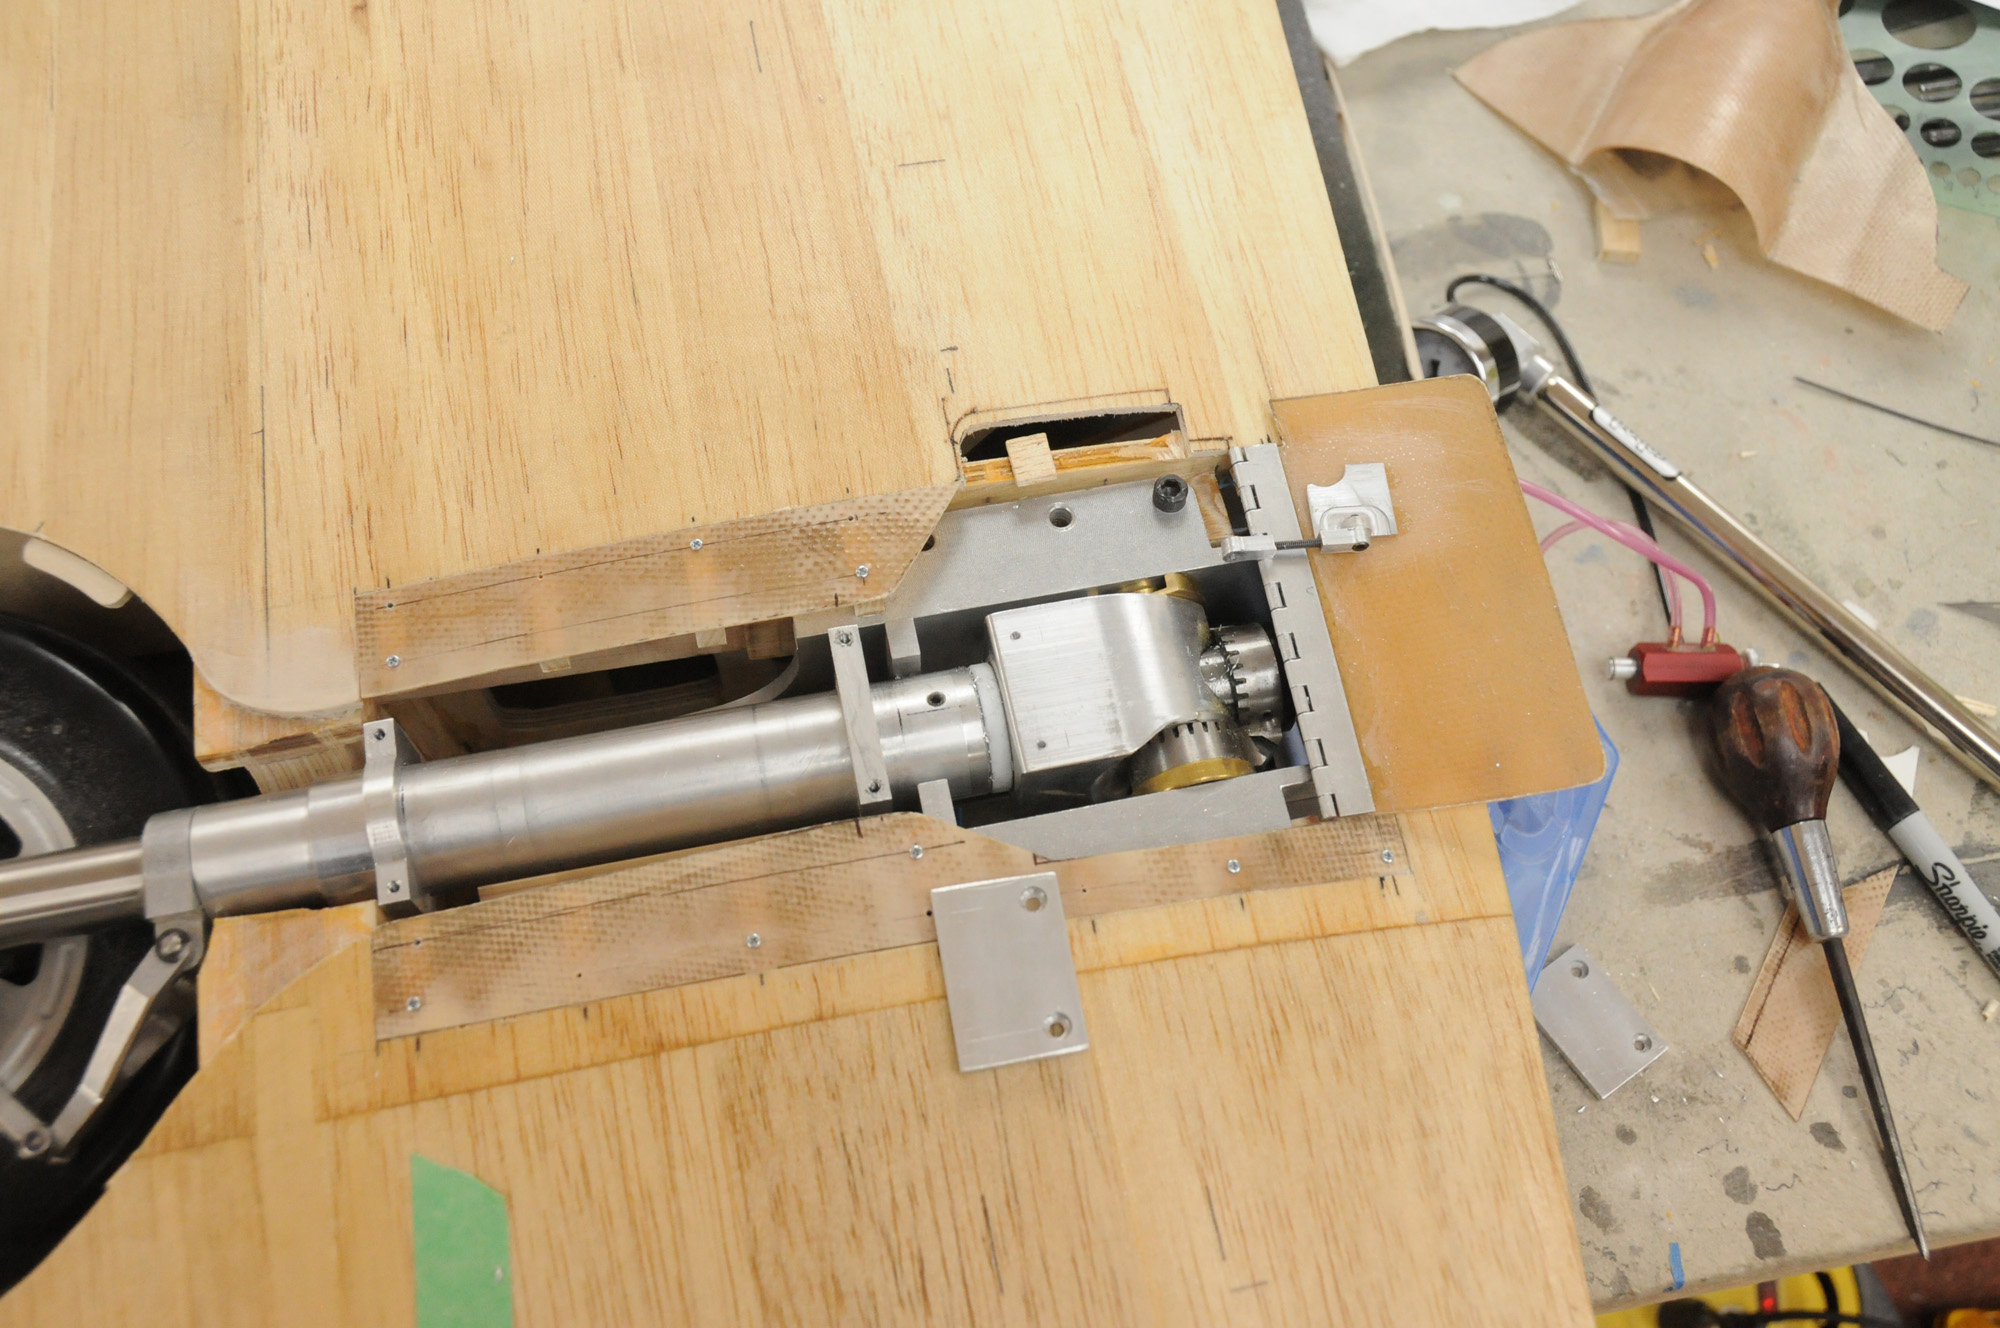
At this point I really needed to focus on the main gear as there is a lot of fitting to do before I close up the top of the center section wing. I used the fiberglass blank I made to form the three piece strut cover and surrounding access cover.


At this point I really needed to focus on the main gear as there is a lot of fitting to do before I close up the top of the center section wing. I used the fiberglass blank I made to form the three piece strut cover and surrounding access cover.
03-23-2014, 06:07 AM
#145
I used a stock aluminum hinge for the forward flap. It is from Gooden Hinge and the part number I used is AL02030202-72. It was epoxied to the forward flap and access cover.
I epoxied wood blocks to the underside of the gear frame to mount the access covers with #0 hardware.


I epoxied wood blocks to the underside of the gear frame to mount the access covers with #0 hardware.
03-23-2014, 06:18 AM
#147
Here is couple of videos of it in motion. I used my hand pump which caused the jerky motion.
http://youtu.be/6EEttdlgd0s http://youtu.be/SUYtQPH0kwI
http://youtu.be/6EEttdlgd0s http://youtu.be/SUYtQPH0kwI
03-23-2014, 06:56 AM
#148
With regards to the 6 flap segments I used a 1/6” music wire as a hinge pin. The technique I used was to cut a 1/8” slot in the bottom of each flap. Then I inserted a 1/16” id x 1/8” od nylon tube in the slot and glued it in place while adding a balsa filler to close up the slot.


03-23-2014, 07:03 AM
#149
I cut slots on the band saw to allow clearance for the stainless steel hinge arms. After the pin was inserted through the SS hinge arms and after all alignments were done, I glued the hinge arms in the wing segments with epoxy and let it cure. This method required me to sheet the bottom of the wings first so that I could glue them in place from the top. Each aileron will be hinged with three 2-56 hex head screws and locking nuts.


03-23-2014, 07:39 AM
#150
Sheeting the fuselage was started after all internal linkages were mounted and then removed. I am using two carbon fiber rods 3/8” diameter for the elevator. The rudder and steering is via two separate pull-pull cables, and the tail retract uses a carbon fiber push pull rod. The servos for all will be at the aft end of the wing opening. I used 1/8”balsa sheets that I spliced together to accommodate the extra long fuselage


