


Gilmore Red Lion Build
 04-09-2015, 03:04 PM
#276

Thread Starter

Join Date: Jul 2012
Location: Missouri
Posts: 1,127
Likes: 0
Received 0 Likes
on
0 Posts
Good to here from you Joe,
Cup Cake Party at my place
There is probably enough for every RCU member.
That is if you like lime cake with nilla frosting.")
Not sure when that will dry. Its pretty thick at the lip.
Kevin
Cup Cake Party at my place
There is probably enough for every RCU member.
That is if you like lime cake with nilla frosting.
Not sure when that will dry. Its pretty thick at the lip.
Kevin
 04-09-2015, 03:53 PM
#277

Lmao just like you its our busy season again. I have to build things so all you trades have plenty to do. Poured on friday inbetween the rain drops and 4 more plans waitng to dig holes. My concrete drivers cry if they get stuck or mud on their tires so i ordered a conveyer for them and my guys. ;p; Stay dry guys ! joe
04-09-2015, 07:47 PM
#278

I took a couple days off as well. I get to do some yard work, some cycling and a little work on the planes. Not back on the Stinson yet. Oh, and the OT... where the heck did it go???!!! 

 04-10-2015, 05:50 AM
#280


Join Date: Jun 2012
Location: Bristol, CT
Posts: 4,002
Likes: 0
Received 0 Likes
on
0 Posts
I'd be happy NOT to have a day off at this point. This year has been the complete opposite from most. I worked outside ALL winter, until spring hits. Then, I sit home? I don't get it. But, oh well. At least I can make some progress on my projects.
04-10-2015, 03:55 PM
#281
Thread Starter
Join Date: Jul 2012
Location: Missouri
Posts: 1,127
Likes: 0
Received 0 Likes
on
0 Posts
Steve, I did not realize your out of work right now. 
Will be praying that gets fixed.
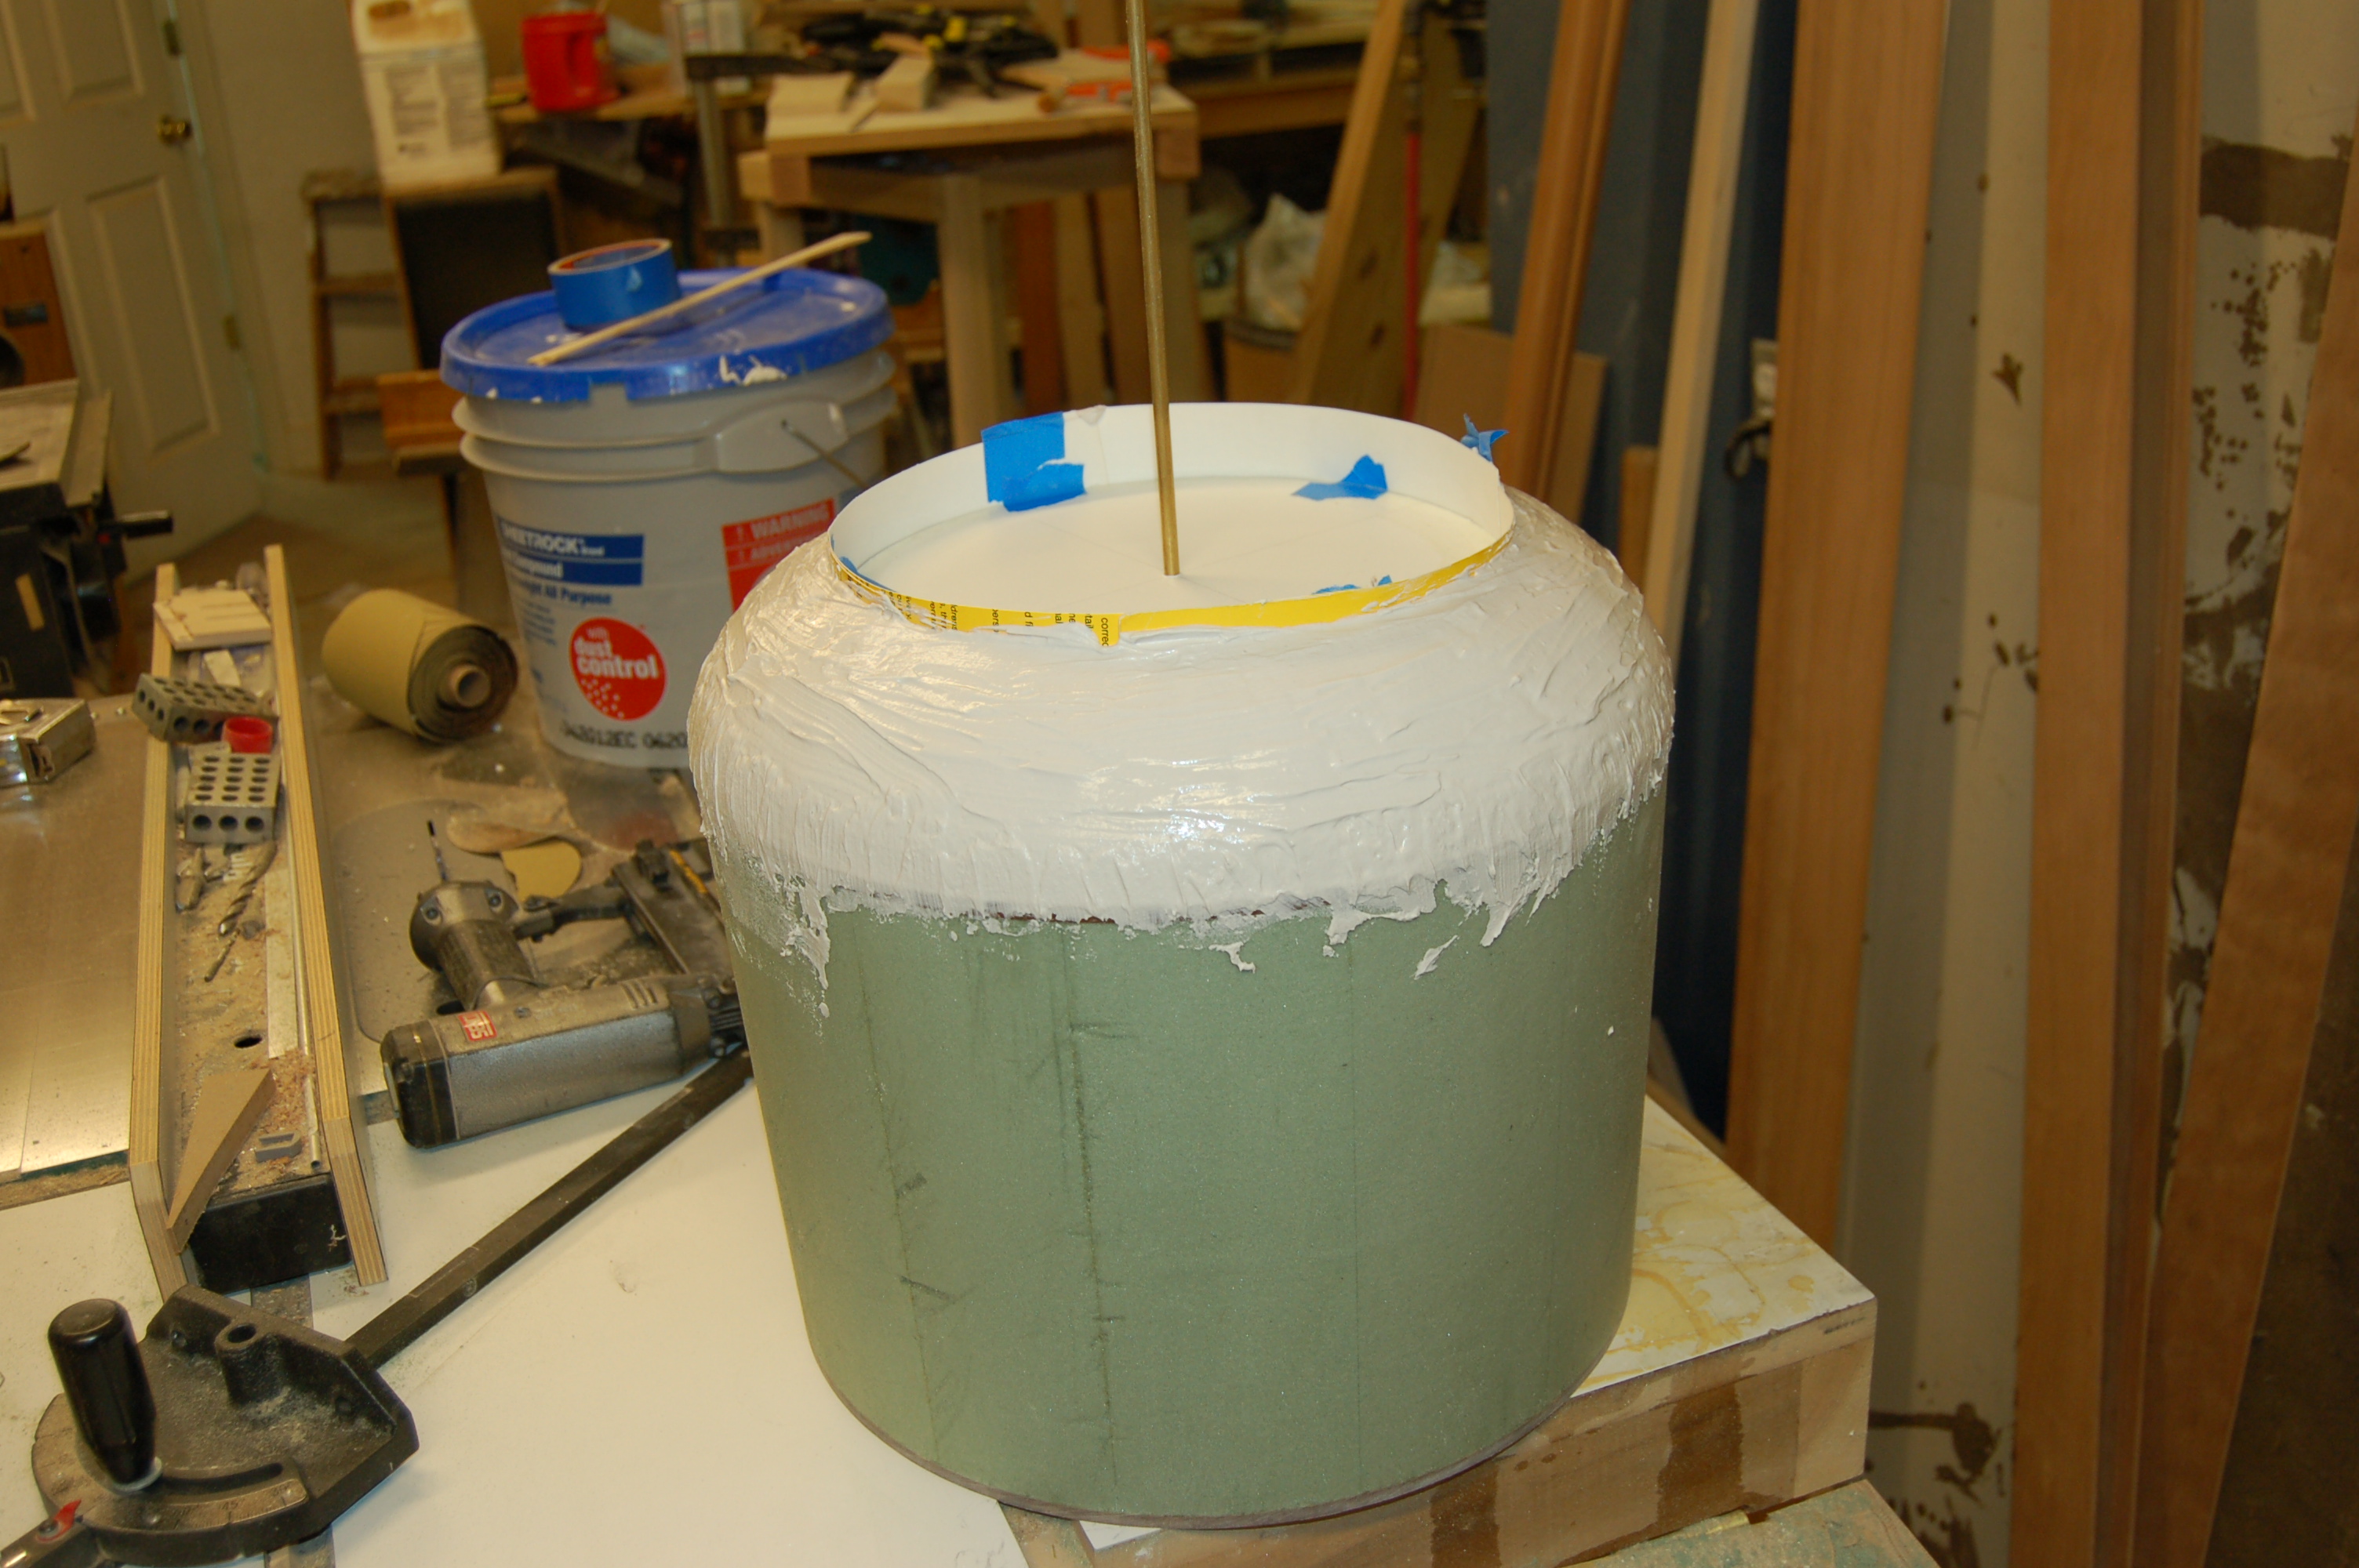
Well the drywall mud didn't work out. I used it cause I wanted something easy to sand.
When I went to sand it, it started flaking off. It was an old pail, maybe that had something to do with it.
Anyway that just wasn't going to cut it. So I flaked all of it off.

I know, looks like someone got the cup cake and licked all the icing off.
So plan B. Plan B is usually is not the easy button and it wasn't here. Plan B took 6 hours
I used body putty, but I didn't lather the whole nose up like I did the mud.
The putty was going to take some elbow grease and I thought it best to do it in stages.
I started with the lip at the opening. Built it up good and sanded it back with the same sanding jig I used with the foam.
Only the only area with sandpaper stuck to it was the area with the fresh putty so as to not oversand any thing else.
Once the lip was all sized in I spread putty out from the lip to the center of the curve then sanded only that in.
Then worked up from the rim to the center of the curve. ditto, ditto, ditto.
Tedious It was, but when you see a compound curve take shape it gives energy


Tomorrow the straight section will get the same treatment.
In comparison to the nose, should be a cake walk, Hee hee
Kevin
Will be praying that gets fixed.
Well the drywall mud didn't work out. I used it cause I wanted something easy to sand.
When I went to sand it, it started flaking off. It was an old pail, maybe that had something to do with it.
Anyway that just wasn't going to cut it. So I flaked all of it off.
I know, looks like someone got the cup cake and licked all the icing off.
So plan B. Plan B is usually is not the easy button and it wasn't here. Plan B took 6 hours
I used body putty, but I didn't lather the whole nose up like I did the mud.
The putty was going to take some elbow grease and I thought it best to do it in stages.
I started with the lip at the opening. Built it up good and sanded it back with the same sanding jig I used with the foam.
Only the only area with sandpaper stuck to it was the area with the fresh putty so as to not oversand any thing else.
Once the lip was all sized in I spread putty out from the lip to the center of the curve then sanded only that in.
Then worked up from the rim to the center of the curve. ditto, ditto, ditto.
Tedious It was,
but when you see a compound curve take shape it gives energyTomorrow the straight section will get the same treatment.
In comparison to the nose, should be a cake walk, Hee hee
Kevin
 04-11-2015, 11:27 AM
#284
Thread Starter
Join Date: Jul 2012
Location: Missouri
Posts: 1,127
Likes: 0
Received 0 Likes
on
0 Posts
Man this sanding is getting old. But almost done.
Small mistake. I thought my plug was 1/2 inch long in the back so as to trim some off the glass when time comes.
Turns out I am just under 1/4 inch short in the back. Will have to tack on a 1/2 inch panel and sand in before glassing the plug.


Kevin
Small mistake. I thought my plug was 1/2 inch long in the back so as to trim some off the glass when time comes.
Turns out I am just under 1/4 inch short in the back. Will have to tack on a 1/2 inch panel and sand in before glassing the plug.
Kevin
04-11-2015, 03:16 PM
#285

Join Date: Sep 2006
Location: The Sunshine state, when it's not raining!
Posts: 8,131
Likes: 0
Received 2 Likes
on
2 Posts
It is looking mighty fine Kevin. I know your pain with the sanding, I have spent many, many, hours on sanding my canopy plug, one more time should do it.
04-19-2015, 09:28 AM
#289
Thread Starter
Join Date: Jul 2012
Location: Missouri
Posts: 1,127
Likes: 0
Received 0 Likes
on
0 Posts
Cowl plug has been glassed and a coat of primer.
Boy am I glad to be to this point.
Evidently my camera is a sin eater.
The plug has lots of sins on it but nothing major. Pics don't really show them though.
I'm off to the store to get some spot putty. But am especially pleased with how it's turned out so far.


This is the first time for spraying out of a real gun. There is going to be a big learning curve for me before I feel comfortable.
Primer is a great start though. Hard to screw that up.
Kevin
Boy am I glad to be to this point.
Evidently my camera is a sin eater.
The plug has lots of sins on it but nothing major. Pics don't really show them though.
I'm off to the store to get some spot putty. But am especially pleased with how it's turned out so far.
This is the first time for spraying out of a real gun. There is going to be a big learning curve for me before I feel comfortable.
Primer is a great start though. Hard to screw that up.
Kevin
04-19-2015, 12:31 PM
#291
Thread Starter
Join Date: Jul 2012
Location: Missouri
Posts: 1,127
Likes: 0
Received 0 Likes
on
0 Posts
My plan is to mold the plug. I thought about the lost mold way but wanted to learn the art of mold making.
Also will have the mold if the unthinkable happens and I wish to make another.
Going to do the same for the spats and gear fairings.
Kevin
Also will have the mold if the unthinkable happens and I wish to make another.
Going to do the same for the spats and gear fairings.
Kevin
Last edited by Melchizedek; 04-25-2015 at 12:01 PM.
04-25-2015, 12:00 PM
#292
Thread Starter
Join Date: Jul 2012
Location: Missouri
Posts: 1,127
Likes: 0
Received 0 Likes
on
0 Posts
Lots of sanding and filling on the cowl plug.
Maybe one more round of sanding and filling and priming.
Then I can polish it up and make the 2 piece mold.
Cowl blisters.
This is iteration 1. Pleas let me know if it seems amiss.
Keep in mind each blister will get sanded into the cowl profile.
Also each blister will get a fillet around it. Fillet will come after foam is glassed.
Only 1 mold of the blisters will be made and they will be laid up individually.


Kevin
Maybe one more round of sanding and filling and priming.
Then I can polish it up and make the 2 piece mold.
Cowl blisters.
This is iteration 1. Pleas let me know if it seems amiss.
Keep in mind each blister will get sanded into the cowl profile.
Also each blister will get a fillet around it. Fillet will come after foam is glassed.
Only 1 mold of the blisters will be made and they will be laid up individually.
Kevin
Last edited by Melchizedek; 04-25-2015 at 12:05 PM.
04-25-2015, 05:20 PM
#294
Thread Starter
Join Date: Jul 2012
Location: Missouri
Posts: 1,127
Likes: 0
Received 0 Likes
on
0 Posts
Robert,
Because the cowl gets smaller toward the back and the front curves in toward the inside of cowl.
As is, my plan is to make parting plane at widest part of cowl (front cowl ring mold A, back taper from widest part to smallest mold B)
The blisters would keep mold be from coming out. Maybe with a 3 piece mold it would be doable (mold B being split into B,C ).
I would rather keep it simple.
Another reason is the blisters on the original (pic 4 in post 292) are attached to the cowl via fasteners (add on).
Also there are 18 of these puppies. Making 18 look identical then glue them to plug and clean up is more work than I want especially since the plug is almost ready to cast. Once the one blister is cast, making 18 of them will be 18 short sorties that can be done at leisure.
Fiberglass specialties states on there site that cowls with blisters are not molded in. Blisters are sold separately. This is probably to keep it simple.
This is just my thinking, I could be missing something. I originally thought of molding them into the cowl but decided not to for reasons stated.
Kevin
04-25-2015, 06:58 PM
#295
Join Date: Sep 2006
Location: The Sunshine state, when it's not raining!
Posts: 8,131
Likes: 0
Received 2 Likes
on
2 Posts
Oh, I understand. If your making a plug for the blister then they are repeatable therefore I think you are doing what's best. But then your way is always best. I, being stubborn and stoopid, would have tried it with the bubbles on. But then I tend to take the hard road and spend way to much time doing it. Example: my canopy!
 04-26-2015, 03:34 PM
#297
Thread Starter
Join Date: Jul 2012
Location: Missouri
Posts: 1,127
Likes: 0
Received 0 Likes
on
0 Posts
Robert, your canopy is going to be the Mother of all Canopies. It will glimmer in the noon day sun
Pete, Thanks
Here's wishing you a great season with your Model 44
Well I think the last coat of primer is on the Cowl Plug. It sanded up real nice this last time around. Apparently all sins have been atoned for.
Once cured it will be ready to buff up.
I'm a green horn when it comes to finishing. I am using Duratec surfacing primer. It is a catalyzed primer. I thought I could just run thinner through the gun to clean it out. Wrong. This last go round (round 4) the gun was spraying ****ty. Took it apart and found out why . Live and learn. Took some time to get the primer lining cleaned out. In case you are wondering, I cleaned the gun up (I thought) just as soon as I was done shooting. I did not let it sit.
Ok. Blister.
I sanded the concave on the bottom of the blister to match the cowl. I then took a piece of platic lam and used the heat gun to curve it to the shape of the cowl. Then I epoxied the blister to the lam. Once that cured I used some epoxy and micro balloons to create a fillet. It then got
glassed.

The blister looks a little mottled. That's the glass weave under the primmer. I layed the primmer down heavy hopping It will clean up with no more coats.
The flange around the blister is larger than the finished one will be.
I am not sure if I am going to go the flange route. Blending them in to the cowl would look a lot nicer but inauthentic.
I'm kinda on the fence on this.
But I am siked over all with the blister.
The cowl is going to look like a bulldog with a spiked collar. Love that look !!


Kevin
Pete, Thanks
Here's wishing you a great season with your Model 44
Well I think the last coat of primer is on the Cowl Plug. It sanded up real nice this last time around. Apparently all sins have been atoned for.
Once cured it will be ready to buff up.
I'm a green horn when it comes to finishing. I am using Duratec surfacing primer. It is a catalyzed primer. I thought I could just run thinner through the gun to clean it out. Wrong. This last go round (round 4) the gun was spraying ****ty. Took it apart and found out why
. Live and learn. Took some time to get the primer lining cleaned out. In case you are wondering, I cleaned the gun up (I thought) just as soon as I was done shooting. I did not let it sit. Ok. Blister.
I sanded the concave on the bottom of the blister to match the cowl. I then took a piece of platic lam and used the heat gun to curve it to the shape of the cowl. Then I epoxied the blister to the lam. Once that cured I used some epoxy and micro balloons to create a fillet. It then got
glassed.
The blister looks a little mottled. That's the glass weave under the primmer. I layed the primmer down heavy hopping It will clean up with no more coats.
The flange around the blister is larger than the finished one will be.
I am not sure if I am going to go the flange route. Blending them in to the cowl would look a lot nicer but inauthentic.
I'm kinda on the fence on this.
But I am siked over all with the blister.
The cowl is going to look like a bulldog with a spiked collar.
Love that look !!Kevin
04-30-2015, 04:36 PM
#298
Thread Starter
Join Date: Jul 2012
Location: Missouri
Posts: 1,127
Likes: 0
Received 0 Likes
on
0 Posts
I did a little fine tuning on the blister plug.
I feathered down the flange edge and elongated the fillet.
It then needed attracted to a cylindrical plate that matches the cowl radius.
Turns out an old tri pod with a wheel rim base was just the ticket. I glued and clamped two layers of bender board around the wheel rim. Then faced it with plastic laminate. Then glued the blister to it and shot the last coat of primer.
This weekend I am planning on Buffing the two plugs up and making the molds.


I had nothing to scale it to except photos, but all in all I think it looks wicked cool and am very pleased.
Onward
Kevin
I feathered down the flange edge and elongated the fillet.
It then needed attracted to a cylindrical plate that matches the cowl radius.
Turns out an old tri pod with a wheel rim base was just the ticket. I glued and clamped two layers of bender board around the wheel rim. Then faced it with plastic laminate. Then glued the blister to it and shot the last coat of primer.
This weekend I am planning on Buffing the two plugs up and making the molds.
I had nothing to scale it to except photos, but all in all I think it looks wicked cool and am very pleased.
Onward
Kevin

