


READ THIS before you even THINK about starting your RTR Savage!
 05-25-2006, 01:12 PM
#1
Senior Member
Thread Starter
My Feedback: (3)

Join Date: Jul 2004
Location: Norwood,
OH
Posts: 22,101
Likes: 0
Received 0 Likes
on
0 Posts
Hopefully you're reading this before your Savage even comes out of the box, or is delivered by Brown Santa. This will save
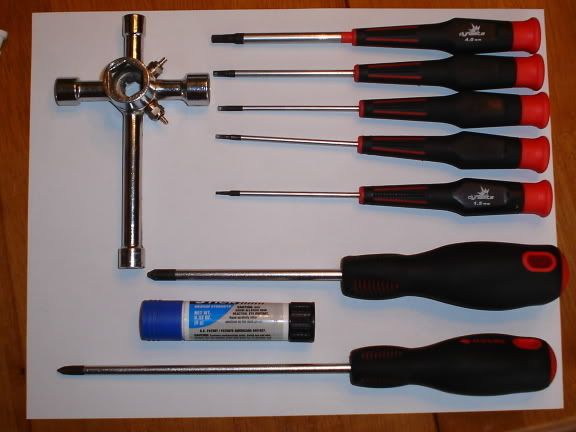
you quite a few headaches, especially if it's your first nitro. With these tips we experianced guys have seen gallons upon gallons of trouble-free running from our Savages without the problems that most people encounter. First and foremost, you need tools. Dynamite has a nice set of five metric hex drivers, which is what I'm using here, for about $15. I'm also using Husky screwdrivers, which a whole set of 10 (I think it was 10) set me back about $20. good screwdrivers and hex drivers will definitely save you some pains with rounding out screws-somethin none of us like to do, but we've all done. I've also got a Duratrax 5 way wrench, which has four handy little holes to screw spare glow plugs into, and it doubles as a glow plug wrench, wheel wrench, and a hammer
You'll also need thread locker. I'm using a blue Loctite stick. It works like chapstick, and should last almost forever when only
workin on RC cars.
First thing you need to do, before you do ANYTHING else, is set your gear mesh. Yes, this thing IS "RTR", but you're also buying a high-maintenance, high dollar toy, like a Ferrari or Lamborghini-and those things aren't cheap to maintain either.
Part 1-setting gear mesh
To set the gear mesh, loosen your motor mount screws. There are two readily visible on the bottom of the motor plate, and the rear two are accessible via holes in the rear skidplate-look close and you'll see 'em.
Right now would be a good time to just take all of them out and loctite them. When you have them screwed back into the motor mount/motor plate with loctite on the threads, slide the motor all the way to the left until the clutchbell hits the spur gear, and gently snug the motor mount screws down. Spin the spur gear clockwise (when looking at it from the rear of the truck) and if it doesn't spin freely, tap the engine mount lightly with your 5 way wrench until it spins freely.
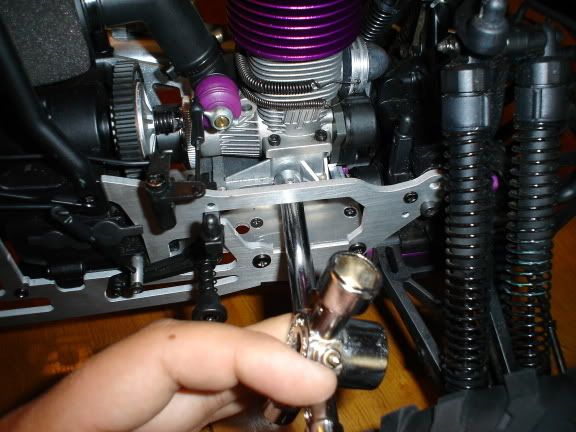
And yes, I forgot to add, that you should remove your fuel tank before doing this
When you do get the spur to spin freely, or at least semi-freely, hold the clutchbell stationary with one hand/finger, while moving the spur gear. you should barely feel the spur gear rock back and forth between the teeth of the clutchbell. If it doesn't, then lightly tap the engine mount with your 5 way wrench again until you have a TINY bit of play between the gears. If you're not sure if you set it right, tear a strip of printer paper, fold it over, and put it between the clutch and spur. if the spur spins freely, but binds up when you put the paper through the gear, you've got it right
Once you're fairly certain you got the gear mesh setting right, tighten the engine mount screws, and double check that the
spur still spins freely (It should).
Part 2-air filter
This is the easiest part
Being as paranoid as I am, I'm afraid that the factory didn't make my zip tie on my air filter tight enough. So this may just be me, LOL.
cut off the old zip tie
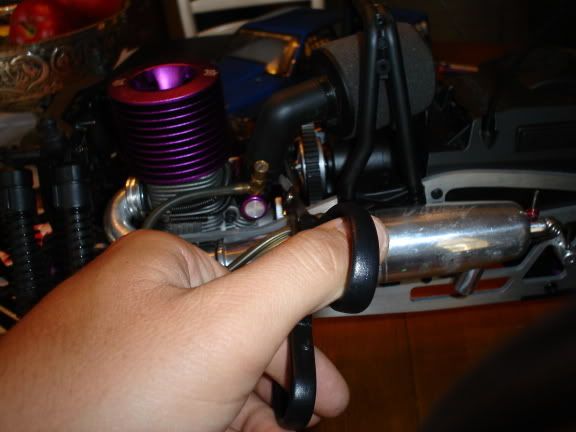
get a new one
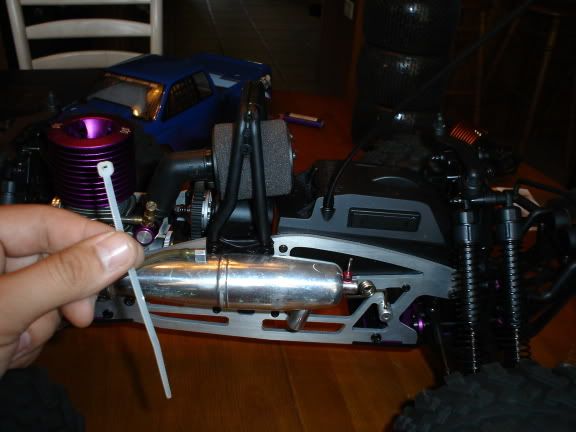
install-and yes, i'm using pliers to pull it good 'n' tight.
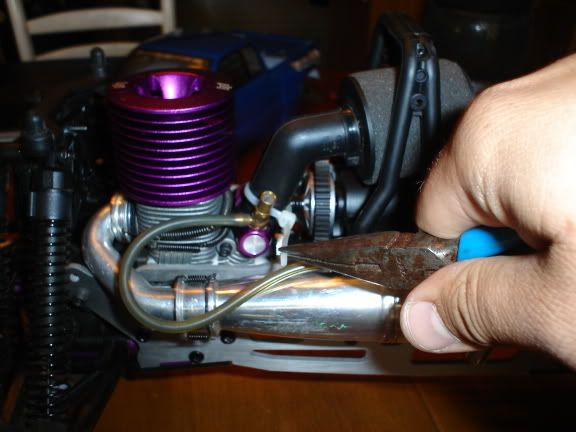
then cut off the excess
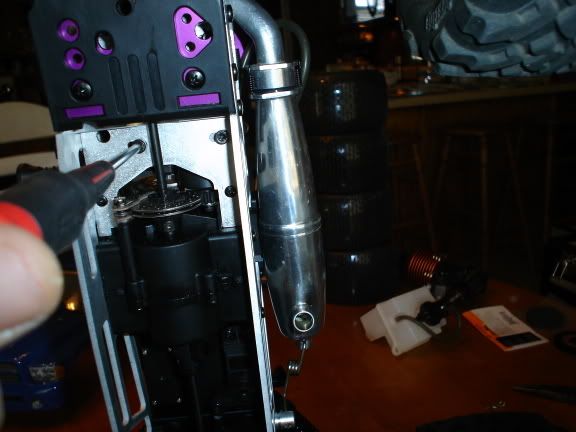
Part 3-make sure everything is tight and loctited
First, go through every screw that threads into plastic you can find and make sure it's good and snug. All the screws that thread into metal need to be loctited.
here are the screws that need to be loctited:
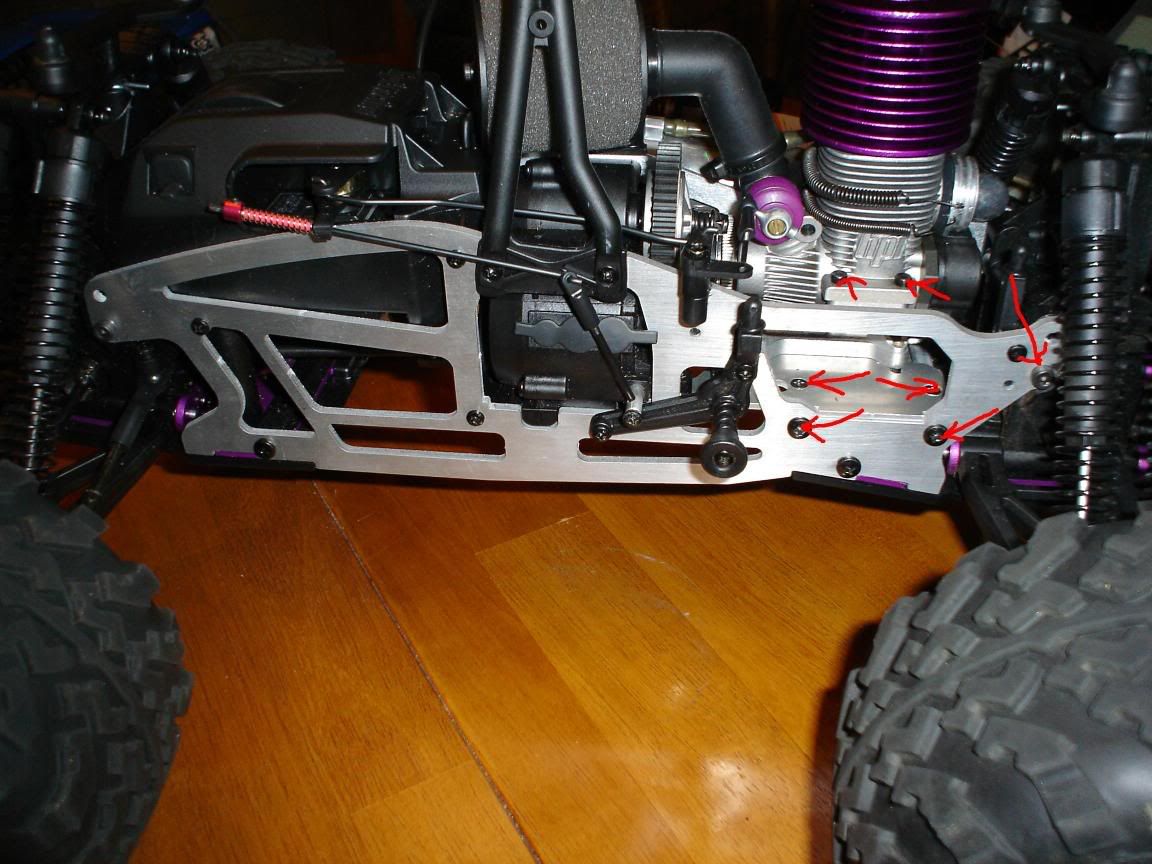
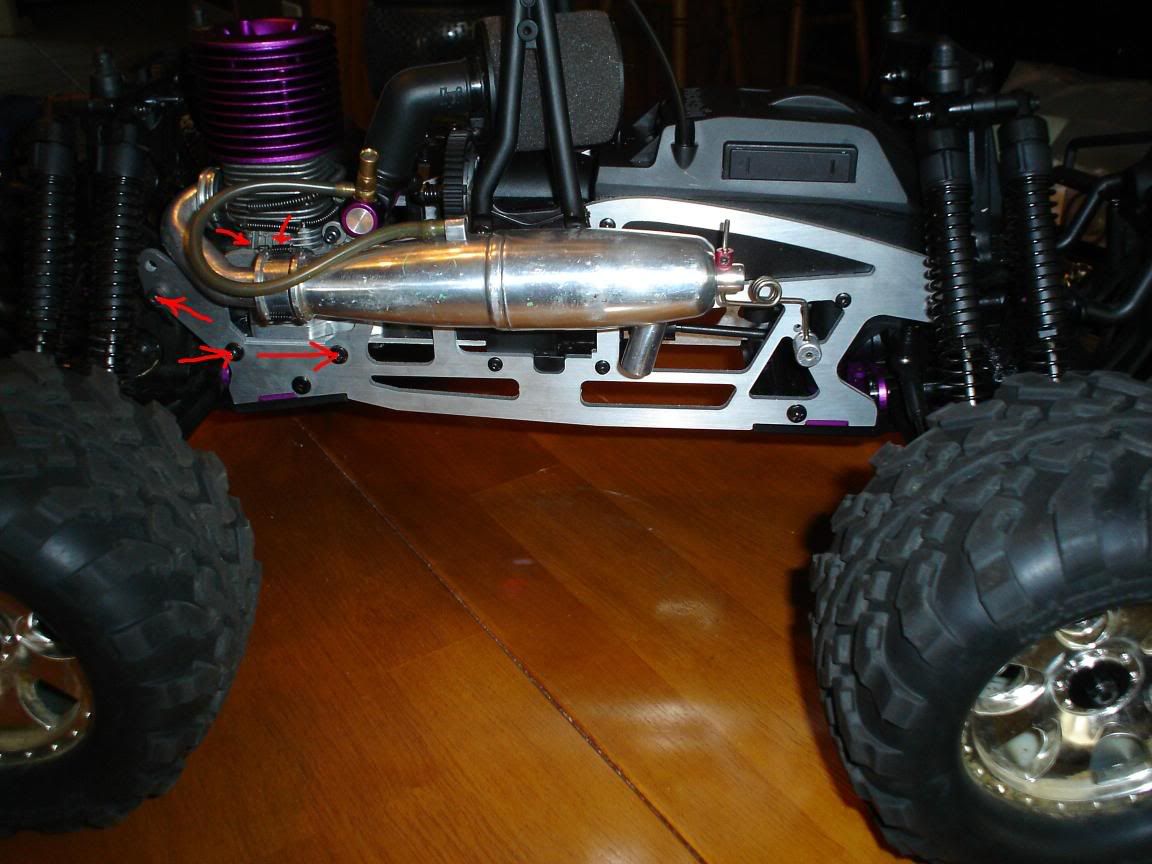
the two arrows that you can't see what they're pointing to are actually pointing toward the engine screws on the right side that hold the engine to the engine mount, and don't forget to loctite the engine mount screws when you set your gear mesh
I'll be editing this post through the day, adding pictures and information. any questions or anything, feel free to ask in the thread. Also, if you think I missed something, let me know
you quite a few headaches, especially if it's your first nitro. With these tips we experianced guys have seen gallons upon gallons of trouble-free running from our Savages without the problems that most people encounter. First and foremost, you need tools. Dynamite has a nice set of five metric hex drivers, which is what I'm using here, for about $15. I'm also using Husky screwdrivers, which a whole set of 10 (I think it was 10) set me back about $20. good screwdrivers and hex drivers will definitely save you some pains with rounding out screws-somethin none of us like to do, but we've all done. I've also got a Duratrax 5 way wrench, which has four handy little holes to screw spare glow plugs into, and it doubles as a glow plug wrench, wheel wrench, and a hammer
You'll also need thread locker. I'm using a blue Loctite stick. It works like chapstick, and should last almost forever when only
workin on RC cars.
First thing you need to do, before you do ANYTHING else, is set your gear mesh. Yes, this thing IS "RTR", but you're also buying a high-maintenance, high dollar toy, like a Ferrari or Lamborghini-and those things aren't cheap to maintain either.
Part 1-setting gear mesh
To set the gear mesh, loosen your motor mount screws. There are two readily visible on the bottom of the motor plate, and the rear two are accessible via holes in the rear skidplate-look close and you'll see 'em.
Right now would be a good time to just take all of them out and loctite them. When you have them screwed back into the motor mount/motor plate with loctite on the threads, slide the motor all the way to the left until the clutchbell hits the spur gear, and gently snug the motor mount screws down. Spin the spur gear clockwise (when looking at it from the rear of the truck) and if it doesn't spin freely, tap the engine mount lightly with your 5 way wrench until it spins freely.
And yes, I forgot to add, that you should remove your fuel tank before doing this
When you do get the spur to spin freely, or at least semi-freely, hold the clutchbell stationary with one hand/finger, while moving the spur gear. you should barely feel the spur gear rock back and forth between the teeth of the clutchbell. If it doesn't, then lightly tap the engine mount with your 5 way wrench again until you have a TINY bit of play between the gears. If you're not sure if you set it right, tear a strip of printer paper, fold it over, and put it between the clutch and spur. if the spur spins freely, but binds up when you put the paper through the gear, you've got it right
Once you're fairly certain you got the gear mesh setting right, tighten the engine mount screws, and double check that the
spur still spins freely (It should).
Part 2-air filter
This is the easiest part
Being as paranoid as I am, I'm afraid that the factory didn't make my zip tie on my air filter tight enough. So this may just be me, LOL.
cut off the old zip tie
get a new one
install-and yes, i'm using pliers to pull it good 'n' tight.
then cut off the excess
Part 3-make sure everything is tight and loctited
First, go through every screw that threads into plastic you can find and make sure it's good and snug. All the screws that thread into metal need to be loctited.
here are the screws that need to be loctited:
the two arrows that you can't see what they're pointing to are actually pointing toward the engine screws on the right side that hold the engine to the engine mount, and don't forget to loctite the engine mount screws when you set your gear mesh
I'll be editing this post through the day, adding pictures and information. any questions or anything, feel free to ask in the thread. Also, if you think I missed something, let me know
 05-25-2006, 03:10 PM
#3
Senior Member
Thread Starter
My Feedback: (3)
Join Date: Jul 2004
Location: Norwood,
OH
Posts: 22,101
Likes: 0
Received 0 Likes
on
0 Posts
TY, I figured this might keep the number of people that are having issues straight outta the box down.
05-25-2006, 04:17 PM
#4
Senior Member
Join Date: May 2006
Location: Gresham,
OR
Posts: 127
Likes: 0
Received 0 Likes
on
0 Posts
ORIGINAL: ThunderbirdJunkie
LL, there is a cone-shaped brass collet behind your flywheel......... if the collet is slipping, then it would give the illusion that your clutch is slipping, and you'd see similar symptoms of a really slippy clutch.
that's gonna be covered in my little thingie tomorrow too:P
LL, there is a cone-shaped brass collet behind your flywheel......... if the collet is slipping, then it would give the illusion that your clutch is slipping, and you'd see similar symptoms of a really slippy clutch.
that's gonna be covered in my little thingie tomorrow too:P
05-25-2006, 05:48 PM
#5
Senior Member
Join Date: May 2006
Location: Gresham,
OR
Posts: 127
Likes: 0
Received 0 Likes
on
0 Posts
ok ok ok, i guess i can find out some information on my own instead counting on you to put it up(like you said you would).
05-25-2006, 05:58 PM
#6
Senior Member
Thread Starter
My Feedback: (3)
Join Date: Jul 2004
Location: Norwood,
OH
Posts: 22,101
Likes: 0
Received 0 Likes
on
0 Posts
LL...i'll get it up, but i forgot to tear my clutch/engine apart to take pics...and the engine is in my truck and the gears are meshed so nicely i dont wanna take it back out
Actually i'm gonna go head to the LHS before they close, and go snag another PS for my m427 (i've broken two...third time's a charm?)
So, i'll do it when i get home
Good things come to those who wait
Actually i'm gonna go head to the LHS before they close, and go snag another PS for my m427 (i've broken two...third time's a charm?)
So, i'll do it when i get home
Good things come to those who wait
05-25-2006, 07:44 PM
#8
Senior Member
Thread Starter
My Feedback: (3)
Join Date: Jul 2004
Location: Norwood,
OH
Posts: 22,101
Likes: 0
Received 0 Likes
on
0 Posts
i don't know. I just loctite it, and stick it in there, and let it sit for a couple hours.
05-25-2006, 07:57 PM
#10
Member
Join Date: May 2006
Location: LH,
CA
Posts: 84
Likes: 0
Received 0 Likes
on
0 Posts
ORIGINAL: ThunderbirdJunkie
i don't know. I just loctite it, and stick it in there, and let it sit for a couple hours.
i don't know. I just loctite it, and stick it in there, and let it sit for a couple hours.
 05-25-2006, 08:10 PM
#11
Senior Member
Join Date: Dec 2005
Location: Southeastern,
NC
Posts: 2,997
Likes: 0
Received 0 Likes
on
0 Posts
You set the mesh without locktite. Then go back and remove-locktite-replace each screw, one at a time so you don't change the mesh.
05-25-2006, 09:06 PM
#12
Senior Member
Thread Starter
My Feedback: (3)
Join Date: Jul 2004
Location: Norwood,
OH
Posts: 22,101
Likes: 0
Received 0 Likes
on
0 Posts
What chronic said. I just got back from my LHS a bit ago, and no pullstarter for my Mach 427[:@]
So...Tomorrow morning first thing I'll tear apart the clutch and do a thingie on how to make sure it's all set
So...Tomorrow morning first thing I'll tear apart the clutch and do a thingie on how to make sure it's all set
05-25-2006, 09:35 PM
#14
Senior Member
Thread Starter
My Feedback: (3)
Join Date: Jul 2004
Location: Norwood,
OH
Posts: 22,101
Likes: 0
Received 0 Likes
on
0 Posts
theyr'e right above the hex screws I have in the VCP, that's what the empty holes are.
As you can see, I haven't done crap about it, because I honestly don't care:P the truck doesn't feel any different when I grab it and flex it in any way I can, so I don't see the need for it.
05-25-2006, 10:03 PM
#15
Senior Member

If you don't mind, I'll add that you should just go ahead and Permatex Ultra Copper RTV the carb and backplate at this time as well because once that engine gets a few tanks on it, it WILL get the inevitable carb or backplate leanout or both if you are lucky. When brand new, my S25 developed both leaks fairly quickly and it drove me nuts until I found out about the RTV fix from my LHS. Anyways, better to nip it in the bud sooner than later because tuning a engine that has a air leak is next to impossible. Many people get discourged with the truck when this happens and end up throwing it on ebay when a $8 tube of RTV can save the day.
05-25-2006, 10:08 PM
#16
Senior Member
Also, if you don't have any locktite around, simply tighten up the engine screws as tight as you can by hand and then put a set of pliers on the allen wrench that is inserted into the screw head and turn it a bit more......just don't go nuts or you'll snap the head off the screw.
05-26-2006, 11:38 AM
#17
Senior Member
Join Date: Feb 2006
Location: Sudbury,
ON, CANADA
Posts: 494
Likes: 0
Received 0 Likes
on
0 Posts
Hey Tbird,
great job on the write up You need to do add using the roto start for a new engine.
P
great job on the write up
You need to do add using the roto start for a new engine.P
05-26-2006, 11:48 AM
#18
Senior Member
Thread Starter
My Feedback: (3)
Join Date: Jul 2004
Location: Norwood,
OH
Posts: 22,101
Likes: 0
Received 0 Likes
on
0 Posts
As soon as I get a replacement XTM backplate, I will. That's actually been my whole problem with installing the rotostart on my Mach 427, the backplate on my XTM .247 was messed up...but there is somethin on Savage Central too
05-26-2006, 12:07 PM
#19
Senior Member
Join Date: Feb 2006
Location: ny ny
Posts: 625
Likes: 0
Received 0 Likes
on
0 Posts
hey guys
about those pins falling out.
i knew about that when i got my truck.
as i was doing the first tank break in thing.
i saw the pins walking out.
i made plates that are held in by the screw.
i still got all four of mine pins.
about those pins falling out.
i knew about that when i got my truck.
as i was doing the first tank break in thing.
i saw the pins walking out.
i made plates that are held in by the screw.
i still got all four of mine pins.
05-26-2006, 01:42 PM
#20
Senior Member
Join Date: May 2005
Location: , KS
Posts: 243
Likes: 0
Received 0 Likes
on
0 Posts
Good write-up, T-Bird.
I happened to of had 4 screws that fit nicely where the pins were,and swapped them out. Then locktited the metal to metal screws,as you had done. 3 gallons later,still haven't removed either plate and haven't lost one screw.
Your mesh description's pretty good,I think a lot of guys run the mesh too loose. I'll even set it a little tighter than that if I'm installing a new bell and spur,doesn't take long to seat them in. I wouldn't recommend that though,until you master the other.
05-26-2006, 01:43 PM
#21
Senior Member
Join Date: Nov 2005
Location: Mountain Village,
AK
Posts: 493
Likes: 0
Received 0 Likes
on
0 Posts
nice job there thunderbird,
i wish i did this when i got my savvyx. question here. what part number are those screws just below the pins that fell out named? i lost mine. i didnt know i was suppose to loctite mine. but after i stripped a spur half a gallon through, i read i should loctite mine and i did. but one question on that screw thing. is this screw the correct one?
http://www2.towerhobbies.com/cgi-bin...?&I=LXDLK8&P=Z
that goes to the screw hole below the pin? i asked this question in the anyone own a savvy x thread before i knew about this one.
thanks.
ps. its the last screw to the right on the last pic up there that has a red arrow to it.
05-26-2006, 02:05 PM
#25
Senior Member
Join Date: Feb 2006
Location: ny ny
Posts: 625
Likes: 0
Received 0 Likes
on
0 Posts
i think he only did that so as to not get any dirt in the carb inlet.
you could spin that engine for a month of sundays and it will never run.
you could spin that engine for a month of sundays and it will never run.