Top Flite Giant P-47 Build


 02-23-2015, 05:35 PM
#2127
Senior Member
My Feedback: (1)
Join Date: Dec 2010
Location: Mt Morris, IL
Posts: 1,433
Likes: 0
Received 0 Likes
on
0 Posts
Gary,
Your right, they tell you to add sheet to raise the sides.. The problem I'm having is how much I will have to build it up.
In this pic I have a 1/2" block representing where I will build up the sides, but that still leaves me about an inch low..
If I built it up that high, it covers up a lot of the dash..
On the bubble canopy, is your dash covered up on the sides from having to build it up so high?
Jimbo
02-23-2015, 07:28 PM
#2128


On the TFGS P-47 the panle is very narrow. On my kit build I have a full size cockpit and the panel is much bigger. the kit is off in many ways so it will be tough to get the canopy and the panle to be both the right size, the fuselage is a little thin for scale. Razor back is tougher then the bubble.
TB
TB
02-24-2015, 05:48 AM
#2129
Senior Member
My Feedback: (1)
Join Date: Dec 2010
Location: Mt Morris, IL
Posts: 1,433
Likes: 0
Received 0 Likes
on
0 Posts
TB,
You are so right, lots of little things on the kit that isn't right..
I'm going to do my best to make the Ziroli canopy work, camera doesn't really show it, but it looks a lot better than the TF.. Not to mentioned I paid $32+$9 SH..
If I cant get it to look right, where I'm happy with it, I will take a stab at making a plug and have one made..
I know me, if I'm not happy with something in the shop, I will hate it at the field..lol
02-25-2015, 05:31 AM
#2134
Senior Member
My Feedback: (1)
Join Date: Dec 2010
Location: Mt Morris, IL
Posts: 1,433
Likes: 0
Received 0 Likes
on
0 Posts
Gary,
It was great bs'ing with you last night and catching up..
The Ziroli canopy fits pretty well on the sides and is a little long in the front, I can live with the length issue.. Height is also good.. The only problem is the curve on top in the back, pic 1-2


I could just glue the canopy to the existing shape of the razor spine, but as you can see the back is pretty plain. Forward of the canopy fairings isn't supposed to be curved, on the real one it's "A" framed and the top also over hangs.


So with the day off from work, kids at school and the wife at work, I'm not coming out of the shop till I put this issue to bed..lol
The canopy fairings and mounting the cowl is all that is holding me up on glassing the fuse, so close..
Jimbo
It was great bs'ing with you last night and catching up..
The Ziroli canopy fits pretty well on the sides and is a little long in the front, I can live with the length issue.. Height is also good.. The only problem is the curve on top in the back, pic 1-2
I could just glue the canopy to the existing shape of the razor spine, but as you can see the back is pretty plain. Forward of the canopy fairings isn't supposed to be curved, on the real one it's "A" framed and the top also over hangs.
So with the day off from work, kids at school and the wife at work, I'm not coming out of the shop till I put this issue to bed..lol
The canopy fairings and mounting the cowl is all that is holding me up on glassing the fuse, so close..
Jimbo
02-25-2015, 08:32 AM
#2136
Senior Member
My Feedback: (1)
Join Date: Dec 2010
Location: Mt Morris, IL
Posts: 1,433
Likes: 0
Received 0 Likes
on
0 Posts
Progress, time for a coffee break..
I cut new fairing parts bigger than the original, this heps close up to the new canopy and will now give me the room to make the sides of the fuse aft the head rest flat, "A" framed like they are suppose to be..


Next I cut out the block on top so I can fill and sand to the right curve of the new canopy.. Spackle time!

Jimbo
I cut new fairing parts bigger than the original, this heps close up to the new canopy and will now give me the room to make the sides of the fuse aft the head rest flat, "A" framed like they are suppose to be..
Next I cut out the block on top so I can fill and sand to the right curve of the new canopy.. Spackle time!
Jimbo
 02-25-2015, 08:17 PM
#2138
Senior Member
My Feedback: (1)
Join Date: Dec 2010
Location: Mt Morris, IL
Posts: 1,433
Likes: 0
Received 0 Likes
on
0 Posts
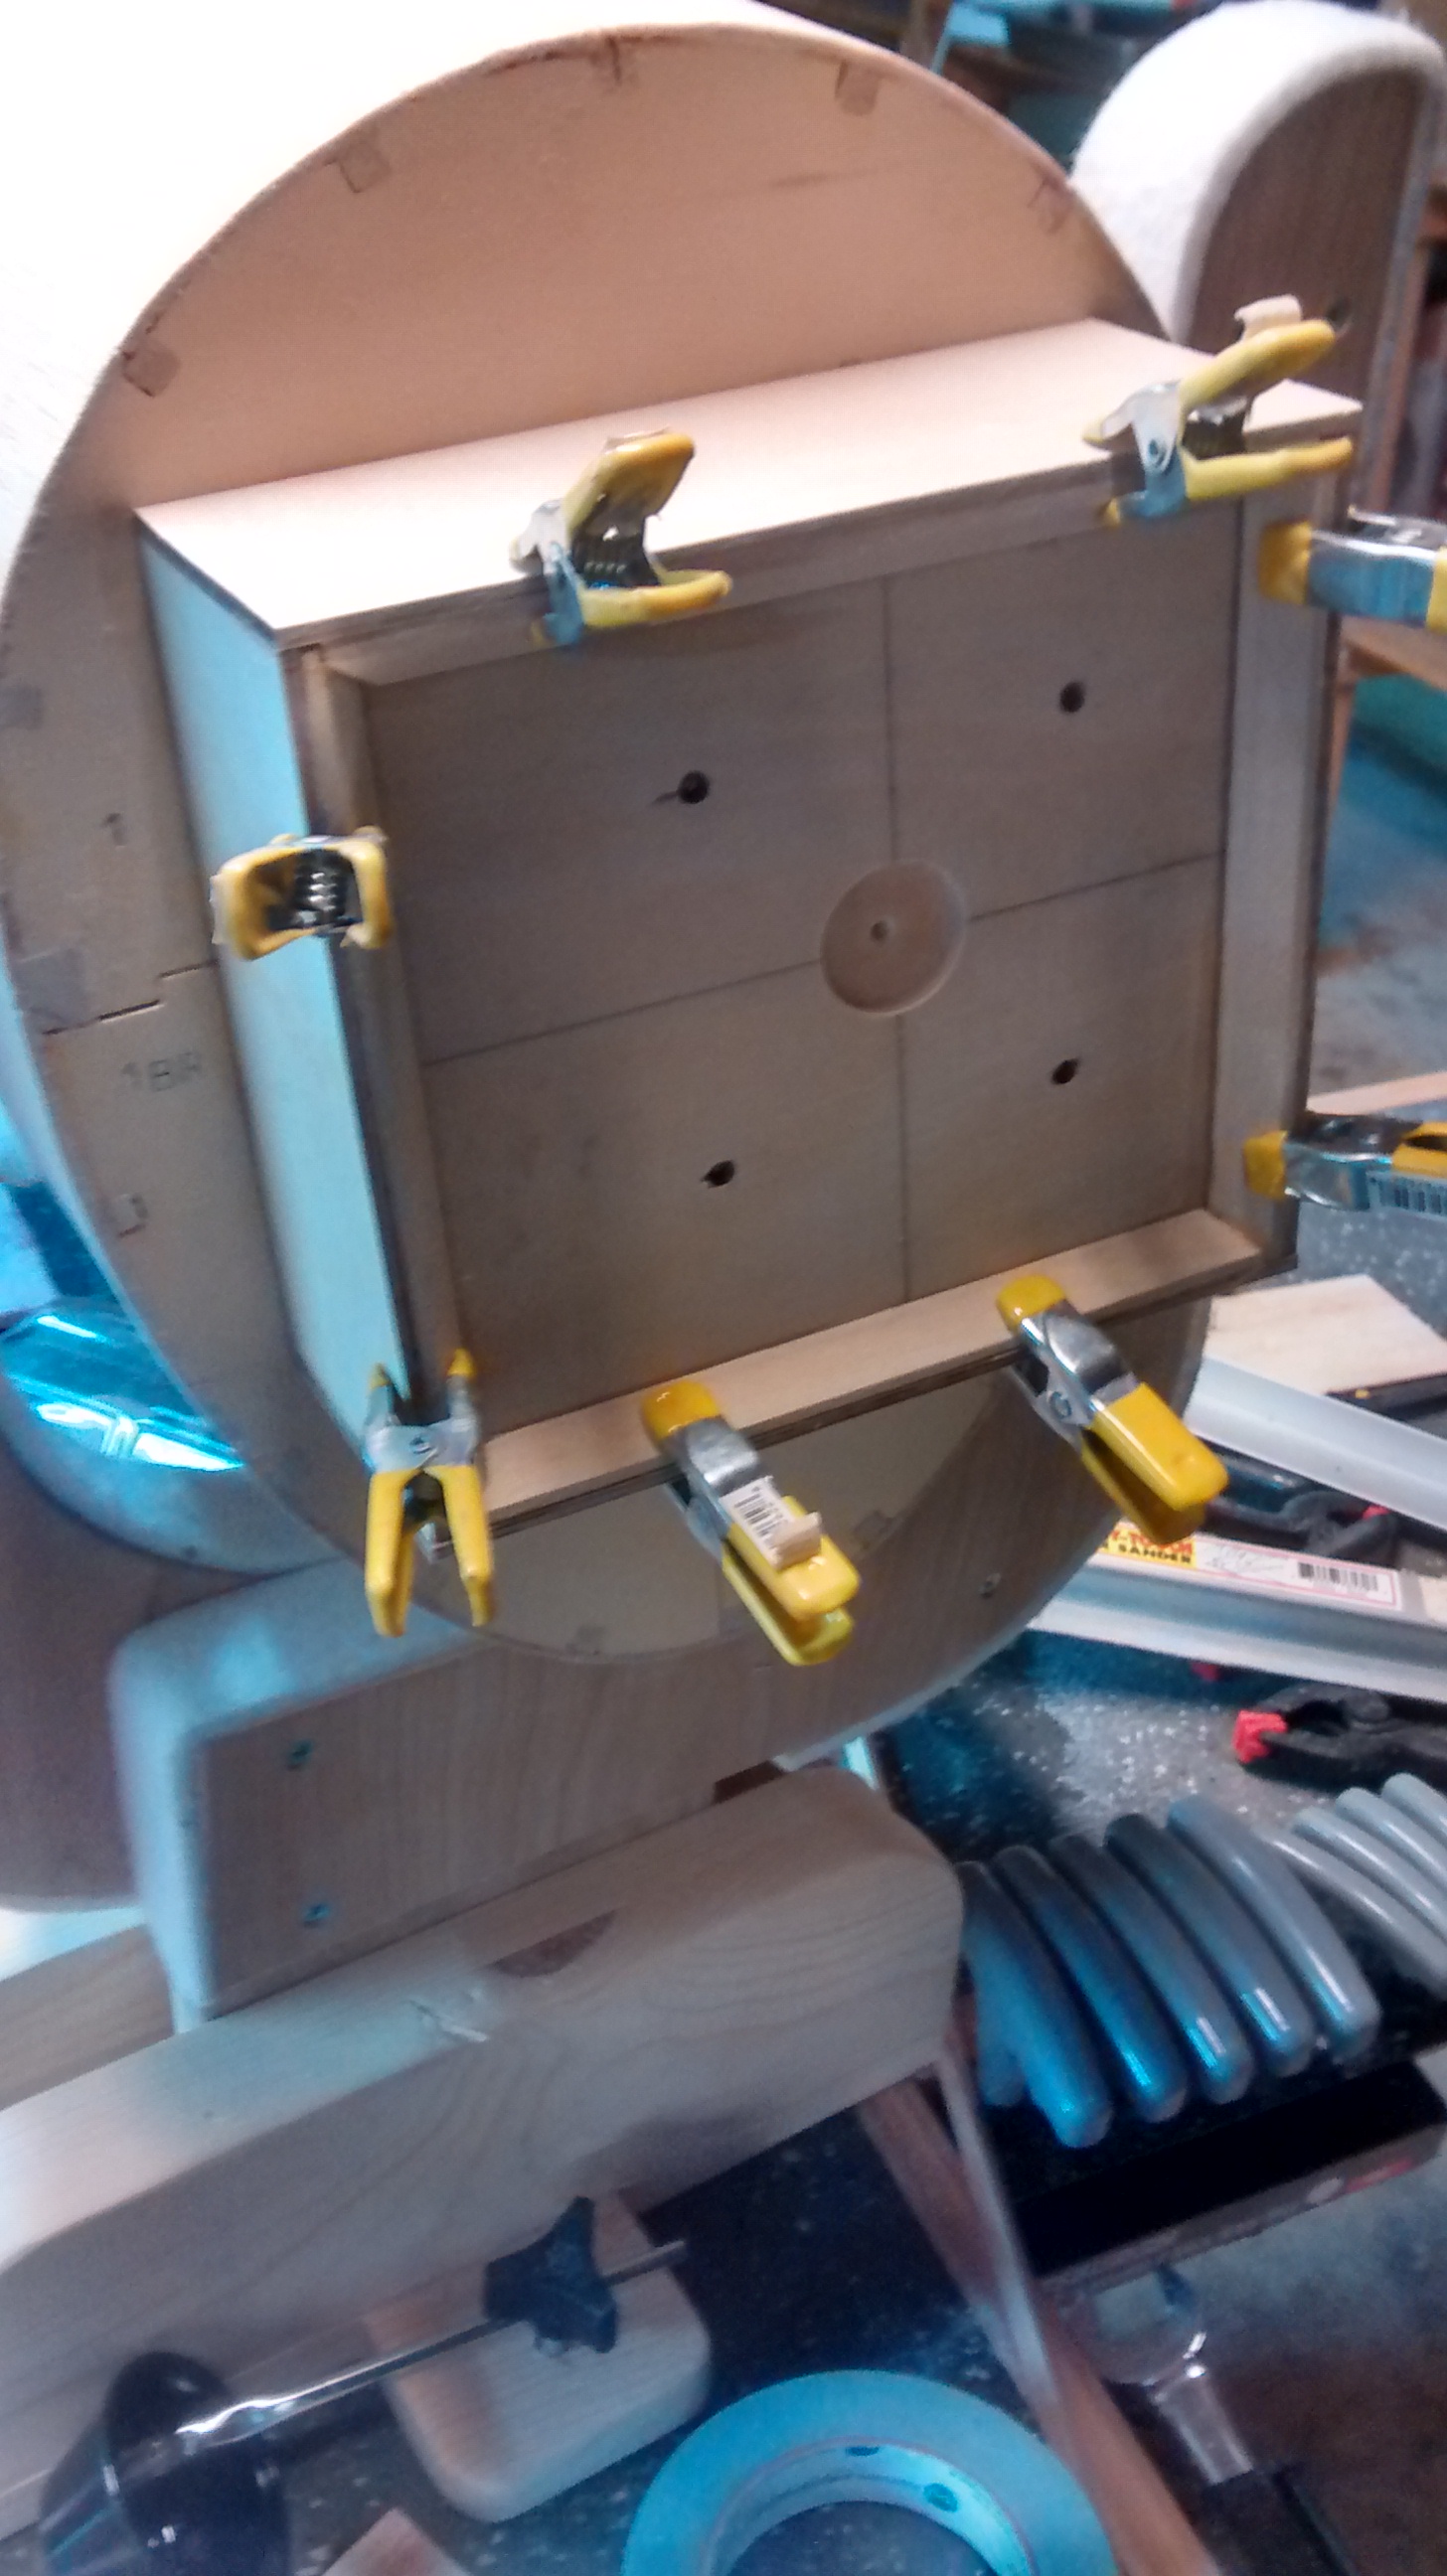
While I was waiting for filler to dry on the razor, I focused on the motor box..
I knew going into the build I would have to add weight to the nose, most everyone with this plane has.. I also did scale hinge lines, so more weight in the tail..
I have never been a fan of having to add dead weight to a plane, so I usually try and make it useful weight to accomplish my CG..
The DLE 85 picks up a good chunk of it, but the motor box can also use a makeover.
I felt the original was weak at best and needed beefing up for the 85..
The sides are two pieces that you glue together to make the crutch, early on I strapped the glue joints with aircraft ply and epoxy while building the fuse.. The entire framework is all light ply, but with strapping and tristock the inside structure is very solid.
The motor box itself is the real weak point in my opinion. It's just the 1/8" light ply with dublers on the inside.. The firewall is 1/4" ply and 1/8" light ply for the front..
I cut a new piece for the front out of AP, the light ply would crush around the motor mount and change my thrust lines over time..
The new firewall is now a solid 3/8" backed up with poplar tri-stock inside..
I then cut AP to wrap the outside of the entire MB, extending it past the firewall so I could add tri-stock to the front as well.. I will tri-stock to the bulkhead once I start fitting the cowl mounts and blocks..
All that's left for beefing the firewall is to drill and pin it tomorrow..


If any more weight is needed up front, I might fiberglass the box, but I think I'm about there for balance..
I should be glassing next week! Mirce, if you reading this, I will be placing a order next week..
Jimbo
I knew going into the build I would have to add weight to the nose, most everyone with this plane has.. I also did scale hinge lines, so more weight in the tail..
I have never been a fan of having to add dead weight to a plane, so I usually try and make it useful weight to accomplish my CG..
The DLE 85 picks up a good chunk of it, but the motor box can also use a makeover.
I felt the original was weak at best and needed beefing up for the 85..
The sides are two pieces that you glue together to make the crutch, early on I strapped the glue joints with aircraft ply and epoxy while building the fuse.. The entire framework is all light ply, but with strapping and tristock the inside structure is very solid.
The motor box itself is the real weak point in my opinion. It's just the 1/8" light ply with dublers on the inside.. The firewall is 1/4" ply and 1/8" light ply for the front..
I cut a new piece for the front out of AP, the light ply would crush around the motor mount and change my thrust lines over time..
The new firewall is now a solid 3/8" backed up with poplar tri-stock inside..
I then cut AP to wrap the outside of the entire MB, extending it past the firewall so I could add tri-stock to the front as well.. I will tri-stock to the bulkhead once I start fitting the cowl mounts and blocks..
All that's left for beefing the firewall is to drill and pin it tomorrow..
If any more weight is needed up front, I might fiberglass the box, but I think I'm about there for balance..
I should be glassing next week! Mirce, if you reading this, I will be placing a order next week..
Jimbo
02-26-2015, 11:00 AM
#2140
Jimbo, did you move the firewall back? Or are you moving the cowl forward. One thing I like about the RTC is all the formers are one piece and not split like the kit. I just added 1/8 ply to the sides inside and may add a piece of 3/8" to the firewall inside along with aluminum angles.
TB
TB
02-26-2015, 11:14 AM
#2142
Senior Member
My Feedback: (1)
Join Date: Dec 2010
Location: Mt Morris, IL
Posts: 1,433
Likes: 0
Received 0 Likes
on
0 Posts
Jimbo, did you move the firewall back? Or are you moving the cowl forward. One thing I like about the RTC is all the formers are one piece and not split like the kit. I just added 1/8 ply to the sides inside and may add a piece of 3/8" to the firewall inside along with aluminum angles.
TB
TB
Firewall is in its stock location , I'm moving the cowl forward similar to yours.. I'm still working it out in my head, I want my cowl screws internal, but not a full ring.. I want the open look for cooling, just don't want to see the mounting blocks.. Soon as I finish the canopy, I'm jumping on to that..
Jimbo
02-26-2015, 11:42 AM
#2143
Senior Member
My Feedback: (1)
Join Date: Dec 2010
Location: Mt Morris, IL
Posts: 1,433
Likes: 0
Received 0 Likes
on
0 Posts
Getting a lot closer to happy.. Lol
First build up coat came out good.. Have to carve the top block now, then put a finish coat on.. :-) little sneak peak

Jimbo
First build up coat came out good.. Have to carve the top block now, then put a finish coat on.. :-) little sneak peak
Jimbo
 02-26-2015, 04:34 PM
#2147
Senior Member
My Feedback: (1)
Join Date: Dec 2010
Location: Mt Morris, IL
Posts: 1,433
Likes: 0
Received 0 Likes
on
0 Posts
The ARC must be different in that respect as well.
I mocked mine up on the plane as well as the print and I need to come out 3/4"..
I'm using the fiberglass specialties cowl and so far it looks like the plug cap will fit, it's real close though..
Jimbo
02-27-2015, 05:14 AM
#2148
I will be interested to see how it plys out. On my kit build/ prototype I was able to get the plug cap in the cowl but I still used a 1/2 prop hub exstention. The FS cowl is smaller then the RTC cowl 
I cheted my thrust line by a 1/8" also so not sure how you are getting gobs of room, is yor DLE85 smaller")
anyways your build is looking great. When you get it done you Gary and I should get together and fly at one of the meets.
TB
I cheted my thrust line by a 1/8" also so not sure how you are getting gobs of room, is yor DLE85 smaller
anyways your build is looking great. When you get it done you Gary and I should get together and fly at one of the meets.
TB
02-28-2015, 07:29 AM
#2149
Senior Member
My Feedback: (1)
Join Date: Dec 2010
Location: Mt Morris, IL
Posts: 1,433
Likes: 0
Received 0 Likes
on
0 Posts
I will be interested to see how it plys out. On my kit build/ prototype I was able to get the plug cap in the cowl but I still used a 1/2 prop hub exstention. The FS cowl is smaller then the RTC cowl
I cheted my thrust line by a 1/8" also so not sure how you are getting gobs of room, is yor DLE85 smaller
anyways your build is looking great. When you get it done you Gary and I should get together and fly at one of the meets.
TB
I cheted my thrust line by a 1/8" also so not sure how you are getting gobs of room, is yor DLE85 smaller
anyways your build is looking great. When you get it done you Gary and I should get together and fly at one of the meets.
TB
That is strange how our numbers are so different on the same plane..
My 85 is 7 7/8" to the hub.
I mounted the motor back on and actually, I only need to move my cowl forward 3/8" and still have 1/4" clearance on the prop.
02-28-2015, 07:48 AM
#2150
Senior Member
My Feedback: (1)
Join Date: Dec 2010
Location: Mt Morris, IL
Posts: 1,433
Likes: 0
Received 0 Likes
on
0 Posts
My FS cowl is also the same size as the stock as per drawings.. How close is your carb to the firewall? Mine has the carb hold down bolts 1/16" from the FW. I counter sunk for my butterfly just to be safe and will do the same on my carb bolts..