


First Time Kit Builder: Project GP Super Decathalon
 05-18-2014, 06:31 PM
#51
Senior Member
Thread Starter

Join Date: Jul 2003
Location: Shell Rock, IA
Posts: 199
Likes: 0
Received 0 Likes
on
0 Posts
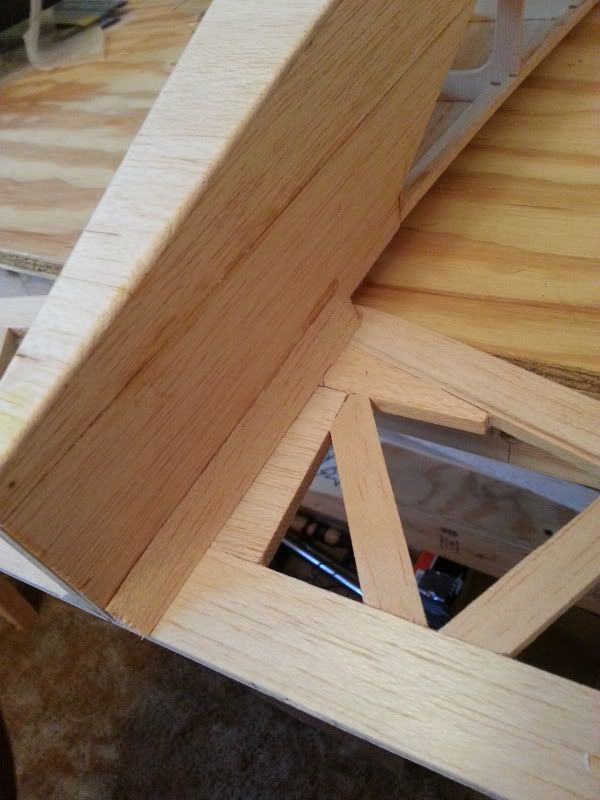
Epoxied the tail feathers and the under stabilizer support on tonight. Had a swamped weekend so didn't get as much done as I could but it's getting to the point of fitting in my radio equipment and engine and start routing pushrod & sleeve locations. Need to sand the wing to fuse filler blocks yet as well.


 05-22-2014, 10:37 PM
#53
Senior Member
Thread Starter
Join Date: Jul 2003
Location: Shell Rock, IA
Posts: 199
Likes: 0
Received 0 Likes
on
0 Posts
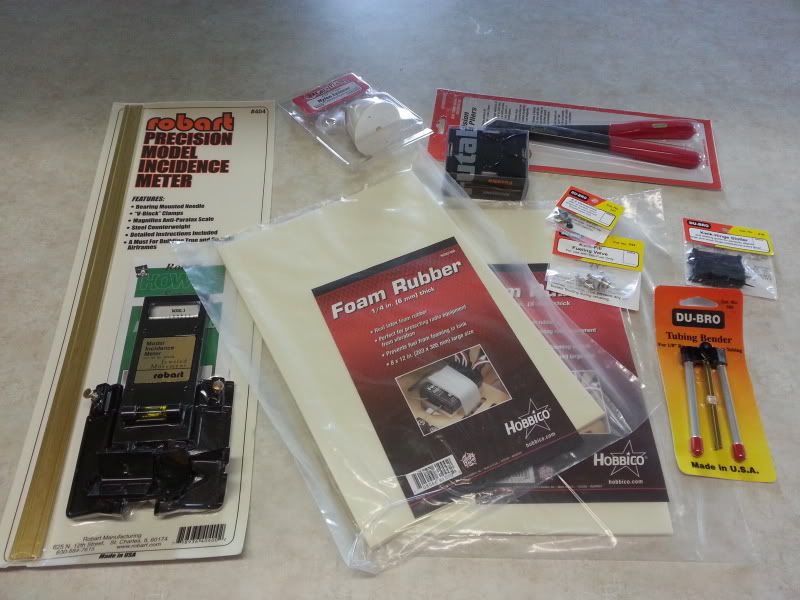
Nothing extremely new to report, been a bit busy lately and my weekends are a going to be booked solid for the next few weeks. I literally have 2 weddings in a row to go to. How dare them cramp into my build time!  Anyway, got a few goodies in the mail yesterday that should help the build along. Sounds like one of the said weddings will be down in the "big city" where there's a nice sized hobby shop that I like to go to. They usually have everything one would need. I'm essentially to the point of covering the model once I get the pushrod tubes installed and the wing servo located and cut out in the wing so I'm planning on getting all my covering while I'm there. I'm also in need of getting all my radio equipment so I can get my servos installed ugh....$$$$
Anyway, got a few goodies in the mail yesterday that should help the build along. Sounds like one of the said weddings will be down in the "big city" where there's a nice sized hobby shop that I like to go to. They usually have everything one would need. I'm essentially to the point of covering the model once I get the pushrod tubes installed and the wing servo located and cut out in the wing so I'm planning on getting all my covering while I'm there. I'm also in need of getting all my radio equipment so I can get my servos installed ugh....$$$$ 05-23-2014, 04:16 AM
#54
Senior Member
My Feedback: (5)
Join Date: Sep 2012
Location: Ormond Beach,
FL
Posts: 179
Likes: 0
Received 0 Likes
on
0 Posts
I found that where the tri-stock meets the turtle deck sheathing got very thin when sanded to make it blend in well. Applied a fillet of epoxy and microballoons on the inside of the sheathing where it meets the tri-stock to reinforce.
05-25-2014, 08:02 PM
#55
Senior Member
Thread Starter
Join Date: Jul 2003
Location: Shell Rock, IA
Posts: 199
Likes: 0
Received 0 Likes
on
0 Posts
Right not I'm fabbing up my throttle and fuel tube routing. At the same time while the engine is installed I'm trying to cut the cowling around the engine. Is there a trick to this or is it just a matter of trail fitting the cowl little by little and trimming the cowl each time around the engine head?
05-26-2014, 08:31 AM
#56
Senior Member
My Feedback: (5)
Join Date: Sep 2012
Location: Ormond Beach,
FL
Posts: 179
Likes: 0
Received 0 Likes
on
0 Posts
Right not I'm fabbing up my throttle and fuel tube routing. At the same time while the engine is installed I'm trying to cut the cowling around the engine. Is there a trick to this or is it just a matter of trail fitting the cowl little by little and trimming the cowl each time around the engine head?
05-26-2014, 03:11 PM
#57
Senior Member
Thread Starter
Join Date: Jul 2003
Location: Shell Rock, IA
Posts: 199
Likes: 0
Received 0 Likes
on
0 Posts
Yep it's out the RH side. I've got a hole drilled where the center rocker arm hold down is located...or should be. Guess I'll just work my way around slowly to contour the head and clear everything.
05-28-2014, 06:11 AM
#58
Senior Member
My Feedback: (5)
Join Date: Sep 2012
Location: Ormond Beach,
FL
Posts: 179
Likes: 0
Received 0 Likes
on
0 Posts
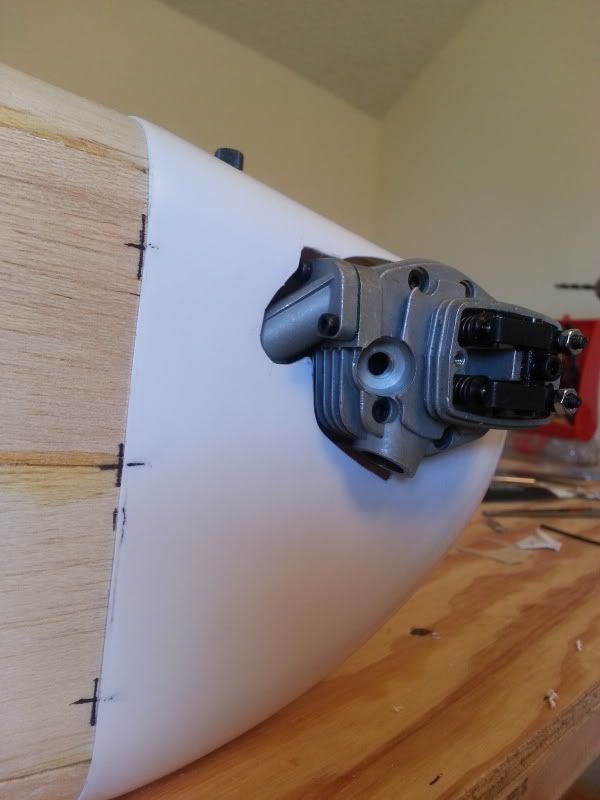
Put a refedrence mark on the fuselage and the cowl. Remove the cowl and tape a clear report cover to the side of the fuselage and transfer the reference mark to the clear plastic. Mark the cut out on the clear plastis then cut it out and make sure the fit is good. Tape the clear plastic to the cowl, ligning up reference marks then mark cowl cut out.
05-28-2014, 08:16 AM
#59
Senior Member
Thread Starter
Join Date: Jul 2003
Location: Shell Rock, IA
Posts: 199
Likes: 0
Received 0 Likes
on
0 Posts
I'll give that method a go. I tried using a cardboard template but cardboard seemed a bit soft and would rip/tear in places where I didn't want it to. I'll scrounge around the house and see if I can find a piece of clear plastic to use for a template.
05-29-2014, 01:18 PM
#60
Senior Member
Thread Starter
Join Date: Jul 2003
Location: Shell Rock, IA
Posts: 199
Likes: 0
Received 0 Likes
on
0 Posts
Holy cow! Using the clear plastic sheet method took all the guesswork out of cutting into the cowl. I was a bit apprehensive about cutting into it since you essentially only have one shot. I think I'm still going to trim another 1/16th or so around the engine just to be safe but overall I'm extremely happy with how it turned out...other than the fact the rocker cover and hsn have to be removed to install it but I'm hoping once it's on it won't be coming off unless I have a problem. Now I can yank the engine out and get started on break in.
Here are a few pics:
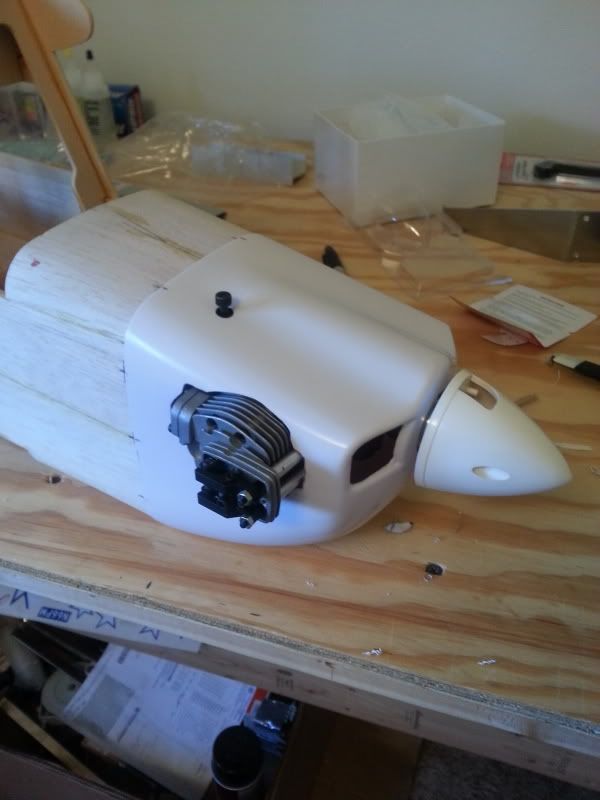

Here are a few pics:
 05-30-2014, 12:18 PM
#62
Senior Member
My Feedback: (5)
Join Date: Sep 2012
Location: Ormond Beach,
FL
Posts: 179
Likes: 0
Received 0 Likes
on
0 Posts
Holy cow! Using the clear plastic sheet method took all the guesswork out of cutting into the cowl. I was a bit apprehensive about cutting into it since you essentially only have one shot. I think I'm still going to trim another 1/16th or so around the engine just to be safe but overall I'm extremely happy with how it turned out...other than the fact the rocker cover and hsn have to be removed to install it but I'm hoping once it's on it won't be coming off unless I have a problem. Now I can yank the engine out and get started on break in.
Here are a few pics:
Here are a few pics:
I prefer the clear report cover so you can put it over the engine and mark where cuts need to be by seeing the engine and needle valve.
05-30-2014, 12:48 PM
#63
Banned
I don't know what the rest of it looks like, but, I would block off the left side air inlet, so that only the one over the engine is open, then cut a large hole in the bottom of the cowling (where it won't usually show) for air exit. You would like two to three times the area for goesouta as you have goesinta. The idea is that you don't want to "pack" air, where the air does not flow, so the outlet greater than inlet will create a vacuum in the cowling, and suck air in. This method has been used in scale, where the only inlet was hidden behind the spinner backplate.
Les
Les
05-30-2014, 01:00 PM
#64
Senior Member
My Feedback: (5)
Join Date: Sep 2012
Location: Ormond Beach,
FL
Posts: 179
Likes: 0
Received 0 Likes
on
0 Posts
Avistar, with the engine mounted sideways you may need some weight in the left wing to ballance laterally. If I were you I would get my gear, engine, electronics, etc where I want them and check latteral ballance before covering. That way if needed a small amount of weight could be added inside the tip of the left wing where the smallest amount of weight could correct any latteral ballance issue and it won't be seen when covered.
05-30-2014, 01:09 PM
#65
Senior Member
Thread Starter
Join Date: Jul 2003
Location: Shell Rock, IA
Posts: 199
Likes: 0
Received 0 Likes
on
0 Posts
Yeah I figured I'd drill an exit hole somewhere in the bottom of the cowl. Has anyone ever used seaplane grommets? We used them when we recovered an Ag-Cat when I was still working as an aircraft mech at the airport. Come in various sizes and have a hood over the hole on the le and acts almost like a venturi effect to evacuate any moisture that would happen to get between the fabric. Probably not needed in small scale, any hole on the lower cowl skin should act like a venturi while in flight. Or could cut a "door" in the lwr cowl and bend it to open to the aft, should act like a cowl vent.
On a different note I'm planning on picking up my covering this weekend. Any rough estimates on how much I'll need? Planning on a yellow/white scheme. Planning on ultracote if they have it, which comes in 6.5ft rolls.
On a different note I'm planning on picking up my covering this weekend. Any rough estimates on how much I'll need? Planning on a yellow/white scheme. Planning on ultracote if they have it, which comes in 6.5ft rolls.
05-31-2014, 04:42 AM
#66
Senior Member
My Feedback: (5)
Join Date: Sep 2012
Location: Ormond Beach,
FL
Posts: 179
Likes: 0
Received 0 Likes
on
0 Posts
Drilling a hole for exit air will not provide a large enough opening. Ideally you want 3 times as much exit air as entering air. You should get by with 2 rolls of the main color and 1 roll of trim if you plan your cuts well.
05-31-2014, 06:31 AM
#67
Banned
"Planning on ultracote if they have it, which comes in 6.5ft rolls."
Doesn't matter how much you get, you WILL end up 1 foot short:-)))))))))))))) Guess how I know.
Les
Doesn't matter how much you get, you WILL end up 1 foot short:-)))))))))))))) Guess how I know.
Les
05-31-2014, 07:29 AM
#68

My Feedback: (20)

Join Date: Jun 2009
Location: LaGrange,
GA
Posts: 544
Likes: 0
Received 0 Likes
on
0 Posts
The cowl looks awesome. I was going to suggest maybe using a molding transfer gauge to help: http://greeneprojects.files.wordpres...2-13-23-23.jpg Your method turned out great though.
05-31-2014, 07:20 PM
#69

Looking good so far...I will follow this one, as I have been wanting to build a Citabria or Decathlon. I am pretty much torn between the GP Decathlon (if I can find one) and the Sig Citabria.
I have about 10 wonderful fun hours of Decathlon time, so I would probably reduce dihedral and build the Sig Citabria (if I go that route) as a Decathlon, in my old flight school's paint scheme.
Matt
I have about 10 wonderful fun hours of Decathlon time, so I would probably reduce dihedral and build the Sig Citabria (if I go that route) as a Decathlon, in my old flight school's paint scheme.
Matt
06-01-2014, 08:17 AM
#70
Senior Member
Thread Starter
Join Date: Jul 2003
Location: Shell Rock, IA
Posts: 199
Likes: 0
Received 0 Likes
on
0 Posts
Avistar, with the engine mounted sideways you may need some weight in the left wing to ballance laterally. If I were you I would get my gear, engine, electronics, etc where I want them and check latteral ballance before covering. That way if needed a small amount of weight could be added inside the tip of the left wing where the smallest amount of weight could correct any latteral ballance issue and it won't be seen when covered.
06-04-2014, 03:50 PM
#71

I had one years ago with a Saito .72 mounted inverted. Plenty of power, maybe too much torque on take off. I moved the location of the landing gear based on something I read about helping on paved strips (can't recall forward or rear), I also tried to make washout 2 degrees, but was only able to get one degree due to rigidity of wing after assembled. I loved the way the plane flew and landed, but take-offs were a PITA!! Thing would ground loop bad, and I could never quite master take-offs to look decent. I sold it due to ground handling problems. If you've ever flown a Cub, I would say it was worse on ground handling. Be ready to abort your take-offs as soon as it goes squirelly. I would also suggest reinforcing the balsa wing-tips at the rear where the ailerons are. One little bump will break the trailing edge balsa tips next to the ailerons. Put a piece of aircraft ply in there to give it some strength. Good luck!
06-11-2014, 08:20 AM
#72
Senior Member
Thread Starter
Join Date: Jul 2003
Location: Shell Rock, IA
Posts: 199
Likes: 0
Received 0 Likes
on
0 Posts
Sorry for the stagnant thread boys, had a little mishap with my avistar last week and stalled on take off and cartwheeled into the weeds so I've been in the shop but not working on the Decathlon. Thinking the culprit was too tall of grass on the runway, wrong prop, grass buildup on said prop, and too small of wheels. No major damage but it knocked the firewall loose and pulled the front left fuse side out of position.
While it's down I'm stiffening up the tail feathers and converting it to a tail dragger with larger 3 1/2" wheels.
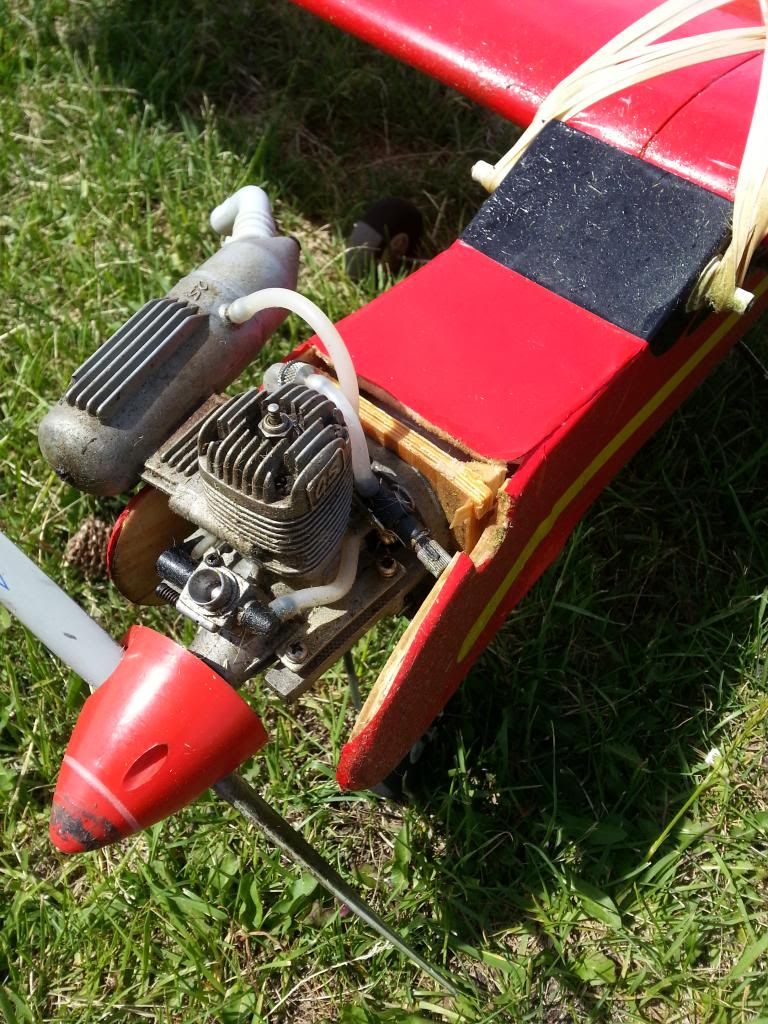
While it's down I'm stiffening up the tail feathers and converting it to a tail dragger with larger 3 1/2" wheels.

