


Sig Ryan STA
 07-05-2014, 04:13 AM
#1926

Pink tape, or ignoring it, are the two options that come to my mind.
No cherries. No vid. Sorry.
I watched the Angels from my house. The P-51's, too.
Last night, when leaving the flying field, I was buzzed by a P-51. Those Merlins sound great at full song !
 07-07-2014, 04:36 AM
#1927

Join Date: Jan 2012
Location: ACT, AUSTRALIA
Posts: 27
Likes: 0
Received 0 Likes
on
0 Posts
Hello Folks,
I've just come across this thread in a search. I've got one of these kits sitting in the wings waiting to get built. I now just need to go back to page 1 and start reading about this great bird/kit
I've just come across this thread in a search. I've got one of these kits sitting in the wings waiting to get built. I now just need to go back to page 1 and start reading about this great bird/kit

 07-11-2014, 04:09 AM
#1929
Thread Starter
Good Luck with your build NO153Y! If you get stuck, ask for help...
07-22-2014, 01:06 PM
#1930
Senior Member
Join Date: Jul 2002
Location: Brunswick, ME
Posts: 1,192
Likes: 0
Received 0 Likes
on
0 Posts
I did system checks and some taxi tests with my SIG Ryan this past weekend at a Memorial Fun-Fly at my local club. I had purchased mine mostly built from the widow of a former member last year and finally got back to it a few weeks ago. The taxi tests showed it to be a little squirley and the engine didn't like being cowled. I made one high speed run but it veered left off into the high grass and flipped over. Some minor covering damage (it's very old and brittle) but that's all...except for my bruised ego, of course. The CG is still a little forward of the recommended positon so I'm going to try adding some bracing to the tail and a little counter weight to see if I can get it back to the position shown on the plans. It got a lot of attention and I hope it flies well. It's always hard trying to straighten out an old model that someone else built and has been sitting for a long time. My first post on this starts on page 24, post #577 for those interested in it's history.
Jaybird

Jaybird
Last edited by Jaybird; 07-22-2014 at 06:03 PM.
07-24-2014, 06:06 AM
#1934
Senior Member
Join Date: Jul 2002
Location: Brunswick, ME
Posts: 1,192
Likes: 0
Received 0 Likes
on
0 Posts
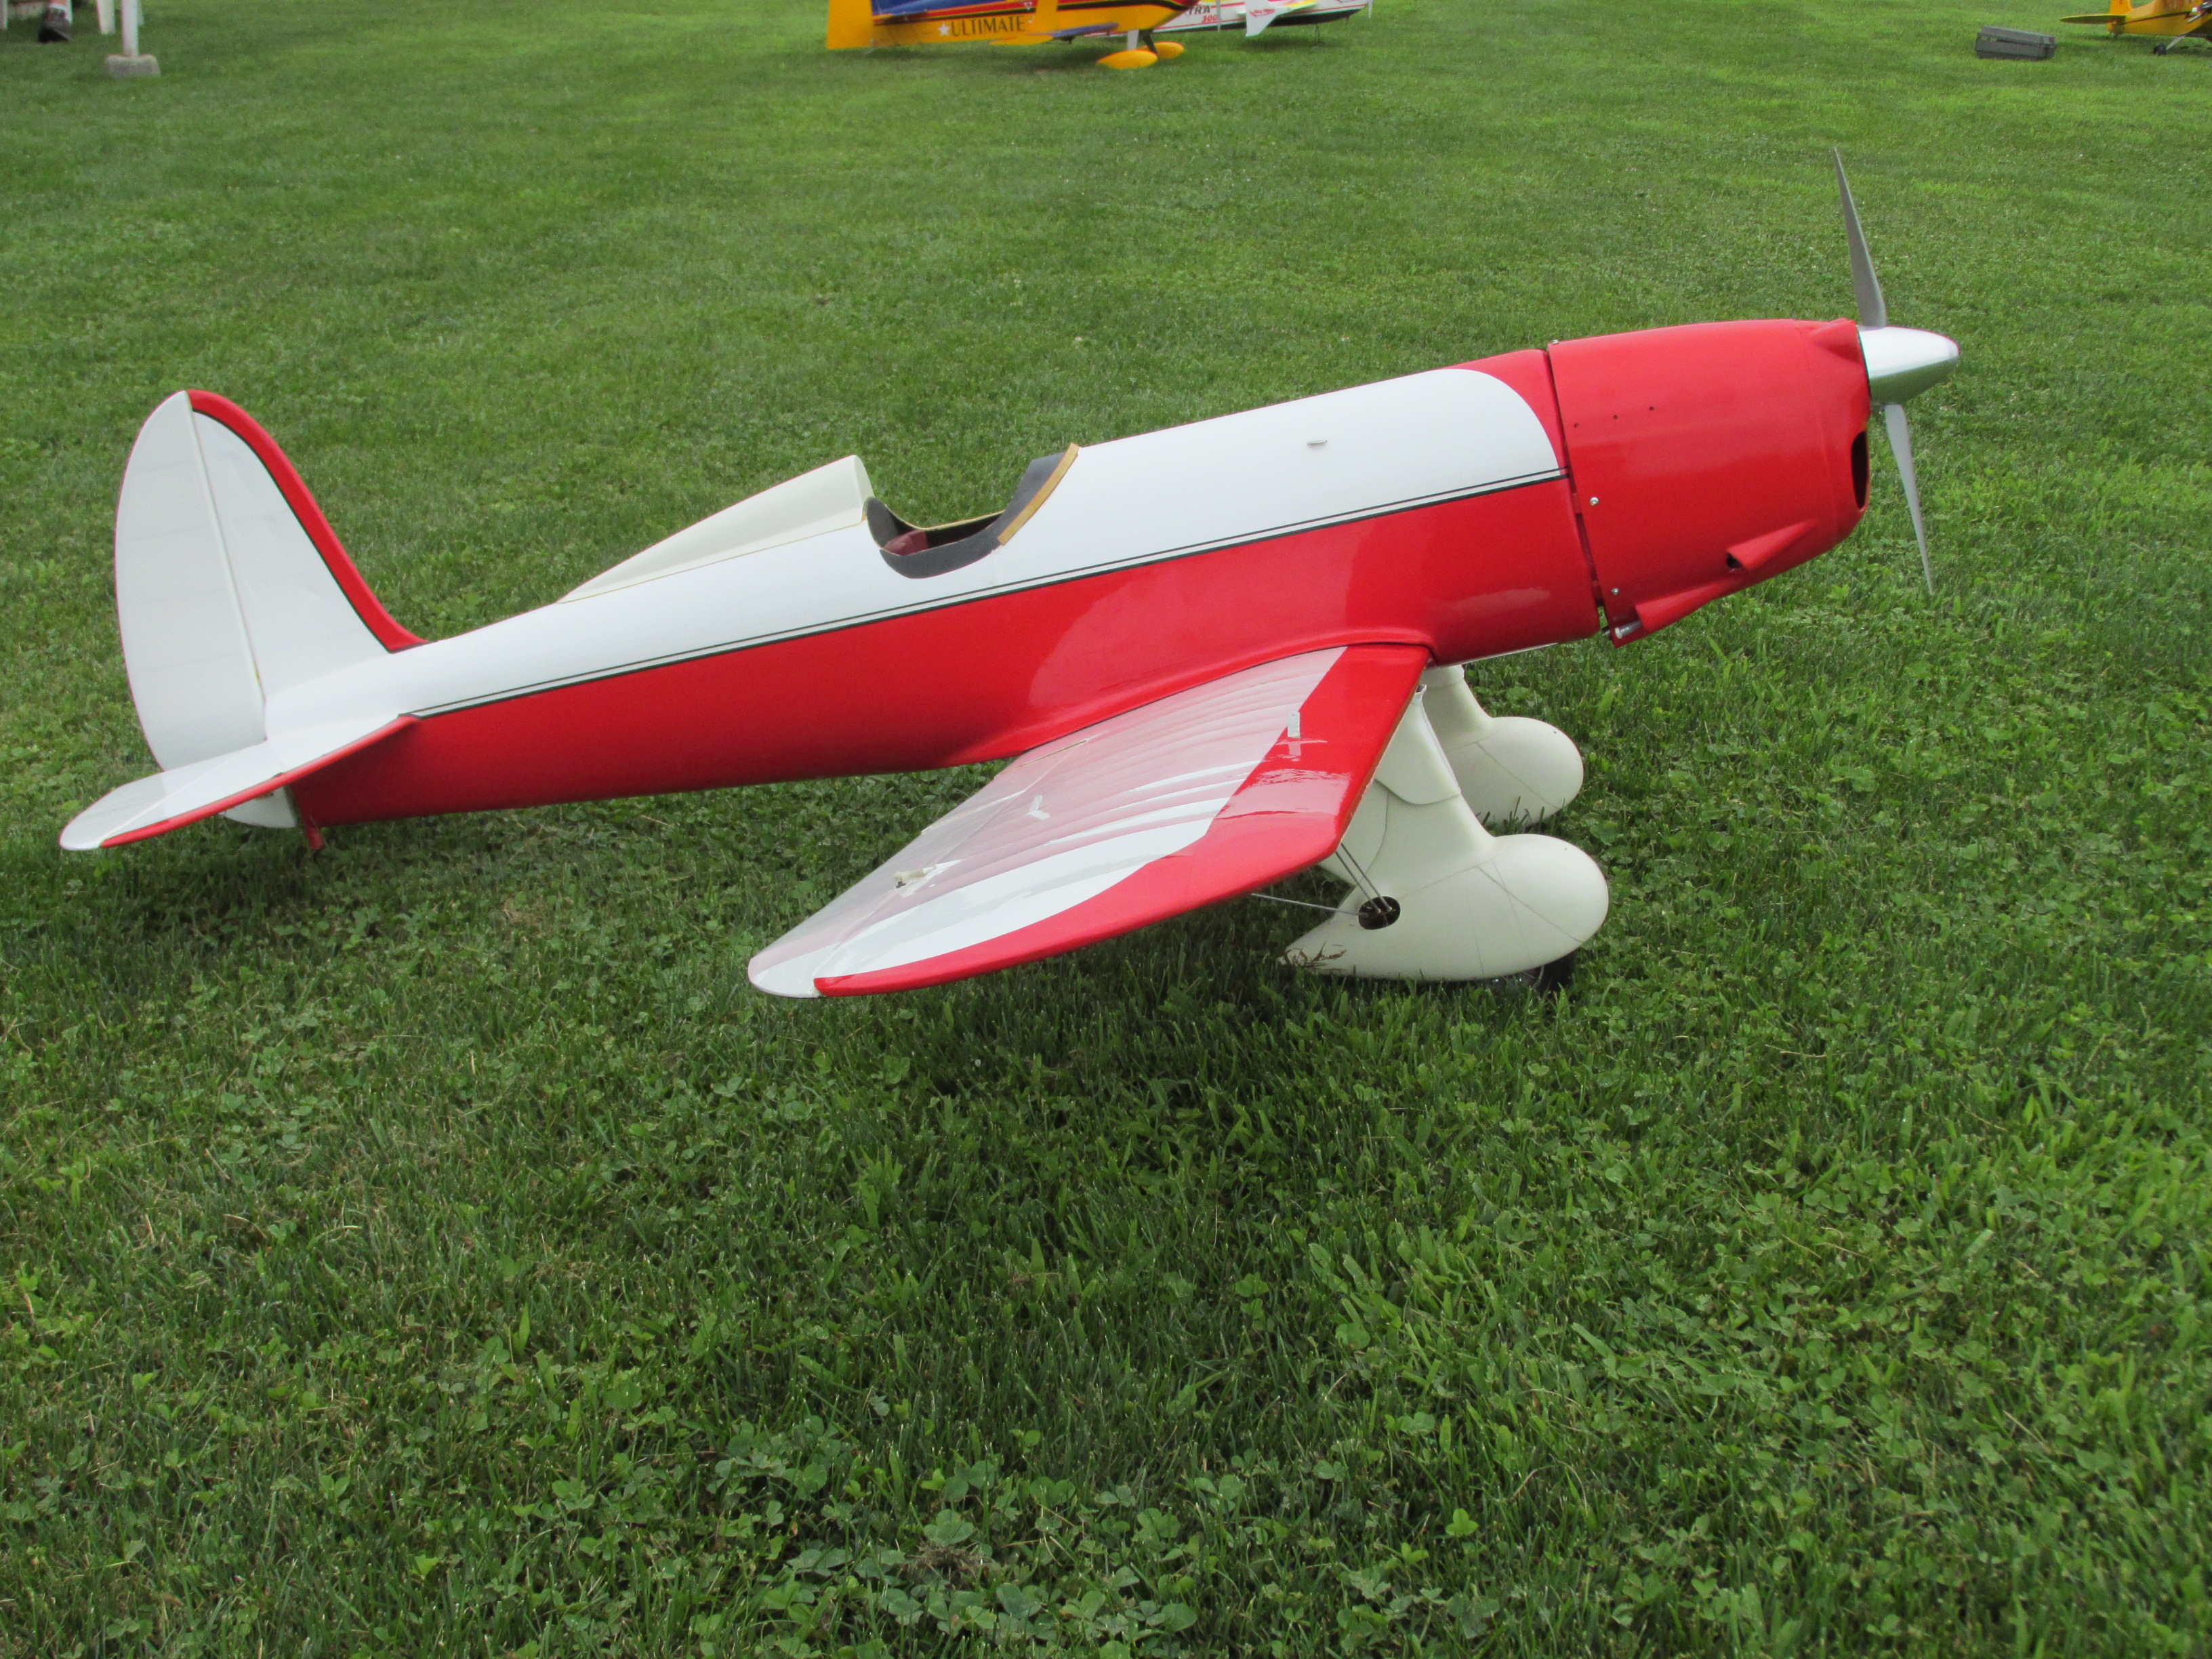
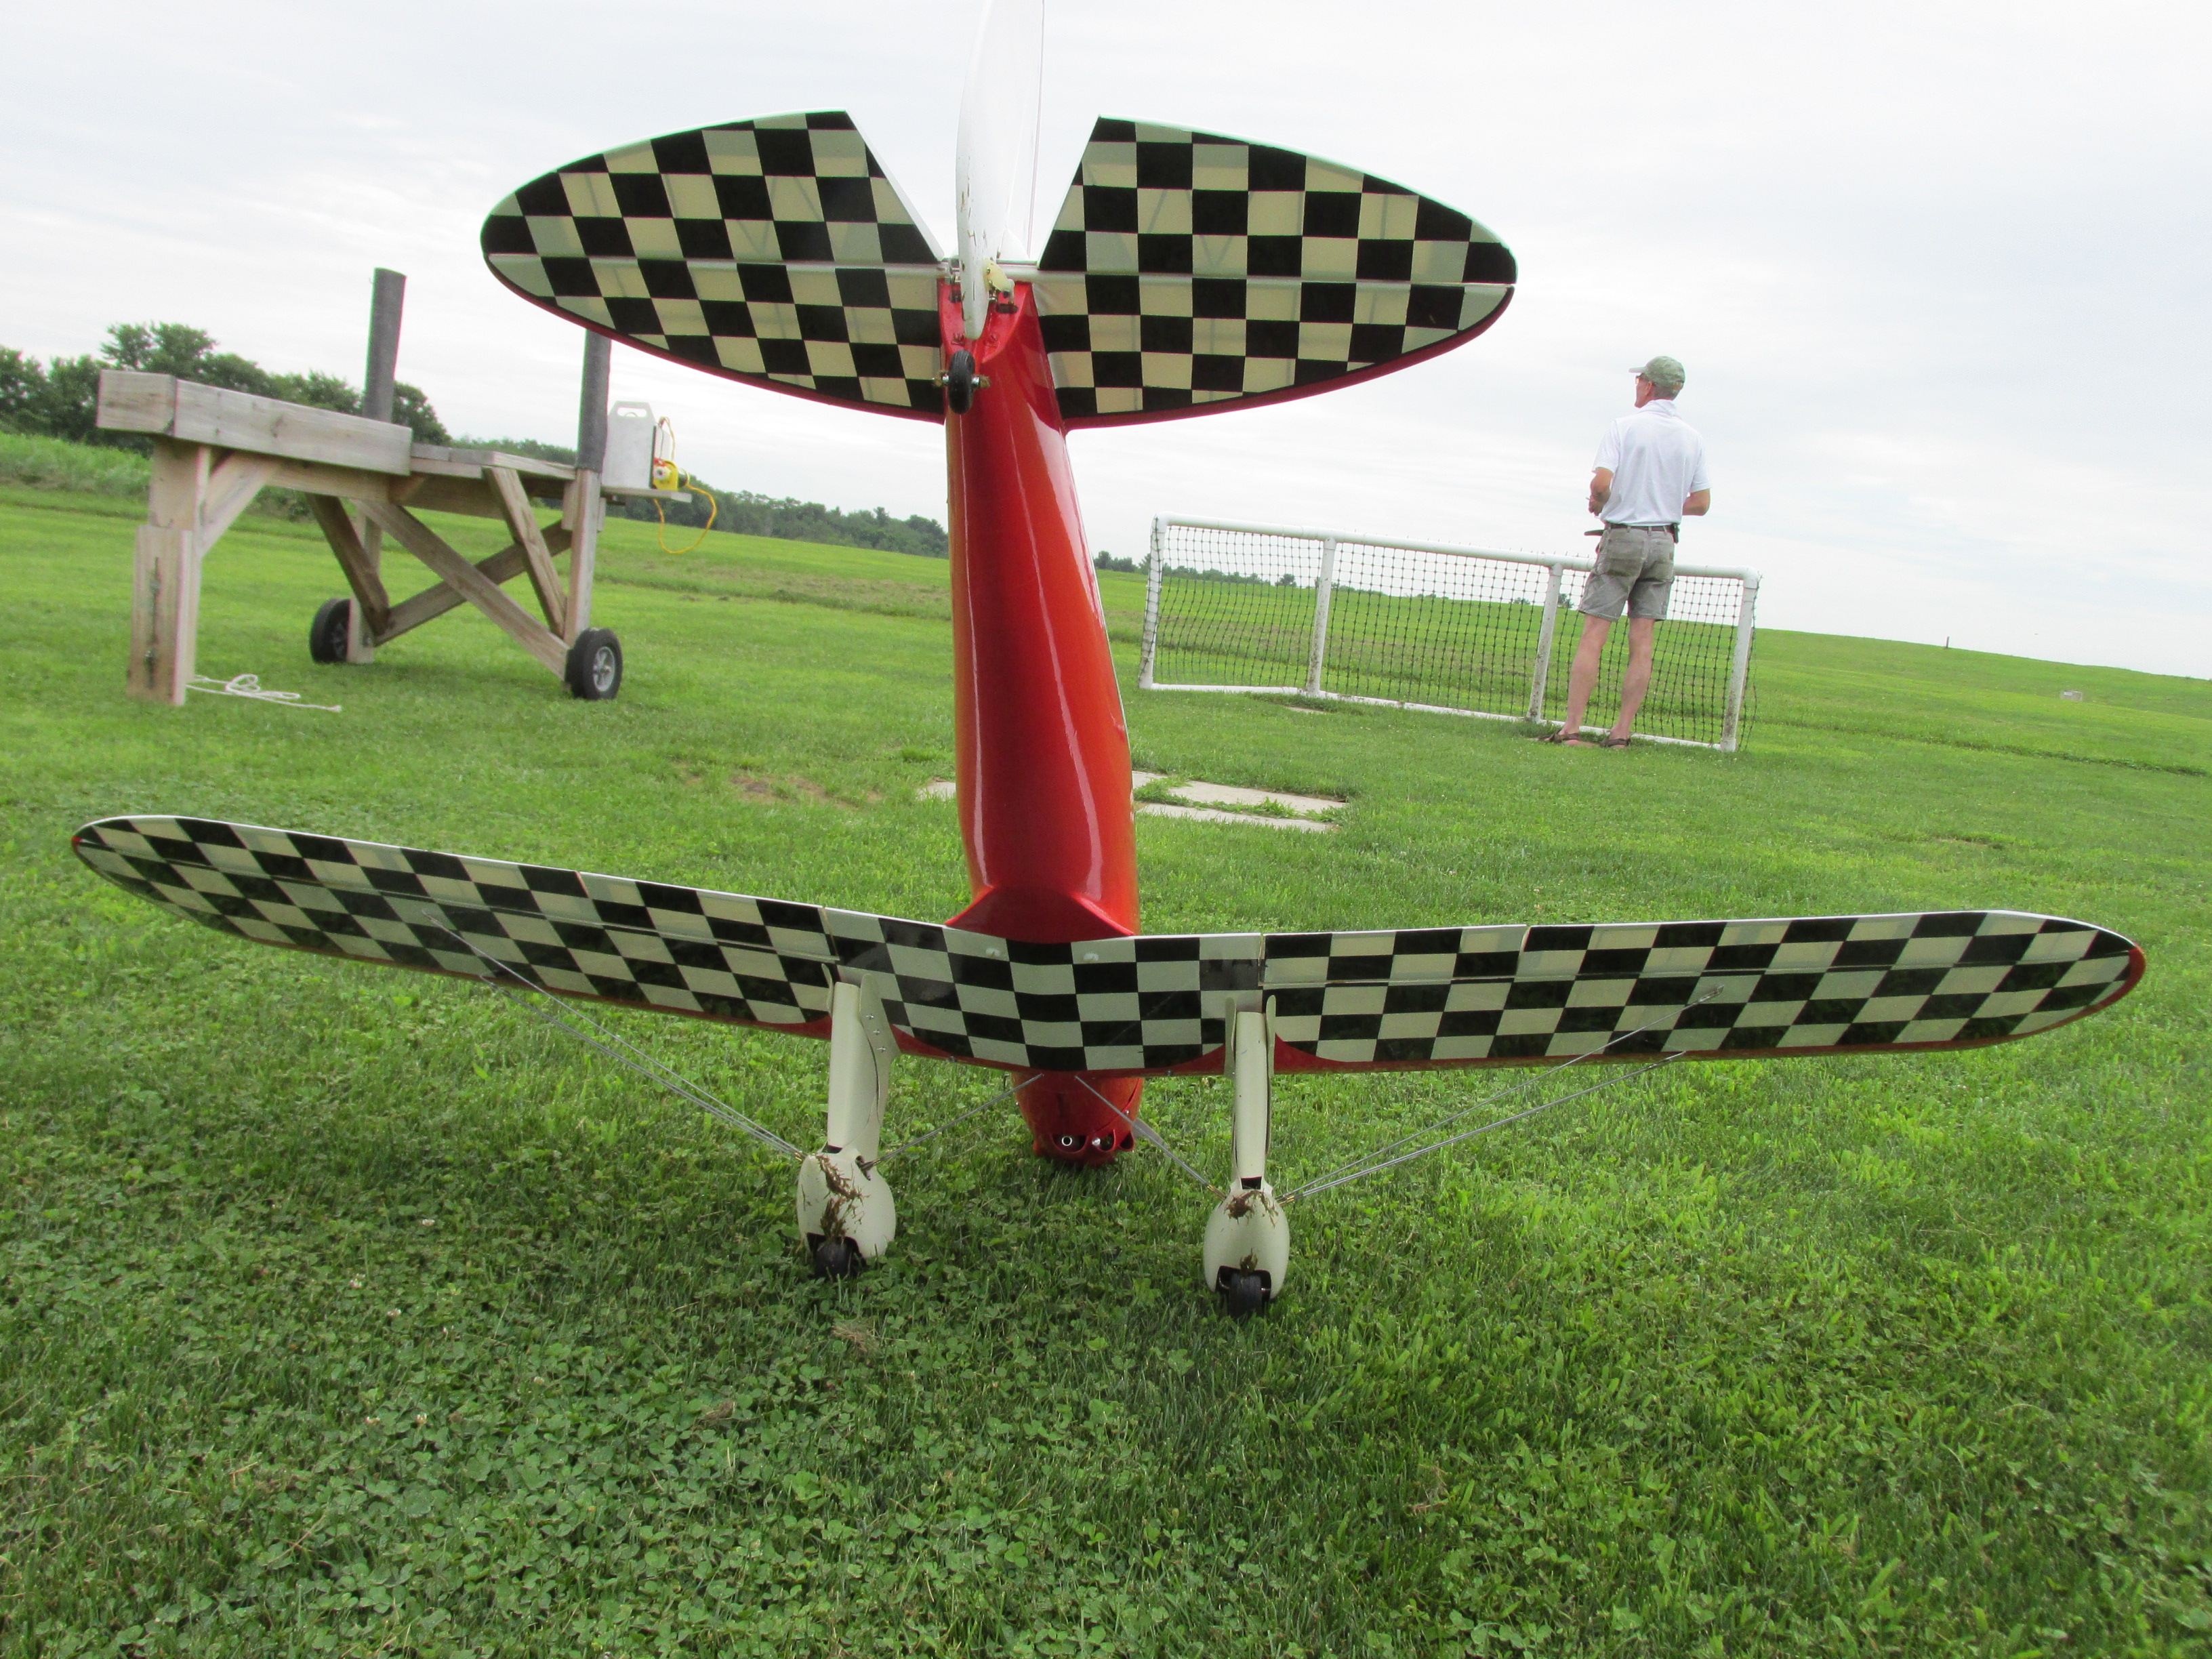
Thanks, it's still pretty rough in places...but looks good from a distance. I plan to add the upper wing braces after I know it flies well. As far as the color scheme, the builder did all the covering including the checkerboard and added the red diamond at the top of the fuselage just behind the firewall. it was easier to paint the whole cowl red than try to remove the covering and mask the cowl off for red and white.
Jaybird
Jaybird
07-24-2014, 11:48 AM
#1935
I'm still broke but there is a SIG STA kit posted to the site today for $200 + $30 shipping.
http://www.rcuniverse.com/market/item.cfm?itemId=989411
http://www.rcuniverse.com/market/item.cfm?itemId=989411
07-26-2014, 06:54 PM
#1936
Senior Member
Join Date: Jul 2002
Location: Brunswick, ME
Posts: 1,192
Likes: 0
Received 0 Likes
on
0 Posts
I finally got it in the air today but it took some work. One issue was the fuel line from the tank was split at the end of the brass exit tube. A fair amount of fuel had spilled inside the tank compartment. Luckily the foam padding absorbed most of it. I removed the tank and fixed the tube, replaced the fuel line and cut new foam spacers to hold it in place. I also replaced the high speed needle valve assembly as the old one was loose and the knurl was worn. I also had to replace the glow plug even though the one in it was new when I started running it last week. It will start and idle well and produce good power now. The take off was a non-event...nice ground roll, the tail came up, a little back pressure and up it went. It needed a fair amount of nose down trim to keep level flight into the wind and just a little aileron trim. Rolls and loops nicely and motors along at a good clip at just half throttle. I tried the flaps at altitude and couldn't really see how it reacted to help or not. Slowed it up at altitude and full up elevator produced a nice "falling leaf". Added power and flew out of it nicely. A couple laps around the landing pattern and it was time to come in under the telephone lines off the north end of the runway. It stayed nice and steady and touched down with a short roll out. Whew! I need to find a way to get more cooling air OUT of the cowling and I think it will be all set. No in flight pics but there were witnesses.
Jaybird
Jaybird
Last edited by Jaybird; 07-26-2014 at 06:56 PM.
07-27-2014, 02:42 AM
#1937
Thread Starter
Congratulations Jaybird! That's why fuel proofing the inside tank area is so important, once the balsa gets soaked you've ruined your model...I bet it looked great in the air. 
07-28-2014, 08:28 AM
#1939
Senior Member
Join Date: Jul 2002
Location: Brunswick, ME
Posts: 1,192
Likes: 0
Received 0 Likes
on
0 Posts
Thanks. Now that I know it flies, It will be fun to finish cleaning it up and add some more details to it. It's a very handsome plane in the air and fast too.
Jaybird
Jaybird
07-29-2014, 06:33 AM
#1941
Here is another shot from a PT-22 along with a link to a pilot's manual (scroll to bottom of the page). https://sites.google.com/site/ranger...r-5n721rfromst

07-29-2014, 05:46 PM
#1942
07-29-2014, 05:47 PM
#1943
Senior Member
Join Date: Jul 2002
Location: Brunswick, ME
Posts: 1,192
Likes: 0
Received 0 Likes
on
0 Posts
Third flight not so good. Came in dead stick and hit hard on the mains and broke the rear brace support blocks out of the wing. I was afraid it would happen at some point as it looked a little weak. Not sure when I'll get to the repairs and recovering. I saw that Vincent added blocks and supports into his wing as he built it. What have other people done to brace the landing gear from flexing fore and aft?
Darn.
Jaybird
Darn.
Jaybird
Last edited by Jaybird; 07-30-2014 at 07:13 AM.
07-30-2014, 05:42 AM
#1944
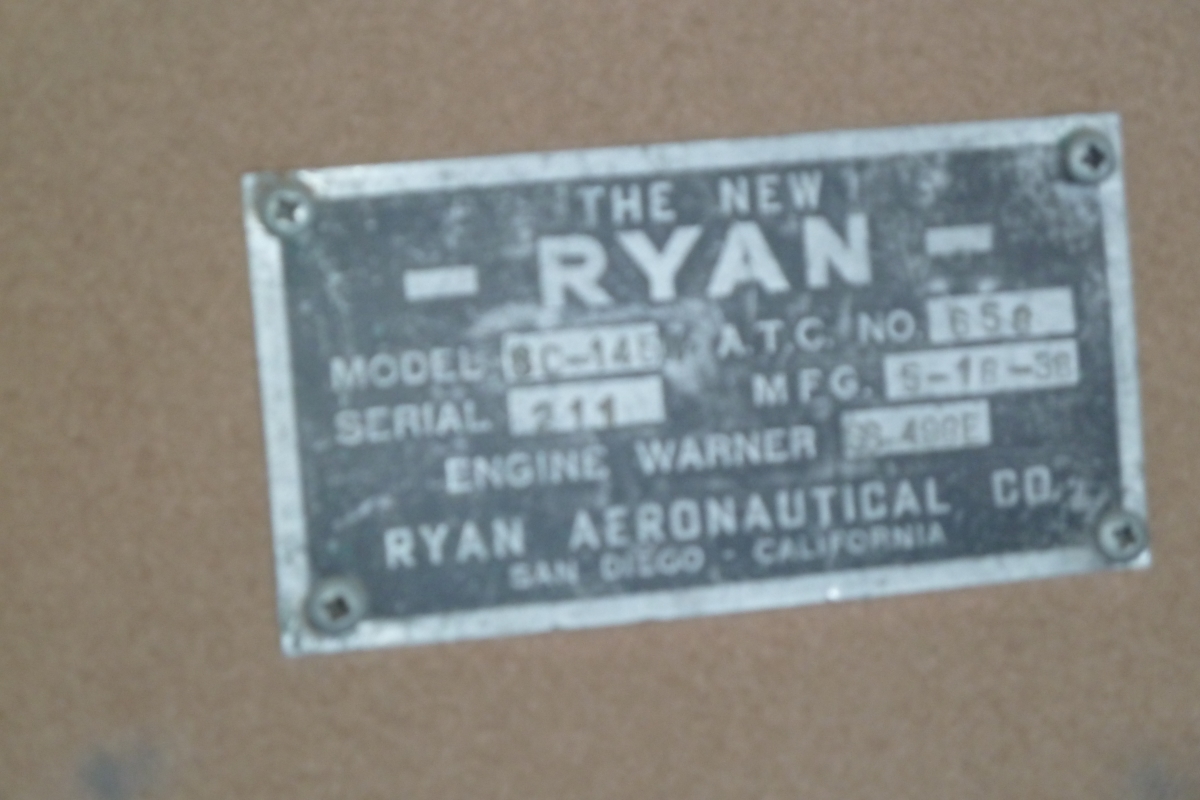
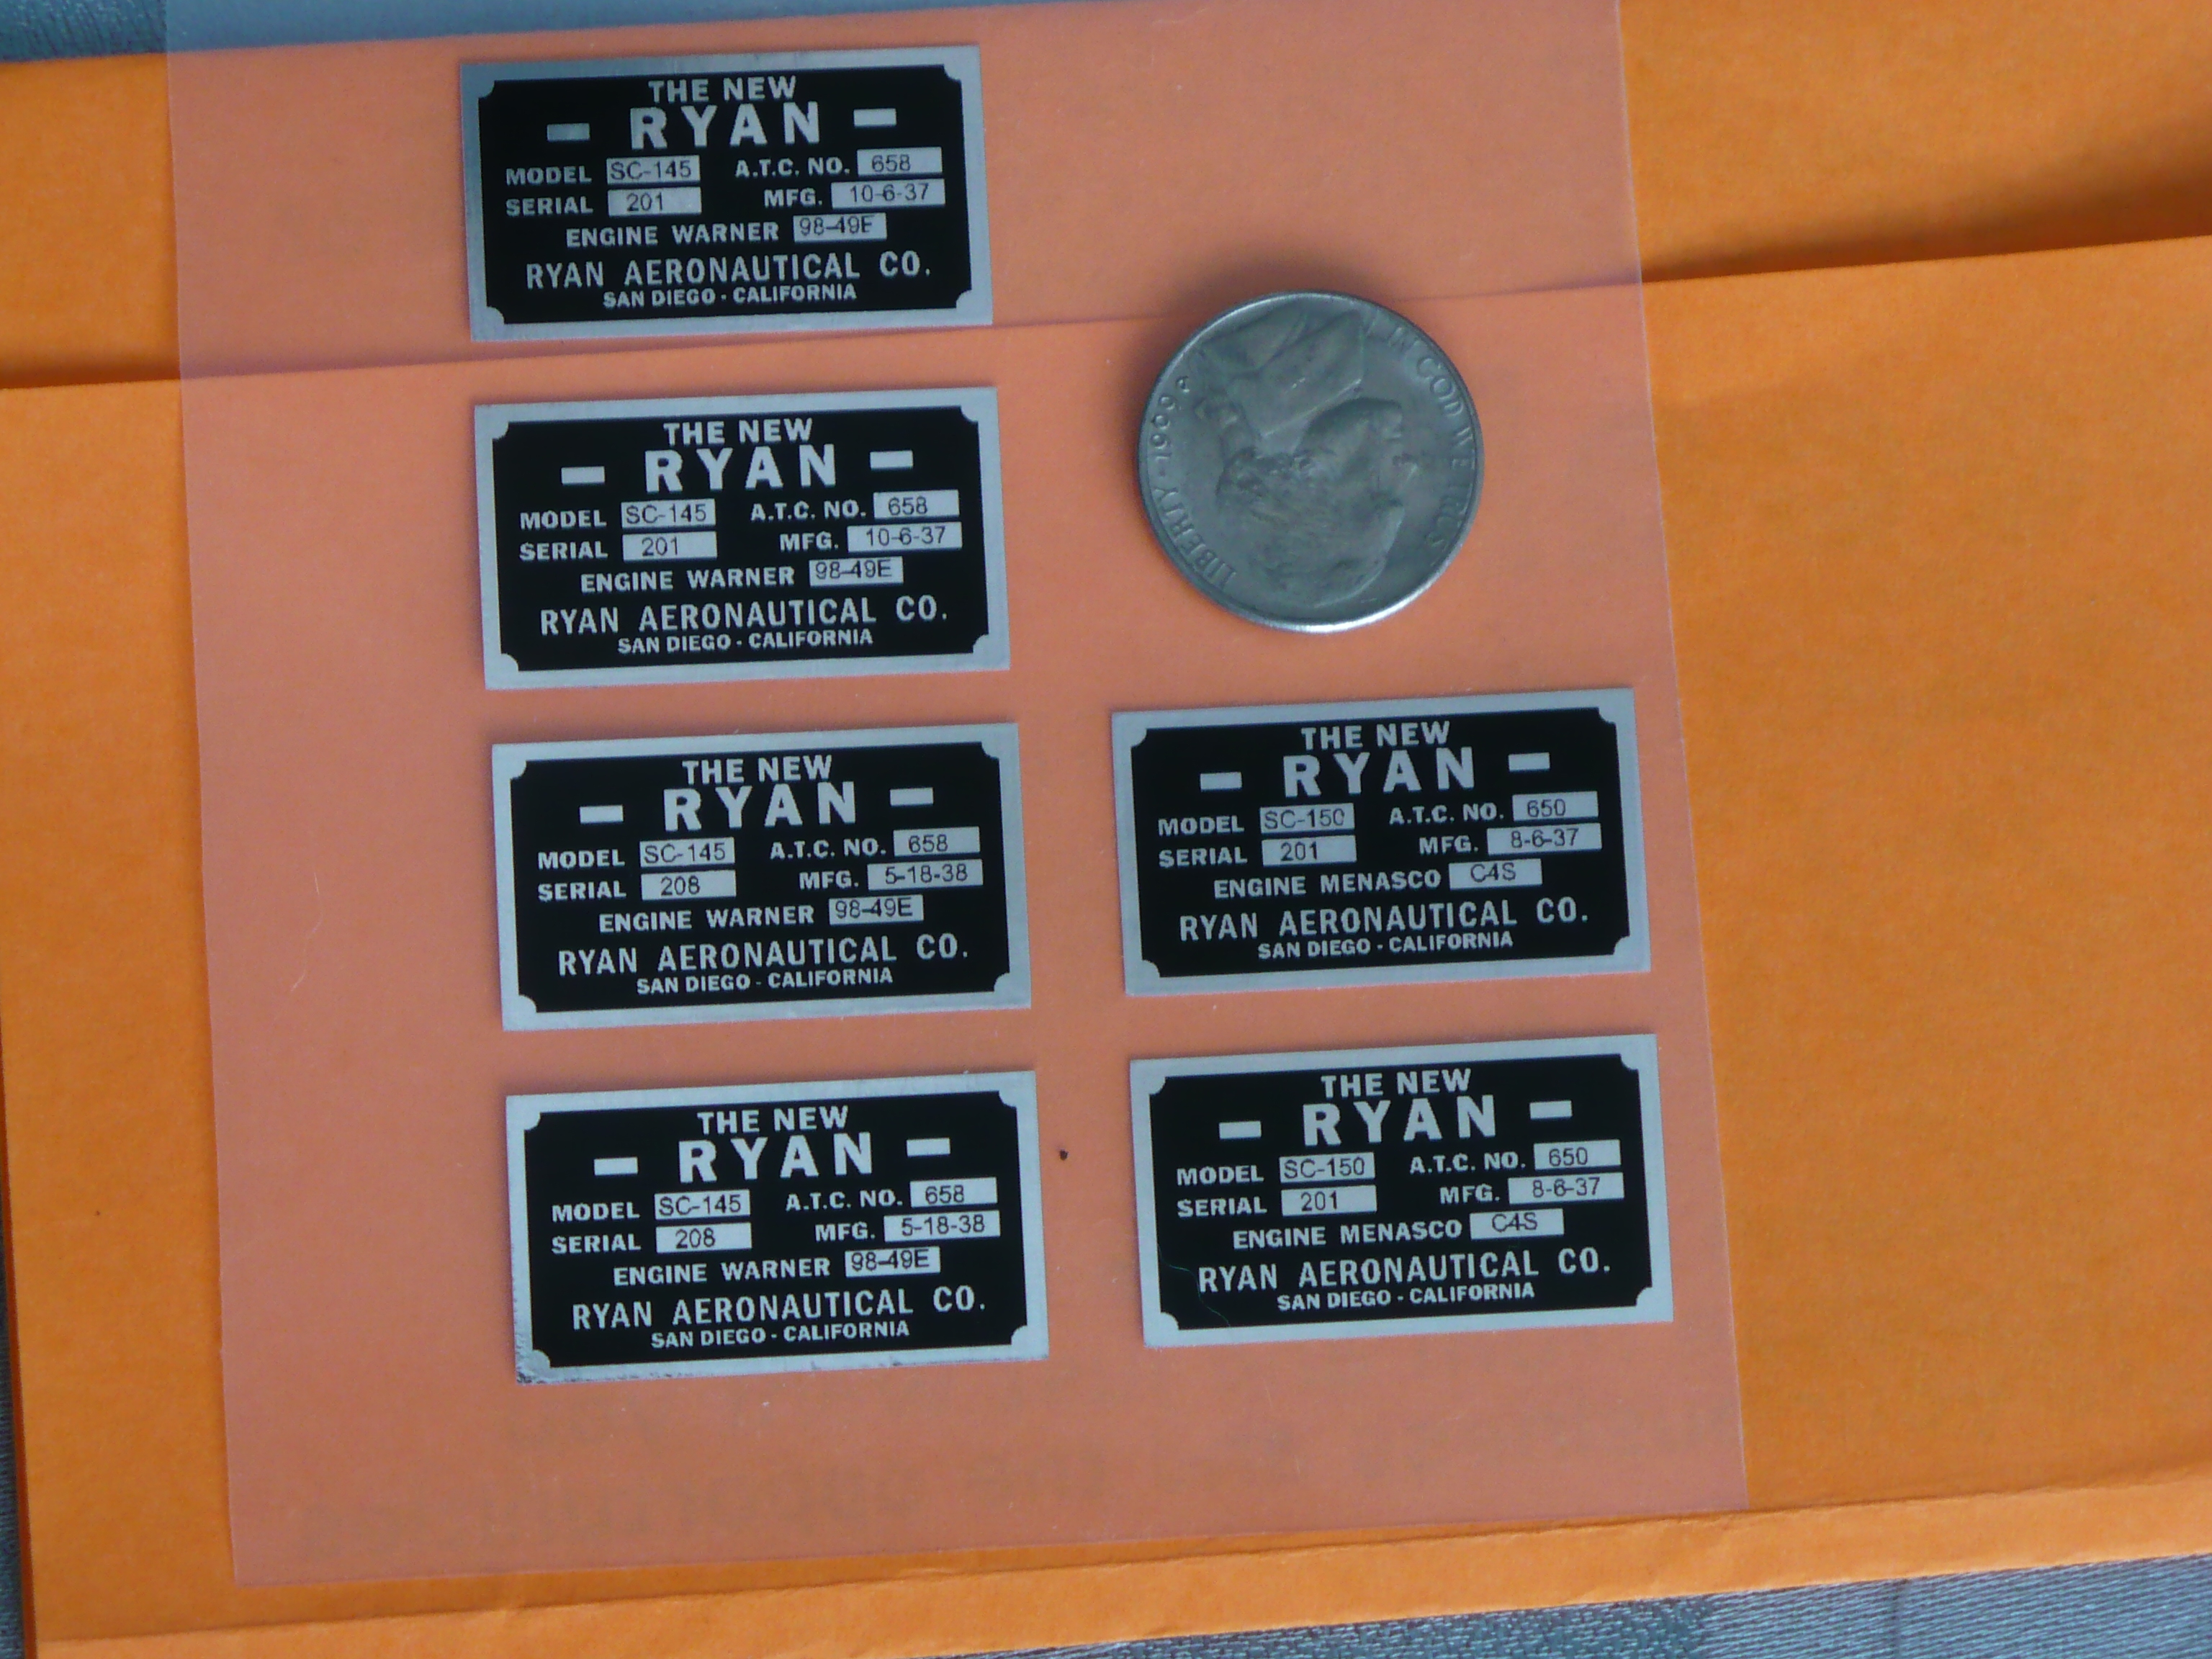
Good eye Tom! Yes, Gary over at Decal-It did make them he also made a set of decals for a Civil Air Patrol livery for my Cessna 182. I am also planning to order some N number sets for the Ryan SC-W & SC-M project. I like his work! The decals are 1/5th scale and I laid the dime in the middle to give a sense of scale. The Ryan S/N plates were made with three different engines listed.
07-31-2014, 12:02 AM
#1945
Good eye Tom! Yes, Gary over at Decal-It did make them he also made a set of decals for a Civil Air Patrol livery for my Cessna 182. I am also planning to order some N number sets for the Ryan SC-W & SC-M project. I like his work! The decals are 1/5th scale and I laid the dime in the middle to give a sense of scale. The Ryan S/N plates were made with three different engines listed.
The four registration placards, in the bottom left of the pics, are the give away. Nobody does as well as Gary, on that stuff.
07-31-2014, 06:41 AM
#1947


Join Date: Sep 2006
Location: The Sunshine state, when it's not raining!
Posts: 8,131
Likes: 0
Received 2 Likes
on
2 Posts
Gary does superb graphic design work but I really wish his finish step was through the vinyl cutter. I don't like the plastic excess with the lettering, which is hideable with a clear coat but that is another step that most often is not required elsewise.
08-01-2014, 02:34 AM
#1948
It depends on what you order, or the process that he chooses. If you want something a certain way, discuss it with him, and see what he can come up with.
10-09-2014, 12:11 PM
#1950
I found out the serial number plate I was using was later than when my aircraft was built. With the aid of a friend I was able to run down the one Ryan SC-W with the original 1938 plate and get a picture of it. The airplane in question is in Australia and being lovingly flown and cared for! Here is the original plate picture i sent to Gary and my decals in 1/5th scale. You can get the decals from Gary @Decal-it.
Mike
Mike