


Top Flite GS P-47 sports scale; diary of a build

 03-15-2014, 08:55 AM
#1177


Originally Posted by [email protected]
That's good thinking. 18 would be nice though.
TB
Last edited by TonyBuilder; 03-15-2014 at 08:57 AM.
03-15-2014, 09:18 AM
#1178
I have been working on fitting the cockpit and canopy. The cockpit is pretty strait forward but some adjustments are needed to get it all nice and peachy.
I glued in a back plate to finish off the cockpit opening. This will get glassed with the fuselage, primed and painted.

The cockpit box is fitted and held in with two screws at the armor plate and 4 screws inside the fuselage.


I need to do a bit of repair on the cockpit components and wont do that until final install, but otherwise it is good.

Lt. Walker took a seat to see how things are coming along, he likes it")
You can see that Lt. Walker had a run in with Hannibal Lecter, he lost both his ears on that encounter!

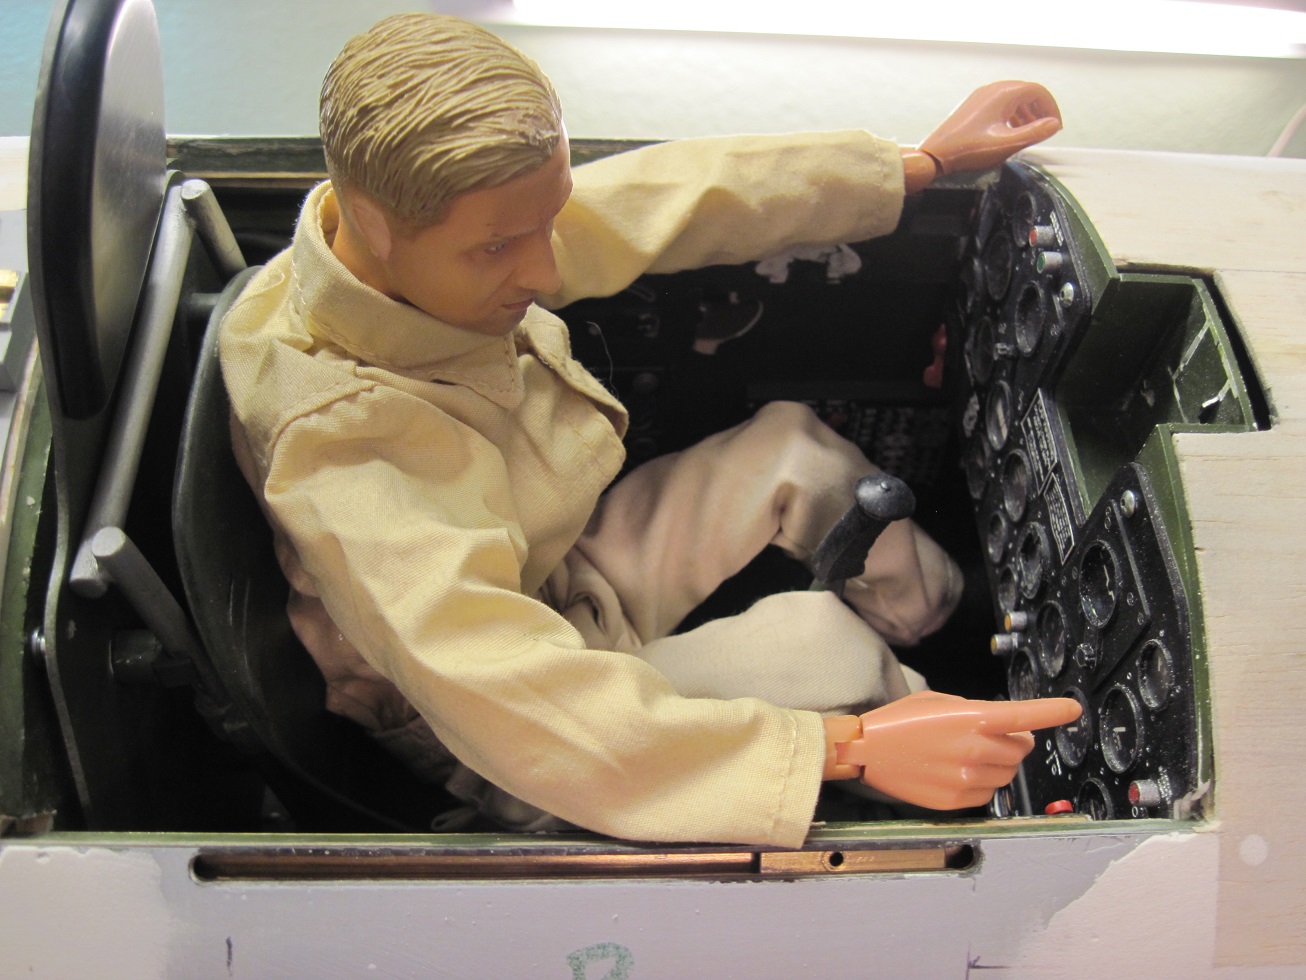
The instrument panel is fitted and I will attach it in a different way then with the prototype.
I cut the cavity for the gun sight and on the prototype I attached the panel threw the gun sight to a balsa block inside. This time I am using two button head screws directly threw the panel into the former.
Vibration reeked havoc on the gun sight and the cockpit so I need to do a better job this time.

Next I fitted the canopy, a bit of adjusting was required to get it just right.


On the prototype the canopy did not fit as snug as I would have liked so I redid the install to get it to fit tight.
I had to make a new bracket for the sled and the canopy. I used aluminum this time, the braes was flexing a lot. I also had to drill two new holes in the canopy for the rails.
It all fits much better now.


The screen is fitting nicely, this will bolt down to the glassed and primed fuselage, then I will glue it in. I am toying with having it just bolted so I could remove it if I need to for maintenance.


I am getting the plate ready, this will be glued to the balsa and finish out the screen floor.

TB
I glued in a back plate to finish off the cockpit opening. This will get glassed with the fuselage, primed and painted.
The cockpit box is fitted and held in with two screws at the armor plate and 4 screws inside the fuselage.
I need to do a bit of repair on the cockpit components and wont do that until final install, but otherwise it is good.
Lt. Walker took a seat to see how things are coming along, he likes it
You can see that Lt. Walker had a run in with Hannibal Lecter, he lost both his ears on that encounter!
The instrument panel is fitted and I will attach it in a different way then with the prototype.
I cut the cavity for the gun sight and on the prototype I attached the panel threw the gun sight to a balsa block inside. This time I am using two button head screws directly threw the panel into the former.
Vibration reeked havoc on the gun sight and the cockpit so I need to do a better job this time.
Next I fitted the canopy, a bit of adjusting was required to get it just right.
On the prototype the canopy did not fit as snug as I would have liked so I redid the install to get it to fit tight.
I had to make a new bracket for the sled and the canopy. I used aluminum this time, the braes was flexing a lot. I also had to drill two new holes in the canopy for the rails.
It all fits much better now.
The screen is fitting nicely, this will bolt down to the glassed and primed fuselage, then I will glue it in. I am toying with having it just bolted so I could remove it if I need to for maintenance.
I am getting the plate ready, this will be glued to the balsa and finish out the screen floor.
TB
Last edited by TonyBuilder; 03-15-2014 at 09:52 AM.
03-15-2014, 11:53 AM
#1179
The wind screen is installed and I think I will not glue it in. It will be much easier to paint the fuselage without the screen attached. Plus I like the idea of being able to remove it, never know might hit a giant bug and damage the screen!
I am using 6 #72 stainless steel screws that are counter sunk and will flush out when finished.
Having the carbon shell and G-10 under makes for a very solid installation.


The inside shell for the screen is cut and primed. I wont install this until I glass the fuselage. Then I will glue it in place and paint it black.

Maybe I will work on the bottom detailing aft of the wing next!
TB
I am using 6 #72 stainless steel screws that are counter sunk and will flush out when finished.
Having the carbon shell and G-10 under makes for a very solid installation.
The inside shell for the screen is cut and primed. I wont install this until I glass the fuselage. Then I will glue it in place and paint it black.
Maybe I will work on the bottom detailing aft of the wing next!
TB
03-15-2014, 12:23 PM
#1180
Wind screen insert is installed, but not glued in yet. Wanted to make sure the canopy closed right and tight.


http://youtu.be/3UfoQXtxHRw Here is a short video of the working canopy, just some fine tuning needed.
TB
http://youtu.be/3UfoQXtxHRw Here is a short video of the working canopy, just some fine tuning needed.
TB
Last edited by TonyBuilder; 03-15-2014 at 12:47 PM.
03-16-2014, 05:55 AM
#1183
I took a break from construction and did some detailing on the canopy screen.
I have been playing around with different rivets and screws.


I will clean and prep the screen for painting. I am going to use liquid masking film. I will do a test on one of the other canopies I have.


I sanded the bottom of the screen to get it nice and tight to the fuselage. This looks much better then the prototype, it was really thick!


I will work on the canopy next.
TB
I have been playing around with different rivets and screws.
I will clean and prep the screen for painting. I am going to use liquid masking film. I will do a test on one of the other canopies I have.
I sanded the bottom of the screen to get it nice and tight to the fuselage. This looks much better then the prototype, it was really thick!
I will work on the canopy next.
TB
 03-17-2014, 04:39 AM
#1185
I am working on getting some stuff ready to paint. So I am doing a little more detailing. I want to paint the canopy, inner cooler doors and some hatches on this run.


I have about 4 different sizes and spacing on rivets so I get to get as close as I can to my references.


The plan is to get as much done in the detailing so all Gary has to do is paint the fuselage and the wing in the base silver color. I will do all the detailing and sub colors.
TB
I have about 4 different sizes and spacing on rivets so I get to get as close as I can to my references.
The plan is to get as much done in the detailing so all Gary has to do is paint the fuselage and the wing in the base silver color. I will do all the detailing and sub colors.
TB
 03-17-2014, 04:55 AM
#1188
Originally Posted by [email protected]
Looks great tony. How did you do the rivets and screws? Are they vinyl?
Yes, Chad is making my rivets and fasteners.
TB
03-17-2014, 05:06 AM
#1191


Join Date: Jun 2012
Location: Bristol, CT
Posts: 4,002
Likes: 0
Received 0 Likes
on
0 Posts
03-17-2014, 05:40 AM
#1192
Originally Posted by [email protected]
Nice, so that's the quality I'll get when I order mine from him. Looks real good.
I have both Chads rivets and Mierc rivets, Chads are easier and more reliable to apply. Plus you can get the size and spacing you want, with Mierc it is hit and miss.
TB
03-17-2014, 08:14 AM
#1194
I did some painting today to see how this stuff is going to work.
I am using Klass Kote epoxy paint. I mixed up a 1/2 oz and thinned it down with 1-1/2 thinner.
I wanted it thin and have heard of others mixing two and three to one for detail masking work.
I used my airbrush to paint this.
So I have zero experience painting models so this is my learning ground.
I did not de tack the inner cooler doors and they had a lot of fuzz on them so I stopped painting them. I removed the rivets and sanded it so I will redo that later.


The base did not have any fuzz so I painted them, they came out good. I like the weathered mate finish, I don't like fresh shinny finishes.


The canopy screen looks ok, there are a few fuzzy spots but I can fix that.


The finish is a little dull and I will do some more tests. Any of this can be re-done. I may hit the canopy again and I may try thin it less. I put the paint on pretty thin but I did a bunch of coats.
TB
I am using Klass Kote epoxy paint. I mixed up a 1/2 oz and thinned it down with 1-1/2 thinner.
I wanted it thin and have heard of others mixing two and three to one for detail masking work.
I used my airbrush to paint this.
So I have zero experience painting models so this is my learning ground.
I did not de tack the inner cooler doors and they had a lot of fuzz on them so I stopped painting them. I removed the rivets and sanded it so I will redo that later.
The base did not have any fuzz so I painted them, they came out good. I like the weathered mate finish, I don't like fresh shinny finishes.
The canopy screen looks ok, there are a few fuzzy spots but I can fix that.
The finish is a little dull and I will do some more tests. Any of this can be re-done. I may hit the canopy again and I may try thin it less. I put the paint on pretty thin but I did a bunch of coats.
TB
Last edited by TonyBuilder; 03-17-2014 at 08:38 AM.
03-17-2014, 10:38 AM
#1198
The verdict is still out. I don't know if this aluminum paint is going to do the trick. It is dull and looks kind of gray like the primer. I might try some of the aluminum rattle can paint at the auto store.
The liquid mask worked good


I like the look of this and if this is what this paint will look like then maybe it will be ok.

TB
The liquid mask worked good
I like the look of this and if this is what this paint will look like then maybe it will be ok.
TB
Last edited by TonyBuilder; 03-17-2014 at 10:42 AM.
03-17-2014, 11:37 AM
#1200
Steve, I haven't tried anything but the Klass Kote. I will be looking at a few paints before I go any further.


I'm not sure if my paint is any good still, been siting around for almost a year now, The B side was a big hard clump with some liquid at the top. It took me a long time with a drill and a paint mixer to get it mixed and I don't think I got it all.
The paint was sticky to the touch. Even after a few hours. All the lacquer paints I have used dry really fast. I was able to scrape it off with my nail. So I am going to start over on the canopy. I will sand it really good, I will mask it again and then prime it. Once it is all sanded and ready for rivets I will clean the glass. I need to polish the glass and get all the blemishes out. Then I will detail it and paint it. But first I want to test some other paints. Dupli- color paint has a good rattle can aluminum paint I will try on some test stuff.
TB
Last edited by TonyBuilder; 03-17-2014 at 11:46 AM.