


Top Flite GS P-47 sports scale; diary of a build
 04-06-2014, 01:51 PM
#1276


Some of the modifications from the prototype will be the way I do the guns. I have some new ideas to try, they will be removable. The landing light and navigation light will be a bit different. Servo hatches may be held with mags or I might do counter sunk screws.
TB
TB
Last edited by TonyBuilder; 04-06-2014 at 06:14 PM.
 04-06-2014, 02:43 PM
#1278
TB
Last edited by TonyBuilder; 04-06-2014 at 05:04 PM.
04-06-2014, 03:31 PM
#1280
Originally Posted by [email protected]
What's on the walls? Plastic? Where'd ya get it?
Yes it is plastic and styrein, Chad Veich made the formed plastic walls.
TB
04-07-2014, 03:19 AM
#1281
Well back to work and no Angie for a whole week  I need to get the aileron and flap done, from there it is all down hill. Once I get the wing joined I can start glassing, priming and detailing. I do get to think a lot about what I want to do next as far as modifications so the time away is good in that way, but I am ready to power this bird out and get to the finishing. My pitot tube should be here next week so that will be good. I cant skin the bottom until I install that. I will do magnets for the servo hatches again. On the prototype they had really small magnets and held for the most, but I will go with 1/4" this time so I don't see them coming off. I may even come up with a clever way of popping them without a tool. They are only for setup and maintenance so not an every flight thing.
Anyways I will be back at it next weekend, aileron and flap")
TB
I need to get the aileron and flap done, from there it is all down hill. Once I get the wing joined I can start glassing, priming and detailing. I do get to think a lot about what I want to do next as far as modifications so the time away is good in that way, but I am ready to power this bird out and get to the finishing. My pitot tube should be here next week so that will be good. I cant skin the bottom until I install that. I will do magnets for the servo hatches again. On the prototype they had really small magnets and held for the most, but I will go with 1/4" this time so I don't see them coming off. I may even come up with a clever way of popping them without a tool. They are only for setup and maintenance so not an every flight thing. Anyways I will be back at it next weekend, aileron and flap
TB
04-07-2014, 06:12 AM
#1282
So my gear is not designed for this kit and with the custom install the gear is at a downward angle. This changes the degree on the struts so I called Darrell and he said he has 90 and maybe 95 degree blocks, these are 88 degree so once I get the wing joined I can tell what I need. This is great news because I do not want my gear slanted in when she is on her legs, rather have a slight out then in. BTW, Darrell is great when it comes to modifying and helping his customers out.


TB
TB
04-13-2014, 03:40 AM
#1284
Aileron and flap, left wing.
Well I got the blocks in and sheeted the bottom of the aileron and flap.
One thing I wish I did was build both wings at the same time. It doesn't really mater if you are building to specs, but with a custom build it is hard to do a month or two later.
I did the hinge blocks a little different then on the right wing. I am not to concerned with having equal weight on the wings. I balance at setup threw the nav light housings.


I am working on the LE of the aileron and flap and once that is shaped I will install the hinges.


TB
Well I got the blocks in and sheeted the bottom of the aileron and flap.
One thing I wish I did was build both wings at the same time. It doesn't really mater if you are building to specs, but with a custom build it is hard to do a month or two later.
I did the hinge blocks a little different then on the right wing. I am not to concerned with having equal weight on the wings. I balance at setup threw the nav light housings.
I am working on the LE of the aileron and flap and once that is shaped I will install the hinges.
TB
04-13-2014, 08:05 AM
#1285
Both the aileron and flap are ready for hinges and glass.
I like to face the ends of my control surfaces with birch ply.
I first make a copy of the right wing aileron end and flap ends. Then I glue it in place before I start shaping. This gives me a real time guide to sand down to.


They are ready for glass so I think I will go ahead and glass them before I cut in the hinges. Will make it easier to sand without the hinges sticking out, so that's next.


Getting closer to having this wing done, really sucks not being able to work on it during the week.
TB
I like to face the ends of my control surfaces with birch ply.
I first make a copy of the right wing aileron end and flap ends. Then I glue it in place before I start shaping. This gives me a real time guide to sand down to.
They are ready for glass so I think I will go ahead and glass them before I cut in the hinges. Will make it easier to sand without the hinges sticking out, so that's next.
Getting closer to having this wing done, really sucks not being able to work on it during the week.
TB
04-14-2014, 04:01 AM
#1286
Got the bottom of the aileron and flap glassed. I am going back to the way I did the glassing on the prototype. So once I get the cloth on the tops and a rough sanding I will hit it again and then do final sanding.


I weighed the finished aileron and flap that has been glassed (one thin coat) and hinged. I am comparing them to the aileron and flap from the prototype.
The prototype flap weighed 5-1/4oz the new flap weighed 3-3/4oz and the unfinished no glass and no hinges weighed 3-1/4oz.
The aileron from the prototype weighed 3-3/8oz the new aileron weighed 2-3/8oz, the unfinished aileron weighed 3-1/4oz.
Just curious to how things come out with different methods.
TB
04-14-2014, 03:21 PM
#1287
Well with nothing to do but think about what's next I have a few ideas to try. I do need to start thinking about getting my engine broken in. So I might go ahead and mount it to my 100cc Sbach, flying season won't start for another month or so, so any fuel I can get threw the engine will be much needed.
I should be able to get the flap and aileron hinged next week then I can detail the wheel well, install the landing light and pitot tube, then sheet the bottom of the left wing.
All I need is a couple of weeks of none stop build time and I will have her ready for detailing.
TB
I should be able to get the flap and aileron hinged next week then I can detail the wheel well, install the landing light and pitot tube, then sheet the bottom of the left wing.
All I need is a couple of weeks of none stop build time and I will have her ready for detailing.
TB
Last edited by TonyBuilder; 04-15-2014 at 03:58 AM.


 04-18-2014, 10:52 AM
#1290
Back for the weekend. It is hard to get into build mode on complicated tasks like making and installing the hinges so I don't know If I will get to them this weekend. Being gone all week and not in a rhythm is hard. But I can do simple tasks like glassing the tops of the aileron and flap, done! I may detail the left wing wheel well to. I have a couple more weeks working out of town at the lake then hopefully a couple weeks off to get the rest of the building and glassing done.
TB
TB
04-18-2014, 11:41 AM
#1291


Join Date: Jun 2012
Location: Bristol, CT
Posts: 4,002
Likes: 0
Received 0 Likes
on
0 Posts
Flyzone beaver. I fly that in the summer months way more than my giants and such. It's just such a blast shooting splash and gos with it. Well worth the money.
04-18-2014, 12:19 PM
#1292
Originally Posted by [email protected]
Flyzone beaver. I fly that in the summer months way more than my giants and such. It's just such a blast shooting splash and gos with it. Well worth the money.
TB
04-19-2014, 11:58 AM
#1294
Today was a great flying day, best weather and sky in over a month so had to go fly!
I will be doing the third access hatch on the fuselage. I am doing all new electronics in this modified version of Angie. The prototype had a single receiver, one bat for receiver, one bat for ignition and one bat for the landing light. Now I will have two receivers, full telemetry, engine RPM, engine head temp, receiver bat voltage and external volt (for the second receiver bat), and air speed indicator. There will be two 2300 life bats for the receivers so two MPI HD switches and one 2300 life for the ignition.No switch for the ignition being it will be on an optical switch. No switch for the landing light either, it will be on an optical switch. The main hatch on the top left of the fuselage will now house the air fill, fuel fill and air gage. No need for the RPM reader.
The second hatch on the left side will house the charging jacks for the ignition and landing light. The new hatch on the right side will house the receiver switches. The hatch will operate the same as the left side, there is a hand hold right next to the hatch so this will work out great.

TB
I will be doing the third access hatch on the fuselage. I am doing all new electronics in this modified version of Angie. The prototype had a single receiver, one bat for receiver, one bat for ignition and one bat for the landing light. Now I will have two receivers, full telemetry, engine RPM, engine head temp, receiver bat voltage and external volt (for the second receiver bat), and air speed indicator. There will be two 2300 life bats for the receivers so two MPI HD switches and one 2300 life for the ignition.No switch for the ignition being it will be on an optical switch. No switch for the landing light either, it will be on an optical switch. The main hatch on the top left of the fuselage will now house the air fill, fuel fill and air gage. No need for the RPM reader.
The second hatch on the left side will house the charging jacks for the ignition and landing light. The new hatch on the right side will house the receiver switches. The hatch will operate the same as the left side, there is a hand hold right next to the hatch so this will work out great.
TB
Last edited by TonyBuilder; 04-19-2014 at 12:07 PM.
04-19-2014, 01:33 PM
#1295
My T-box and air speed indicator came today 
Now I can get the left wing done and sheet it.

It mounts to the radio and can be removed easily.


The pitot tube is just a copper tube so I think I can use an aluminum tube to make it linger and more scale.

Really cool!
TB
Now I can get the left wing done and sheet it.
It mounts to the radio and can be removed easily.
The pitot tube is just a copper tube so I think I can use an aluminum tube to make it linger and more scale.
Really cool!
TB
04-19-2014, 03:09 PM
#1297
The third hatch "Data Case, Level Lugs, Oxygen" is huge! on my drawing it is 4-1/8"x 3-1/2"
I use my drawings and blow them up to the correct size based on the overall size of my plane.

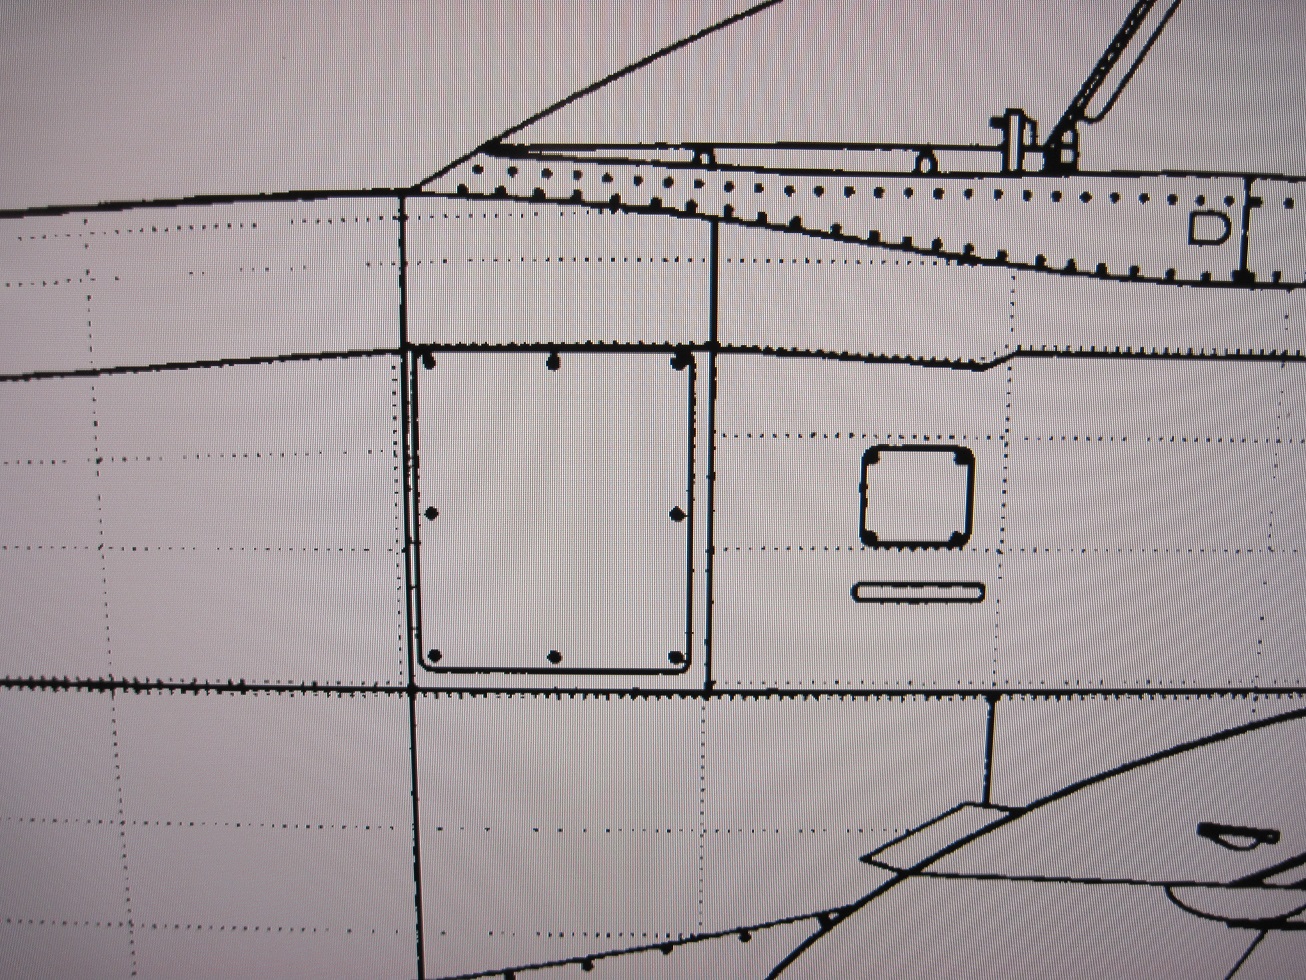
I used the laser to line up the panel lines to locate the hatch.


The carbon fiber I am laying up now is the sub skin for the hatch to close onto.
The hand hold is just in front of the hatch and there is a small access hatch above that. This is how I will get to the screw that holds the handle in place. I need to do two on the other side so I can remove the hand holds for finishing.


I will let theses cure then I need to layup the hatches next.
TB
I use my drawings and blow them up to the correct size based on the overall size of my plane.
I used the laser to line up the panel lines to locate the hatch.
The carbon fiber I am laying up now is the sub skin for the hatch to close onto.
The hand hold is just in front of the hatch and there is a small access hatch above that. This is how I will get to the screw that holds the handle in place. I need to do two on the other side so I can remove the hand holds for finishing.
I will let theses cure then I need to layup the hatches next.
TB
04-20-2014, 05:01 AM
#1298
Today I will do more CF layups. The sub skin is off and I will lay the hatches next. I want to do one more hatch. In a model like this it is very hard to see the amount of fuel left after ant given flight, without counting the turns on your pump (not 100% accurate) or taking the wing off to look so there is a hatch right after the cowl on the left side that would be a perfect window to the tank. So I will lay that up to.

I will layup the hinge pocket sleeves also.
Its a layup day
TB
I will layup the hinge pocket sleeves also.
Its a layup day
TB

