


Top Flite GS P-47 sports scale; diary of a build
 04-21-2014, 03:45 AM
#1301

Well I did not get a lot done this weekend, to many other things I needed to do. I did get all my fuse hatches laid up.
The gas gage sub skin and door hatch are done and ready to install.

The third hatch sub skin on the right side is cut and ready to install.


Hatch is cut and ready to hinge, I ordered some more offset hinges so they should be here for next weekend.


Plugging away, as long as I get something done I am moving forward. Really want to have May off so I can get her done, fingers crossed")
TB
The gas gage sub skin and door hatch are done and ready to install.
The third hatch sub skin on the right side is cut and ready to install.
Hatch is cut and ready to hinge, I ordered some more offset hinges so they should be here for next weekend.
Plugging away, as long as I get something done I am moving forward. Really want to have May off so I can get her done, fingers crossed
TB


 04-21-2014, 02:23 PM
#1305
Kevin, I do three layers of 5.6oz I sqegee it off on the final layer. This gives me the thickness I need. I then glue 1/32 birch ply to the inside. This makes it very stiff. For the sub skin 1/16" balsa flushes out with the 3/32" main skin.
TB
TB
04-24-2014, 08:23 AM
#1307

Tony carbon fiber hatches and other parts of the plane really come out nice with it's use, all your fits are near perfect, you really are quite good with it. I had several questions but some of the others have already asked and your presentation is so good that I'm learning alot while leaning towards useing it in the future, What kind of resin do you bond it with and what kind of cutters are required to cut it. I do know there some precautions when working with it to protect yourself from the dust. I really don't have much to say when I look in on your build, the truth is alot of what you do is over my head and I'm learning plenty thanks to your work, I'm just in awe at much of what you do, shows how much I don't know.
I have said it before, it's going to be one hell of an airplane and I mean that in a very good way.
Leroy
I have said it before, it's going to be one hell of an airplane and I mean that in a very good way.
Leroy
04-24-2014, 09:34 AM
#1308
My Feedback: (2)

Join Date: Jun 2013
Location: Evansville, IN
Posts: 429
Likes: 0
Received 0 Likes
on
0 Posts
I agree with you Leroy - Tony is a master class builder!! Tony - I know you are very busy and working but if you get some time could you do a video from start to finish on making a hatch with the carbon fiber? I understand most of what you are doing but I need to see how you get the fit perfect. All my attempts come up with a gap somewhere and then I try and fill it and make it worse.
If you don't have the time I totally understand and will continue watching your build!!
Keith
If you don't have the time I totally understand and will continue watching your build!!
Keith
04-24-2014, 09:40 AM
#1309
Leroy, first thank you. As for the resin I use Zpoxy finishing resin. I thin it with alcohol for good penetration. I use to cut it with a fiber wheel on my dremel but it does creat a lot of dust and will heat up and soften the cut area. I do all my cutting on my scroll saw, I cover the piece with blue tape and mark it with a sharpie. I cut just outside the line and sand to fit.
OKC I don't know much about CF, just a beginner. I don't bother with opposing weave on the layering, you waist a lot doing that and all my pieces are not stand alone, they all get a ply backing that locks it into the shape. Once the ply is glued in, it does not twist or flex, so when you do glue in the ply make sure you have the shape you want.
TB
04-26-2014, 01:00 PM
#1311
Today I tackled a task well over due. I need to get my engine broken in, tuned and running like a top before I mount it to Angie.
So I pulled the EME120 I have in my 100cc Sbach. I will use the frame as a flying test and break in stand. I will be flying without the cowl so first thing I did was remove the cowl. Without the wing and canopy I marked where the fuse balanced as is. Then I removed the engine.
I have over a 100 flights on this engine/plane and it has performed like a swis watch. 100 flights and not as much as a hickup, no dead stick, no flouding at start, nothing but great performance.
I do have a few maitanance issues to deal with so this is a good time. My mufflers keep coming loose and I need to get that fixed. Also I like to go over a new fram after a season of flying (100 flights). Turned out that my ignition battery had a screw in it from a braket mounted to the outside of the fire box. The bat did not fail but it was not charging properly and it was leaking so it was a good thing I am doing this. Other wise all looks good so onto mounting the DLE85.
I made a sub fire wall to mount the DLE to out of 3/4" CDX ply and I am using the standoffs from the EME to hold the 3/4" ply firewall for the DLE. I did not want to drill new holes in the fram so the engine is offset a bit as the bolt patturn is close but not a match. This also pushes the engine forward a bit to help in balancing. There is only a 4oz difference in weight between the EMEand DLE. But without the cowl I will need a bit more weight.
The engine bolted up easaly and not much needed to be done to the frame. I just disconnected the throttle and choke linkage leaving the servos in place. I don't need a choke servo being I have an open cowl. So I installed a new servo in the fram for the throttle and had to drill a hole in the fram for that. The idea is to leave as much of the existing plane intact and just mount the new engine to the frame. I used a 5200 A123 life battery to balance being I had one laying around. So she is ready to go. I want to get a good 30 flights in for break in. Then I will try the 4-blade prop. I keept the 32oz tank in and once I see what my fuel consumption is I will install the side sadle fuel system and test it out. I'm looking forward to getting this engine all broken in and ready, won't be long before I'm ready to install it in Angie so time to get on it.
My hinges came so tomorrow I will work on the hatches.
TB
Last edited by TonyBuilder; 04-26-2014 at 01:10 PM.
04-27-2014, 03:17 AM
#1312
I was hoping to go and fly today to get some fuel threw the engine but its going to be windy so not going to happen this weekend 
Here are some pics of the flying test stand.


I am trying the Nord lock washers.


I am using the stock muffler for break in and will mount the custom muffler for a test on the fixed test stand before I install the engine in Angie.

All ready to go just need some descent weather.


TB
Here are some pics of the flying test stand.
I am trying the Nord lock washers.
I am using the stock muffler for break in and will mount the custom muffler for a test on the fixed test stand before I install the engine in Angie.
All ready to go just need some descent weather.
TB
04-27-2014, 04:54 AM
#1313


Join Date: Jul 2012
Location: Missouri
Posts: 1,127
Likes: 0
Received 0 Likes
on
0 Posts
What would it be worth for manufacturers to sell already broke in motors ?
I know, silly thought.
Just thinking out loud !
Kevin
I know, silly thought.
Just thinking out loud !
Kevin
Last edited by Melchizedek; 04-27-2014 at 05:19 AM.
04-27-2014, 07:20 AM
#1315

I spent the morning trying get get whats remaining of Angie 1.0 prepped for a test shoot. I'm using a new gun and just need to get it dialed in before going to Angie 2.0. It's a warm muggy morning here in Texas, so I think I could have reduced the paint a little more to get it to flow out better. All-in-all the color looks pretty good. Later today when the sun comes out and the paint kicks off, I will take it out in the sun for some better lighted pics.
As for now, back to your regular scheduled programming.....
As for now, back to your regular scheduled programming.....
04-27-2014, 03:50 PM
#1323
So I got the main hatch done today. Here is how she went.
I had already laid up the sub skin and the hatch last week, and cut the opening. So all I needed to do was cut the hatch and trim the sub skin.
I cut a 1/32" birch ply backing to glue to the hatch.

I like to glue the hatch backing to the hatch laid over the fuselage or area that the hatch will be placed as to keep the shape true.


Once the ply is glued to the carbon fiber hatch it is very stiff and does not warp or flex.

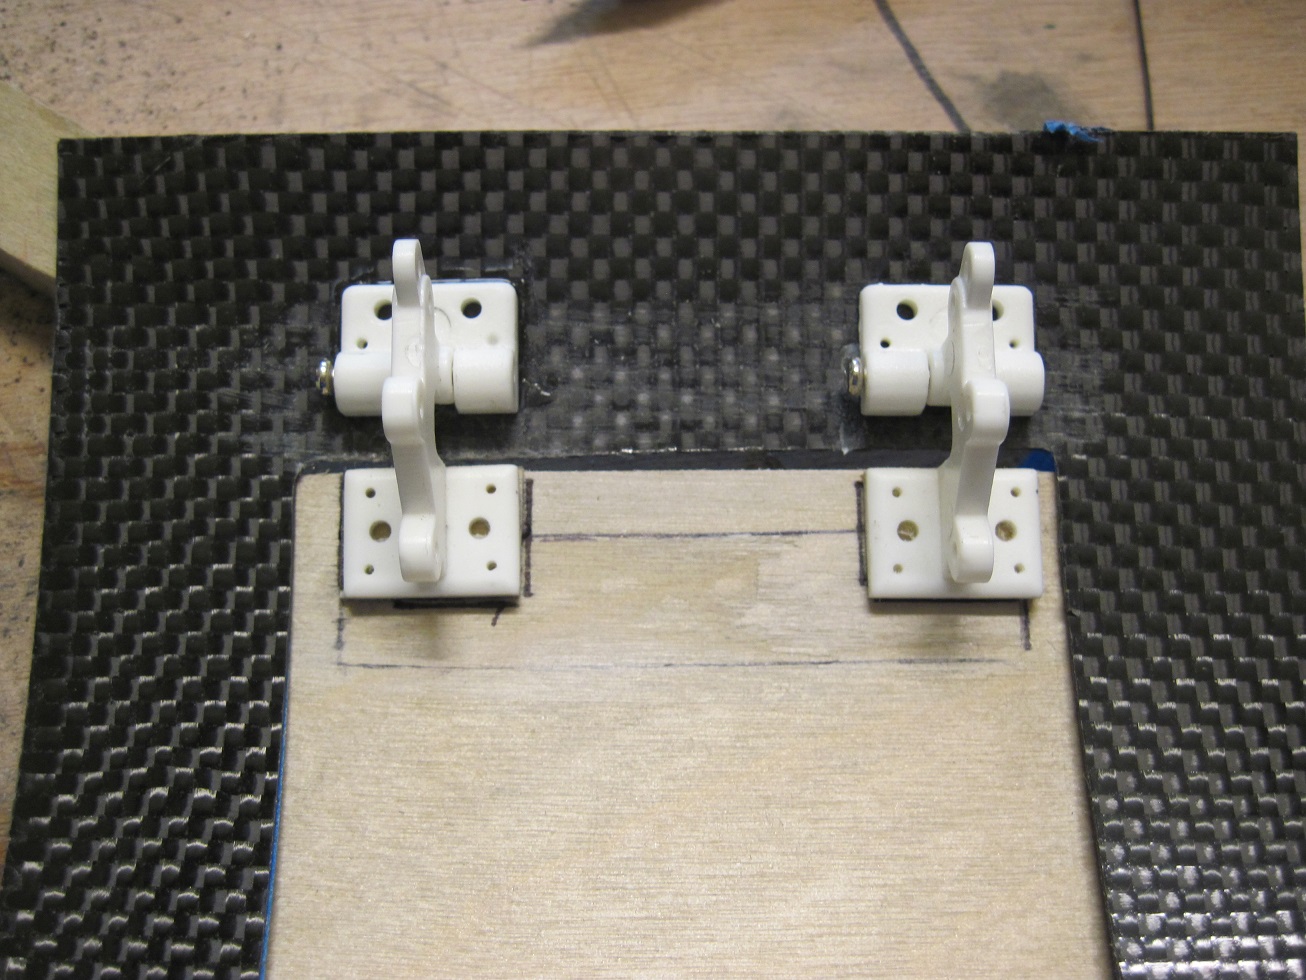
Next I cut the opening in the sub skin. and laid out the hinges. I tack the hinges with CA, I will be removing the one on the hatch after fitting.
It is time to frame out the hatch compartment. This will be housing my main switches for my receivers.
I glued in some 3/32" balsa supports at the ends of the opening to stiffen things up.


Then some micro-ply to frame out the switch box.


The switch plate is attached to the sides with screws, I glued in some 1/4" hard wood for the plate to site on.

The sheet metal plate for the magnets gets reassessed into the ply backing so it flushes out with the inside of the door.

Time to bolt the hinges to the sub frame and the hatch. The sub frame gets #72 button head screws and red lock-tite. the hatch is removable so it gets #80 countersunk stainless screws.


Now it its time to glue in the sub skin.


It is good to have a hinge that is held together with screws so you can separate them during construction.


The finish skin is 1/16" balsa and I usually do it in two or more pieces.


Now all I need to do is the release mechanism and this is all done.
TB
I had already laid up the sub skin and the hatch last week, and cut the opening. So all I needed to do was cut the hatch and trim the sub skin.
I cut a 1/32" birch ply backing to glue to the hatch.
I like to glue the hatch backing to the hatch laid over the fuselage or area that the hatch will be placed as to keep the shape true.
Once the ply is glued to the carbon fiber hatch it is very stiff and does not warp or flex.
Next I cut the opening in the sub skin. and laid out the hinges. I tack the hinges with CA, I will be removing the one on the hatch after fitting.
It is time to frame out the hatch compartment. This will be housing my main switches for my receivers.
I glued in some 3/32" balsa supports at the ends of the opening to stiffen things up.
Then some micro-ply to frame out the switch box.
The switch plate is attached to the sides with screws, I glued in some 1/4" hard wood for the plate to site on.
The sheet metal plate for the magnets gets reassessed into the ply backing so it flushes out with the inside of the door.
Time to bolt the hinges to the sub frame and the hatch. The sub frame gets #72 button head screws and red lock-tite. the hatch is removable so it gets #80 countersunk stainless screws.
Now it its time to glue in the sub skin.
It is good to have a hinge that is held together with screws so you can separate them during construction.
The finish skin is 1/16" balsa and I usually do it in two or more pieces.
Now all I need to do is the release mechanism and this is all done.
TB
