Go Back  RCU Forums > RC Airplanes > Kit Building
Reload this Page >

Top Flite GS P-47 sports scale; diary of a build

Community
Search
Notices
Kit Building If you're building a kit and have questions or want to discuss kit building post it here.

Top Flite GS P-47 sports scale; diary of a build

Thread Tools
 
Search this Thread
 
Old 03-17-2015, 06:20 AM
  #1926  
rt3232
My Feedback: (6)
 
Join Date: Dec 2004
Location: hastings, MN
Posts: 5,953
Likes: 0
Received 1 Like on 1 Post
Default

Fantastic T/B

Cheers Bob T
Old 03-17-2015, 07:52 AM
  #1927  
John Taylor
My Feedback: (16)
 
Join Date: Apr 2002
Location: Macedon, NY
Posts: 301
Likes: 0
Received 0 Likes on 0 Posts
Default

Looks Great T/B John T.
Old 03-17-2015, 08:44 AM
  #1928  
willig10
 
Join Date: Sep 2007
Location: Haltom, TX
Posts: 1,181
Likes: 0
Received 0 Likes on 0 Posts
Default

Tony:
Nothing wrong with your finish. Looks "AWESOME".

Glenn
Old 03-17-2015, 10:01 AM
  #1929  
TonyBuilder
Thread Starter
My Feedback: (11)
 
TonyBuilder's Avatar
 
Join Date: Mar 2010
Location: Austin , TX
Posts: 4,166
Likes: 0
Received 1 Like on 1 Post
Default

Originally Posted by FlyerInOKC
That little wrinkle looks like scale hanger rash picked up in the field! You see a lot of wear in the surviving pictures of the birds in the theater of operations.
Thats why I don't do filler and sand, as long as the outline is good I don't care if there are dents, low spots and imperfections. Like you said these planes are all dented and beat up while in use.

TB
Old 03-17-2015, 02:52 PM
  #1930  
TonyBuilder
Thread Starter
My Feedback: (11)
 
TonyBuilder's Avatar
 
Join Date: Mar 2010
Location: Austin , TX
Posts: 4,166
Likes: 0
Received 1 Like on 1 Post
Default

Getting some work in this evening. I need to get the inner cooler doors done so I can cover that area. I will only be covering up to the panle line just before the wing. I may have some tuning to do on the belly pan.

I have desided to do a more scale canopy, not sliding be more detailed then just the plastic glued down canopy. I want go make a sled that will hold the rear section of the canopy and allow me to slide the canopy back and forth for cock pit detailing/ pilot and then bolt it down with two screws. This way I can acsess the cockpit after the plane is done by just removing the two screws and sliding the canopy back.

I will try and cover the fuse up to the wing this evening.........trying,


TB

Last edited by TonyBuilder; 03-17-2015 at 02:57 PM.
Old 03-17-2015, 03:18 PM
  #1931  
Melchizedek
 
Melchizedek's Avatar
 
Join Date: Jul 2012
Location: Missouri
Posts: 1,127
Likes: 0
Received 0 Likes on 0 Posts
Default

Great job on the foil Tony.
Looks fantastic.

Kevin
Old 03-17-2015, 04:30 PM
  #1932  
TonyBuilder
Thread Starter
My Feedback: (11)
 
TonyBuilder's Avatar
 
Join Date: Mar 2010
Location: Austin , TX
Posts: 4,166
Likes: 0
Received 1 Like on 1 Post
Default

Originally Posted by Melchizedek
Great job on the foil Tony.
Looks fantastic.

Kevin
Thanks Kevin but it is not foil, it's ultraCote covering. The foil is only used on fiberglassed parts like hatches, gear doors and fairings.

Im wimping out and taking the night off, but I did get the inner cooler doors done


They are riveted and ready for paint and what ever falls on them. They won't get glued in until all painting and the stars and bars are done.


These will be in the closed position.

TB
Attached Thumbnails Click image for larger version

Name:	image.jpg
Views:	148
Size:	808.5 KB
ID:	2082179   Click image for larger version

Name:	image.jpg
Views:	145
Size:	750.8 KB
ID:	2082180   Click image for larger version

Name:	image.jpg
Views:	169
Size:	951.6 KB
ID:	2082181   Click image for larger version

Name:	image.jpg
Views:	131
Size:	900.0 KB
ID:	2082182   Click image for larger version

Name:	image.jpg
Views:	152
Size:	1,001.6 KB
ID:	2082183   Click image for larger version

Name:	image.jpg
Views:	140
Size:	767.0 KB
ID:	2082184   Click image for larger version

Name:	image.jpg
Views:	148
Size:	902.8 KB
ID:	2082185   Click image for larger version

Name:	image.jpg
Views:	134
Size:	99.1 KB
ID:	2082186  

Old 03-18-2015, 05:17 AM
  #1933  
TonyBuilder
Thread Starter
My Feedback: (11)
 
TonyBuilder's Avatar
 
Join Date: Mar 2010
Location: Austin , TX
Posts: 4,166
Likes: 0
Received 1 Like on 1 Post
Default

I am working on bashing my cockpit and canopy. I want to get this done before I start covering again.


I cut the cockpit opening and I am cutting down the full size cockpit to fit the RTC


It won't be as nice as the full cockpit but it will do.


Onward.

TB
Attached Thumbnails Click image for larger version

Name:	image.jpg
Views:	152
Size:	862.6 KB
ID:	2082243   Click image for larger version

Name:	image.jpg
Views:	132
Size:	797.2 KB
ID:	2082244   Click image for larger version

Name:	image.jpg
Views:	149
Size:	801.2 KB
ID:	2082245   Click image for larger version

Name:	image.jpg
Views:	141
Size:	731.9 KB
ID:	2082246   Click image for larger version

Name:	image.jpg
Views:	147
Size:	752.2 KB
ID:	2082247   Click image for larger version

Name:	image.jpg
Views:	137
Size:	805.5 KB
ID:	2082248   Click image for larger version

Name:	image.jpg
Views:	132
Size:	895.5 KB
ID:	2082249   Click image for larger version

Name:	image.jpg
Views:	135
Size:	814.6 KB
ID:	2082250  

Click image for larger version

Name:	image.jpg
Views:	136
Size:	759.4 KB
ID:	2082251   Click image for larger version

Name:	image.jpg
Views:	144
Size:	795.6 KB
ID:	2082252   Click image for larger version

Name:	image.jpg
Views:	131
Size:	856.4 KB
ID:	2082253  
Old 03-18-2015, 07:49 AM
  #1934  
FlyerInOKC
My Feedback: (6)
 
FlyerInOKC's Avatar
 
Join Date: Nov 2004
Location: Oklahoma City, OK
Posts: 14,145
Received 271 Likes on 236 Posts
Default

Looking great TB!
Old 03-18-2015, 05:19 PM
  #1935  
TonyBuilder
Thread Starter
My Feedback: (11)
 
TonyBuilder's Avatar
 
Join Date: Mar 2010
Location: Austin , TX
Posts: 4,166
Likes: 0
Received 1 Like on 1 Post
Default

Almost got the cockpit done. I created a box (tub) for the cockpit parts, it is only a halfe cockpit, the floor is at the waist so just the torso, keeping it simple.

Need to to get the canopy installed next.

Slowly but surely


TB
Old 03-18-2015, 05:19 PM
  #1936  
TonyBuilder
Thread Starter
My Feedback: (11)
 
TonyBuilder's Avatar
 
Join Date: Mar 2010
Location: Austin , TX
Posts: 4,166
Likes: 0
Received 1 Like on 1 Post
Default

Almost got the cockpit done. I created a box (tub) for the cockpit parts, it is only a halfe cockpit, the floor is at the waist so just the torso, keeping it simple.

Need to to get the canopy installed next.

Slowly but surely


TB
Old 03-19-2015, 04:04 AM
  #1937  
TonyBuilder
Thread Starter
My Feedback: (11)
 
TonyBuilder's Avatar
 
Join Date: Mar 2010
Location: Austin , TX
Posts: 4,166
Likes: 0
Received 1 Like on 1 Post
Default

So I keep reminding myself that this is just "get it done and fly" scale so I am using the one piece canopy as it fits better and is easyer to install. The more scale one won't fit without a lot of work!


The sled is cut in and will get glued in after it gets painted and the covering is done.


The cockpit tub is done and most of the parts are fited and will get installed during finishing.


One thing I found interesting and did not make sence. That in scale compatitions the cockpit is not taken into consideration (not scored). So my cockpit is more then good to compeat in the sports scale division (ARF).


On the prototype my cockpit took a beating from vibration so everything is getting bolted and glued down with epoxy, nothing will fall off


I am now ready to finish covering the fuselage. I am masking off the panle and after it is laid down I just cut the covering on the tape, then remove the tape and finish laying down the edge. This is the only way to get all the compound cut panels in the right spot.


TB
Attached Thumbnails Click image for larger version

Name:	image.jpg
Views:	144
Size:	1.09 MB
ID:	2082389   Click image for larger version

Name:	image.jpg
Views:	148
Size:	1.03 MB
ID:	2082390   Click image for larger version

Name:	image.jpg
Views:	122
Size:	966.7 KB
ID:	2082391   Click image for larger version

Name:	image.jpg
Views:	126
Size:	1.04 MB
ID:	2082392   Click image for larger version

Name:	image.jpg
Views:	135
Size:	1.06 MB
ID:	2082393   Click image for larger version

Name:	image.jpg
Views:	131
Size:	798.6 KB
ID:	2082394   Click image for larger version

Name:	image.jpg
Views:	137
Size:	942.3 KB
ID:	2082395   Click image for larger version

Name:	image.jpg
Views:	139
Size:	1.05 MB
ID:	2082396  

Click image for larger version

Name:	image.jpg
Views:	129
Size:	1.05 MB
ID:	2082397   Click image for larger version

Name:	image.jpg
Views:	139
Size:	887.9 KB
ID:	2082398   Click image for larger version

Name:	image.jpg
Views:	126
Size:	1.04 MB
ID:	2082399   Click image for larger version

Name:	image.jpg
Views:	145
Size:	1.02 MB
ID:	2082400   Click image for larger version

Name:	image.jpg
Views:	148
Size:	1.14 MB
ID:	2082402   Click image for larger version

Name:	image.jpg
Views:	137
Size:	1.05 MB
ID:	2082403   Click image for larger version

Name:	image.jpg
Views:	123
Size:	883.0 KB
ID:	2082404   Click image for larger version

Name:	image.jpg
Views:	134
Size:	803.0 KB
ID:	2082405  

Click image for larger version

Name:	image.jpg
Views:	132
Size:	1.02 MB
ID:	2082406  

Last edited by TonyBuilder; 03-19-2015 at 04:06 AM.
Old 03-19-2015, 05:47 AM
  #1938  
TonyBuilder
Thread Starter
My Feedback: (11)
 
TonyBuilder's Avatar
 
Join Date: Mar 2010
Location: Austin , TX
Posts: 4,166
Likes: 0
Received 1 Like on 1 Post
Default

A start on covering with the masked panles.


The strait runs don't need the masking tape.


I wont do anymore detailing until the entire fuselage is covered.

TB
Attached Thumbnails Click image for larger version

Name:	image.jpg
Views:	131
Size:	798.2 KB
ID:	2082430   Click image for larger version

Name:	image.jpg
Views:	124
Size:	788.6 KB
ID:	2082431   Click image for larger version

Name:	image.jpg
Views:	133
Size:	905.6 KB
ID:	2082432   Click image for larger version

Name:	image.jpg
Views:	124
Size:	768.4 KB
ID:	2082433   Click image for larger version

Name:	image.jpg
Views:	126
Size:	675.3 KB
ID:	2082434   Click image for larger version

Name:	image.jpg
Views:	139
Size:	864.4 KB
ID:	2082435   Click image for larger version

Name:	image.jpg
Views:	135
Size:	893.5 KB
ID:	2082436  
Old 03-19-2015, 09:13 AM
  #1939  
FlyerInOKC
My Feedback: (6)
 
FlyerInOKC's Avatar
 
Join Date: Nov 2004
Location: Oklahoma City, OK
Posts: 14,145
Received 271 Likes on 236 Posts
Default

Great looking covering, nice job TB!
Old 03-20-2015, 03:59 AM
  #1940  
TonyBuilder
Thread Starter
My Feedback: (11)
 
TonyBuilder's Avatar
 
Join Date: Mar 2010
Location: Austin , TX
Posts: 4,166
Likes: 0
Received 1 Like on 1 Post
Default

Thanks OKC,
I am trying to get the fuselage done today so I can get going on the wing.

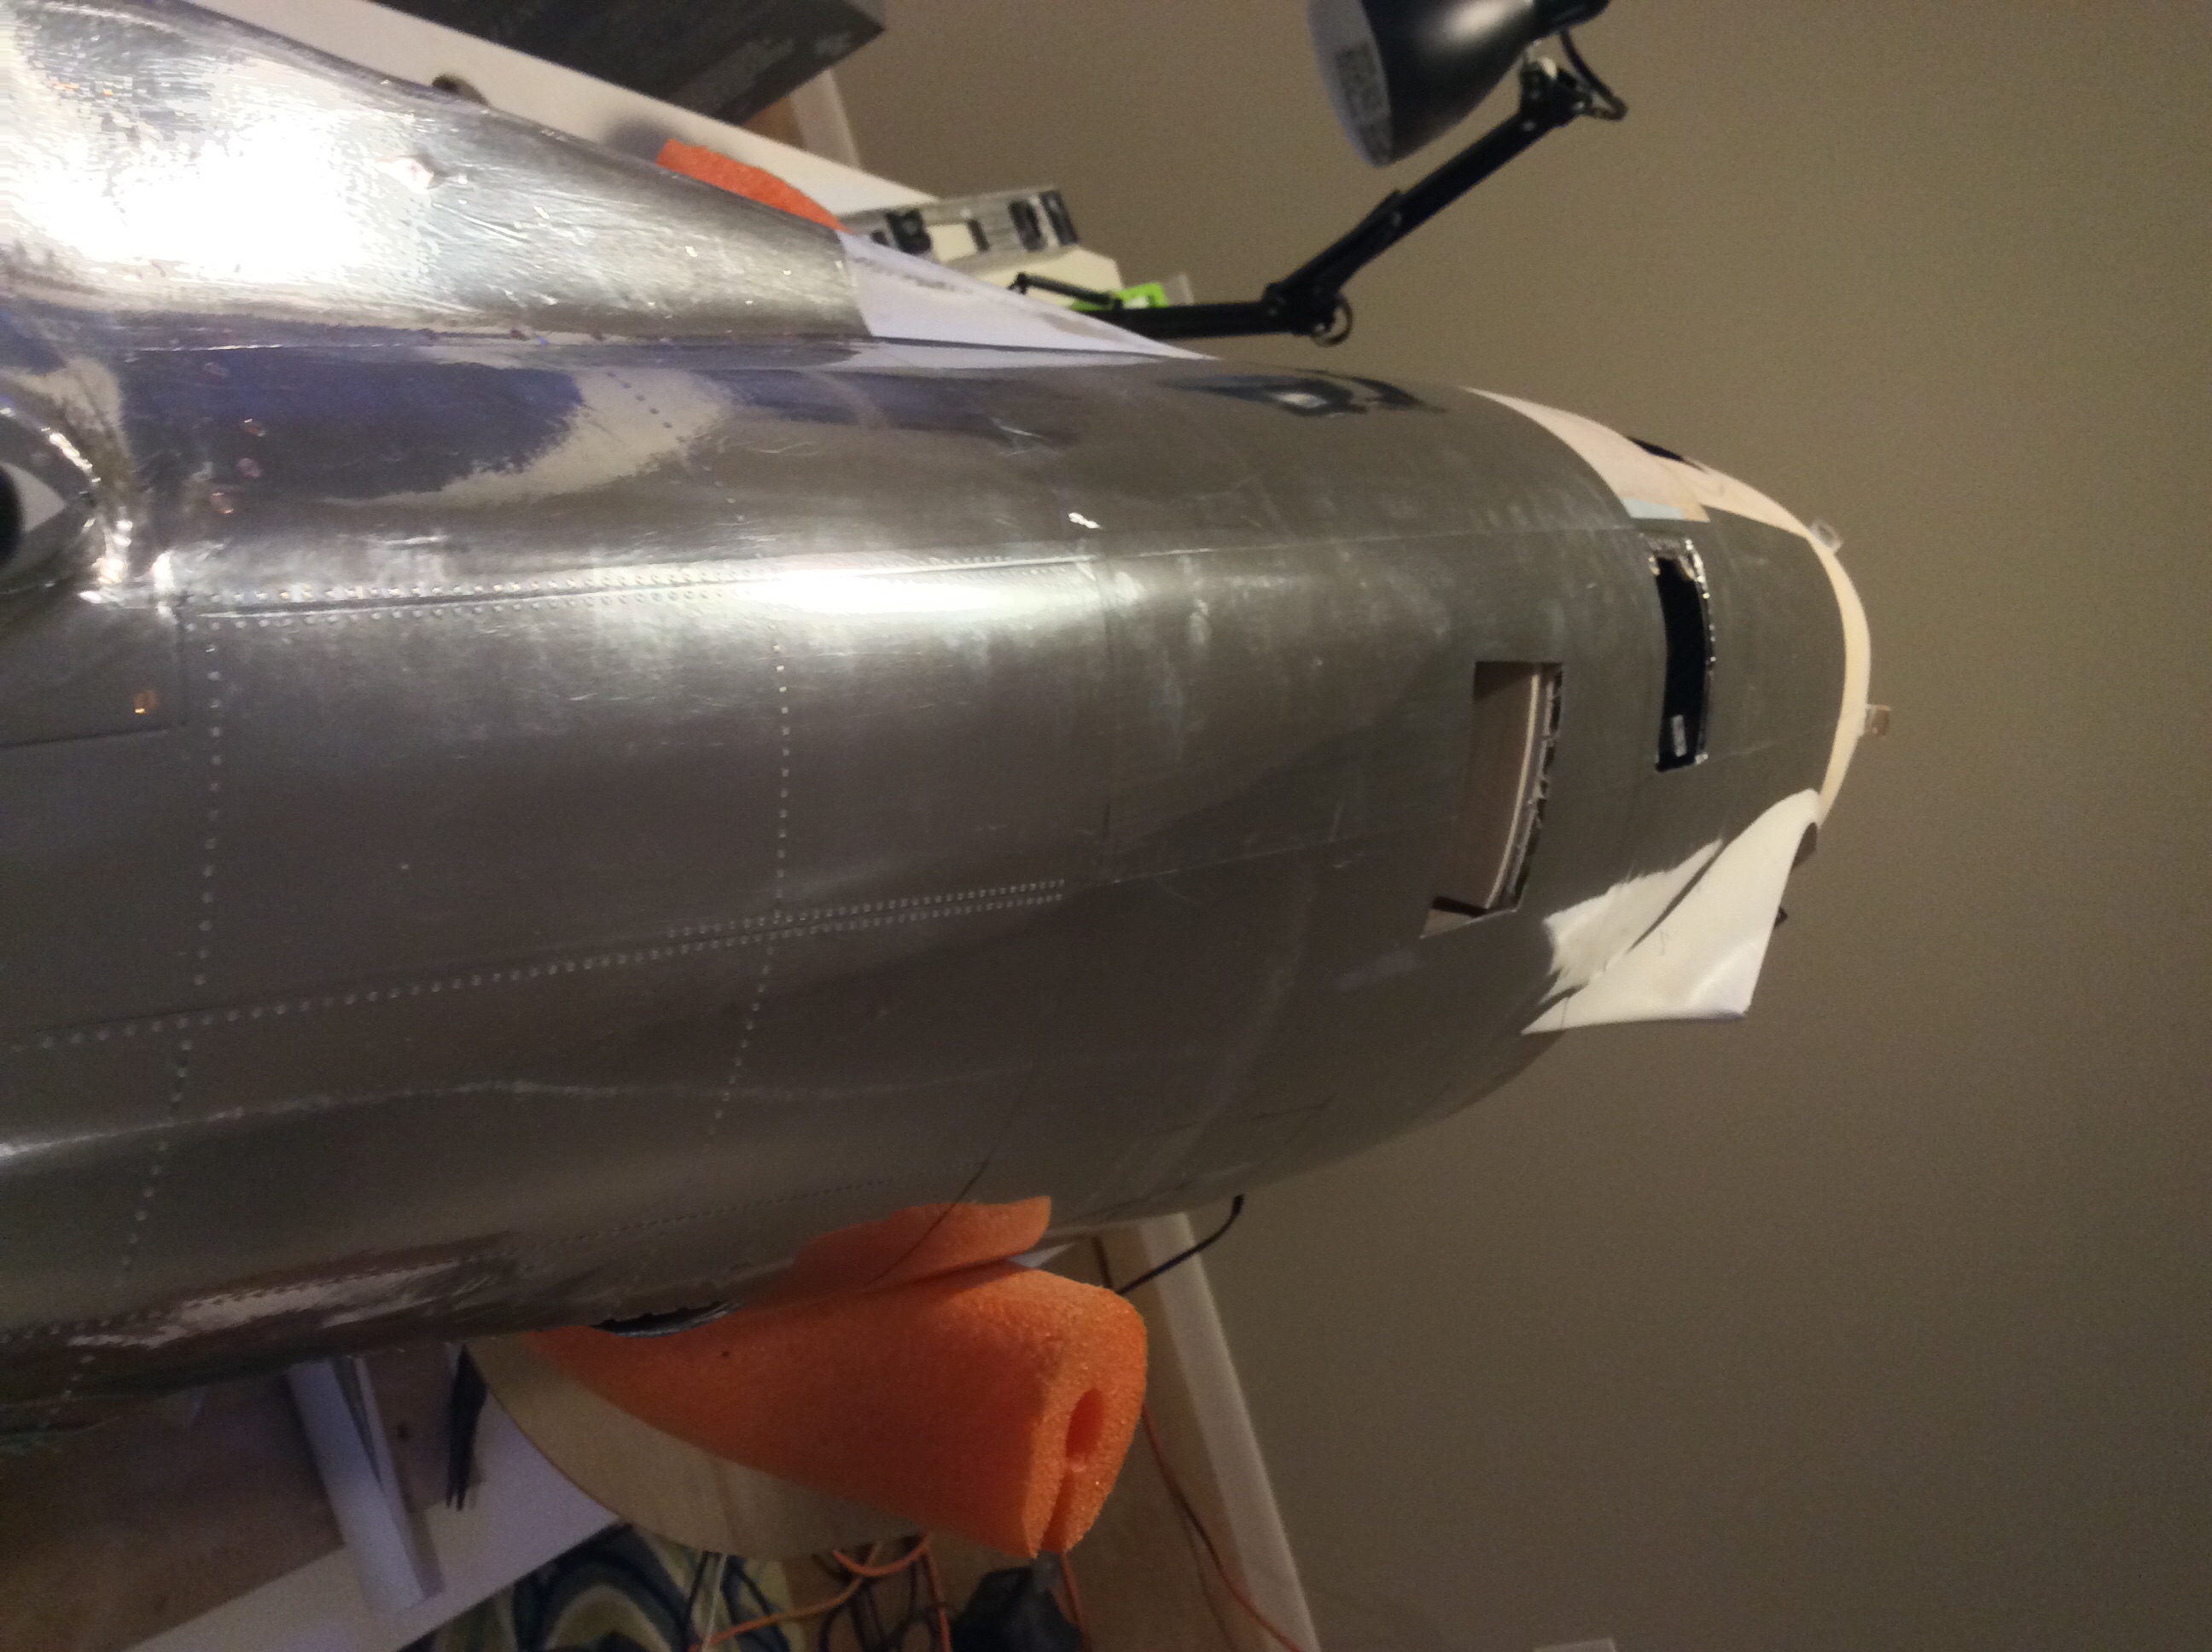
installing the covering in indavidual panles is more time consuming then the blanket covering. Is it better or dose it take less covering, I don't know, probably takes more as I will be using 8 rolls to cover this build.

The panels really pop with the changing direction of the grain.


Once the rivets are installed the panles will really pop.


This is a polished "musime" finish and we will see if I do any weathering short of the natural weathering as I really don't clean my planes.


Paint for the olive drab and the invasion strips will be simi gloss as flat will look A bit off in my opinion.


The foil failings will get done when all the covering is done.


Covering is almost done with just the front left to do.


It is hard to see the indavidual panles but they are there and I am interested to see what it looks like in the natural light.


TB
Attached Thumbnails Click image for larger version

Name:	image.jpg
Views:	132
Size:	798.2 KB
ID:	2082677   Click image for larger version

Name:	image.jpg
Views:	132
Size:	788.6 KB
ID:	2082678   Click image for larger version

Name:	image.jpg
Views:	137
Size:	905.6 KB
ID:	2082679   Click image for larger version

Name:	image.jpg
Views:	125
Size:	768.4 KB
ID:	2082680   Click image for larger version

Name:	image.jpg
Views:	129
Size:	864.4 KB
ID:	2082681   Click image for larger version

Name:	image.jpg
Views:	133
Size:	893.5 KB
ID:	2082682   Click image for larger version

Name:	image.jpg
Views:	123
Size:	870.7 KB
ID:	2082683   Click image for larger version

Name:	image.jpg
Views:	133
Size:	810.4 KB
ID:	2082684  

Click image for larger version

Name:	image.jpg
Views:	130
Size:	178.6 KB
ID:	2082685   Click image for larger version

Name:	image.jpg
Views:	147
Size:	789.2 KB
ID:	2082686   Click image for larger version

Name:	image.jpg
Views:	122
Size:	719.3 KB
ID:	2082687   Click image for larger version

Name:	image.jpg
Views:	127
Size:	809.8 KB
ID:	2082688   Click image for larger version

Name:	image.jpg
Views:	125
Size:	730.7 KB
ID:	2082689   Click image for larger version

Name:	image.jpg
Views:	132
Size:	704.1 KB
ID:	2082690   Click image for larger version

Name:	image.jpg
Views:	122
Size:	783.6 KB
ID:	2082691   Click image for larger version

Name:	image.jpg
Views:	124
Size:	906.5 KB
ID:	2082692  

Click image for larger version

Name:	image.jpg
Views:	127
Size:	928.4 KB
ID:	2082693   Click image for larger version

Name:	image.jpg
Views:	130
Size:	880.9 KB
ID:	2082694   Click image for larger version

Name:	image.jpg
Views:	112
Size:	956.1 KB
ID:	2082695   Click image for larger version

Name:	image.jpg
Views:	143
Size:	1.08 MB
ID:	2082696   Click image for larger version

Name:	image.jpg
Views:	129
Size:	1.04 MB
ID:	2082697   Click image for larger version

Name:	image.jpg
Views:	118
Size:	951.5 KB
ID:	2082698   Click image for larger version

Name:	image.jpg
Views:	124
Size:	954.2 KB
ID:	2082699   Click image for larger version

Name:	image.jpg
Views:	123
Size:	1.05 MB
ID:	2082700  

Click image for larger version

Name:	image.jpg
Views:	116
Size:	987.7 KB
ID:	2082701   Click image for larger version

Name:	image.jpg
Views:	138
Size:	878.2 KB
ID:	2082702   Click image for larger version

Name:	image.jpg
Views:	114
Size:	1.06 MB
ID:	2082703   Click image for larger version

Name:	image.jpg
Views:	154
Size:	1.04 MB
ID:	2082704   Click image for larger version

Name:	image.jpg
Views:	124
Size:	1.04 MB
ID:	2082705   Click image for larger version

Name:	image.jpg
Views:	122
Size:	1.03 MB
ID:	2082706   Click image for larger version

Name:	image.jpg
Views:	129
Size:	1.09 MB
ID:	2082707   Click image for larger version

Name:	image.jpg
Views:	122
Size:	1,020.3 KB
ID:	2082708  


Last edited by TonyBuilder; 03-20-2015 at 04:23 AM.
Old 03-20-2015, 04:08 AM
  #1941  
stevegauth30
 
stevegauth30's Avatar
 
Join Date: Jun 2012
Location: Bristol, CT
Posts: 4,002
Likes: 0
Received 0 Likes on 0 Posts
Default

I'm anxious to see the end result. I know it will look great.
Old 03-20-2015, 04:51 AM
  #1942  
TonyBuilder
Thread Starter
My Feedback: (11)
 
TonyBuilder's Avatar
 
Join Date: Mar 2010
Location: Austin , TX
Posts: 4,166
Likes: 0
Received 1 Like on 1 Post
Default

I am stepping up into high gear as I only have two weeks left to get this bird done, after that I will only have the weekends to work on it and the flying season starts May 1st.

Tomorrow I start the wing and need to have that done and ready to cover by the end of the week, yes it's just a hobby (or a way of life) but right now it is my main goal to be able to tour this year to all the local warbird events.

Our field has a impresive collection of planes and pilots including a few giant scale B-17s and some nicely scaled warbirds.

We will be hitting the events like bomber field and other well known events, the scale masters reginal qualifier to gain some expieriance.

I will also mount the DLE85 to my pawnee for the remainder of the break in of the bowman ring and to insure a relieble running engine before I mount it to thus bird.

So lots to do!

TB
Old 03-20-2015, 05:33 AM
  #1943  
FlyerInOKC
My Feedback: (6)
 
FlyerInOKC's Avatar
 
Join Date: Nov 2004
Location: Oklahoma City, OK
Posts: 14,145
Received 271 Likes on 236 Posts
Default

Wow! Work of art!
Old 03-20-2015, 01:20 PM
  #1944  
rt3232
My Feedback: (6)
 
Join Date: Dec 2004
Location: hastings, MN
Posts: 5,953
Likes: 0
Received 1 Like on 1 Post
Default

Hi T/B
Things are looking great, and I know you are rush mode but please take a breath every hour and make sure you don't miss something

Cheers Bob T
Old 03-20-2015, 02:04 PM
  #1945  
TonyBuilder
Thread Starter
My Feedback: (11)
 
TonyBuilder's Avatar
 
Join Date: Mar 2010
Location: Austin , TX
Posts: 4,166
Likes: 0
Received 1 Like on 1 Post
Default

No worries on that, with $$$ work taking a good 8-10'hr a day I only get a few hours a day to work on the build. As to don't hurry, just spent all day setting tile to just have to tear it all out at the end of the day, client ordered wrong tile

TB
Old 03-21-2015, 05:24 AM
  #1946  
TonyBuilder
Thread Starter
My Feedback: (11)
 
TonyBuilder's Avatar
 
Join Date: Mar 2010
Location: Austin , TX
Posts: 4,166
Likes: 0
Received 1 Like on 1 Post
Default

Got the fuselage all covered and ready for finishing.


With all the covering done the foil went on all the fairings.


Detailing will be done in between finishing the wing.


TB
Attached Thumbnails Click image for larger version

Name:	image.jpg
Views:	116
Size:	864.4 KB
ID:	2082913   Click image for larger version

Name:	image.jpg
Views:	115
Size:	1.04 MB
ID:	2082914   Click image for larger version

Name:	image.jpg
Views:	119
Size:	1.01 MB
ID:	2082915   Click image for larger version

Name:	image.jpg
Views:	114
Size:	990.3 KB
ID:	2082916   Click image for larger version

Name:	image.jpg
Views:	116
Size:	1.02 MB
ID:	2082917   Click image for larger version

Name:	image.jpg
Views:	113
Size:	1.06 MB
ID:	2082918   Click image for larger version

Name:	image.jpg
Views:	119
Size:	1,022.9 KB
ID:	2082919   Click image for larger version

Name:	image.jpg
Views:	109
Size:	1.12 MB
ID:	2082920  

Click image for larger version

Name:	image.jpg
Views:	118
Size:	887.8 KB
ID:	2082921   Click image for larger version

Name:	image.jpg
Views:	111
Size:	861.6 KB
ID:	2082925   Click image for larger version

Name:	image.jpg
Views:	116
Size:	920.1 KB
ID:	2082926   Click image for larger version

Name:	image.jpg
Views:	118
Size:	908.0 KB
ID:	2082927   Click image for larger version

Name:	image.jpg
Views:	120
Size:	877.4 KB
ID:	2082928   Click image for larger version

Name:	image.jpg
Views:	119
Size:	1.08 MB
ID:	2082929   Click image for larger version

Name:	image.jpg
Views:	119
Size:	1.06 MB
ID:	2082930  

Last edited by TonyBuilder; 03-21-2015 at 05:27 AM.
Old 03-21-2015, 06:18 AM
  #1947  
stevegauth30
 
stevegauth30's Avatar
 
Join Date: Jun 2012
Location: Bristol, CT
Posts: 4,002
Likes: 0
Received 0 Likes on 0 Posts
Default

Man! That looks smooth!
Old 03-21-2015, 09:07 AM
  #1948  
TonyBuilder
Thread Starter
My Feedback: (11)
 
TonyBuilder's Avatar
 
Join Date: Mar 2010
Location: Austin , TX
Posts: 4,166
Likes: 0
Received 1 Like on 1 Post
Default

Yea it looks prity good. I have never seen a foil covered plane up close and in person but I like this better then what I have seen with the foil. I know the foil is a more durable finish, but with not having to do all the glaring and priming this is not bad at all.

TB
Old 03-21-2015, 09:29 AM
  #1949  
TonyBuilder
Thread Starter
My Feedback: (11)
 
TonyBuilder's Avatar
 
Join Date: Mar 2010
Location: Austin , TX
Posts: 4,166
Likes: 0
Received 1 Like on 1 Post
Default

Getting in some more work on the detailing of the fuselage as I start on the wing.

Cockpit it is all done and Instaled.


TB
Attached Thumbnails Click image for larger version

Name:	image.jpg
Views:	111
Size:	905.9 KB
ID:	2082960   Click image for larger version

Name:	image.jpg
Views:	107
Size:	894.1 KB
ID:	2082961   Click image for larger version

Name:	image.jpg
Views:	120
Size:	756.8 KB
ID:	2082962   Click image for larger version

Name:	image.jpg
Views:	118
Size:	846.4 KB
ID:	2082966   Click image for larger version

Name:	image.jpg
Views:	111
Size:	851.4 KB
ID:	2082973   Click image for larger version

Name:	image.jpg
Views:	124
Size:	867.0 KB
ID:	2082974   Click image for larger version

Name:	image.jpg
Views:	136
Size:	844.7 KB
ID:	2082977  
Old 03-21-2015, 09:50 AM
  #1950  
John Taylor
My Feedback: (16)
 
Join Date: Apr 2002
Location: Macedon, NY
Posts: 301
Likes: 0
Received 0 Likes on 0 Posts
Default

Nice Job Tony. John T.


Contact Us - Archive - Advertising - Cookie Policy - Privacy Statement - Terms of Service -

Copyright © 2024 MH Sub I, LLC dba Internet Brands. All rights reserved. Use of this site indicates your consent to the Terms of Use.