


Top Flite GS P-47 sports scale; diary of a build
 04-24-2015, 06:01 AM
#2051


Thanks Bob, yes this does help. I'm not glass so I will be tight to the fuselage on both C2 and F5 I have the carbon fiber end plates I will glue to E5 and C2 as I will be using foil to cover the belly. 1/64 ply is a good spacer for the gap.
TB
TB

 04-24-2015, 12:47 PM
#2056
I have the wheel wells pretty much done short of a few details.
Im getting them ready to paint.


There are very slight diferances between the left and the right being the right was done over a year ago and I don't think anyone will notice.


Mainly it is different as the way I built them but the end result should be very close.


Once I have the wells painted I will install the gear and the air cylinders for the inner door and rout the hoes lines as they need to be strapped into the wheel well.

I think the best way to do the gear doors is to first install the gear, get it to where I want it. Then cut the carbon fiber bottom skin. Once that is all trimmed and looking good I will glue it in. Then I can cover with 1/16" balsa, sand and fill to get the wing ready to cover then cut the balsa to fit the gear.

So I will work on that next.
TB
Im getting them ready to paint.
There are very slight diferances between the left and the right being the right was done over a year ago and I don't think anyone will notice.
Mainly it is different as the way I built them but the end result should be very close.
Once I have the wells painted I will install the gear and the air cylinders for the inner door and rout the hoes lines as they need to be strapped into the wheel well.
I think the best way to do the gear doors is to first install the gear, get it to where I want it. Then cut the carbon fiber bottom skin. Once that is all trimmed and looking good I will glue it in. Then I can cover with 1/16" balsa, sand and fill to get the wing ready to cover then cut the balsa to fit the gear.
So I will work on that next.
TB
Last edited by TonyBuilder; 04-24-2015 at 01:26 PM.
04-27-2015, 02:56 PM
#2057
The wheel wells are done and I cut the carbon fiber bottom skins for the gear.


I make a templet of the gear doors to trim and adjust it to fit my wheel, gear and wheel well.


I trace ace it over the CF skin and leave about a 1/16" in so I create the lip for the gear doors.


Cutting the the skin is much easier then after it is glued in, I use my scroll saw. Once fixed the skins gets glued in.


The wells are done and ready for paint.


One thing ink new I am trying is using a bumper to badge the way the gear sits in the well. I want the gear to close all the way and be tight but don't want it slamming into the lip for the gear doors so the bumper is on the I- beam. The gear will always be Coles as the air pressure will be positive on the gear.


The gear is mounted and wells are ready for paint. The gear doors flush out with the top and there is plenty of room in the well still.


With the wells ready and the skins cut I painted the wells yellow crome.


With the wells painted and once they dry I can install the air cylinders for the inner doors, the gear and cut the doors.


I did not detail the left side as much as the right but who will know")


Yellow really looks good and once the aluminum is on it will pop.
TB
I make a templet of the gear doors to trim and adjust it to fit my wheel, gear and wheel well.
I trace ace it over the CF skin and leave about a 1/16" in so I create the lip for the gear doors.
Cutting the the skin is much easier then after it is glued in, I use my scroll saw. Once fixed the skins gets glued in.
The wells are done and ready for paint.
One thing ink new I am trying is using a bumper to badge the way the gear sits in the well. I want the gear to close all the way and be tight but don't want it slamming into the lip for the gear doors so the bumper is on the I- beam. The gear will always be Coles as the air pressure will be positive on the gear.
The gear is mounted and wells are ready for paint. The gear doors flush out with the top and there is plenty of room in the well still.
With the wells ready and the skins cut I painted the wells yellow crome.
With the wells painted and once they dry I can install the air cylinders for the inner doors, the gear and cut the doors.
I did not detail the left side as much as the right but who will know
Yellow really looks good and once the aluminum is on it will pop.
TB
Last edited by TonyBuilder; 04-27-2015 at 03:45 PM.
 04-28-2015, 02:18 PM
#2061
Getting some progress on the right wing gear doors.
I plumbed the gear and the inner gear door cylinder. I rougted the house for the inner door threw the gear bay and back along the main well back wall.


Getting all the houses in was not to bad as I planed for it so I pre drilled holes in walls and detailed panels before I painted.


Nest at I fine tuned the CF skin.


The gear goes in without hitting the skin so we are good.


Getting the geomitry for the inner gear door cylinder takes time. All I care is that the door is open 90* when open and that it is closed tights so with air you can have the cylinder not close all the way, this way it keeps pressure the door without draining a battery or burning a servo if you use a servo for the doors. I prefer air all the way.


I first cut the gear doors from the templet, then start fitting them to the wing.
I use 4 carbon fieber lay ups to do the bottom, and the gear doors.
The balsa skin is cut from 1/16" balsa and cut and fitted around the gear door, then glued it in with epoxy. This method is much better then cutting the gear from a finishe covered wing. I will do this on the Meister build.


The carbon skin works as the lip stop for the gear doors.


Now that the doors are cut into three pieces I will bolt the lower door to the main gear. As planed I sanded the gear stop block so the gear will sit lower and the doors are flush now with plenty of room. I will detail the doors as I have the room to do so.


The doors will get 3/32 birch ply glued to the top of the CF doors, this will flush them out and I can cover them with covering. Once both wings are fired I will sand it all as a whole.
Next I will hing the inner door and the upper door.
TB
I plumbed the gear and the inner gear door cylinder. I rougted the house for the inner door threw the gear bay and back along the main well back wall.
Getting all the houses in was not to bad as I planed for it so I pre drilled holes in walls and detailed panels before I painted.
Nest at I fine tuned the CF skin.
The gear goes in without hitting the skin so we are good.
Getting the geomitry for the inner gear door cylinder takes time. All I care is that the door is open 90* when open and that it is closed tights so with air you can have the cylinder not close all the way, this way it keeps pressure the door without draining a battery or burning a servo if you use a servo for the doors. I prefer air all the way.
I first cut the gear doors from the templet, then start fitting them to the wing.
I use 4 carbon fieber lay ups to do the bottom, and the gear doors.
The balsa skin is cut from 1/16" balsa and cut and fitted around the gear door, then glued it in with epoxy. This method is much better then cutting the gear from a finishe covered wing. I will do this on the Meister build.
The carbon skin works as the lip stop for the gear doors.
Now that the doors are cut into three pieces I will bolt the lower door to the main gear. As planed I sanded the gear stop block so the gear will sit lower and the doors are flush now with plenty of room. I will detail the doors as I have the room to do so.
The doors will get 3/32 birch ply glued to the top of the CF doors, this will flush them out and I can cover them with covering. Once both wings are fired I will sand it all as a whole.
Next I will hing the inner door and the upper door.
TB
Last edited by TonyBuilder; 04-28-2015 at 02:25 PM.
04-29-2015, 05:31 AM
#2063
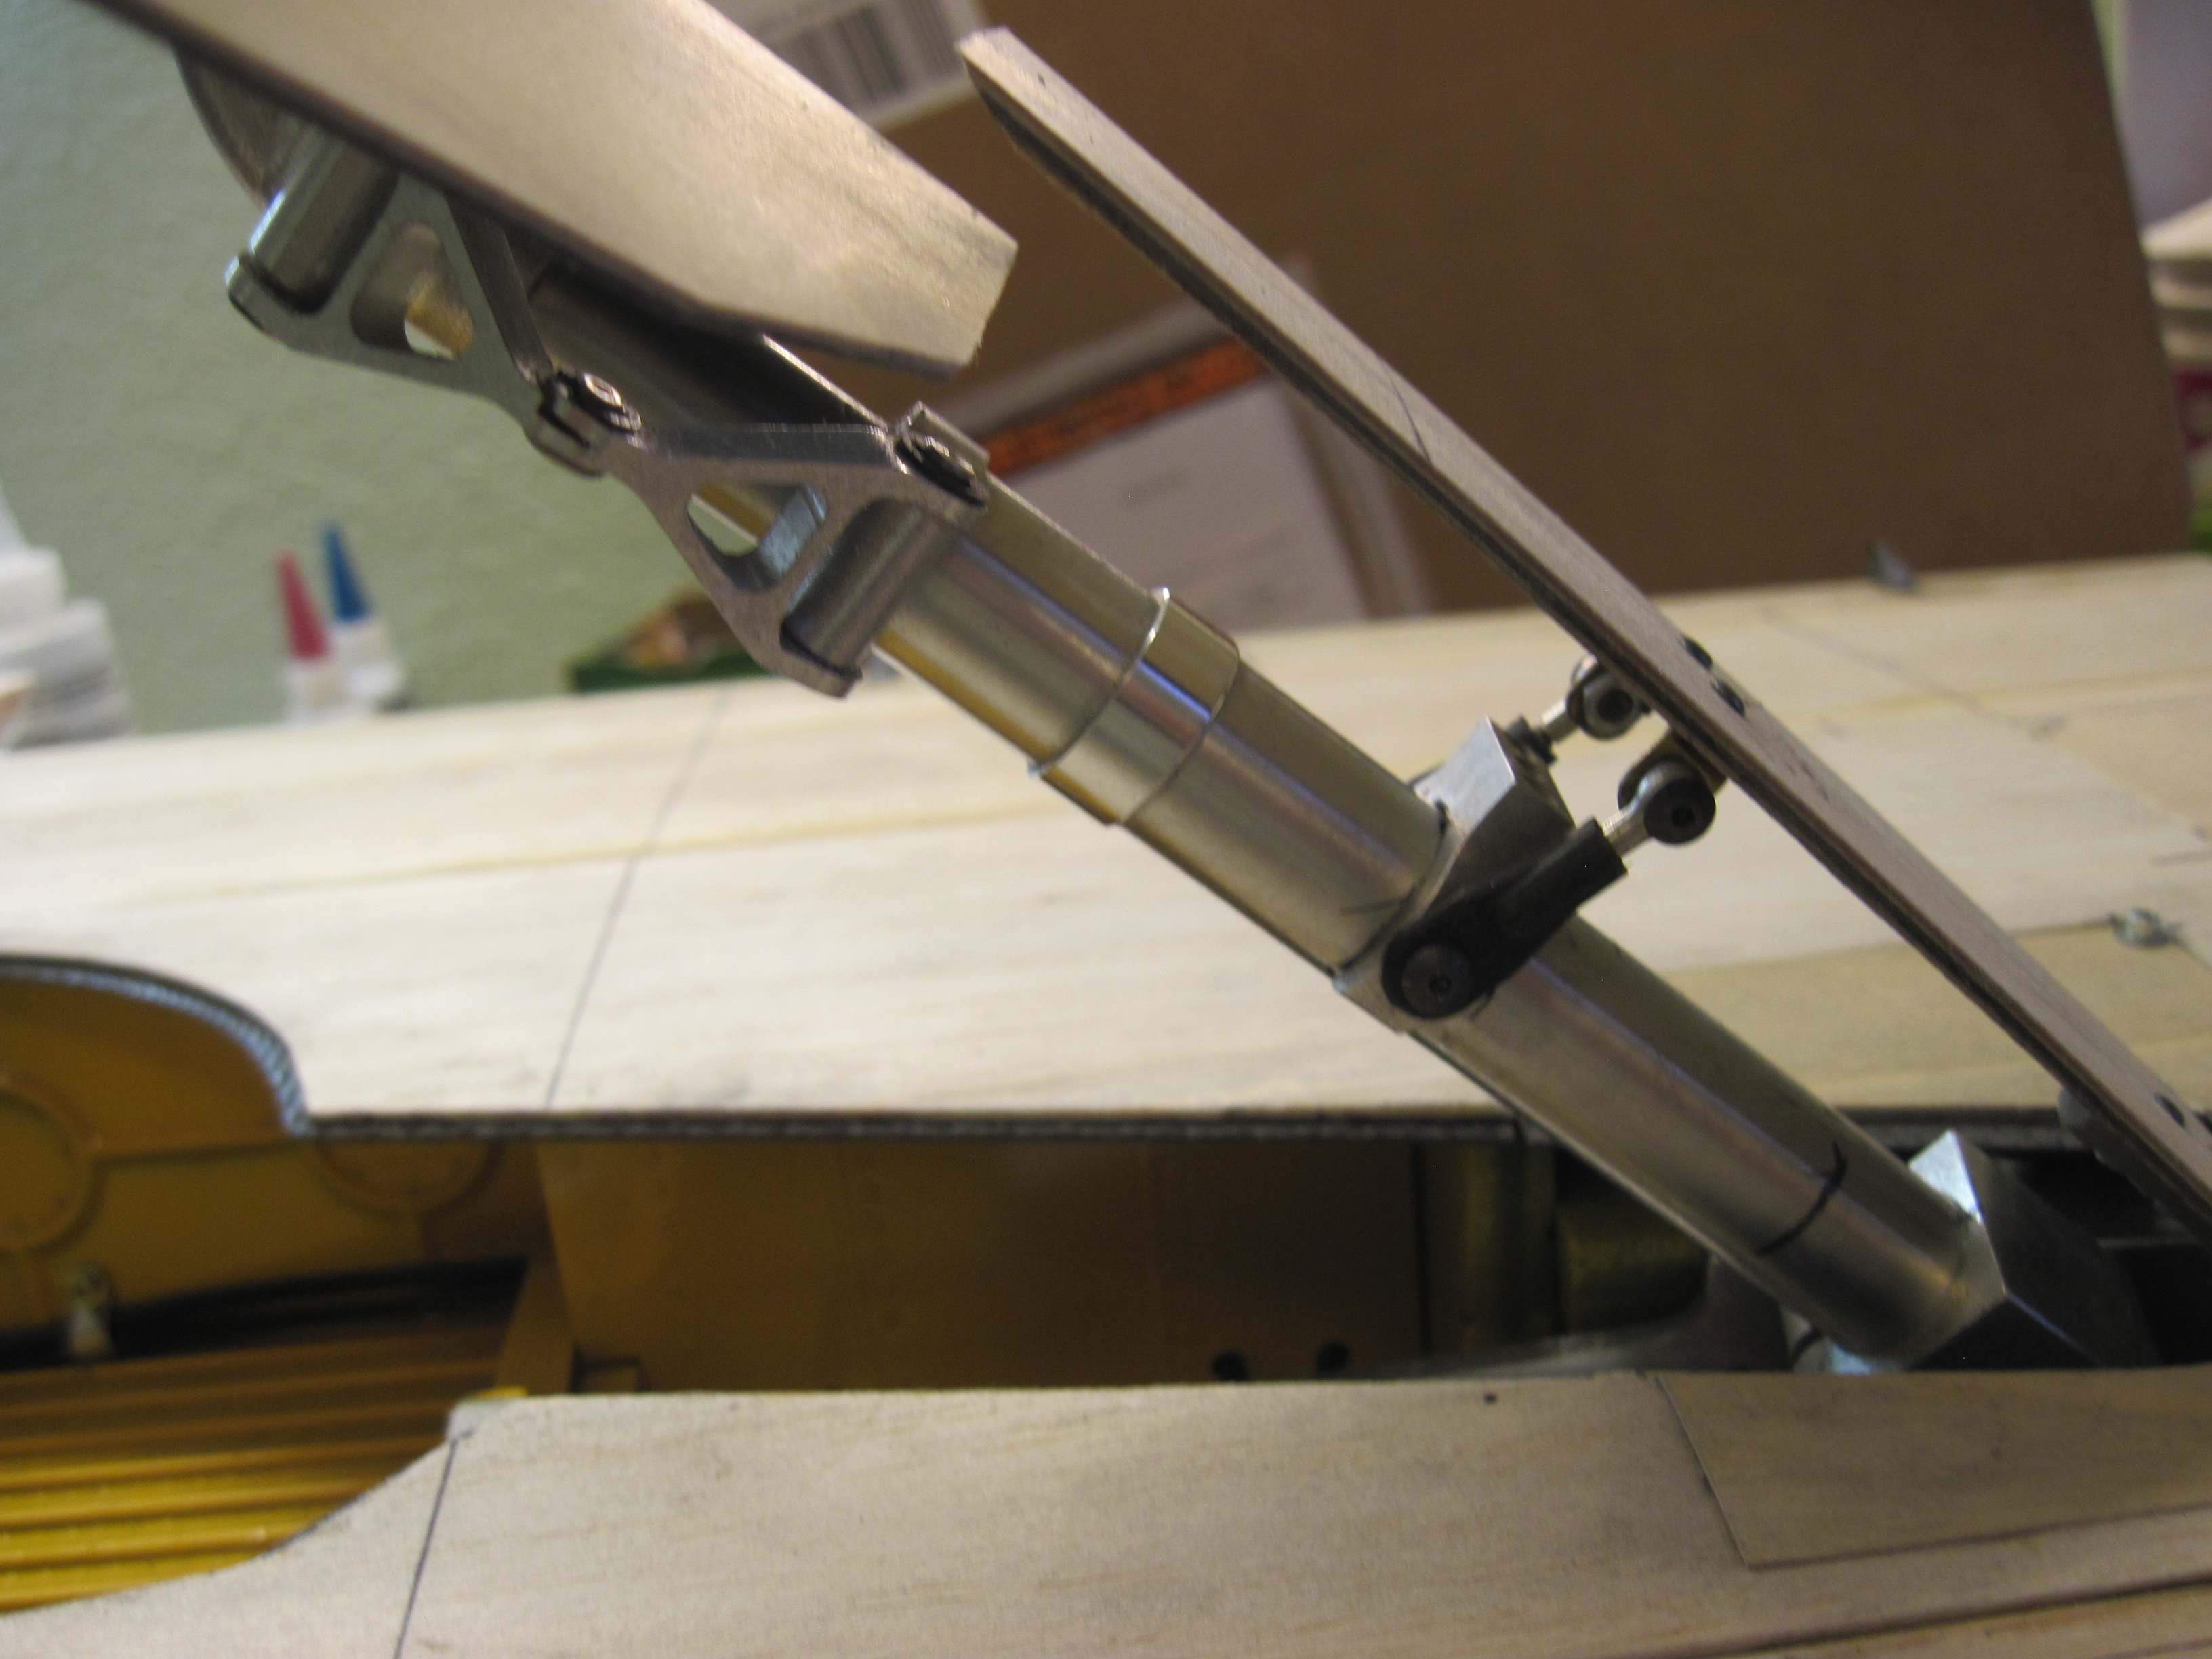
I finally got the inner gear door installed. I tried a couple hinging and ended up with a piano hinge. It is not scale but very functional. The full scale looks to have an offset hinge so I will do that on the Meister.


The air cylinder is correctly placed so the door is open at ninety degrees and closes tight so it is still pulling on the door when closed for a tight fitting.


The wheel clears the cylinder with a little wiggle room.

Next I will work on the upper door.


TB
The air cylinder is correctly placed so the door is open at ninety degrees and closes tight so it is still pulling on the door when closed for a tight fitting.
The wheel clears the cylinder with a little wiggle room.
Next I will work on the upper door.
TB
Last edited by TonyBuilder; 04-29-2015 at 05:52 AM.
 05-03-2015, 04:08 AM
#2066
ARCA had our warbird this weekend, it was a blast, over 100 planes and 53 pilots. Next year I will have Miss Fire in the mix.
Here is a video of the action.
https://youtu.be/y8fZ3vyNKMQ


Next year will be even bigger.
TB
Here is a video of the action.
https://youtu.be/y8fZ3vyNKMQ
Next year will be even bigger.
TB
Last edited by TonyBuilder; 05-03-2015 at 04:10 AM.
05-04-2015, 08:06 AM
#2072
Getting some work in before I have to go back to real work.
The gear doors are done on the right wing and I used some of the parts from the prototype, as this will save having to make new ones and figuring what works.
The upper door is hinged with a single Robart hinge pin and is bolted with two screws threaded into the hinge.


The linkage holding the door is the same as on the prototype and works very well.

The doors close without binding. The higher you place the bracket the better as it lifts the upper door first. I have a slight gap as I don't want to redo the linkages as to move it higher. This works fine for this build.


The doors close tight and there is only a small gape at the upper door and the lower door. Plus a gap at the upper door where it meats the wing but this is mostly closed when the gear is down.


https://youtu.be/YVZyPIzS4Bg
Next I will do the left wing.
TB
The gear doors are done on the right wing and I used some of the parts from the prototype, as this will save having to make new ones and figuring what works.
The upper door is hinged with a single Robart hinge pin and is bolted with two screws threaded into the hinge.
The linkage holding the door is the same as on the prototype and works very well.
The doors close without binding. The higher you place the bracket the better as it lifts the upper door first. I have a slight gap as I don't want to redo the linkages as to move it higher. This works fine for this build.
The doors close tight and there is only a small gape at the upper door and the lower door. Plus a gap at the upper door where it meats the wing but this is mostly closed when the gear is down.
https://youtu.be/YVZyPIzS4Bg
Next I will do the left wing.
TB
Last edited by TonyBuilder; 05-04-2015 at 09:39 AM.
05-05-2015, 04:44 AM
#2075
Got the left wing gear doors cut and skinned.


The inner door is hinged and ready for the linkage to be installed.


I started to detail the upper door to see how that would work.


Almost got the gear all done. I am hoping to have the wing ready to cover next weekend.
The schedule for this year is creeping up on me. Bomber Field has there warbird on June 6th and then the next week is WBOT, or the Scale masters qualifier.
The next qualifier is in August at Bomber field and then the championship is also at Bomber field in October of this year.
Also thinking of going to Joe Nall next week so we will see.
TB
The inner door is hinged and ready for the linkage to be installed.
I started to detail the upper door to see how that would work.
Almost got the gear all done. I am hoping to have the wing ready to cover next weekend.
The schedule for this year is creeping up on me. Bomber Field has there warbird on June 6th and then the next week is WBOT, or the Scale masters qualifier.
The next qualifier is in August at Bomber field and then the championship is also at Bomber field in October of this year.
Also thinking of going to Joe Nall next week so we will see.
TB
Last edited by TonyBuilder; 05-05-2015 at 04:49 AM.