


Sig Spacewalker 1/3 scale (by rookie)
 09-15-2014, 03:40 AM
#401

No offence taken Kevin, I knew where you were heading, just gave you a gentle heads-up at that time... we are one big happy family and should be looking out for each other!
 09-15-2014, 07:48 AM
#402
"then put an oz. scale under the tail wheel will that be the amount of out of balance weight needed in the nose to trim it to thrust line."
Don't forget to multiply the weight shown on the scale by the fractional distance between the balance point to tail wheel and the balance point to weight in nose.
Most of the time I just stack wheel weights on the nose until it balances then melt them in a tin can and pour the molten lead into a mold sized to fit their intended location. Using your idea should save time guessing how much weight to stack up.
Thanks for the idea
Jerry
09-15-2014, 07:49 AM
#403
Thread Starter

Join Date: Jul 2012
Location: Missouri
Posts: 1,127
Likes: 0
Received 0 Likes
on
0 Posts
Vincent, you and the Gang (you know who you are, don't list least I leave someone off) have made my joining the family a warm experience.
The world can be a cold place sometimes, when I post it has always been responded to with the sentiment of "Good Will Toward Man"
Greatful I am !
Robert, that scraggily edge is die crushed. It is slightly oversized and also gets rounded. I will add a backing plate as you suggest. Thanks
Kevin
The world can be a cold place sometimes, when I post it has always been responded to with the sentiment of "Good Will Toward Man"
Greatful I am !
Robert, that scraggily edge is die crushed. It is slightly oversized and also gets rounded. I will add a backing plate as you suggest. Thanks
Kevin
09-15-2014, 08:09 AM
#404
Thread Starter
Join Date: Jul 2012
Location: Missouri
Posts: 1,127
Likes: 0
Received 0 Likes
on
0 Posts
Leroy, I am the wrong guy to ask. But as Jerry stated. It makes sense you would be very much in the ball park.
I read somewhere that they balance the full size with scales under the wheels, plus a mathematical formula.
Algebra 1 was the pinnacle in my math career, sorry to say.
For this SW, I plan to make a Vanessa jig to balance her.
Kevin
I read somewhere that they balance the full size with scales under the wheels, plus a mathematical formula.
Algebra 1 was the pinnacle in my math career, sorry to say.
For this SW, I plan to make a Vanessa jig to balance her.
Kevin
09-15-2014, 01:02 PM
#405

Well kevin I'm going to give that a trial run on my next plane. Because of some of the things we do on our planes and the size of them I find it cunbersome to just handle them on a ballance stand. I did some guessing when I modified my space walker and was plesantly surprised that I could ballance it with batteries and took a larger one in the chin, glad I made that hatch and mount for weight.
Some of the things your doing to your plane do foster ideas for improving strength where needed in the event of. Truth is we,I , don't always think along those lines while building and the tail is one of the things first to suffer a bummer.
Keep up the good work, lots of ideas and in the end you'll have a very nice plane.
Leroy
09-15-2014, 01:42 PM
#406
Thread Starter
Join Date: Jul 2012
Location: Missouri
Posts: 1,127
Likes: 0
Received 0 Likes
on
0 Posts
Thank You Leroy 
I have a question for all you guys who have done pull pull setups on the rudder.
Concerning attachment of the cables (cable termination). The kit offers " wrap fine wire around like a bandage and CA.
Dubro has cable crimps. The Crimps scare me with the chance of cable cut on the crimp. Not to let go until flight.
What are some alternative ways to terminate the cable ?
Kevin
09-15-2014, 01:54 PM
#407

Join Date: Sep 2006
Location: The Sunshine state, when it's not raining!
Posts: 8,131
Likes: 0
Received 2 Likes
on
2 Posts
Take one of your small wire cutters to your sander and flatten ever so lightly the cutting edge. Then you can do the hook and loop ( double loop for me) method without concern of cutting the wire. There really is no other way that is as strong and safe when using wire. But a quick search on Tower will yield a couple connection options, although I am not recommending them.
I use the cable, thimbles, and sleeves from http://vogelsang-aeroscale.com/tools.html, simply the best.
I use the cable, thimbles, and sleeves from http://vogelsang-aeroscale.com/tools.html, simply the best.
Last edited by acerc; 09-15-2014 at 01:56 PM.
09-15-2014, 02:13 PM
#410
Thread Starter
Join Date: Jul 2012
Location: Missouri
Posts: 1,127
Likes: 0
Received 0 Likes
on
0 Posts
Now that stuff looks sweet.
I see the product, price. But cant find a way to order ?
sorry, never mind. I found there number.
I see the product, price. But cant find a way to order ?
sorry, never mind. I found there number.
Last edited by Melchizedek; 09-15-2014 at 02:19 PM.
09-15-2014, 02:37 PM
#411
Join Date: Sep 2006
Location: The Sunshine state, when it's not raining!
Posts: 8,131
Likes: 0
Received 2 Likes
on
2 Posts
What I do is run the cable through the sleeve, around the thimble, back through the sleeve, pull the sleeve up tight to the thimble, run the cable back through the sleeve from the thimble side thereby looping it around the sleeve, then crimp. If you use the flattened cutters as I described, you will not cut through the sleeve.
09-15-2014, 03:24 PM
#412
Thread Starter
Join Date: Jul 2012
Location: Missouri
Posts: 1,127
Likes: 0
Received 0 Likes
on
0 Posts
Vogolsang's cable keepers look to be bullet proof and idiot resistant  Therefor I should be alright
 ")
They were closed when I called so sent them an email.
Was a little surprised that they don't do web orders. But that's ok.
Thank you for the heads up Robert. I was not excited about the two options I was aware of.
I feel this option is no sweat
Kevin
Therefor I should be alright They were closed when I called so sent them an email.
Was a little surprised that they don't do web orders. But that's ok.
Thank you for the heads up Robert. I was not excited about the two options I was aware of.
I feel this option is no sweat
Kevin
09-15-2014, 03:34 PM
#414
Join Date: Sep 2006
Location: The Sunshine state, when it's not raining!
Posts: 8,131
Likes: 0
Received 2 Likes
on
2 Posts
My pleasure Kevin. I did not like what the usual hobby stuff offered either, and made a couple myself. Then I found and bought from overseas, then one day was at an event talking with Gutz, owner of Vogelsang, and learned of his stateside products.
09-16-2014, 07:28 AM
#415
Thread Starter
Join Date: Jul 2012
Location: Missouri
Posts: 1,127
Likes: 0
Received 0 Likes
on
0 Posts
Well, got going on the fuse/wing. First up was to index the wing to the fuse. I started doing this way back when but went down another rabbit trail.
When them waskily wabbits rear there heads, I cant help myself.
I intend to permanently glue the center wing section to the fuse but not just yet. Having said that I need the wing in place fit the under belly. So I dowel pinned it in place. This will give me shear strength when glued.
I used two 3/8 hdwd dowels. I'v had these guys for over 25 years. Back when I used to dowel boards together to make panels. Biscuits are just to easy to do that anymore. Having said that, a doweled lumber panel is way better imho.
I used a 3/8 brad point and made a drill jig on the drill press. This assured nice square wobble free holes. No weebles in my shop.


I then sheeted the chin with 3/8 balsa as per sig design. This then gets sanded to a compound shape.
Artistic license is required here. It goes from a rounded straight front to a triangular back.
This covers where I am putting the ignition and opti kill switch. It is also a wire way between nose and mid fuse.
So I am going to put a hatch here.
I covered the nose with some monocoat and waxed it. I used 1 layer of heavy CF cloth I had left over from my bike.
3 layers of 7.5 oz cloth, and 1 layer 5 oz on top and then a layer of peel ply on that.. I have little experience with how much and how little cloth to make a stiff door.
I just did what seemed good to me. I am not worried about a heavy door here. With all I got going in the back.
I used the CF for two reasons. I do know from experience that it sets up much stiffer than glass does. So I am fairly certain I will get the rigidity I want. second reason I used it, It was handy. Another cool thing if it is the first layer down. Its obvious when the other layers are properly wetted out. It turns very black.

These next 2 shots are just for grins. This plane looks huge in my shop.

Kevin
When them waskily wabbits rear there heads, I cant help myself.
I intend to permanently glue the center wing section to the fuse but not just yet. Having said that I need the wing in place fit the under belly. So I dowel pinned it in place. This will give me shear strength when glued.
I used two 3/8 hdwd dowels. I'v had these guys for over 25 years. Back when I used to dowel boards together to make panels. Biscuits are just to easy to do that anymore. Having said that, a doweled lumber panel is way better imho.
I used a 3/8 brad point and made a drill jig on the drill press. This assured nice square wobble free holes. No weebles in my shop.
I then sheeted the chin with 3/8 balsa as per sig design. This then gets sanded to a compound shape.
Artistic license is required here. It goes from a rounded straight front to a triangular back.
This covers where I am putting the ignition and opti kill switch. It is also a wire way between nose and mid fuse.
So I am going to put a hatch here.
I covered the nose with some monocoat and waxed it. I used 1 layer of heavy CF cloth I had left over from my bike.
3 layers of 7.5 oz cloth, and 1 layer 5 oz on top and then a layer of peel ply on that.. I have little experience with how much and how little cloth to make a stiff door.
I just did what seemed good to me. I am not worried about a heavy door here. With all I got going in the back.
I used the CF for two reasons. I do know from experience that it sets up much stiffer than glass does. So I am fairly certain I will get the rigidity I want. second reason I used it, It was handy. Another cool thing if it is the first layer down. Its obvious when the other layers are properly wetted out. It turns very black.
These next 2 shots are just for grins. This plane looks huge in my shop.
Kevin
09-16-2014, 09:42 AM
#416

What I do is run the cable through the sleeve, around the thimble, back through the sleeve, pull the sleeve up tight to the thimble, run the cable back through the sleeve from the thimble side thereby looping it around the sleeve, then crimp. If you use the flattened cutters as I described, you will not cut through the sleeve.
 09-16-2014, 05:35 PM
#417
Thread Starter
Join Date: Jul 2012
Location: Missouri
Posts: 1,127
Likes: 0
Received 0 Likes
on
0 Posts
I thought it a good idea to take care of the internals in the rear fuse before closing it up.
Pull has to wait. No response yet from Vogelsang.
I needed a second elevator horn. Went to the hobby shop and they don't have one the size I need.
Great Leaping Lizards Batman!! We have to wait a week for a horn. Not so fast Robin!! To the BatCave !!

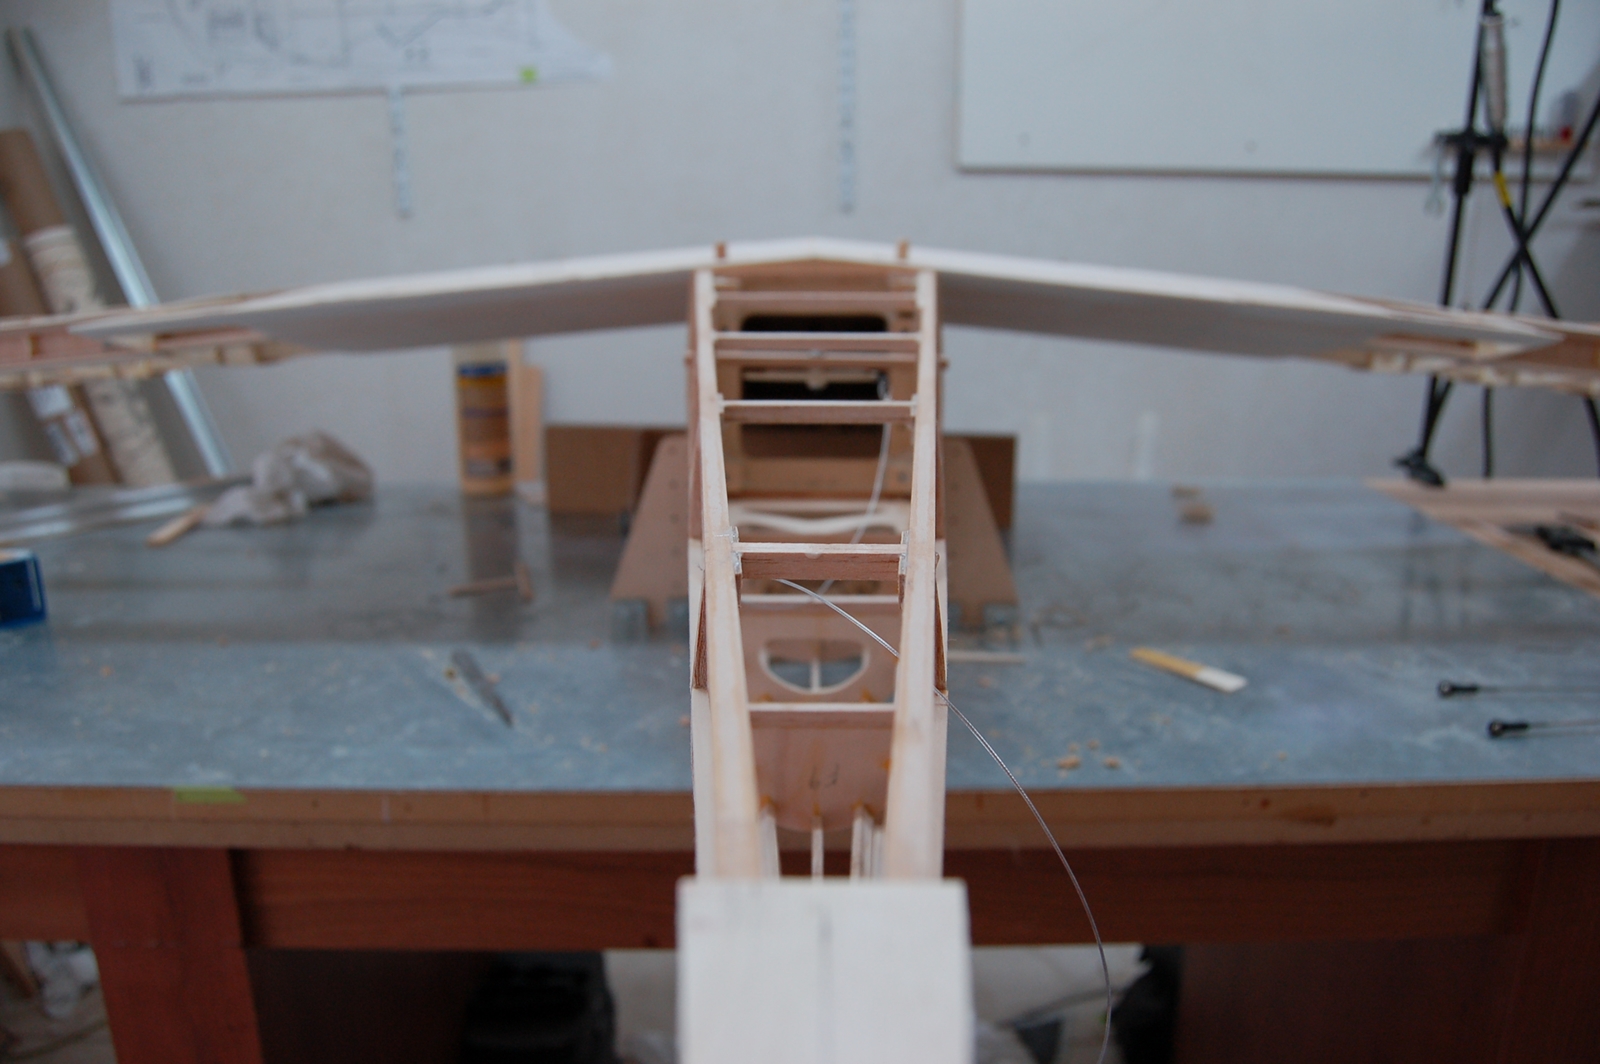
Next up I thought I would index the horizontal stab. Sig says make the trailing edge parallel with the wing trailing edge. So I leveled up the fuse and squared up off the table at the wing trailing edge so I hade something solid to put a tape on.

Once the stab was dead on I glued indexing blocks underneath. When It comes time to glue it down I only have to worry about level.

I had to lay on the floor to get this next shot. When I got down there I forg........ oh yea !


I have a question on the elevator horn mount. What I would like to do is set the blindnuts under the surface so there is nothing on top of the elevator.
The mount blocks are beach. Will there be an issue with wood crush and loose horn if I do this ( ie no top plate) ?

Kevin
Pull has to wait. No response yet from Vogelsang.
I needed a second elevator horn. Went to the hobby shop and they don't have one the size I need.
Great Leaping Lizards Batman!! We have to wait a week for a horn. Not so fast Robin!! To the BatCave !!
Next up I thought I would index the horizontal stab. Sig says make the trailing edge parallel with the wing trailing edge. So I leveled up the fuse and squared up off the table at the wing trailing edge so I hade something solid to put a tape on.
Once the stab was dead on I glued indexing blocks underneath. When It comes time to glue it down I only have to worry about level.
I had to lay on the floor to get this next shot. When I got down there I forg........ oh yea !
I have a question on the elevator horn mount. What I would like to do is set the blindnuts under the surface so there is nothing on top of the elevator.
The mount blocks are beach. Will there be an issue with wood crush and loose horn if I do this ( ie no top plate) ?
Kevin
Last edited by Melchizedek; 09-16-2014 at 05:40 PM.
09-16-2014, 05:50 PM
#418
Join Date: Sep 2006
Location: The Sunshine state, when it's not raining!
Posts: 8,131
Likes: 0
Received 2 Likes
on
2 Posts
Counter sunk flush, blind nuts work great. I have my cub one piece wing held on this way. But! If you really have concern here is another option that I have done when strength was in question on a moving surface. Drill the hole to hold a threaded coupler screwed into the blind nut and soldered, epoxy these two parts in. Then the horn bolts screw into the threaded coupler. This gives no room for flexing of the bolt or blind nut.
Last edited by acerc; 09-16-2014 at 05:57 PM.
09-16-2014, 06:47 PM
#420
Thread Starter
Join Date: Jul 2012
Location: Missouri
Posts: 1,127
Likes: 0
Received 0 Likes
on
0 Posts
Thanks Robert /Vince
Robert I had to read your option 2 a couple of three times before it clicked.
Sometimes hard to visualize anothers thought.
Kinda like speaking Japanese. You use English very slowly and speak loudly LOL.
Option 2 sounds fix it and forget it. Thanks
Kevin
Robert I had to read your option 2 a couple of three times before it clicked.
Sometimes hard to visualize anothers thought.
Kinda like speaking Japanese. You use English very slowly and speak loudly LOL.
Option 2 sounds fix it and forget it. Thanks
Kevin
09-17-2014, 01:51 PM
#421
Thread Starter
Join Date: Jul 2012
Location: Missouri
Posts: 1,127
Likes: 0
Received 0 Likes
on
0 Posts
Spent the day setting up servo connections for the tail feathers while I still had full access to rear fuse.
Just before that though I popped the front hatch blank off the chin. It is stiff enough but might add another layer or 2 of glass to beef her up


https://www.youtube.com/watch?v=_70gpSjZdHM&feature=youtu.be
Just before that though I popped the front hatch blank off the chin. It is stiff enough but might add another layer or 2 of glass to beef her up
https://www.youtube.com/watch?v=_70gpSjZdHM&feature=youtu.be
09-19-2014, 02:25 PM
#422
Thread Starter
Join Date: Jul 2012
Location: Missouri
Posts: 1,127
Likes: 0
Received 0 Likes
on
0 Posts
Did some surgery on the left hip of the front fuse. This is the location of the fuel dot and switch.
I cut everything out except longeron. This was left for the skin to sit on. Later I will lay up a Fiberglass hatch on the skin. Then make the cut out for the hatch. I set the mounting plate back a bit to accommodate space for the hinges.


I then skinned the front fuse.


Kevin
I cut everything out except longeron. This was left for the skin to sit on. Later I will lay up a Fiberglass hatch on the skin. Then make the cut out for the hatch. I set the mounting plate back a bit to accommodate space for the hinges.
I then skinned the front fuse.
Kevin
 09-19-2014, 06:44 PM
#424
Kevin I never used the 1/64" wing wrap on the wing but I did use it for the base of the wing fairing, it works well for that if your doing one. Very nice joinery fit up if I say so myself.
Leroy
Leroy
09-19-2014, 07:17 PM
#425
Thread Starter
Join Date: Jul 2012
Location: Missouri
Posts: 1,127
Likes: 0
Received 0 Likes
on
0 Posts
Thank you David, Your build is fabulous. "We just need more of it"
Leroy,
I am not going to do the wing wrap at the joint either. I do intend to do a wing fillet like you did with yours. It really gives the plane pizazz.
I have not ever done a fillet. I understand the dynamics of making it but unsure on size. Am pondering this.
Happy for suggestions on this ???
Now get busy David. You have a plane to build
Kevin
Last edited by Melchizedek; 09-20-2014 at 08:56 AM.