


G&L 1/5 DHC chipmunk - diary of a build.


 06-27-2014, 09:29 AM
#227
Well the cowl filets are coming along, man it is looking much better now. As some of you already know from my P-47 build I am obsessed with tight fitting doors and hatches. ")


Once I sand this I will install the door latches then do final filling, that should do it for the doors. Then I will add details after I prime it.


TB
Once I sand this I will install the door latches then do final filling, that should do it for the doors. Then I will add details after I prime it.
TB
06-27-2014, 03:18 PM
#228
Another great day today, the cowl came out better then I expected, so stoked 
The doors and the cowl are as one.


The lip is nice and strong, substantial and will hold the door really good.


I need to finish the inside of the door.

You can see how nice the line came out, when it is closed it disappears. Being the latch has not been installed and the air cylinder is not installed yet it is open just a bit when at rest.


Next I will do the latches and the air cylinders.


One thing I will do to the fuselage once the wing is mated to the fus, is to clos this big exit gap up. I don't need this much exit for cooling, half will do.


So stoked
TB
The doors and the cowl are as one.
The lip is nice and strong, substantial and will hold the door really good.
I need to finish the inside of the door.
You can see how nice the line came out, when it is closed it disappears. Being the latch has not been installed and the air cylinder is not installed yet it is open just a bit when at rest.
Next I will do the latches and the air cylinders.
One thing I will do to the fuselage once the wing is mated to the fus, is to clos this big exit gap up. I don't need this much exit for cooling, half will do.
So stoked
TB
06-27-2014, 04:15 PM
#229

My Feedback: (2)

Join Date: Jun 2013
Location: Evansville, IN
Posts: 429
Likes: 0
Received 0 Likes
on
0 Posts
Tony, Looking really good.
When using the Easy Sand - how does it hold up to chipping? On the areas in your pictures I did the same thing with bondo and it chipped if I wasn't really careful.
Did you post on the P-47 thread a picture of the Easy Sand? I need to get some if it will hold up to chipping as I damaged my P-40 on maiden - damn ignition died and I landed in the muddy part of the field and it flipped and damaged the vertical stabilizer.
Thanks
Keith
06-27-2014, 04:21 PM
#230
My Feedback: (2)
Join Date: Jun 2013
Location: Evansville, IN
Posts: 429
Likes: 0
Received 0 Likes
on
0 Posts
Tony, Looking really good.
When using the Easy Sand - how does it hold up to chipping? On the areas in your pictures I did the same thing with bondo and it chipped if I wasn't really careful.
The areas in this picture on my door is what chipped. Could be my bondo wasn't that good or I mixed it wrong.

Did you post on the P-47 thread a picture of the Easy Sand? I need to get some if it will hold up to chipping as I damaged my P-40 on maiden - damn ignition died and I landed in the muddy part of the field and it flipped and damaged the vertical stabilizer.
Thanks
Keith
When using the Easy Sand - how does it hold up to chipping? On the areas in your pictures I did the same thing with bondo and it chipped if I wasn't really careful.
The areas in this picture on my door is what chipped. Could be my bondo wasn't that good or I mixed it wrong.
Did you post on the P-47 thread a picture of the Easy Sand? I need to get some if it will hold up to chipping as I damaged my P-40 on maiden - damn ignition died and I landed in the muddy part of the field and it flipped and damaged the vertical stabilizer.
Thanks
Keith
06-28-2014, 01:03 AM
#231
Keith, yes I did post on my P-47 thread. You can get the easy sand threw amazon. As for being strong and not chipping. It is very strong but it is not impervious to chipping, depends on how thick and how you mix it. I mix pretty rich. I haven't used it enough to know but once it has some paint on it, it will take a lot to chip or break it, amazing stuff.
TB
TB
 06-28-2014, 06:14 AM
#234
The mornings progress. I got the engine door latches on the left side done, came out great 
I laid out the holes on both doors for drilling and cutting the notches in.


I ground down a fiber wheel to a much smaller size so I could get a good start on the notches. The holes are 1/8".

1/8" G-10 is used for the latch arm.
A second layer was added to bring it to 1/4" then tapered to match the cowls couture.


Getting them just right takes patients


I installed the door and taped it shut nice and tight, then I fitted the arms and glued them in with thin CA. I will threw bolt them once all is good.


Taking the tape off shows a perfect fit and no adjustments needed.


As for the durability of the door surround with the Easy Sand I always hit the joint line with thin CA. The easy sand is porous and soaks it up solidifying the corners.


Now to do the right side.
TB
I laid out the holes on both doors for drilling and cutting the notches in.
I ground down a fiber wheel to a much smaller size so I could get a good start on the notches. The holes are 1/8".
1/8" G-10 is used for the latch arm.
A second layer was added to bring it to 1/4" then tapered to match the cowls couture.
Getting them just right takes patients
I installed the door and taped it shut nice and tight, then I fitted the arms and glued them in with thin CA. I will threw bolt them once all is good.
Taking the tape off shows a perfect fit and no adjustments needed.
As for the durability of the door surround with the Easy Sand I always hit the joint line with thin CA. The easy sand is porous and soaks it up solidifying the corners.
Now to do the right side.
TB
Last edited by TonyBuilder; 06-28-2014 at 06:17 AM.
06-28-2014, 08:09 AM
#235
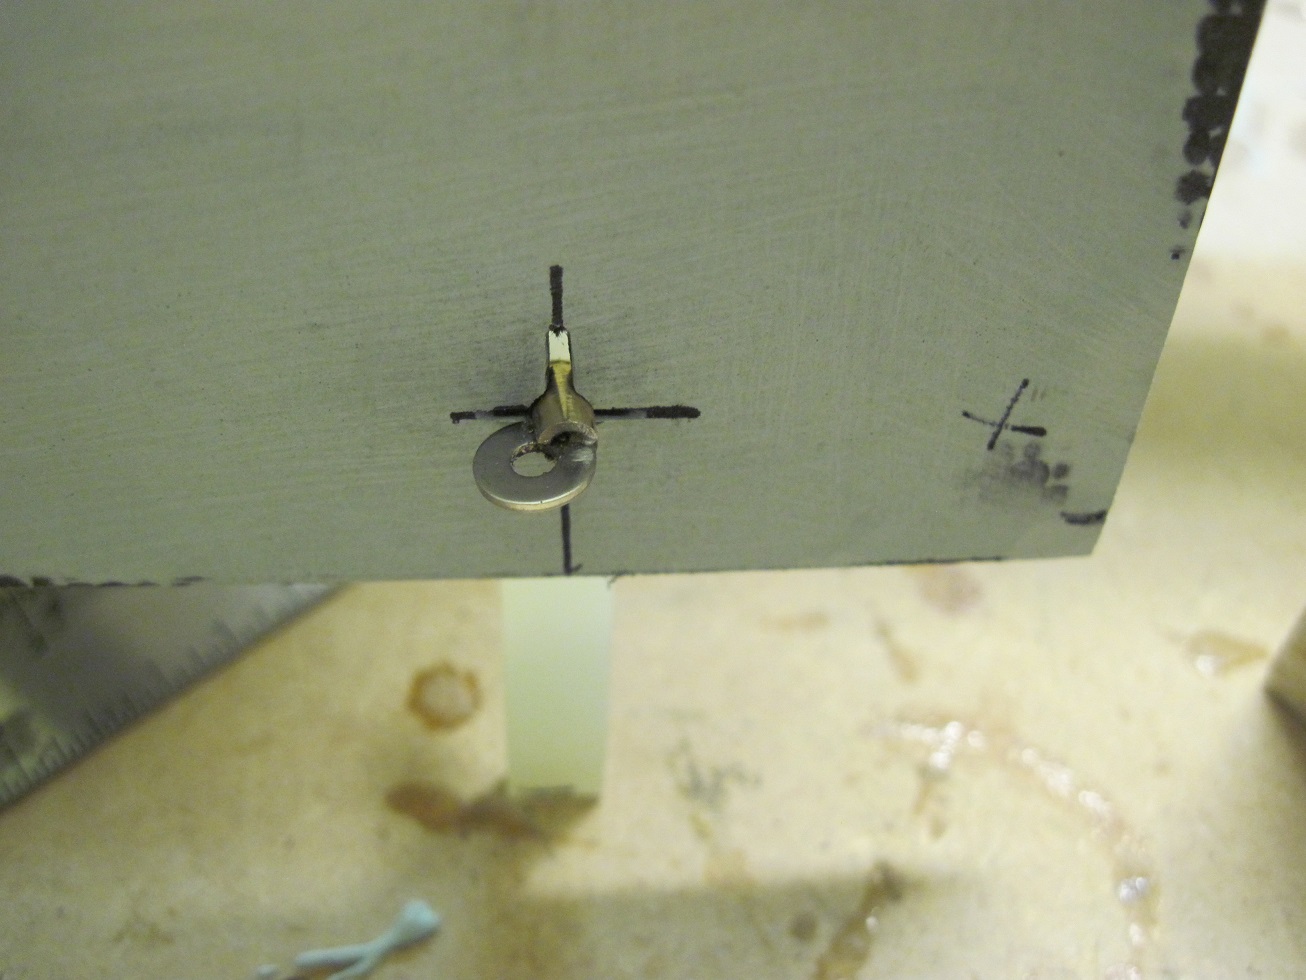
Both doors are done. I also got the latch arms secured with two countersunk 1-72 stainless steel screws.
Both doors fit nice and snug, still need to adjust the opening for the latches so the operate easily, there tight right now.


I may drill out the washer to increase the hole,, might look better!


Two 1-72 screws per arm. This will also help hold the lip securely to the cowl, you all know what vibration does


Post video.
http://youtu.be/FUv0pla3Fy8
Onward.
TB
Both doors fit nice and snug, still need to adjust the opening for the latches so the operate easily, there tight right now.
I may drill out the washer to increase the hole,, might look better!
Two 1-72 screws per arm. This will also help hold the lip securely to the cowl, you all know what vibration does
Post video.
http://youtu.be/FUv0pla3Fy8
Onward.
TB
Last edited by TonyBuilder; 06-28-2014 at 11:44 AM.
06-28-2014, 11:09 AM
#236
I put the finishing touches on the cowl frame.
All three aluminum rods are in to support the front of the cowl.


I glased the inside and used some scraps of carbon fiber to reinforce the pan.


I hit all the wood to fuel proof it and I also hit all the easy sand, it is porous and will soak it in. I will sand it when it dries.


Hitting the door lip with resin also will help to keep it from chipping.

Break time.
TB
All three aluminum rods are in to support the front of the cowl.
I glased the inside and used some scraps of carbon fiber to reinforce the pan.
I hit all the wood to fuel proof it and I also hit all the easy sand, it is porous and will soak it in. I will sand it when it dries.
Hitting the door lip with resin also will help to keep it from chipping.
Break time.
TB
06-29-2014, 02:58 AM
#237
So after giving it some consideration I am opting to not do air activated doors on the engine doors. I may do a spring activated kickstand later down the road, we will see.
The main reason in the first place for doing the doors is for scale detailing, and to be able to have a concealed fastening system for the cowl (cowl ring).
Second is access to the engine for tuning. I want to be able to pull the door (s) off when doing run-ups, tuning and maintenance. It takes all but 5 seconds to pull and replace the doors. I don't want un-needed complications with air hoses and cylinder linkages for something that will not be used.
I don't plan on opening these doors during everyday flying, only at shows and only as needed for tuning. So it only makes sense to just have a static kickstand, plus sometimes I would only want to open one door and not always both.
So the cowl is done short of scale detailing.


The cowl weighs in at 1lb-4-1/2oz. That should be good being on the first chippy I added 32oz at the maiden and ended up taking off 12oz after I put the DLE55 on. I should be able to balance with the equipment, if weight is needed I can do some liquid lead in the chine of the cowl.


TB
The main reason in the first place for doing the doors is for scale detailing, and to be able to have a concealed fastening system for the cowl (cowl ring).
Second is access to the engine for tuning. I want to be able to pull the door (s) off when doing run-ups, tuning and maintenance. It takes all but 5 seconds to pull and replace the doors. I don't want un-needed complications with air hoses and cylinder linkages for something that will not be used.
I don't plan on opening these doors during everyday flying, only at shows and only as needed for tuning. So it only makes sense to just have a static kickstand, plus sometimes I would only want to open one door and not always both.
So the cowl is done short of scale detailing.
The cowl weighs in at 1lb-4-1/2oz. That should be good being on the first chippy I added 32oz at the maiden and ended up taking off 12oz after I put the DLE55 on. I should be able to balance with the equipment, if weight is needed I can do some liquid lead in the chine of the cowl.
TB
Last edited by TonyBuilder; 06-29-2014 at 03:10 AM.
06-29-2014, 10:25 AM
#242
Banned
06-29-2014, 10:28 AM
#243
For the most part the filets on the top of the fuselage just behind the cowl is completed.
On this fuselage the noes tapers quit a bit to accommodate the super chipmunk cowl. Being this cowl is for a different kit the fit was really close but not a perfect match. So I knew I was going to have to do some filling to get the lines to sleek out.
So I started to build up the area to match up with the cowl. I also moved the cowl up a bit so that compounded the tapering issue.


There is a distinctive detail where the cowl is flush with the top of the fuselage and as it turns down to the side it opens up for cooling, from there it is open threw the bottom until it goes back up the side. So I am creating this detal the best I can.


This is what it will look like when I am done. You can see the grey part in front of the canopy is overlaid and proud of the sides of the fuselage.
 This is a good shot to what I am looking for.
The bottom section is next but at least this is ready for the canopy.


I still need to fine tune this but it is coming together and looking good.


One of the signatures to this plane is its sleek lines from the canopy forward, I am close to getting that


If any of you are wondering what my target weight is, it is 24-25lb. My first build was just over 22lb and flew great with the DLE55. Being this is more of a scale build of the military trainer and not the super chipmunk it will fly great and very scale like at 25lb.
I am done with the front and will move to the tail feathers next.
TB
On this fuselage the noes tapers quit a bit to accommodate the super chipmunk cowl. Being this cowl is for a different kit the fit was really close but not a perfect match. So I knew I was going to have to do some filling to get the lines to sleek out.
So I started to build up the area to match up with the cowl. I also moved the cowl up a bit so that compounded the tapering issue.
There is a distinctive detail where the cowl is flush with the top of the fuselage and as it turns down to the side it opens up for cooling, from there it is open threw the bottom until it goes back up the side. So I am creating this detal the best I can.
This is what it will look like when I am done.
The bottom section is next but at least this is ready for the canopy.
I still need to fine tune this but it is coming together and looking good.
One of the signatures to this plane is its sleek lines from the canopy forward, I am close to getting that
If any of you are wondering what my target weight is, it is 24-25lb. My first build was just over 22lb and flew great with the DLE55. Being this is more of a scale build of the military trainer and not the super chipmunk it will fly great and very scale like at 25lb.
I am done with the front and will move to the tail feathers next.
TB
Last edited by TonyBuilder; 06-29-2014 at 10:32 AM.
06-30-2014, 03:35 AM
#244
Doing a little tinkering.
So I am attempting to make a mold for the air scoops on the cowl. I need two of the large ones, one smaller and one round.
I am making the plug out of soft balsa, easiest to shape for me.


I am glassing it with just resin so I can sand it smooth and it wont be so soft.


One on the right side, one on the chine (the round one) and one on the left side. Then there are two on the top. A smaller one and a rectangular one at the back of the cowl.


I have two options so far. One is to use some clear Lexan and heat form it over the plug like a light leans. then cut that out and glue it to the cowl, or even use that as a mold to layup some weave and resin.
I will play around with this and see what works best, new territory for me being I don't have a vacuum former.
TB
So I am attempting to make a mold for the air scoops on the cowl. I need two of the large ones, one smaller and one round.
I am making the plug out of soft balsa, easiest to shape for me.
I am glassing it with just resin so I can sand it smooth and it wont be so soft.
One on the right side, one on the chine (the round one) and one on the left side. Then there are two on the top. A smaller one and a rectangular one at the back of the cowl.
I have two options so far. One is to use some clear Lexan and heat form it over the plug like a light leans. then cut that out and glue it to the cowl, or even use that as a mold to layup some weave and resin.
I will play around with this and see what works best, new territory for me being I don't have a vacuum former.
TB
Last edited by TonyBuilder; 06-30-2014 at 03:42 AM.

 06-30-2014, 10:56 AM
#248
Banned
A grid of squares could be drawn on a print like in the pic above.
The print could even have the size of the model.
If these pics are useless for you then please just disregard.
Only trying to be useful.
Zor
06-30-2014, 03:56 PM
#250
Here re is a breife history on the chipmunks engines that were used.
Initially formed as a subsidiary of the de Havilland Aircraft Company on March 5, 1928, de Havilland Canada produced many of its parent company's aircraft before producing their first indigenous aircraft, the DHC-1 Chipmunk. Designed by Wsiewolod Jan Jakimiuk, the former chief designer of the Polish aircraft manufacturer PZL "Warszawa-Okecie" S.A, it was developed as a replacement for the venerable de Havilland DH82A Tiger Moth. The prototype (CF-DIO-X) flew for the first time at Downsview, Toronto on May 22, 1946 and despite the crash of the second prototype on January 19, 1947 after failing to recover from a spin, deliveries of production aircraft to the Royal Canadian Air Force commenced in 1948. According to some sources, the aircraft was originally nicknamed the "Jakimiuk" after its designer but was renamed the Chipmunk when Phillip Garratt (the manager of de Havilland Canada) returned from a vacation during which he had been "entertained" by the antics of several chipmunks. Even though the name Jakimiuk was popular, Chipmunk had a certain similarity so the name was adopted. This led to the decision to name all subsequent de Havilland Canada aircraft after Canadian animals, whether this is fact or an urban legend is unclear.
The design of the Chipmunk took advantage of several wartime advances in aviation construction, resulting in an aircraft that differed from many previous de Havilland offerings. The most noticeable was the change from the trusted wood and steel tube to all metal construction. Fabric covering was still used on areas such as the wings aft of the main wing spar, the trailing edge flaps and the control surfaces; however, the wing leading edge and fuselage were of stressed-skin, metal construction. The instructor and student were seated in a tandem cockpit that was covered by a rearward sliding, one-piece Plexiglas canopy. Considering the bitter winters that could be encountered in Canada, this was a welcome change from older open-cockpit designs. Two areas of the Chipmunk's design that remained true to traditional de Havilland ways were the shape of the vertical stabiliser and rudder and the use of a 142 hp de Havilland Gipsy Major 1C engine driving a fixed pitch, two-blade propeller. Although the choice of an engine of somewhat modest horsepower could be seen by some as "typically British" when compared to the powerplants in use in some contemporary American aircraft, the Chipmunk's MAUW (Maximum All Up Weight) of around 1,800 lbs gave it an excellent power to weight ratio.
The first production Chipmunks were given the designation DHC-1 and entered service with the RCAF as the Chipmunk T.1. A change to the 145 hp Gipsy Major 10 engine resulted in the DHC-1A-1 and then the fully aerobatic, Gipsy Major 1C powered DHC-1B-1 (the previous models being only partially aerobatic). Further minor improvements, design and engine changes and variants produced for export led to a host of suffixes, ending with the 142 hp Gipsy Major 1G powered DHC-1B-2-S5. The Royal Air Force also expressed an interest in the Chipmunk and, following evaluation of two aircraft by the Aeroplane and Armament Experimental Establishment at Boscombe Down in England, it was ordered into production for the RAF under Air Ministry Specification 8/48 as a fully aerobatic, ab initio trainer. The de Havilland parent company began building Chipmunks as the T.10 for the RAF and subsequently, some of these aircraft were passed to the Army and later to the Royal Navy. Although at first glance it was visually similar to the Canadian aircraft, apart from a multi-panel cockpit canopy instead of a one-piece version, there were many subtle differences. These included (to name a few) being built to imperial measurements as opposed to metric, the installation of a 145 hp Gipsy Major 8 engine, faired landing gear legs, different wingtips and cockpit layout, a slightly thinner aluminium skin and changes to the attachments for the wings and tailplane and elevator profile.
Deliveries of the T.10 began in February 1950 with the Oxford University Air Squadron being the first to receive the type. This was soon followed by deliveries to 19 RAF Reserve flying schools and two Rhodesian Air Training Group schools. Eventually, the aircraft went on to replace the DH82A Tiger Moth with all 17 university air squadrons in England as well as the RAF Volunteer Reserve flying schools and, from time to time, the RAF College at Cramwell.
As with several previous de Havilland aircraft, the Chipmunk was to have royal connections in Britain. A brand new T.10 was delivered to RAF White Waltham and used to teach HRH Prince Philip, the Duke of Edinburgh, to fly. Trained by Flight Lieutenant Caryl Gordon, the Duke made his first solo on December 20, 1952. Sixteen years later, HRH Prince Charles, the Prince of Wales, was also being taught to fly in a Chipmunk. On July 30, 1968, the Prince began his initial flights in a T.10 at RAF Tangmere before more formal training began on October 28 of the same year. After fourteen and a half hours of instruction by Squadron Leader Philip Pinney, he made his first solo flight at RAF Bassingbourn on January 14, 1969.
Even though the DHC-1 was originally designed and built in Canada, only 217 of the eventual 1,291 Chipmunks produced came from that country. The vast majority were produced in England with 1,000 rolling off the de Havilland production lines before production ended in 1958. Out of this total, 735 went mainly to the RAF as the T.10 and the T.20 export version with civilian models being built as the Mk.21. As well as the Canadian and British aircraft, a further 60 Chipmunks were produced under licence in Portugal by Ind�stria Aeron�utica de Portugal, SA (OGMA). By the late 1950s many ex-RAF T.10s were being released into the civil market as the Chipmunk Mk.22 while a number of those that remained in service had larger fuel tanks installed and were re-designated the Chipmunk Mk.22A. Further after-market conversions included the heavily modified Mk.23 crop sprayer with a hopper in place of the front cockpit developed in England by Farm Aviation Services. Another agricultural version was also produced as a joint venture by Sasin Aircraft Services and Aerostructures in Australia as the SA29 Spraymaster. Although similar in concept to the Mk.23, the SA29 was very different structurally, had a one-piece canopy with a cable cutter, streamlined strakes and a dorsal fin fillet. It also had wing endplates and different spray bars. The same company also produced the Sundowner, a modified Chipmunk with a 180 hp Lycoming O-360 engine.
With their excellent handling characteristics, it came as no surprise that a number of surplus Chipmunks were converted for use in aerobatic competitions and displays. The Super Chipmunk was one such conversion that went on to win the American national aerobatics championships in 1969. Work on this aircraft began in 1967 when Jean Paul Huneault of Pierrefonds, Quebec started modifying an ex-RCAF DHC-1B-2-S3. The original Gipsy Major engine was replaced by a 210 hp Continental IO-360-C6A driving a Hartzell constant-speed propeller and the control surfaces were re-skinned in metal. The airframe remained basically original although new engine mounts and a revised cowling were fitted as well as shortened landing gear and electrically driven flaps. An updated Super Chipmunk powered by an aerobatic version of the 210 hp Teledyne Continental IO-360-HB (as used in the CT/4B Airtrainer) is still available in kit form today.
Another far more modified version was the late Art Scholl's DHC-1A "Pennzoil Special" that performed at air shows throughout America in the 1970s and early 1980s. Although it also started life as a surplus RCAF Chipmunk, by the time it had been rebuilt it was a totally different aircraft. A much more powerful 260 hp six cylinder Lycoming GO-435 engine was installed, the tandem cockpit was changed to a single seat one, retractable landing gear was fitted, the wingspan was reduced by 3 ft, 4 in and the area of the vertical stabiliser and rudder was increased by a quarter. In addition, the wingtips, tailplane and rudder lost their distinctive de Havilland curves and acquired a more "squared off" look. This aircraft still exists and is on display at the Smithsonian Institution's National Air and Space Museum in the United States.
Not only did the Chipmunk prove to be very popular worldwide (allegedly seeing service in over 60 countries) but it also had amazing longevity. In Canada, the aircraft was finally retired from service in 1971 while those in the RAF were gradually replaced by the BAe (Scottish Aviation Bulldog) T1 but still continued training pilots until 1997. As well as being used as a trainer, some countries employed the Chipmunk in roles as diverse as glider towing, artillery observation posts and even on military security patrols. As mentioned previously, the aircraft had excellent handling characteristics which, when combined with its beautifully harmonised controls, has led to the Chipmunk being described as "just like a Spitfire to fly but with a lot less power". The current use of a T.10 to train Spitfire pilots for the RAF's Battle of Britain Memorial Flight is perhaps a testimony to this. Of the estimated 500 Chipmunks still in existence, the vast majority are still airworthy and in private ownership, including here in New Zealand. Even though the Royal New Zealand Air Force never used any variants of the DHC-1, it has proved popular with private owners and a number have been imported into the country since the 1990s.
Last edited by TonyBuilder; 06-30-2014 at 03:58 PM.