


G&L 1/5 DHC chipmunk - diary of a build.


 07-25-2014, 03:11 PM
#377

Join Date: Sep 2007
Location: Haltom,
TX
Posts: 1,181
Likes: 0
Received 0 Likes
on
0 Posts
Tony, what weight did you use on the fiberglass? Also what resin are you using? The plane is looking awesome. I am thinking about 1 or 2 ounce cloth on my bird. Your thoughts?
thanks
glenn
thanks
glenn
07-26-2014, 03:19 PM
#381
I got the bottom of the wing all sanded. This is the hardest with 7 hatches. One reason I glass the way I do (heavy) is so I can go at it hard. I used my palm sander with 180 grit and it came out flat as a pan, none of this back and forth with a sanding block, over and over.
I will do the tip tomorrow and that will make it primer ready.
TB
I will do the tip tomorrow and that will make it primer ready.
TB
07-27-2014, 12:26 PM
#384
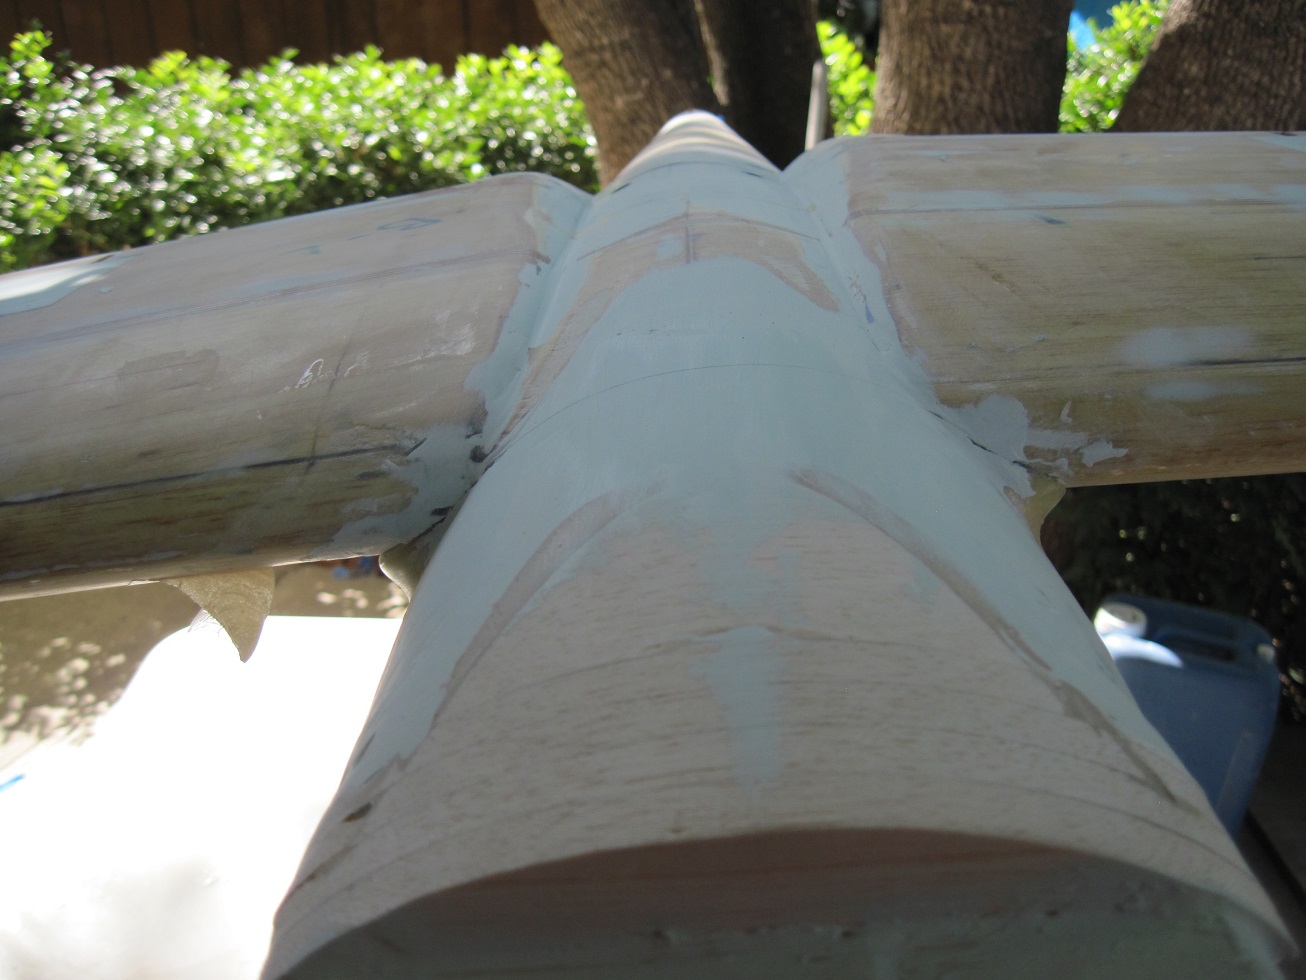
So I got the top all sanded and ready for the last "I hope this works" task. I lined the top portion where I cut away the 3/32" balsa sheeting down to the foam with some carbon fiber weave. This is where the fuselage saddle sits.
I then brushed that with resin, and then bolted the wing in place. Vaseline was put on the wing dowels, and the wing bolts. The fuselage was masked off with packing tape, blue tape and cling wrap. it is drying. The plan is to have a solid indent for the fuselage to sit in and the wing fairing will be flush with the top of the wing, otherwise it would sit on top and have a sizable rounded edge. Only time will tell, three hours before I can see the results.
TB
07-27-2014, 12:47 PM
#385
So I haven't been taking that many pics, mostly grunt work on the glassing.
I guess grunt work deserves a few pics too")
The TE of the flaps and ailerons was installed before glassing.
Came out good.


Then off to the glassing, 3/4oz cloth on the first coat, then when dry I brush on the second coat.


The wing is mostly all sanded and ready for primer.
You can see the shinny spots, those are the low spots. I will fill them with easy sand, hit the wing one last time and then it is ready for primer.


The top section from inside.

The saddles area is drying and in a few hours all will be reviled.


TB
I guess grunt work deserves a few pics too
The TE of the flaps and ailerons was installed before glassing.
Came out good.
Then off to the glassing, 3/4oz cloth on the first coat, then when dry I brush on the second coat.
The wing is mostly all sanded and ready for primer.
You can see the shinny spots, those are the low spots. I will fill them with easy sand, hit the wing one last time and then it is ready for primer.
The top section from inside.
The saddles area is drying and in a few hours all will be reviled.
TB
07-27-2014, 02:39 PM
#386
So far so good.
The wing separated as planed. I hit it one more time to fill some of the air bubbles.


I will let this cure over night and sand it tomorrow.


I am getting the stab ready. I glued the two elevators together with the torque rod.


The center section is to allow installation of the elevator after painting. I haven't decided if I want to glue it in or have it removable.
There really is not any reason to have to remove it once the elevator is hinged.


TB
The wing separated as planed. I hit it one more time to fill some of the air bubbles.
I will let this cure over night and sand it tomorrow.
I am getting the stab ready. I glued the two elevators together with the torque rod.
The center section is to allow installation of the elevator after painting. I haven't decided if I want to glue it in or have it removable.
There really is not any reason to have to remove it once the elevator is hinged.
TB
07-28-2014, 01:18 AM
#387
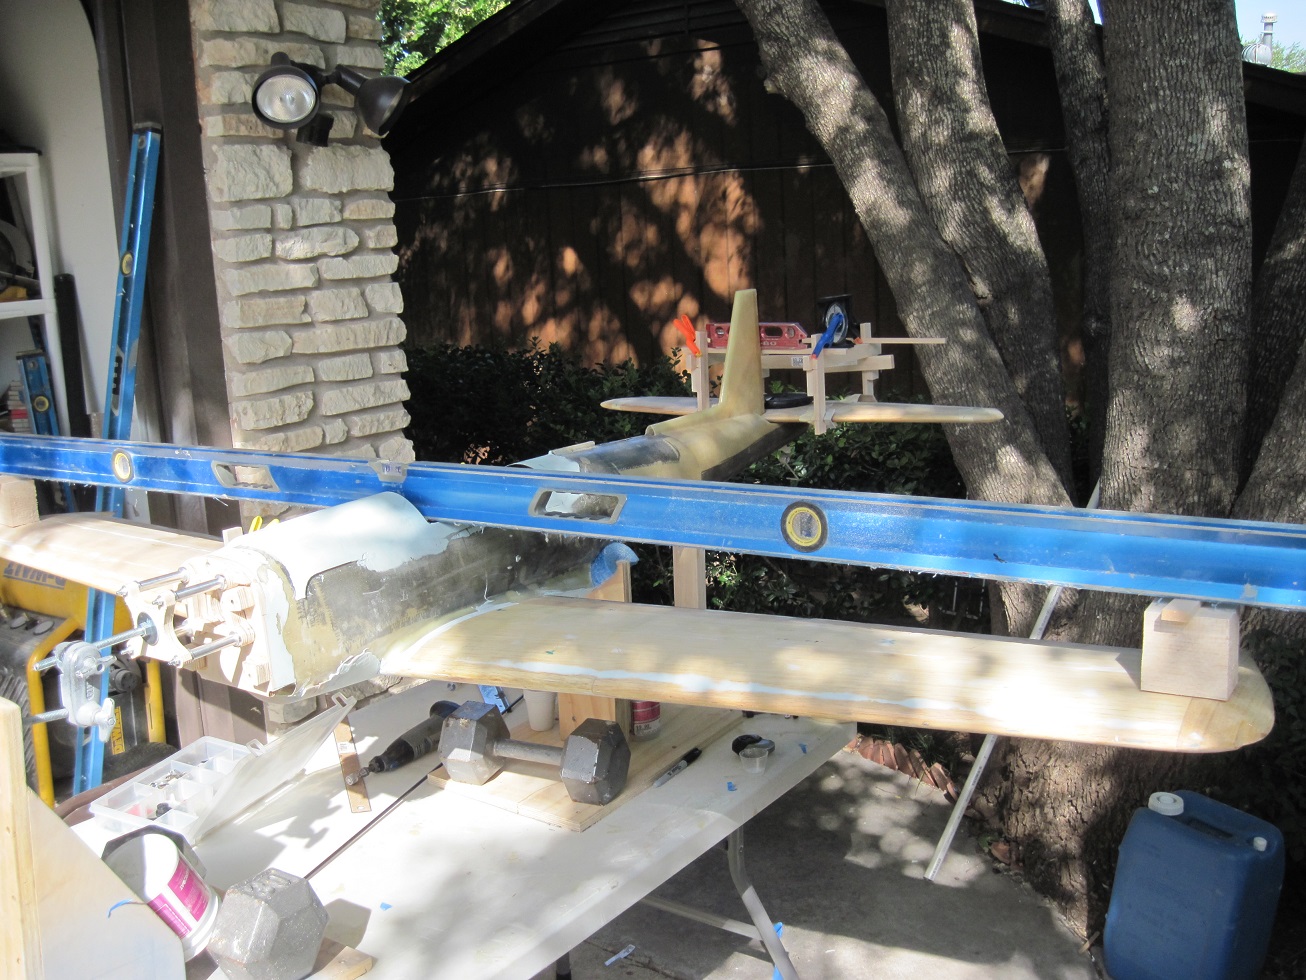
On the bench for today, finish the wing belly, install the stab, prim the wing.
With the wing almost complete I will move back to the fuselage this week. The canopy is the biggest project left before I start detailing.
I weighed the fuselage and wing to date, just over 10lb.
TB
With the wing almost complete I will move back to the fuselage this week. The canopy is the biggest project left before I start detailing.
I weighed the fuselage and wing to date, just over 10lb.
TB

 07-28-2014, 03:34 PM
#390
Wing...ing it!
Today was a marathon day, got a solid none stop 12hr day in.
I started the day by doing some filling on the top of the wing before I sand it. If you look at the wing in the right angle and light you can see the low spots, they shine. I am not going to fill them, just the big stuff. Primmer will get the little stuff.

After sanding the top of the wing nice and smooth I started to work on the indention at the top wing saddle. It came out good, lots of sanding to get it nice and smooth.
I will hit this with easy sand and then cut the access hatch for the servo leads.


Next is the rear section of the belly at the wing fairings.
Some carbon fiber tube was used at the wing bolts.
Washers were inserted before the carbon tubs went in.
Then a thin coat of easy sand to start forming the belly.


For the end piece that will butt up to the wing, this was made from 1/8" Micro-lite ply.
It is glues to the rear section of the fuselage. Also a 1/4 piece of Micro-ply was added inside the fuselage and glued to the 1/8" backing piece. This completes the rear facing section.
To form the side fairings I tried a few methods, first trying to make it whole then attach it. I tried the pieces that where cut off, then foam, but nothing was working out.
So I went with the piece in built up method. I first glued in a balsa block to start the fairing.


Then I just kept adding pieces until I had the area filled.
This worked the best.


Then the sanding starts.


Easy sand was added, then sanding, then more easy sand, basically just keep repeating.


The belly was done at the same time and a piece of cling wrap between the wing and the fuselage to keep them from fussing together.
More easy sand, apply and repeat.


The flaps were added to gage the thickness of the fairing.


They are staring to look good


Sanding goes on forever!


TB
Today was a marathon day, got a solid none stop 12hr day in.
I started the day by doing some filling on the top of the wing before I sand it. If you look at the wing in the right angle and light you can see the low spots, they shine. I am not going to fill them, just the big stuff. Primmer will get the little stuff.
After sanding the top of the wing nice and smooth I started to work on the indention at the top wing saddle. It came out good, lots of sanding to get it nice and smooth.
I will hit this with easy sand and then cut the access hatch for the servo leads.
Next is the rear section of the belly at the wing fairings.
Some carbon fiber tube was used at the wing bolts.
Washers were inserted before the carbon tubs went in.
Then a thin coat of easy sand to start forming the belly.
For the end piece that will butt up to the wing, this was made from 1/8" Micro-lite ply.
It is glues to the rear section of the fuselage. Also a 1/4 piece of Micro-ply was added inside the fuselage and glued to the 1/8" backing piece. This completes the rear facing section.
To form the side fairings I tried a few methods, first trying to make it whole then attach it. I tried the pieces that where cut off, then foam, but nothing was working out.
So I went with the piece in built up method. I first glued in a balsa block to start the fairing.
Then I just kept adding pieces until I had the area filled.
This worked the best.
Then the sanding starts.
Easy sand was added, then sanding, then more easy sand, basically just keep repeating.
The belly was done at the same time and a piece of cling wrap between the wing and the fuselage to keep them from fussing together.
More easy sand, apply and repeat.
The flaps were added to gage the thickness of the fairing.
They are staring to look good
Sanding goes on forever!
TB
Last edited by TonyBuilder; 07-28-2014 at 03:46 PM.
07-28-2014, 04:08 PM
#391
More progress.
I would go back and forth from the front to the back of the wing.
Starting to build up the belly at the front.


The front needs to be built up a bit so I am adding balsa to achieve this.


Easy sand and cling wrap.


Sand, easy sand, sand, easy sand................


I must have taken the wing off over two dozen times during this proses.
More to come!
TB
I would go back and forth from the front to the back of the wing.
Starting to build up the belly at the front.
The front needs to be built up a bit so I am adding balsa to achieve this.
Easy sand and cling wrap.
Sand, easy sand, sand, easy sand................
I must have taken the wing off over two dozen times during this proses.
More to come!
TB
 07-28-2014, 07:58 PM
#393
Banned
07-29-2014, 01:44 AM
#394
More progress from yesterday.
So for the wing bolts I use steel alen bolts with T-nuts. I buried the washer under the carbon tube. I don't like using plastic on a plane this big.


The blind nuts will get pined and glued in. I counter sink them so I can glue a piece of 1/8" ply over them. Nothing worse then to have a wing T-nut pop out or spin on you when taking the wing off.


The wing joint is coming out great. I still need to do some more work on the front fairings but I am happy with the line.


This will all get 3/4oz cloth and glassed, it will keep the easy sand from chipping.


Doing the rear fairing (belly) as part of the fuselage was much better then making it part of the wing.


The wing dowels will get cleaned up and I will glue in a former at the front fuselage for the wing dowels and my fuel tank.


The sides of the front fuselage still need work, I ran out of easy sand, have more on the way for mid week.


What a day.
TB
So for the wing bolts I use steel alen bolts with T-nuts. I buried the washer under the carbon tube. I don't like using plastic on a plane this big.
The blind nuts will get pined and glued in. I counter sink them so I can glue a piece of 1/8" ply over them. Nothing worse then to have a wing T-nut pop out or spin on you when taking the wing off.
The wing joint is coming out great. I still need to do some more work on the front fairings but I am happy with the line.
This will all get 3/4oz cloth and glassed, it will keep the easy sand from chipping.
Doing the rear fairing (belly) as part of the fuselage was much better then making it part of the wing.
The wing dowels will get cleaned up and I will glue in a former at the front fuselage for the wing dowels and my fuel tank.
The sides of the front fuselage still need work, I ran out of easy sand, have more on the way for mid week.
What a day.
TB
Last edited by TonyBuilder; 07-29-2014 at 01:47 AM.
07-29-2014, 07:08 AM
#399
Tail wheel assembly.
Before I can install the stab I have to install the tail wheel assembly.
I am using the larger of the Sullivan tail wheel assemblies. On the first build I used the one down from this and it took a beating, but kept on ticking.
The tier was burning a grove on the underside of the fuselage as evidence of the wheel compressing and hitting the fuselage.
I do not want this on this build. The wheel assembly is not the most scale but I want a reliable way to install and for durability.
The first build had over 100 flights, and a lot of hard landings and it held up to this day (the install).

First I need to break loos the brass coupler from the main gear post.
Then I solder that to the steering post that comes threw the fuselage.


Then I can solder the gear back onto the coupler and that is the installation of this type of gear, for me

I can not remove the gear but I can unbolt it from the fuselage and mask it off and move it around for finishing and painting.
TB
Before I can install the stab I have to install the tail wheel assembly.
I am using the larger of the Sullivan tail wheel assemblies. On the first build I used the one down from this and it took a beating, but kept on ticking.
The tier was burning a grove on the underside of the fuselage as evidence of the wheel compressing and hitting the fuselage.
I do not want this on this build. The wheel assembly is not the most scale but I want a reliable way to install and for durability.
The first build had over 100 flights, and a lot of hard landings and it held up to this day (the install).
First I need to break loos the brass coupler from the main gear post.
Then I solder that to the steering post that comes threw the fuselage.
Then I can solder the gear back onto the coupler and that is the installation of this type of gear, for me
I can not remove the gear but I can unbolt it from the fuselage and mask it off and move it around for finishing and painting.
TB
07-29-2014, 07:32 AM
#400
Stab installation.
Installing the stabilizer is a proses that requires some time and mythology.
This kit is pretty right on with the saddles but you still need to check.
I am setting everything to 0 digress.
First I level the wing and the plane. I like to use a 8' level for the side to side. I just block up the ends at the same height.
Then I level the plane from front to back. My build jig lets me adjust the plane with ease.


Next I need to set the fin plumb to the plane. If you remember I did not glue the fin/ ruder post to the bottom of the fuselage until it was time to set the stab.
I use an aluminum angle to plumb the fin up with. Once I like it I tack it with thin CA and then epoxy it to the bottom inside of the fuselage. I will pin this later.


Once the wing and plane are level I make a jig for the stab so I can adjust it both ways.
By moving the stab forward or back it centers the level. From the last build it sets at about the same spot as the first.


Some weight is added to keep it true, then epoxy and lots of checking and measuring.

The strait edge from the level gives a good visual confirmation that it is good.
I will spend a good hour or two getting this ready.


Now I just wait and hope all is good.
This is just the first step. I will pin the stab once this dries, then the filets and that will do it for the tail.

TB
Installing the stabilizer is a proses that requires some time and mythology.
This kit is pretty right on with the saddles but you still need to check.
I am setting everything to 0 digress.
First I level the wing and the plane. I like to use a 8' level for the side to side. I just block up the ends at the same height.
Then I level the plane from front to back. My build jig lets me adjust the plane with ease.
Next I need to set the fin plumb to the plane. If you remember I did not glue the fin/ ruder post to the bottom of the fuselage until it was time to set the stab.
I use an aluminum angle to plumb the fin up with. Once I like it I tack it with thin CA and then epoxy it to the bottom inside of the fuselage. I will pin this later.
Once the wing and plane are level I make a jig for the stab so I can adjust it both ways.
By moving the stab forward or back it centers the level. From the last build it sets at about the same spot as the first.
Some weight is added to keep it true, then epoxy and lots of checking and measuring.
The strait edge from the level gives a good visual confirmation that it is good.
I will spend a good hour or two getting this ready.
Now I just wait and hope all is good.
This is just the first step. I will pin the stab once this dries, then the filets and that will do it for the tail.
TB
Last edited by TonyBuilder; 07-29-2014 at 07:34 AM.

