


G&L 1/5 DHC chipmunk - diary of a build.
 07-29-2014, 01:51 PM
#401


Today was a slow day, yesterday kicked my butt ")
I fitted the removable rear section. This will allow access to the elevator and visual inspection of the pull-pulls.
It also helps in the installation so it is not a blind install. I laid I piece of CF on the bottom of the stab to lock it into the fuselage. I have one more brace to put in.


I pined the Fin post with a 1/8" CF dowel. The LE of the stab got a 4" CF dowel threw the LE and into the fin post, couple pins at the front and some in the fin post at the ruder.
I will make the fillets and fairing from Evercoat light weight filler.


The bottom ruder section that is part of the stab is glued in. I will finish this out with easy sand.
It will be in two parts, the very end will be on the removable end piece.


I am designing the canopy slides. For the fin rail I will use two bras rectangular tubes. I soldered a post at each end to glue into the fuselage. This is all just rough as I figure it out.


The sides will get 1/32" birch ply and glassed, then easy sand.


I will work on the canopy tomorrow in earnest.
TB
I fitted the removable rear section. This will allow access to the elevator and visual inspection of the pull-pulls.
It also helps in the installation so it is not a blind install. I laid I piece of CF on the bottom of the stab to lock it into the fuselage. I have one more brace to put in.
I pined the Fin post with a 1/8" CF dowel. The LE of the stab got a 4" CF dowel threw the LE and into the fin post, couple pins at the front and some in the fin post at the ruder.
I will make the fillets and fairing from Evercoat light weight filler.
The bottom ruder section that is part of the stab is glued in. I will finish this out with easy sand.
It will be in two parts, the very end will be on the removable end piece.
I am designing the canopy slides. For the fin rail I will use two bras rectangular tubes. I soldered a post at each end to glue into the fuselage. This is all just rough as I figure it out.
The sides will get 1/32" birch ply and glassed, then easy sand.
I will work on the canopy tomorrow in earnest.
TB
Last edited by TonyBuilder; 07-29-2014 at 01:54 PM.
 07-30-2014, 01:18 AM
#402
On the bench for today, cut and fit the canopy frame. I may have to order a new canopy. The one I used for a mold is really beat up. I will clean it to see if it is salvageable. There are some creases from pulling it out off of the frame.
One thing I will try today is to make a sanding plug from spray can foam. Once the frame is glued on there will be lots of sanding and support is necessary. I may try lining the inside with an old t-shirt and plastic wrap then fill it with foam and let it expand and dry.
TB
One thing I will try today is to make a sanding plug from spray can foam. Once the frame is glued on there will be lots of sanding and support is necessary. I may try lining the inside with an old t-shirt and plastic wrap then fill it with foam and let it expand and dry.
TB

 07-30-2014, 03:22 AM
#404
Yes, Futaba recommends the tips of the antennas on your receivers to be outside of the fuselage. My plan is to have the antennas come out of the floor of my cockpit being the floor will be just below the instrument panel and maybe have the other receivers antennas come out the bottom just behind the wing belly.
TB
07-30-2014, 05:50 AM
#406
Member
Join Date: Sep 2003
Location: palos park,
IL
Posts: 51
Likes: 0
Received 0 Likes
on
0 Posts
I am really enjoying your build thread. Really fine craftmanship. I was wondering if you could provide more details about the access to
the elevator and rudder control connections. Where are placing the hatch? How are securing it? Thanks for time.
Ron
the elevator and rudder control connections. Where are placing the hatch? How are securing it? Thanks for time.
Ron
07-30-2014, 12:42 PM
#409
Canopy frame.
So my experiment on the pray can foam mold did not work, just a big stick blob.
I emptied the whole can into the mold, the top got hard but the rest was a mess.

My canopy is toast, I tried cleaning it and it simply is not going to clean up.
Two frame layups was to much for it.
I will use this one as a sanding plug. I will try the foam again this time I will spray it right into the inside of the canopy in layers. I will let the first layer dry then hit it again until it is full.


The frame came out really good. Just some fine tuning and I will sand it smooth once the canopy plug is dry.
Then it will be ready for the NEW canopy, yes I will have to order a new one, that will set my back a week on the canopy


Meantime I got a lot to work on, plus I can get the canopy rails done, and install the actuator.


TB
So my experiment on the pray can foam mold did not work, just a big stick blob.
I emptied the whole can into the mold, the top got hard but the rest was a mess.
My canopy is toast, I tried cleaning it and it simply is not going to clean up.
Two frame layups was to much for it.
I will use this one as a sanding plug. I will try the foam again this time I will spray it right into the inside of the canopy in layers. I will let the first layer dry then hit it again until it is full.
The frame came out really good. Just some fine tuning and I will sand it smooth once the canopy plug is dry.
Then it will be ready for the NEW canopy, yes I will have to order a new one, that will set my back a week on the canopy
Meantime I got a lot to work on, plus I can get the canopy rails done, and install the actuator.
TB
07-31-2014, 02:01 AM
#411
The second foam plug came out better. I used the red can instead of the blue. This will be a good sanding plug for the frame.
On the bench for today will be to design the canopy slides and actuator mechanism. I want to use a single actuator so this will be a challenge with the long fin and the rise it has as it goes to the tail.
TB
On the bench for today will be to design the canopy slides and actuator mechanism. I want to use a single actuator so this will be a challenge with the long fin and the rise it has as it goes to the tail.
TB
07-31-2014, 04:38 AM
#412
Canopy sled bracket.
So this is what I came up with. A similar system as my P-47 but a little change.
The bracket that attaches to the canopy is the same, the actuator will be the same but the slide rails are different and the method of attaching to the actuator is with a ball link.


The ball link will allow me to attach the actuator without any screws. I can simply snap it on or off.


Next I will fabricate the attaching bracket that will be part of the canopy.

My canopy will only open to the first and second position (single pilot) being I only get 100mm on the actuator and a full slide would be around 8"
I will be able to slide the canopy all the way for setup purposes.


TB
So this is what I came up with. A similar system as my P-47 but a little change.
The bracket that attaches to the canopy is the same, the actuator will be the same but the slide rails are different and the method of attaching to the actuator is with a ball link.
The ball link will allow me to attach the actuator without any screws. I can simply snap it on or off.
Next I will fabricate the attaching bracket that will be part of the canopy.
My canopy will only open to the first and second position (single pilot) being I only get 100mm on the actuator and a full slide would be around 8"
I will be able to slide the canopy all the way for setup purposes.
TB
Last edited by TonyBuilder; 08-01-2014 at 02:28 AM.
07-31-2014, 07:40 AM
#413
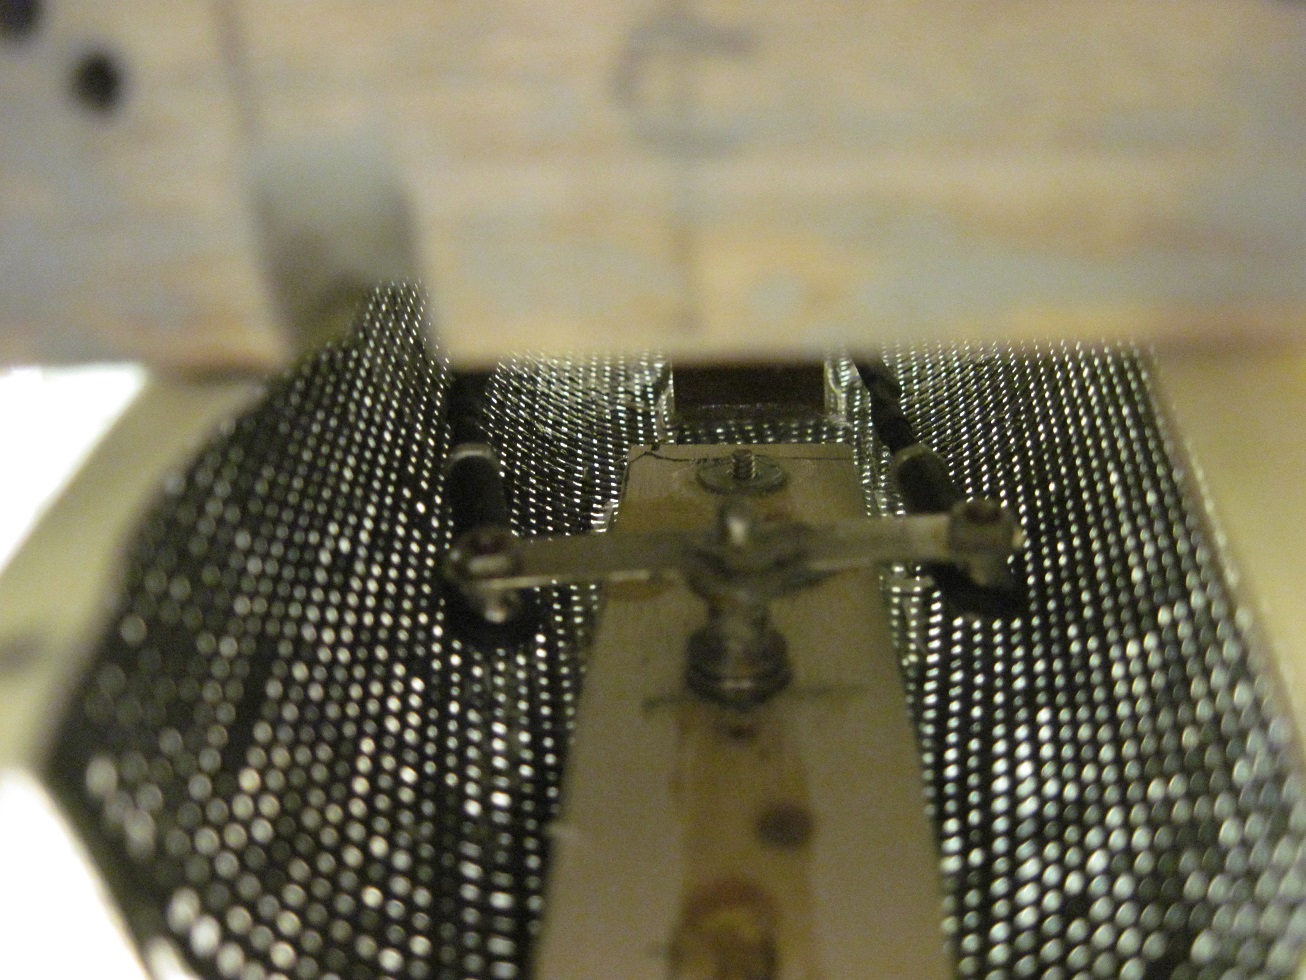
Actuator.
The canopy actuator is installed and the mock up of the bracket that will be bolted to the canopy once I put the glass into the frame.
The liner servo is bolted to the inside top of the fuselage. It is accessible but no fun to get too. Install was ok because there is nothing in the way. If I ever need to change it I will have to strip a lot of stuff down.
I did not want to do a hatch so this is it.


This is a nice installation. One option is to do a side hatch for access to the mount, we will see.


The ball link snaps right on.


The mounting bracket is made from G-10 and will bolt to the canopy. The brass bracket will bolt to the G-10.
I will tap thread it with two 2/56 screws.


The two position operation is the best thing with this liner servo, I don't know if you can do that with air.


I will build the sides to the fin and then its waiting on my new canopy. I do have some hatches to do.
The mounting bracket will help to hold the shape of the rear canopy.

I laid up the main rear brace, I laminated a piece of 1/32" ply and carbon fiber on a piece of glass with a piece of glass on top with weight.
Looks good so fare, not as nice as vacuumed formed.
This will keep the shape of the rear canopy.

TB
The canopy actuator is installed and the mock up of the bracket that will be bolted to the canopy once I put the glass into the frame.
The liner servo is bolted to the inside top of the fuselage. It is accessible but no fun to get too. Install was ok because there is nothing in the way. If I ever need to change it I will have to strip a lot of stuff down.
I did not want to do a hatch so this is it.
This is a nice installation. One option is to do a side hatch for access to the mount, we will see.
The ball link snaps right on.
The mounting bracket is made from G-10 and will bolt to the canopy. The brass bracket will bolt to the G-10.
I will tap thread it with two 2/56 screws.
The two position operation is the best thing with this liner servo, I don't know if you can do that with air.
I will build the sides to the fin and then its waiting on my new canopy. I do have some hatches to do.
The mounting bracket will help to hold the shape of the rear canopy.
I laid up the main rear brace, I laminated a piece of 1/32" ply and carbon fiber on a piece of glass with a piece of glass on top with weight.
Looks good so fare, not as nice as vacuumed formed.
This will keep the shape of the rear canopy.
TB
Last edited by TonyBuilder; 07-31-2014 at 07:42 AM.
07-31-2014, 01:04 PM
#415
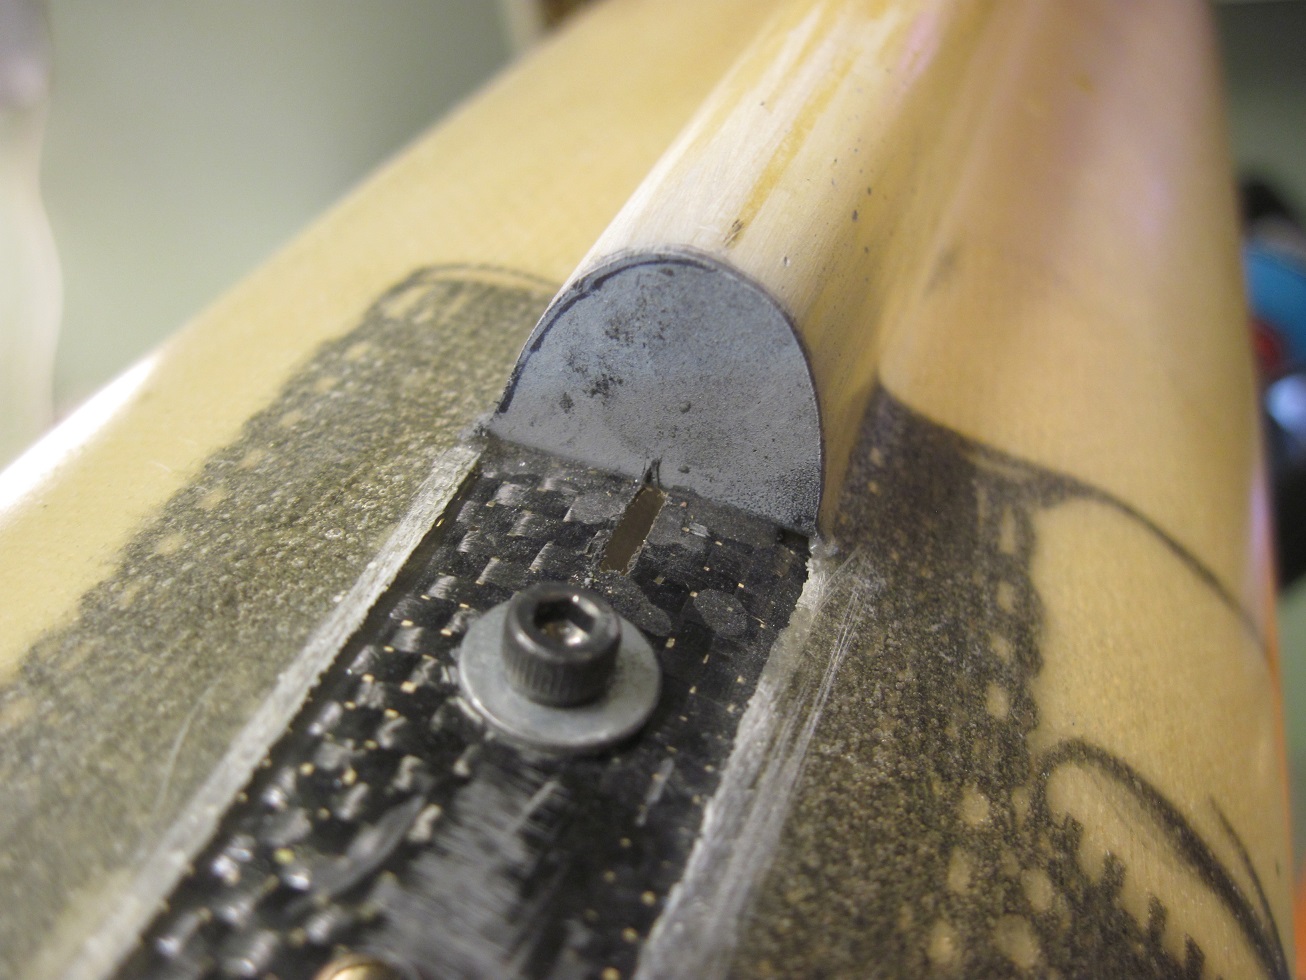
Got a little done on the canopy today.
I put a scrap piece of CF laminate at the end of the fin cut out to clean it up.

The fin canopy rail gets glued in with epoxy.

I faced the sides of the fin rail with two pieces od 1/32" ply, epoxied in and then I glasses the fin with 3/4oz weave.


This will get easy sand when it cures and I sand it down.


My laminate came out great, this will be the back support for the rear part of the canopy.


Moving along.
TB
I put a scrap piece of CF laminate at the end of the fin cut out to clean it up.
The fin canopy rail gets glued in with epoxy.
I faced the sides of the fin rail with two pieces od 1/32" ply, epoxied in and then I glasses the fin with 3/4oz weave.
This will get easy sand when it cures and I sand it down.
My laminate came out great, this will be the back support for the rear part of the canopy.
Moving along.
TB
Last edited by TonyBuilder; 07-31-2014 at 01:07 PM.
 07-31-2014, 05:30 PM
#417
Thanks Ken, I am using a Firgelli liner actuator. I get them from Trossen robotics.
http://www.trossenrobotics.com/p/fig...-Actuator.aspx
TB
Last edited by TonyBuilder; 07-31-2014 at 05:35 PM.
08-01-2014, 02:38 AM
#418
On the bench for today will be hatch layups, easy sand on the fin and stab filets.
I cant do much more on the canopy until my glass gets here. I did cut my side rails. I am using K&S SQ brass tube #8153 for the rails and #8152 for the inner slide.
I use a dermal cut off fiber wheel and double up on the heavy wheels, then I use my drill press with a rail jig to cut the grove.
So I am ready just waiting on glass. I can work on the tail, still need to reshape my ruder. I will start to work on the front compartment that will house my fuel tanks and batteries.
Might even get to the cockpit deck and servo trays. so lots that can be done in preparation to the canopy. Ultimately the canopy deeds to go in before I finalize the center section.
If I need to I can go back to the wing and prime that.
really need to look into a vacuum former fore canopy's, I would much rather make my own in the future being I am such a stickler for details, this canopy is average and not to scale.
Got a quote for the paint stencils, pretty pricy so may have to save up for this.
Onward.
TB
Last edited by TonyBuilder; 08-01-2014 at 02:41 AM.
08-01-2014, 09:45 AM
#419
Some of the mornings progress.
Some easy sand on the fin canopy rail.


Stab filets are getting done.

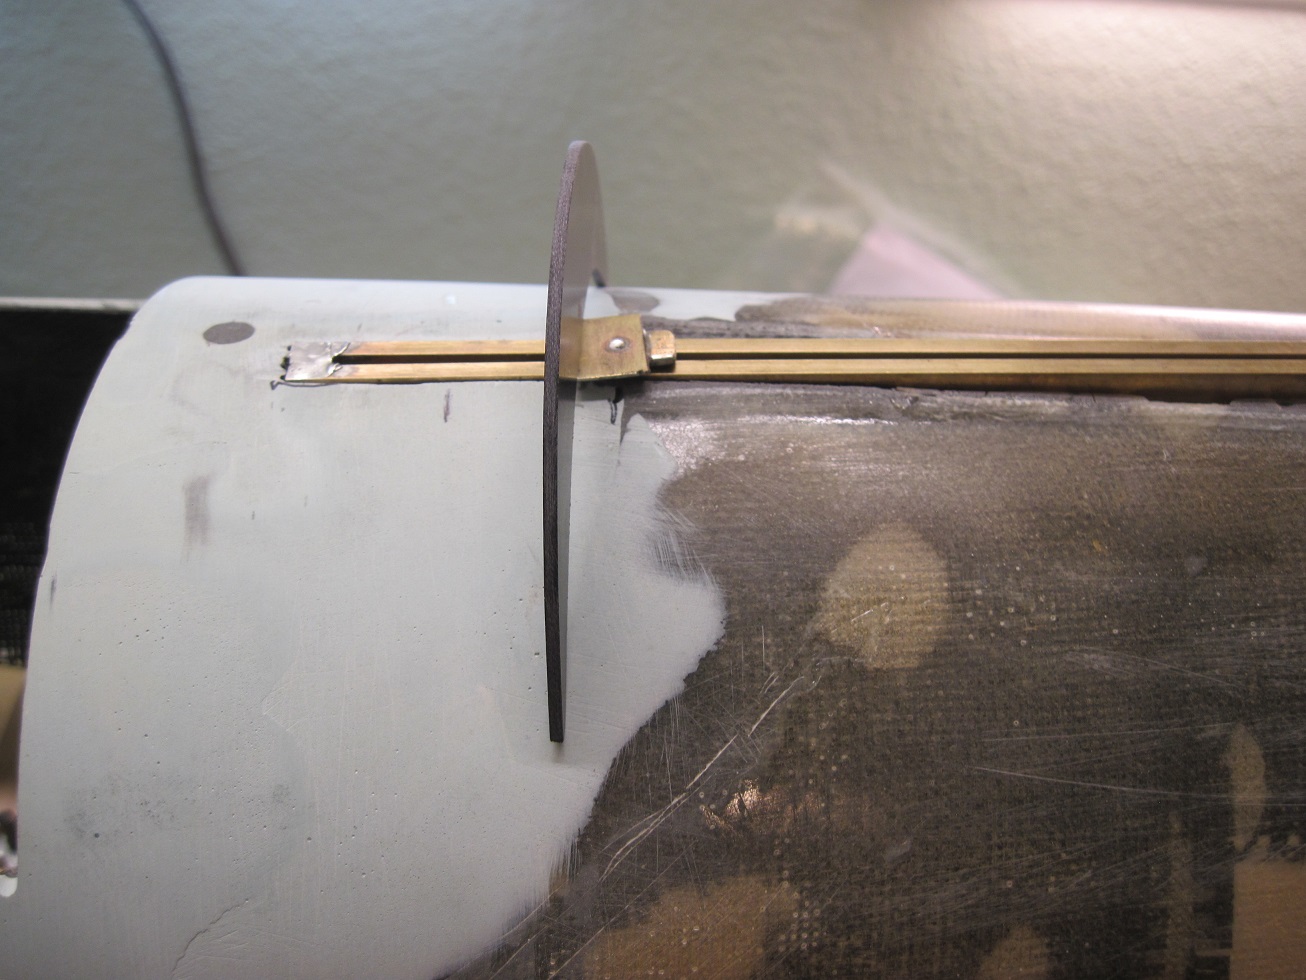
So the first thing I need to do on the canopy is center it on the fuselage.
I do this by using two carbon fiber strips (strait edge). I find that taking measurements off a round fuselage is not easy so I came up with a way to do it.
I use a piece of blue tape folded in sticky side to sticky side leaving a little on one end.
Then I cut the other end square. I pick a natural reference point like the wing saddle. I place the sticky end to the fuselage and mark the reference point on the tape and the fuselage. Then I mark the other end, maybe center top!
Then I just move to the other side and do the same thing until I get equal measurements on both sides. I will move down the fuselage then take the CF strips and tape them to the fuselage.
This gives me a strait reference line on both sides. I mark this with a sharpie.


The reference line is the bottom of the canopy, this centers the canopy on the fuselage. I mark it and now I can install the side rails.


Bit by bit
TB
Some easy sand on the fin canopy rail.
Stab filets are getting done.
So the first thing I need to do on the canopy is center it on the fuselage.
I do this by using two carbon fiber strips (strait edge). I find that taking measurements off a round fuselage is not easy so I came up with a way to do it.
I use a piece of blue tape folded in sticky side to sticky side leaving a little on one end.
Then I cut the other end square. I pick a natural reference point like the wing saddle. I place the sticky end to the fuselage and mark the reference point on the tape and the fuselage. Then I mark the other end, maybe center top!
Then I just move to the other side and do the same thing until I get equal measurements on both sides. I will move down the fuselage then take the CF strips and tape them to the fuselage.
This gives me a strait reference line on both sides. I mark this with a sharpie.
The reference line is the bottom of the canopy, this centers the canopy on the fuselage. I mark it and now I can install the side rails.
Bit by bit
TB
Last edited by TonyBuilder; 08-01-2014 at 09:49 AM.
08-01-2014, 11:27 AM
#420
Sliding canopy side tracks.
I am doing to access hatches. One will be for switches, 4 total and the other is access to the mount for the canopy actuator.


There is only two hatches that I can find on the full scale. Both are at the spine and right behind the canopy.
They are access panels for the accumulators.
 It is hard to see but it is right over the circle insignia.
 The hatches are small, so I may have to out one switch in one hatch and the other in the rear hatch, we will see.
For my fuel fill I will put it in the cowl being I have two engine doors
My canopy slide tracks are done and ready to install.
I am doing them a little different the I did on my P-47.
I soldered tabs on the ends and one in the middle being they are almost 10" long.
This will allow me to shim them and flush them out with the outer skin surface of the fuselage.


I still have to cut the fuselage down to the control lines I marked earlier.


The tabs will either get drilled and tap threaded or just threw bolted with two counter sunk #72 screws in each tab.


The slid inside the track will get a 2/56 or #72 button head screw threw the canopy.


TB
I am doing to access hatches. One will be for switches, 4 total and the other is access to the mount for the canopy actuator.
There is only two hatches that I can find on the full scale. Both are at the spine and right behind the canopy.
They are access panels for the accumulators.
For my fuel fill I will put it in the cowl being I have two engine doors
My canopy slide tracks are done and ready to install.
I am doing them a little different the I did on my P-47.
I soldered tabs on the ends and one in the middle being they are almost 10" long.
This will allow me to shim them and flush them out with the outer skin surface of the fuselage.
I still have to cut the fuselage down to the control lines I marked earlier.
The tabs will either get drilled and tap threaded or just threw bolted with two counter sunk #72 screws in each tab.
The slid inside the track will get a 2/56 or #72 button head screw threw the canopy.
TB
Last edited by TonyBuilder; 08-01-2014 at 11:30 AM.
08-02-2014, 01:26 AM
#421
So I have this idea of doing the canopy glass in sections instead of just gluing the frame over the plastic canopy. I want more detail and sometimes gluing the canopy can be a mess with something this big, getting it all lined up and a clean install. So my thought is to finish the frame and then install the individual glass sections one by one. This will give me more control on the individual installation of each pain of glass. I want the bubble glass in the two rear windows. The canopy that I have is very plane and the glass is flat. It will look much better with the bubble glass in the rear section.


The interior will get similar detailing like this.


The bubble is in the rear two windows.


Also I can paint and detail the canopy then install the glass without masking and all that mess. Might be the best way to preserve the glass too.
So that is the plan for now, build the frame, install it and have it working then install the glass.
TB
The interior will get similar detailing like this.
The bubble is in the rear two windows.
Also I can paint and detail the canopy then install the glass without masking and all that mess. Might be the best way to preserve the glass too.
So that is the plan for now, build the frame, install it and have it working then install the glass.
TB
Last edited by TonyBuilder; 08-02-2014 at 01:44 AM.
08-02-2014, 01:34 PM
#423
Banned
I now think I found where you got the pictures of the full size that you occasionally post ...... L O L.
I am still following with great interest in your work but admit that some pictures are not clear to me as to what you are illustrating.
Still it is fascinating to follow along your postings.
Nice work _ _ _ anticipating the end results _ _ _
Zor
Last edited by Zor; 08-02-2014 at 01:37 PM. Reason: Fixing known typos
08-03-2014, 02:00 AM
#424
So I had some time to think about my canopy. I did some mock ups with the old (ugly) canopy glass. It looks like it will work well to cut the individual pains out and glue them in.
One of the reasons for doing the canopy as a whole (gluing the frame over the canopy) is for strength. With all the work I will do on mine it will be very strong stand alone. This frame is really thin with all the vertical post and bolting it is not really an option so I will go forward and build the frame, sand it and prime it.
On the bench for today will be the canopy frame, canopy side track and hatches.
TB
08-03-2014, 01:28 PM
#425
Canopy.
I started the day by fine tuning the canopy. Sanding each vertical and horizontal rail to the same uniform size.
I used a 1/4" stick of brass tubing clamped to each rail to gage the sizing as I sanded.
Easy sand was applied after rough sanding was done.

I also cut the access hatch for the canopy servo. It just makes sense to be able to remove it. plus this is a good inspection hatch.

For the side canopy tracks I cut the fuselage to accommodate the brass rails.


The tracks are bolted with 6 #72 stainless steel counter sunk screws.


The tracks are drilled and tap threaded so no nuts are required.

I added 2 layers of 1/32 birch ply as shims to flush the track out with the fuselages outer skin.


Right now the track is flush with the outer fuselages skin. Once I get it all installed I will see if I need to recess or shim the track for optimal performance.


The frame is reinforced with carbon fiber rods and carbon fiber strips.
The rear brace really helps to hold the shape as the canopy slides back and forth.


The basic supports are in defining the glass panels that will be cut to fit and glued in. This frame is solid as a rock
I still need to detail the roof of the canopy, but that will happen as I move forward.


The track is in and ready for the canopy.


TB
I started the day by fine tuning the canopy. Sanding each vertical and horizontal rail to the same uniform size.
I used a 1/4" stick of brass tubing clamped to each rail to gage the sizing as I sanded.
Easy sand was applied after rough sanding was done.
I also cut the access hatch for the canopy servo. It just makes sense to be able to remove it. plus this is a good inspection hatch.
For the side canopy tracks I cut the fuselage to accommodate the brass rails.
The tracks are bolted with 6 #72 stainless steel counter sunk screws.
The tracks are drilled and tap threaded so no nuts are required.
I added 2 layers of 1/32 birch ply as shims to flush the track out with the fuselages outer skin.
Right now the track is flush with the outer fuselages skin. Once I get it all installed I will see if I need to recess or shim the track for optimal performance.
The frame is reinforced with carbon fiber rods and carbon fiber strips.
The rear brace really helps to hold the shape as the canopy slides back and forth.
The basic supports are in defining the glass panels that will be cut to fit and glued in. This frame is solid as a rock
I still need to detail the roof of the canopy, but that will happen as I move forward.
The track is in and ready for the canopy.
TB
Last edited by TonyBuilder; 08-03-2014 at 01:30 PM.

