


G&L 1/5 DHC chipmunk - diary of a build.
 08-28-2014, 05:21 AM
#576
Banned
To me scale is a matter of dimensions and proportions.
A model could have many details and be way out of scale.
Zor still following with great interest.
Last edited by Zor; 08-28-2014 at 05:24 AM.


")
 08-28-2014, 11:45 AM
#580
The good, and the bad!
So I brought some pieces in to remove the masking tape. The good thing is the finish is good, but the bad is the color is way off.
Everything I painted today has this orange color to it.
Much darker then the fuselage.
Here is a pic with the ruder agents the fuselage. not even close.

Here is a hatch agents the canopy.
The fuselage is a nice yellow and the news stuff is orange.
I am praying it is like this because it hasn't cured yet....... but I don't think so because the pics of the fuselage freshly painted is the nice rich yellow.

The stitching came out great and I like the results, just not the color.


I don't know what happened. I mixed it the same, and sprayed it the at the same time and conditions as the first.


I really don't want to have to paint this all again. It already has a heavy coat on it.


I don't know what to do and why this happened. I will call Klasskoat and see what they say.
TB
So I brought some pieces in to remove the masking tape. The good thing is the finish is good, but the bad is the color is way off.
Everything I painted today has this orange color to it.
Much darker then the fuselage.
Here is a pic with the ruder agents the fuselage. not even close.
Here is a hatch agents the canopy.
The fuselage is a nice yellow and the news stuff is orange.
I am praying it is like this because it hasn't cured yet....... but I don't think so because the pics of the fuselage freshly painted is the nice rich yellow.
The stitching came out great and I like the results, just not the color.
I don't know what happened. I mixed it the same, and sprayed it the at the same time and conditions as the first.
I really don't want to have to paint this all again. It already has a heavy coat on it.
I don't know what to do and why this happened. I will call Klasskoat and see what they say.
TB
 08-28-2014, 01:55 PM
#584

Tony you may have a mixing problem as stated pretaining to color but what I see is what I stated in the PM, poor atomizing of the paint, other words it's not broken into small enough particals to flow into each other creating a smoother film, or not enough paint which leads to runs because of the size of the spray.. What pressure are you useing at the tip, you could increase that a bit and move back to 12" when spraying and see if that helps. Speed of travel can produce the same effects if your going too fast, good reflecting light is important to better see how the paint flows on the painted surface. Often times I will use a hotter reducer to allow more flow out time and shop temps around t 70-80 deg. if possible. Don't wait too long to recoat, check your spec sheet to see what that is. Do it wrong and you could lift the paint thats already on there and "you do not want that".
Leroy
Leroy
08-28-2014, 02:13 PM
#585
Banned
It may not be your mistake at all.
I think we have to distinguish between the orange as a color shade _ _ _ the hue of the color _ _ _ and the surface finish.
I have noticed at some time that the surface finish was what we used to refer to as ' orange peel ' finish.
That has nothing to do with the color ( the hue of the color ).
I can see ( understand ) that a lack of sufficient mixing might cause streaking due to different saturation of the pigments but the uniform darker orange hue ( no streaking ) would have to depend on the pigments proportions of the mix.
It is well known that different batches at the manufacturer can have some pigment proportion variations even if identified by the same color name.
Perhaps this is what has happened ?
Zor
Edited to make myself clearer . . . .
In post # 580, picture #6 ( top to bottom and left to right ) the orange peel surface is quite evident.
End
Last edited by Zor; 08-28-2014 at 02:41 PM.
08-28-2014, 02:24 PM
#586

Join Date: Jun 2012
Location: Bristol, CT
Posts: 4,002
Likes: 0
Received 0 Likes
on
0 Posts
Either way, it's a bummer about the paint. BUT, taking the time to fix won't leave you bummed down the road. You'll be happy you did. I, for one, think your more than ready to tackle a "scale" build and would be thrilled to watch you. You have a real talent for this.
08-28-2014, 03:09 PM
#587
Yes it was a mixing problem. As soon as I called Klasskote and explained he said it was a mixing problem and you have to mix the crap out of it or it will be more orange then yellow. I screwed up, yes I am human and there are many other screw ups I have fixed that I don't always share.
As soon as he said it was a mixing problem I knew exactly what I did, and wont do it again. I did two coats because I ran out and I think that's were I did not mix it enough.
Easy fix, I will paint it again as soon as my paint gets here. A light top coat will get me back on track. I still have that empty feeling in my stomach. It could have been worse, the fuselage could have been orange too. This is a learning proses and I accept all lessons.
I don't think it was my gun, just a carless mistake, I did not realize how important mixing the paint was, now I do.
A change of gears has me installing the engine, fuel tank and all the servos for good and I ready the fuselage. I will work on the wing tomorrow and get that ready for panel likes and rivets.
There has been so much I have learned building and finishing this chipmunk, it has served its purpose very well to teach me what I need so I can finish Angie.
I don't like the rattle can white primer I used either so on Angie I will use the Klasskote primer, black for the final coat and the Dopli high build for prep and panel lines, that's good stuff, the white sucks, but no turning back now.
So onward to getting the fuselage ready and working on the wing. When my paint gets here I will do a light cote of properly mixed yellow, that should get me back on track. Like I said the "good" is I am getting better finishes with the paint gun and the stitching method came out good and works.
TB
08-28-2014, 03:12 PM
#588
Hi Tony,
It may not be your mistake at all.
I think we have to distinguish between the orange as a color shade _ _ _ the hue of the color _ _ _ and the surface finish.
I have noticed at some time that the surface finish was what we used to refer to as ' orange peel ' finish.
That has nothing to do with the color ( the hue of the color ).
I can see ( understand ) that a lack of sufficient mixing might cause streaking due to different saturation of the pigments but the uniform darker orange hue ( no streaking ) would have to depend on the pigments proportions of the mix.
It is well known that different batches at the manufacturer can have some pigment proportion variations even if identified by the same color name.
Perhaps this is what has happened ?
Zor
Edited to make myself clearer . . . .
In post # 580, picture #6 ( top to bottom and left to right ) the orange peel surface is quite evident.
End
TB
08-28-2014, 03:21 PM
#589
Tony you may have a mixing problem as stated pretaining to color but what I see is what I stated in the PM, poor atomizing of the paint, other words it's not broken into small enough particals to flow into each other creating a smoother film, or not enough paint which leads to runs because of the size of the spray.. What pressure are you useing at the tip, you could increase that a bit and move back to 12" when spraying and see if that helps. Speed of travel can produce the same effects if your going too fast, good reflecting light is important to better see how the paint flows on the painted surface. Often times I will use a hotter reducer to allow more flow out time and shop temps around t 70-80 deg. if possible. Don't wait too long to recoat, check your spec sheet to see what that is. Do it wrong and you could lift the paint thats already on there and "you do not want that".
Leroy
Leroy
TB
08-28-2014, 09:52 PM
#591
Tony I had to go back and see your rivet detail, some nice work there. It's going to be a very nice looking plane and your right it's a good test bed for Angie. It will be another dilly of a finish for sure. Like I have said before, there is a few things to learn watching your work come together, great stuff.
Leroy
Leroy
08-29-2014, 03:05 AM
#592
On the bench for today, start working on the wing, get it ready for panel lines and rivets.
I would like to find a good white primer I can spray on the wing. I don't like the rattle can paint I have been using. I know there is a Sherwin Williams auto paint store here in town, They make the Dupli-Color paints. I would like a good primer like the gray but in white that I can spray.
The rattle can gray dries to a hard finish, you cant easily scratch it. The white scratches easily with a pencil when making the rivet lines.
When it rains it pores, now my radio is giving me problems. It was set up and all working and now that I am installing the gear the second receiver is working but only on ch 12 for the canopy, all the other channels 9-11 don't work, there is power to the servo just cant get any switch to operate them, very frustrating. I think I have a gremlin housed in my shop, going hunting.
TB
08-29-2014, 03:09 AM
#593
Tony I had to go back and see your rivet detail, some nice work there. It's going to be a very nice looking plane and your right it's a good test bed for Angie. It will be another dilly of a finish for sure. Like I have said before, there is a few things to learn watching your work come together, great stuff.
Leroy
Leroy
TB
08-29-2014, 06:22 AM
#597
So I wanted to confirm my mistake in the mixing.
I only had about 3/4oz of paint part "A" and 3/4oz of part "B" left.
Not enough to paint all the parts and I want to confirm it was the mixing.
So I mixed it up really good. I first tested the color before I reduced it to make sure it wasn't the reducer.
Then I added the reducer and the color did not change.
I painted some on areas I painted yesterday by brush. The good thing about this paint is it has a long pot life and you can brush it too.
I did some touch up yesterday with the bad mix.
Here you can see the orange.

Today I hit it with the new mix.

I also hit some areas that were masked off and the cockpit deck I hit yesterday, they all match the fuselage.


So it is confirmed it was the lack of mixing the paint properly.
yellow is a hard color to paint. It will play tricks on you. At times the fuselage looks like the orange I painted, and the orange I painted looks like the yellow.
It is the light playing tricks on me.
You can see the pic above how light makes them look completely different colors, but they look the same in the same light.

I wanted to test some of the finishing methods I will be doing on Angie. On Angie most if not all fasteners that are in a painter area will get installed after the painting is done and then clear coated.
On this plane I did not want to do them all. In some pics of the full scale you can see that all the fasteners are not painted, but in other pics of other schemes they are so it is a dealers choice if you want to paint them or not.
On Angie they wont get painted.
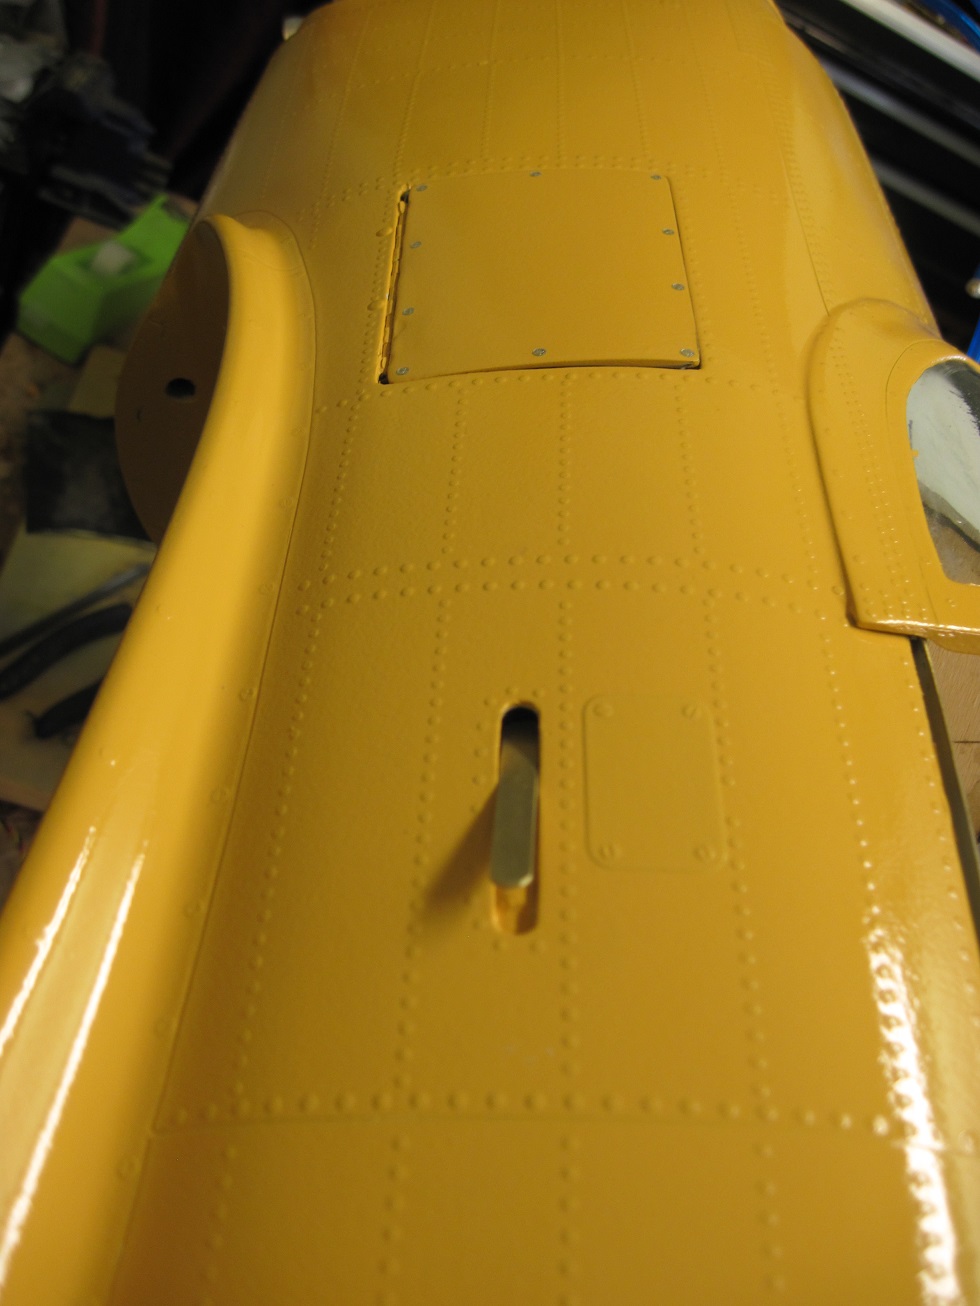
Here are some hatches I did as a test on this plane. The overlay vinyl hatches have holes in the location of the screws.
This way you are not just laying them on top.
 This is the look I am going for on Angie, looks good
On the operational hatches they are laid on top


The hand hold will be polished brass, no paint.


TB
I only had about 3/4oz of paint part "A" and 3/4oz of part "B" left.
Not enough to paint all the parts and I want to confirm it was the mixing.
So I mixed it up really good. I first tested the color before I reduced it to make sure it wasn't the reducer.
Then I added the reducer and the color did not change.
I painted some on areas I painted yesterday by brush. The good thing about this paint is it has a long pot life and you can brush it too.
I did some touch up yesterday with the bad mix.
Here you can see the orange.
Today I hit it with the new mix.
I also hit some areas that were masked off and the cockpit deck I hit yesterday, they all match the fuselage.
So it is confirmed it was the lack of mixing the paint properly.
yellow is a hard color to paint. It will play tricks on you. At times the fuselage looks like the orange I painted, and the orange I painted looks like the yellow.
It is the light playing tricks on me.
You can see the pic above how light makes them look completely different colors, but they look the same in the same light.
I wanted to test some of the finishing methods I will be doing on Angie. On Angie most if not all fasteners that are in a painter area will get installed after the painting is done and then clear coated.
On this plane I did not want to do them all. In some pics of the full scale you can see that all the fasteners are not painted, but in other pics of other schemes they are so it is a dealers choice if you want to paint them or not.
On Angie they wont get painted.
Here are some hatches I did as a test on this plane. The overlay vinyl hatches have holes in the location of the screws.
This way you are not just laying them on top.
On the operational hatches they are laid on top
The hand hold will be polished brass, no paint.
TB
08-29-2014, 08:28 AM
#599
I sanded the cowl to get it ready for the redo paint job.
I went ahead and cut in the exhaust ports.


The Teflon tubes will go in after the cowl is installed ready to fly. I will cut them off after they are clamped and leave about a 1/4" to 1/2" exposed from the cowl floor.
The fuel vent will come out the bottom just behind the mufflers.
My plan for now is to put the fuel dot back there too.


TB
I went ahead and cut in the exhaust ports.
The Teflon tubes will go in after the cowl is installed ready to fly. I will cut them off after they are clamped and leave about a 1/4" to 1/2" exposed from the cowl floor.
The fuel vent will come out the bottom just behind the mufflers.
My plan for now is to put the fuel dot back there too.
TB