


AMR Trainer 26 - (my) official build thread
 02-20-2015, 07:02 AM
#276
Senior Member
Thread Starter

After the dowel cured I added some thin white glue, sold at Lee Valley as Chair Doctor Glue. This stuff excels at wicking into small gaps and swelling the wood to lock two pieces tightly together.

Here's the mocked-up rudder end of the pull-pull system clamped in place.

After determining where the cables needed to exit the fuselage, I marked and drilled 3 holes...

... and cut along them with a razor saw to open them up into slots.

Here's the mocked-up rudder end of the pull-pull system clamped in place.
After determining where the cables needed to exit the fuselage, I marked and drilled 3 holes...
... and cut along them with a razor saw to open them up into slots.
 02-20-2015, 07:10 AM
#277
Senior Member
Thread Starter
The sides of the fuselage were now much weaker where the slots exit the large lightening hole, so I added a couple of 3/8" x 3/8" balsa cross members to restore the strength.

A few months ago I saved some rigid plastic rods from the trash, thinking they'd be useful in a future project. I've forgotten what their original purpose was, but they'll make perfect guide tubes where the cables exit the fuselage.


A little Gorilla Glue is just the thing to lock those in place. When I install the actual cables, I'll add some heat shrink where they pass through the guides to ease wear and tear.
A few months ago I saved some rigid plastic rods from the trash, thinking they'd be useful in a future project. I've forgotten what their original purpose was, but they'll make perfect guide tubes where the cables exit the fuselage.
A little Gorilla Glue is just the thing to lock those in place. When I install the actual cables, I'll add some heat shrink where they pass through the guides to ease wear and tear.
02-20-2015, 07:18 AM
#278
Senior Member
Thread Starter
Another thing I've been puzzling over is covering the inside of the window frames in white. I've mocked up a corner with some 1/8" plywood scrap and ironed a scrap piece of Monokote into the corners.

I glued a scrap piece of 1/8" lexan into the frame with canopy glue overnight. I used WAY to much glue and had to cut and scrape it out, but the bond is very solid.

Still not sure if I will go to all this trouble covering the frames, but it's good to know it'll work if I do.
I glued a scrap piece of 1/8" lexan into the frame with canopy glue overnight. I used WAY to much glue and had to cut and scrape it out, but the bond is very solid.
Still not sure if I will go to all this trouble covering the frames, but it's good to know it'll work if I do.
02-20-2015, 11:54 AM
#279

For What It's Worth:
I use the yellow inner ny-rods for all my cable exit guides for the past 10+ years. It wears very well with both wire cables and coated fishing leader wire. I have used it on 1/4 and 1/3 scale WW1 planes with no failures to date. I am confident enough with this system that I am installing it in my 1/2 scale Nieuport 11.
Your window detail is a good solution......looks good.
02-23-2015, 08:13 AM
#280
Senior Member
Thread Starter
For What It's Worth:
I use the yellow inner ny-rods for all my cable exit guides for the past 10+ years. It wears very well with both wire cables and coated fishing leader wire. I have used it on 1/4 and 1/3 scale WW1 planes with no failures to date. I am confident enough with this system that I am installing it in my 1/2 scale Nieuport 11.
Your window detail is a good solution......looks good.
I use the yellow inner ny-rods for all my cable exit guides for the past 10+ years. It wears very well with both wire cables and coated fishing leader wire. I have used it on 1/4 and 1/3 scale WW1 planes with no failures to date. I am confident enough with this system that I am installing it in my 1/2 scale Nieuport 11.
Your window detail is a good solution......looks good.
02-23-2015, 08:13 AM
#281
Senior Member
Thread Starter
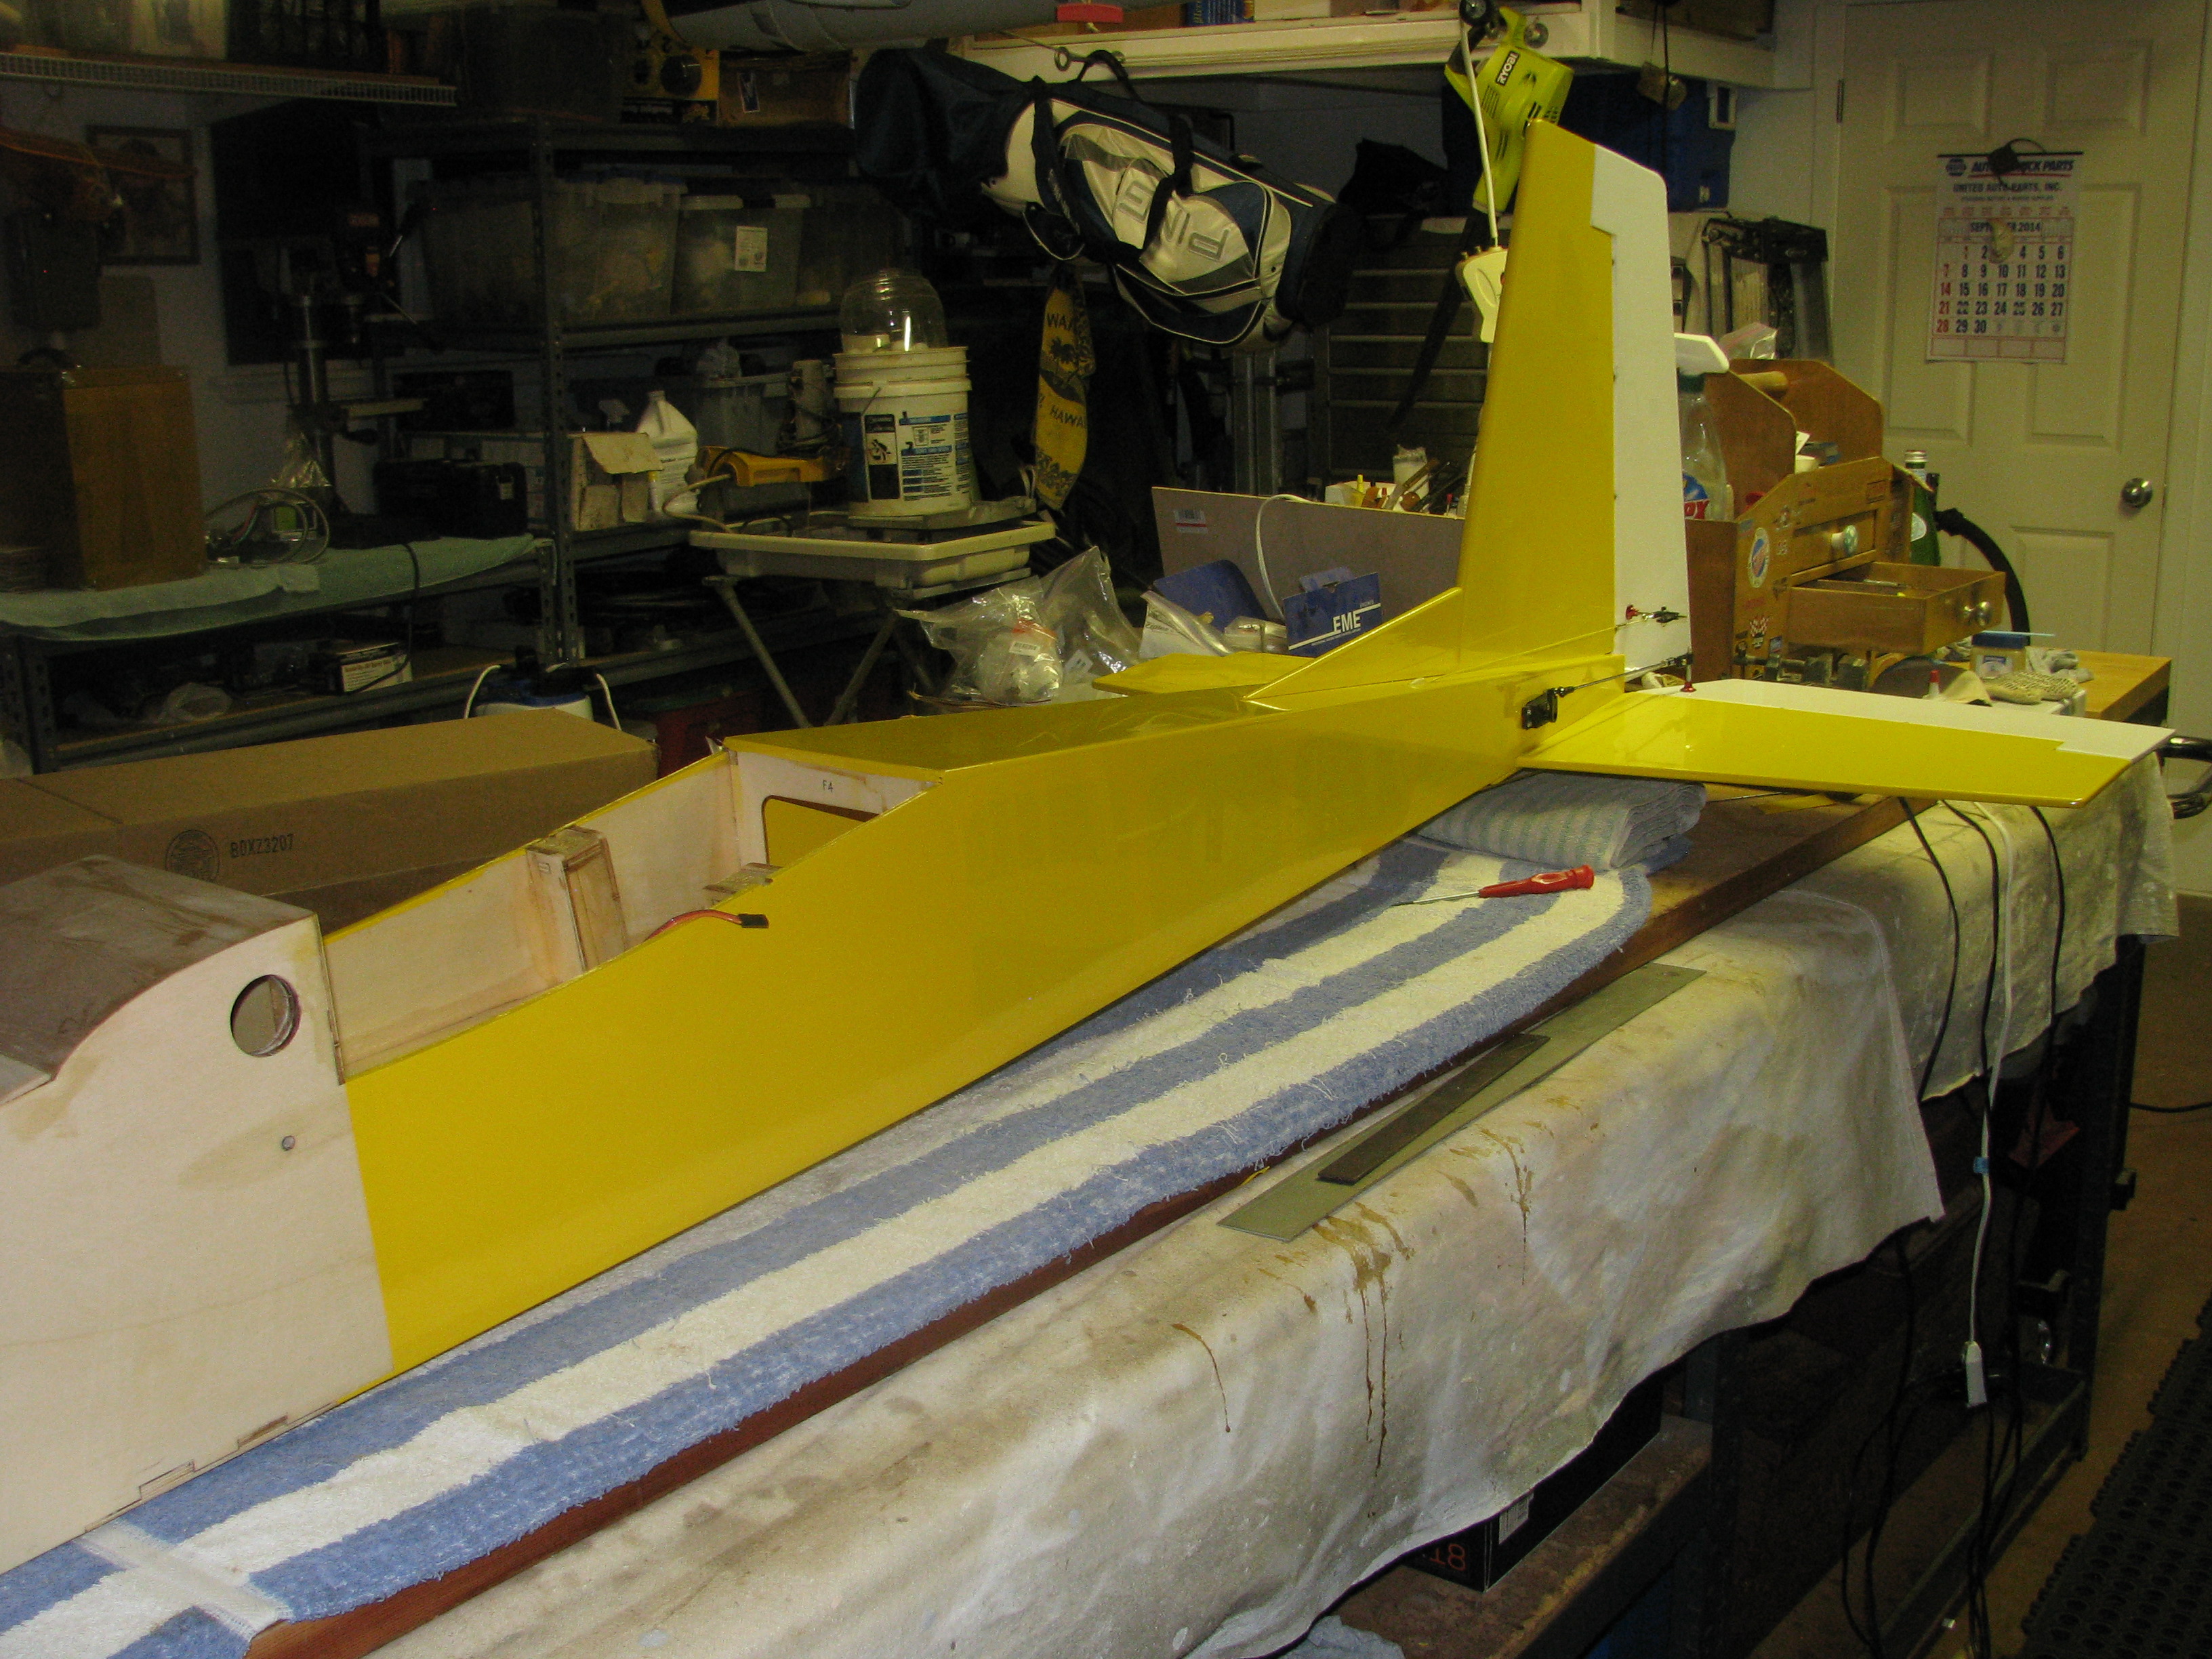
Here's a last pic of the plane (almost) all together before I tear it down for prep and covering.

I've made a hole in the firewall for the choke and throttle linkages. I'll fuelproof it with thinned epoxy after the covering is complete.

Filling and sanding the fuselage.

Filling and sanding the empennage parts and ailerons.

I've made a hole in the firewall for the choke and throttle linkages. I'll fuelproof it with thinned epoxy after the covering is complete.
Filling and sanding the fuselage.
Filling and sanding the empennage parts and ailerons.
02-23-2015, 09:26 AM
#283
Senior Member
Thread Starter
With the Gorilla Glue cured it's time to cut the pull-pull cable guides flush.

Love that flush cut saw! A little sanding and the tubes were flush with the surrounding areas.

Here I've marked the locations of the top (solid) and bottom (dashed) covering seams. Note that the dashed line passes through some lightening cutouts towards the rear... this created problems (more detail to follow).

While getting ready to start covering I discovered a problem.

I bought FLAT Monokote! Oh noes!
Love that flush cut saw! A little sanding and the tubes were flush with the surrounding areas.
Here I've marked the locations of the top (solid) and bottom (dashed) covering seams. Note that the dashed line passes through some lightening cutouts towards the rear... this created problems (more detail to follow).
While getting ready to start covering I discovered a problem.
I bought FLAT Monokote! Oh noes!
02-23-2015, 10:21 AM
#284
Senior Member
Thread Starter
Luckily my LHS had two of the correct colour in stock. Four more are on order.

I prepped the fuselage with SIG Stix-It along the edges and corners.


Covered the back section of the bottom with no problems (those may look like wrinkles in the far back of the photo, but I assure you that's a reflection from the window).

I prepped the fuselage with SIG Stix-It along the edges and corners.
Covered the back section of the bottom with no problems (those may look like wrinkles in the far back of the photo, but I assure you that's a reflection from the window).
02-23-2015, 10:44 AM
#285
Senior Member
Thread Starter
The front section of the bottom went on equally well.

It was when I started on the side that I ran into problems. There were large wrinkles (nothing new) so out came the heat gun, just as it did for the bottom panels. But while I was trying to remove the wrinkles the covering shrank and the seam pulled back (It's suppose to run along the dashed line).

I'm guessing that this is due in part to the fact that the seam ran over empty space in places. I may also be using too much heat. I'm interested in opinions.
In any case I tore that panel off and will redo it.
It was when I started on the side that I ran into problems. There were large wrinkles (nothing new) so out came the heat gun, just as it did for the bottom panels. But while I was trying to remove the wrinkles the covering shrank and the seam pulled back (It's suppose to run along the dashed line).
I'm guessing that this is due in part to the fact that the seam ran over empty space in places. I may also be using too much heat. I'm interested in opinions.
In any case I tore that panel off and will redo it.
02-23-2015, 12:50 PM
#286

My Feedback: (13)
Hay Grosbeak,
I have found that when I'm covering a large area...to use one large piece of Super Monokote, and over lap enough on all sides, to get a good grip on the covering, to help pull tight. I over lap at least 6" and all my buddies state I waste a lot of good covering...but it works for me and my finished product is perfect.
Now first I start by heating down all the four sides, and smooth it out as best I can, while using high heat with my heat iron. I pull as best I can on the side over lap as I heat down and set the Monokote. Use caution here and use enough pull, to keep everything as tight as I can. It doesn't have to be perfect...the heat gun will pull the rest of the wrinkles out-at that stage. I then...and this is secret stuff here...let the work you just heated down...cool down, on all four edges. Let the adhesive in the covering do its thing and harden. Then after I've let all four sides cool down, I take a heat gun...and slowly take all the wrinkles out of the center part. Remember...attach al four sides first and let a small bit over lap the edges and cut a clean overlapped edge prior to moving forward...this is important too. Use caution with the heat gun...and go slowly to flatten out-smooth out the Super Monokote on the inside of the four sides.
It works for me, and now I can cover large pieces of wing and fuselage by using this technique.
Let me know if this helps you...and if needed, send me a PM with your phone number and I'll call you and give you a more detailed instruction.
Great Build...!
Soft Landings Always,
Bobby of Maui
02-23-2015, 01:58 PM
#287
Yes, the open lightening hole and high heat caused your problem........
I go just the opposite than what Bob does. I use as little heat as possible to adhere the covering, sealing all the edges as I go. Then after the whole area, in this case the basic fuselage structure, is covered I go back and tighten up the remaining wrinkles.
We all have are own techniques and with more covering jobs that you do, you will find a technique that you are comfortable with and that works well for you.
I have thrown away a lot ruined covering over the years........there are some mistakes that only a new piece of covering will cure.
Cheers,
Art
02-23-2015, 02:01 PM
#288
...
It was when I started on the side that I ran into problems. There were large wrinkles (nothing new) so out came the heat gun, just as it did for the bottom panels. But while I was trying to remove the wrinkles the covering shrank and the seam pulled back (It's suppose to run along the dashed line)....
I'm guessing that this is due in part to the fact that the seam ran over empty space in places. I may also be using too much heat. I'm interested in opinions.
In any case I tore that panel off and will redo it.
Sincerely, Richard
02-24-2015, 08:00 AM
#289
Junior Member
My Feedback: (1)
Join Date: Dec 2002
Location: Rio Rancho, NM,
Posts: 29
Likes: 0
Received 0 Likes
on
0 Posts
I had the exact same issue with a 2 color covering job on a scratch build plane a few years ago. My solution was to cut a 1/2" strip of 3/32" balsa, cut to fit in the lightening hole where the colors overlap, and then glue flush with the surface of the fuselage.
Good luck with finishing your covering job. My first attempt at monokote was barely presentable, but with the attention to detail I've seen in your thread I expect your finished job to be just fine.
Great job with the build and the thread.
sewoodruff
Good luck with finishing your covering job. My first attempt at monokote was barely presentable, but with the attention to detail I've seen in your thread I expect your finished job to be just fine.
Great job with the build and the thread.
sewoodruff
02-24-2015, 08:11 AM
#290
Junior Member
My Feedback: (1)
Join Date: Dec 2002
Location: Rio Rancho, NM,
Posts: 29
Likes: 0
Received 0 Likes
on
0 Posts
I would suggest the 3rd hole a bit further from the lightening hole and then confining the slot between drill holes. Then you wouldn't need to brace between the sides.
sewoodruff
sewoodruff
02-24-2015, 08:50 AM
#291
Junior Member
My Feedback: (1)
Join Date: Dec 2002
Location: Rio Rancho, NM,
Posts: 29
Likes: 0
Received 0 Likes
on
0 Posts
Just my opinion but I have always felt that running a wing bolt through a dowell concentrated the wing loads and made tearing up the wing more likely then just shearing the bolt in the case of an accident. Getting a sheared off wing bolt out of the fuzelage is the easier repair.
Instead I determine the angle between the top and bottom sheeting and taper a strip of hardwood on the bandsaw then cut 2 pieces to fit between the top and bottom sheeting and all the way from the first to the second ribs. This usually has to be planned ahead so the block also fits between the trailing edge and any spars.
The second advantage now comes into play. Instead of drilling straight down through the wing for the bolts use a drill guide flush on the top of the wing to drill through the wing and wing mount. When you're done with all the drilling and tapping, the bolt will be at an angle through the mounting plate but the bolt head will be flush with the top of the wing and unstressed.
sewoodruff
02-24-2015, 09:27 AM
#292
Junior Member
My Feedback: (1)
Join Date: Dec 2002
Location: Rio Rancho, NM,
Posts: 29
Likes: 0
Received 0 Likes
on
0 Posts
It depends on the application but I have usually found it works better to offset the engine mount or standoffs towards the port side enough to center the spinner backplate between the sides of the fuzelage. I find this helpful later on when building the engine cowl etc.
sewoodruff
sewoodruff
02-25-2015, 05:40 AM
#293
Senior Member
Thread Starter
Thanks for all the excellent tips. Those relating to parts of the build already complete (sewoodruff, I'm looking in your direction!) will be filed away for consideration during the next build. I got on fine with the rest of the covering - more to follow shortly.
02-25-2015, 05:49 AM
#294
Senior Member
Thread Starter
Here's my second go at the rear panel - this time it's cut much higher with the seam above all of the lightening holes. There were some small wrinkles at the seam but I took care of those with the iron.

Here's the entire starboard side of the fuselage complete.

Here I'm putting the base layer on the cowl. Looks pretty rough at the outset...

... but the end result was good.

Here's the entire starboard side of the fuselage complete.
Here I'm putting the base layer on the cowl. Looks pretty rough at the outset...
... but the end result was good.
02-25-2015, 05:54 AM
#295
Senior Member
Thread Starter
I used a steel rule and stopper to mark the lower seam lines for the top layer of covering.


It was a helpful reference in positioning the rearmost piece of the top layer.

It was a helpful reference in positioning the rearmost piece of the top layer.
02-25-2015, 06:00 AM
#296
Senior Member
Thread Starter
I'm very pleased with my colour choice and how well it's laid down.

Here's the first of the window frames covered. Too much heat from the gun burned through the covering in the centre but that's waste... so no harm done.

I was wondering how to cut out the waste from inside the frame when the light bulb came on (I love it when that happens). Razor blade and rare earth magnet!


Here's the first of the window frames covered. Too much heat from the gun burned through the covering in the centre but that's waste... so no harm done.
I was wondering how to cut out the waste from inside the frame when the light bulb came on (I love it when that happens). Razor blade and rare earth magnet!
02-25-2015, 06:04 AM
#297
Senior Member
Thread Starter
Here's the frame (almost) completed with a test fit on the fuse.

I just need to iron small pieces of covering into the corners of the frame to complete the job.
Up next:
- cowl covering
- side window frames
- window tinting
- window fitting
I just need to iron small pieces of covering into the corners of the frame to complete the job.
Up next:
- cowl covering
- side window frames
- window tinting
- window fitting
02-25-2015, 10:28 AM
#298
Senior Member
Thread Starter
Here's the windshield frame with the inside corners covered.

Rough window cutouts.

Covering ironed into frames.

Covering ironed into fuselage (cuts were a little rough... no worries)

Rough window cutouts.
Covering ironed into frames.
Covering ironed into fuselage (cuts were a little rough... no worries)
02-25-2015, 10:35 AM
#299
Senior Member
Thread Starter
Starboard window frames complete.

Port frames complete.

Covering the inner corners of the window frames involved little darts of covering - 26 of these.

I held them in position with pliers while I used my trim iron to seal them in.

It took a few hours of repetitive work... peel off the backing, grab the piece with pliers and hold it in place while until it's tacked down with the iron. Iron it into four surfaces: The inside of the outer frame, the surface of the inner frame, the inside of the inner frame and the inside of the fuselage. Tedious stuff - glad it's done!
Port frames complete.
Covering the inner corners of the window frames involved little darts of covering - 26 of these.
I held them in position with pliers while I used my trim iron to seal them in.
It took a few hours of repetitive work... peel off the backing, grab the piece with pliers and hold it in place while until it's tacked down with the iron. Iron it into four surfaces: The inside of the outer frame, the surface of the inner frame, the inside of the inner frame and the inside of the fuselage. Tedious stuff - glad it's done!
02-25-2015, 10:38 AM
#300
Senior Member
Thread Starter
Finished the cowl and front hatch - here they are in place for a test fit with the windshield frame.

Window tinting and glue-in is next!
Window tinting and glue-in is next!