


Laser Design Services Crusader 2 build

 01-12-2016, 10:04 PM
#78

Join Date: Jun 2008
Location: Christchurch, NEW ZEALAND
Posts: 345
Likes: 0
Received 0 Likes
on
0 Posts
So what are you planning on doing?
If it was me I'd cut the fuselage sides to the correct shape and fit them on the correct side of R1. Your firewall and formers will then fit correctly (You're right though, the firewall looks a bit odd so it might need redoing).
I guess you could continue with the sides on the outside of the ribs and make the entire fuselage wider. In this case your balsa sides are still not quite right. As you say the curve on the bottom fits the lower skin but it is cut to match the outside surface of the skin, you would need to cut 3/32 off the curved part to get the side to fit properly.
In either case the slot you cut in the wing skin has significantly reduced its strength. I have an idea in mind that would solve that problem but it would only work if you build the model as designed. If you want to continue with the fuse sides on the outside I can't think of a quick strong repair ( the problem is the skin will be butt glued to the sides which is very weak). You might be ok though it could be strong enough, but to my mind it's just as easy to fix it now and do it right, than it is to continue.
Over to you though, let me know what you decide and I'll make a sketch of my suggested repair scheme for you if you need it.
Dave H
01-13-2016, 04:24 AM
#79

Thread Starter
Join Date: Mar 2013
Location: Winnipeg,
MB, CANADA
Posts: 751
Likes: 0
Received 0 Likes
on
0 Posts
Hi Dave,
I was more focused on the strength of the fuse to the wing joint to tell you the truth. I should have changed out the wood for the R1 ribs though because they offer no strength so I think going on the outside of them and adding some fillets of epoxy from under the wing skin to the 1/8 balsa sides and removing the soft wood on the R1's where I am mounting servo rails should make for a strong wing. I think there is also a 1/4 triangle added to the wing skin to fuse side? The way the sides just "slot" in just feels right to me. What do think, will it work? If I build a Crusader ll mark ll I will know where to use different grades of balsa not to mention the proper assembly according to the design.
Calvi
01-15-2016, 08:44 PM
#80
Join Date: Jun 2008
Location: Christchurch, NEW ZEALAND
Posts: 345
Likes: 0
Received 0 Likes
on
0 Posts
Hi Calvi,
Sorry it's been a while, RCU kept crashing.
I reckon the the strength in the wing/fuse joint is mainly in the ply doubler. I can't see that having the doubler on the outside of the rib will make it any stronger. A ply doubler on a balsa rib is strong enough for the retract mounts on many designs, so it should be ok for this joint. I plan on tying the doubler into the spar and the LE with triangle balsa as well though on mine.
You will be butt glueing the upper skin to the balsa side. It's never going to be as strong as glueing the face of the skin to the top of the rib, even with epoxy and the 1/4 triangle (grain goes the wrong way for much strength). As I say, I think you'll be ok though.
The fuse and wing slot together really nicely on the inside as well.
I was wondering how you were going to clamp the wing/fuse joint, but I guess you can reach into the gap at the LE and wedge the ply against R1.
Either way good luck.
Dave H
01-15-2016, 10:14 PM
#81
Thread Starter
Join Date: Mar 2013
Location: Winnipeg,
MB, CANADA
Posts: 751
Likes: 0
Received 0 Likes
on
0 Posts
Hi Dave Thanks,
Yes I am rather committed now anyway so we will see what happens. I have just started drawing out a new firewall and formers and playing around with what to do about the vertical stabilizers. Had to epoxy two pieces of 1/8 aircraft ply together so I should be cutting the firewall out by Saturday(takes forever for the epoxy I use to cure, but it sure soaks in nice). Did you happen to draw out what you did for your fins? they look light and strong.
Calvi
01-17-2016, 01:32 AM
#82
Join Date: Jun 2008
Location: Christchurch, NEW ZEALAND
Posts: 345
Likes: 0
Received 0 Likes
on
0 Posts
Here you go Calvi,
I sketched the repair I was thinking of as well. Sorry to keep going on about it but now you'll have all the info to make your decision easier (or more confusing). You'd need a strip of 3/32 balsa about 3/4 inch wide and the length of the slot you cut. *Important* the grain runs the short way across the strip so it matches the wing skin. Sand one edge down and then glue the strip over the slot to repair the skin. Cut an extra 3/32 off the fuse sides to match. Any way I'll leave it up to you now.
I built my fins with an 1/8 X 5/8 and 1/8 square frame covered with 1/16 sheet. Build the frame outline over the plan and add the cross members where they look about right. I've shown exaggerated gaps where the top and bottom frame slides together. Make the joints tight here but don't glue them at this stage. Cover each side with two pieces of 1/16, make the join within the wing profile.
Hope this helps,
Dave H
I don't know why it uploaded rotated 90�, you'll have to tilt your head. Sorry about that.
Last edited by gerryndennis; 01-17-2016 at 01:39 AM.
01-17-2016, 02:03 AM
#83
Thread Starter
Join Date: Mar 2013
Location: Winnipeg,
MB, CANADA
Posts: 751
Likes: 0
Received 0 Likes
on
0 Posts
Hi Dave,
Thanks for the drawings, I have spliced some hard 1/4" balsa to be able to use the laser cut fins, not sure if I will use them or not, if I get the time I will build them up like you did. I had to laminate some 1/32 ply to make my 1/16 front doublers. tomorrow I can epoxy the doublers in place, then join the front and back fuse together. Still not sure if I should roll with what I have done, I have new firewall and formers.


I had already glued in the rear doublers before you pointed out they were the wrong shape, so that is kind of what led me down this road if errors. I should know by now it does not pay to try to compensate for mistakes by deviating from the plans. Oh well water under the bridge")
Calvi
Thanks for the drawings, I have spliced some hard 1/4" balsa to be able to use the laser cut fins, not sure if I will use them or not, if I get the time I will build them up like you did. I had to laminate some 1/32 ply to make my 1/16 front doublers. tomorrow I can epoxy the doublers in place, then join the front and back fuse together. Still not sure if I should roll with what I have done, I have new firewall and formers.
I had already glued in the rear doublers before you pointed out they were the wrong shape, so that is kind of what led me down this road if errors. I should know by now it does not pay to try to compensate for mistakes by deviating from the plans. Oh well water under the bridge
Calvi
01-18-2016, 02:03 AM
#84
Join Date: Jun 2008
Location: Christchurch, NEW ZEALAND
Posts: 345
Likes: 0
Received 0 Likes
on
0 Posts
I know what you mean, I've been trying to sand a leading edge to shape, it just wasn't going right but I've sort of got it done. I've just realised that my LE edge balsa should have been 1/16 thicker. Do I leave it, do I try and glue some 1/16 sheet to the curve, do I try and cut the LE off and start again?
It wouldn't be too much trouble to back track at this stage, just carefully cut through the balsa sides down to the doubler then carve/slice the unwanted balsa off in small chips down to the glue line then sand the glue off (or make new sides and doubler).
What you are doing at the moment is quicker and easier, and I think will be strong enough.
I think where you are going should work ok, but once you glue those sides in you are committed.
Now your firewall.
I can't quite see from the photos but does it sit on the wing spar? It needs to be epoxied to the spar as well as the fuselage sides (ply doubler).
The sides of the firewall look like they will be glued to the balsa sides? I don't think this will be strong enough. I recommend extending the doubler further back so you can glue the firewall to ply. Glue a piece of ply to extend the doubler to the back of the balsa sides. Then glue another piece of ply (1/16 would b best but 1/32 might be ok) over the joint from the back to at least 1/2 inch forward of the joint. Once you've epoxied the firewall in drill two or three holes through the sides and into the firewall a short distance, epoxy toothpicks (cut the pointy bit off first to get the full diameter) into the holes to pin the firewall to the sides. Add triangle as normal. Obviousely the firewall will need to be narrower to fit.
Laser Design Services misread the plan quite badly didn't they? The wing/fuse joint is understandable but cutting the doubler short of the firewall is pretty bad. The fins being cut short is another obvious one.
It's great to see you making progress,
Dave H
01-18-2016, 12:32 PM
#85
Thread Starter
Join Date: Mar 2013
Location: Winnipeg,
MB, CANADA
Posts: 751
Likes: 0
Received 0 Likes
on
0 Posts
The fire wall rests against the back of the doubler at the 3 degree angle cut into it. Is that as it should be? The firewall is (like you said) the thickness of the wing skin proud of sitting on the spar, so once I trim the doubler for that it will sit on the spar. Today the fuse side fronts will be glued to the aft sections.
Calvi
Calvi
01-19-2016, 01:06 AM
#86
Join Date: Jun 2008
Location: Christchurch, NEW ZEALAND
Posts: 345
Likes: 0
Received 0 Likes
on
0 Posts
Some designs get away with glueing the firewall to the balsa sides but these models have the sides larger than the engine mount, even then it's not ideal
The fuselage sides on the Crusader only go halfway up the firewall and the engine mount extends well above the sides. This puts quite a bit of stress on that small joint. There's not much holding the firewall into the model so you need all the strength you can get. Glueing the firewall to balsa won't work.
The doubler is the strong part of the fuselage side, so you need the best bond between them and the firewall you can get. I really don't think the tiny glueing area you would have against the back of the doublers would be sufficient.
So yes I think you need to extend the doubler back, it's also important that you epoxy a ply tripler over the joint in the doubler so you have full strength there.
I've noticed on the plan that rather than using triangle balsa to support the firewall, there's 1/4 ply supports instead. So that's 1/2 inch of ply face glued to the 1/16 ply doubler. As opposed to 1/16 inch of edge glued ply and 1/4 inch ply glued to 1/8 balsa!
This and epoxying the bottom of the firewall to the wing spar should be strong enough.
Have I convinced you?
Dave H
01-19-2016, 02:36 AM
#87
Thread Starter
Join Date: Mar 2013
Location: Winnipeg,
MB, CANADA
Posts: 751
Likes: 0
Received 0 Likes
on
0 Posts
Hi Dave, yes I see your point, I will make sure to heed your advise on the firewall. I am not sure I follow your one sentence
" So yes I think you need to extend the doubler back, it's also important that you epoxy a ply tripler over the joint in the doubler so you have full strength there". But it us 4:30 am here and I am just finishing up my night shift, so I am a little muddled. I see what you mean on the rest of it though, not much meat between the fuse and the firewall.
Calvi
01-19-2016, 11:42 AM
#88
Thread Starter
Join Date: Mar 2013
Location: Winnipeg,
MB, CANADA
Posts: 751
Likes: 0
Received 0 Likes
on
0 Posts
Ok, I have had some sleep and I think what you are saying Dave, is to run the doubler all the way back , then add a trippler over the joint. Simple once one has a nap.
Calvi
Calvi
01-19-2016, 12:07 PM
#89
Join Date: Jun 2008
Location: Christchurch, NEW ZEALAND
Posts: 345
Likes: 0
Received 0 Likes
on
0 Posts
I think you've got it.
Epoxy a piece of ply to the balsa side that sticks out past the ply doubler so that you have ply all the way to the back.
Then epoxy a ply tripler from the back to at least 1/2 an inch forward of the join.
Both these pieces would be the height of the side that sticks out above the wing. They would go from the upper wing skin to the top of the fuselage side.
So the shape of your ply doubler extension piece is the back edge of the existing doubler, along the top of the balsa side, down the 3� angled rear of the balsa side, then forward along the top of the wing skin. The tripler is the same except 1/2 longer at the front.
It would be a good idea to pin the firewall with tooth picks as I said as well.
Dave H
01-20-2016, 01:48 AM
#90
Join Date: Jun 2008
Location: Christchurch, NEW ZEALAND
Posts: 345
Likes: 0
Received 0 Likes
on
0 Posts
You'll be able to position the firewall slightly forward or aft to get the prop and wing slot lined up correctly if you need to as well.
Dave H
Dave H
Last edited by gerryndennis; 01-20-2016 at 01:58 AM.
01-21-2016, 07:13 AM
#91
Thread Starter
Join Date: Mar 2013
Location: Winnipeg,
MB, CANADA
Posts: 751
Likes: 0
Received 0 Likes
on
0 Posts
Ok, starting to look like a starship I mean aircraft!


Gotta get some 3/8 triangle for the fuse bottom, then fit the front retract and canard. I will leave the firewall off until I am ready to join the fuse to the wing.


Gotta get some 3/8 triangle for the fuse bottom, then fit the front retract and canard. I will leave the firewall off until I am ready to join the fuse to the wing.
01-23-2016, 07:25 AM
#93
Thread Starter
Join Date: Mar 2013
Location: Winnipeg,
MB, CANADA
Posts: 751
Likes: 0
Received 0 Likes
on
0 Posts
Had to make my own 3/8 triangle out of square stock, the LHS was out. not too bad to make actually, luckily I had a piece of aluminum from a blackboard frame with a 3/8" flange on it so I just set the square stock in and carved it close then hand sanded it to final shape,


Once the glue dries it is time to fit the front retract and canard pivot!
Calvi
Once the glue dries it is time to fit the front retract and canard pivot!
Calvi
01-23-2016, 08:29 AM
#94
That's a good way to spend a Saturday morning. I have to leave to take Brent to hockey. I have a build going on in rcgroups. I do very little on RCU now a days.
http://www.rcgroups.com/forums/showt...5#post33801016
Jim
http://www.rcgroups.com/forums/showt...5#post33801016
Jim
01-23-2016, 08:38 AM
#95
Thread Starter
Join Date: Mar 2013
Location: Winnipeg,
MB, CANADA
Posts: 751
Likes: 0
Received 0 Likes
on
0 Posts
I had a quick look at your build Jim, very nice, can I build one too? I will take in the whole thread as time permits.
Calvi
Calvi
Last edited by Calvinman; 01-23-2016 at 10:11 AM.
01-23-2016, 11:56 AM
#96
If you ever want a set of plans, I can run one off at the printers on Notre Dame Street for cheap.
Jim
Jim
That's a good way to spend a Saturday morning. I have to leave to take Brent to hockey. I have a build going on in rcgroups. I do very little on RCU now a days.
http://www.rcgroups.com/forums/showt...5#post33801016
Jim
http://www.rcgroups.com/forums/showt...5#post33801016
Jim
01-24-2016, 05:09 AM
#99
Thread Starter
Join Date: Mar 2013
Location: Winnipeg,
MB, CANADA
Posts: 751
Likes: 0
Received 0 Likes
on
0 Posts
Yes I thinks that is about right, I got them to print out the plans for my long sought after "Javelin" plans I downloaded. I thought they were gone after the RCM plans sight went down. I even have the build article for it. I will have to make a list of the plans I have and see if you are interested in any of them.
01-31-2016, 09:31 AM
#100
Thread Starter
Join Date: Mar 2013
Location: Winnipeg,
MB, CANADA
Posts: 751
Likes: 0
Received 0 Likes
on
0 Posts
Got a little bit more done, I decided to give the canard pivot some "adjustability" by slotting the screw holes in case the fuselage takes on a twist so I can align the canard to the wing.
I also got the nose gear mounted, but I should have mounted it a bit higher, too late now, the steering arm will be below the fuse when the gear is down.

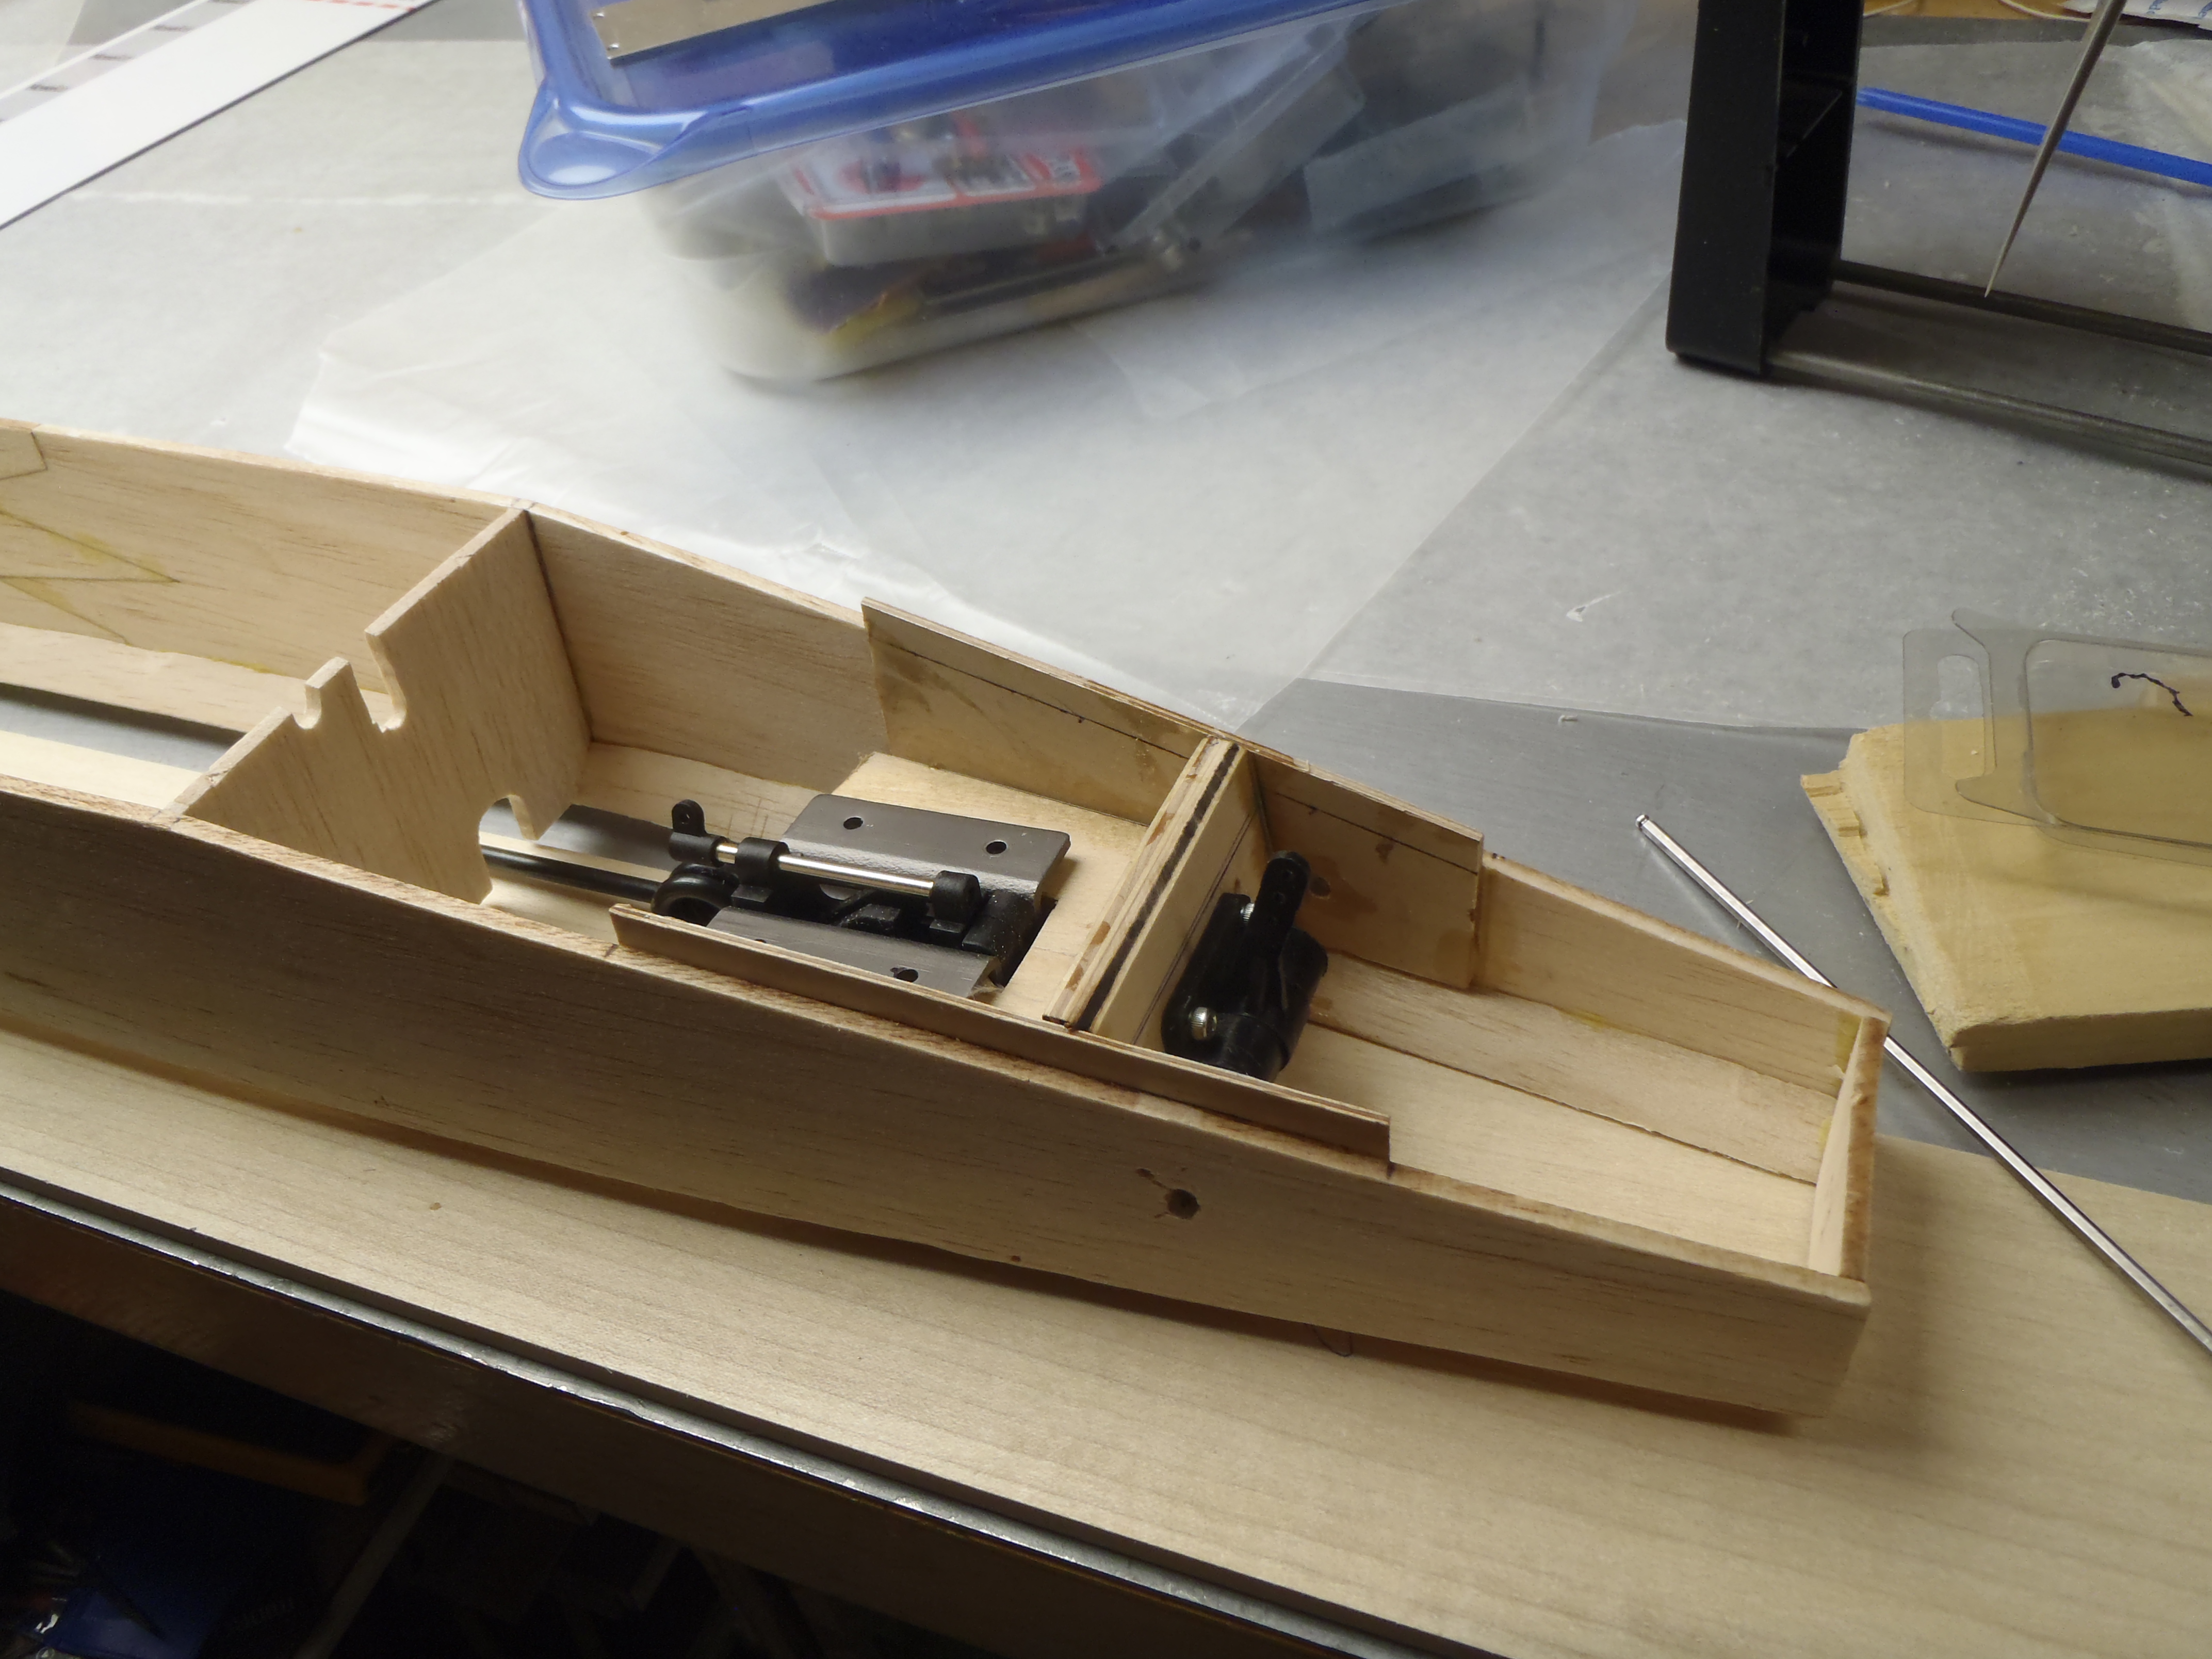
I also got the nose gear mounted, but I should have mounted it a bit higher, too late now, the steering arm will be below the fuse when the gear is down.

