


Wendell Hostetler Lancair ES
 12-31-2015, 02:00 PM
#1
Junior Member
Thread Starter
Join Date: Dec 2015
Posts: 11
Likes: 0
Received 0 Likes
on
0 Posts
Although this is not a kit build, as I'm not using a kit, it is based upon existing plans which I modified slightly for my goals, so I recon kit building would be the proper subforum.
I am starting the build of a Wendell Hostetler drawn Lancair ES 118". This is the Lancair version with a fixed gear. I will make it scale, but not as in 'competition-ready' more as in 'sport scale'. To unexperienced eyes it will be a scale model, the pro's will find tons of things wrong with it, no doubt.

As for the color scheme, the PH-GVH will serve as 1:1 example:


.JPG)

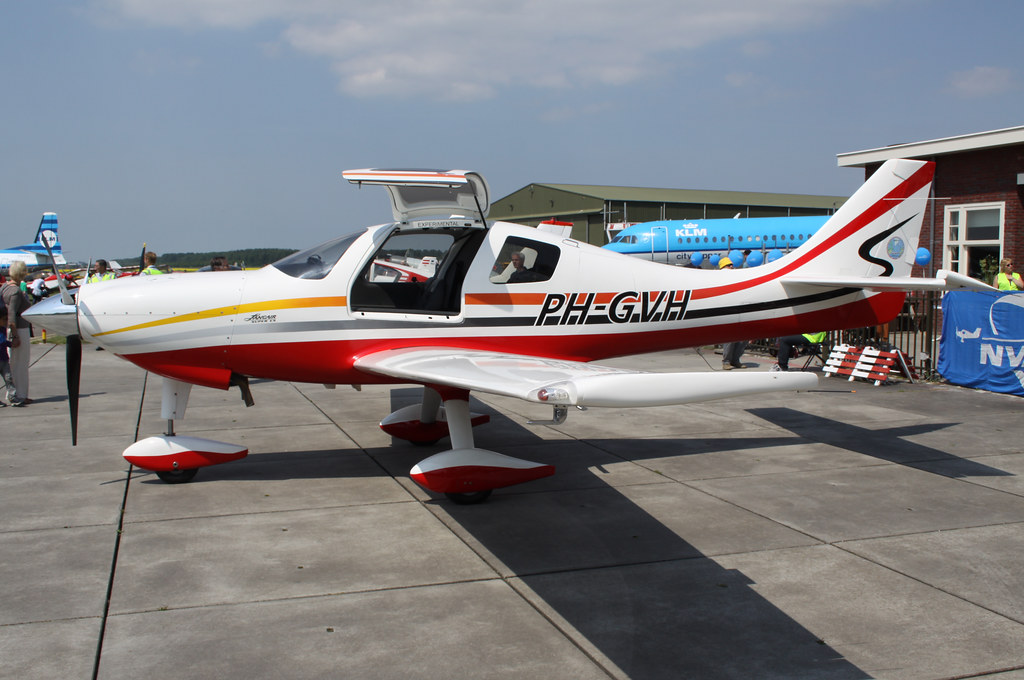


As it turns out, the owner of this 1:1 plane lives nearby, and started his flying career as a rc builder/flyer. I have emailed him, and have been invited to come see the real model 1:1, and possibly even come along for a flight! Also, he has pictures which were made during the 1:1 build, and has indicated he's more than willing to assist me. He hemiself had been pondering building a scale model of his plane, it might be I'll be building 2, in which case the fuse will be built and use as a plug to create moulds.
My English might seem awkward from time to time, please don't hang me for that, I'm Dutch so English is not my native language.
I ordered the plan from Wendell and got them delivered 2 days later at my home. 2 lager sheets, approximately 1m high and 2.5m long. They contain the plans for the IV version (retracts, smaller wing/stab) and the ES version (fixed gear, larger/thicker wing/stab). I wil be building the ES version.

As I want to keep the original plans in tact, I'm using tracing paper to trace the plan, glue that to the wood, and then cut.
Goal will be to keep it light. This means removing as much wood as possible, using as little spackling as possible, contemplating every gram. My goal is to keep it below 20lbs, all up flying weight. It will be an electric bird, so this would be including the battery packs. This is a steep goal, but hey, one has to have something to aim for.
These will be my main tools for the coming period:

It starts by tracing out the fuse sides on tracing paper. As my aim is to keep it light and scale, I have copied Wendells 'optional lightning holes' and added some of my own. Also I have changed the way the wing and gear attach to the fuse. I have no transportation for a 118" wing and besides that, Wendell designed a 3 part wing in which the center section (fully built and sheeted) is attached to the fuse using bolts. I really don't like that construction, so instead of this I will be fixating the center section to the fuse (non-removable) and leave out sheeting spars and such in the center section, as they serve no purpose other than adding weight.
To this effect I have changed the fuse box sides, to add for slots for the landing gear plate and wing spar box to slot in (not visible yet on this photo)

As I cannot get ply sheets long enough, I have to make the fuse box sides out of 2 parts. I have slotted them together in such a way that, without glue, they already hold. Then glued them using a polyurethane based glue.

Now I will glue the both sheets together at a few lightening holes (which will be removed), glue the traced plan on top of it, and start sawing. That way I will do both side at once, and will be sure they are identical.

This is the point where I am at now. Don't expect this plane to be finished tomorrow, next week, next month or possible even next year. I intend to do/build everything myself, and enjoy myself while doing so.
I am starting the build of a Wendell Hostetler drawn Lancair ES 118". This is the Lancair version with a fixed gear. I will make it scale, but not as in 'competition-ready' more as in 'sport scale'. To unexperienced eyes it will be a scale model, the pro's will find tons of things wrong with it, no doubt.
As for the color scheme, the PH-GVH will serve as 1:1 example:
As it turns out, the owner of this 1:1 plane lives nearby, and started his flying career as a rc builder/flyer. I have emailed him, and have been invited to come see the real model 1:1, and possibly even come along for a flight! Also, he has pictures which were made during the 1:1 build, and has indicated he's more than willing to assist me. He hemiself had been pondering building a scale model of his plane, it might be I'll be building 2, in which case the fuse will be built and use as a plug to create moulds.
My English might seem awkward from time to time, please don't hang me for that, I'm Dutch so English is not my native language.
I ordered the plan from Wendell and got them delivered 2 days later at my home. 2 lager sheets, approximately 1m high and 2.5m long. They contain the plans for the IV version (retracts, smaller wing/stab) and the ES version (fixed gear, larger/thicker wing/stab). I wil be building the ES version.
As I want to keep the original plans in tact, I'm using tracing paper to trace the plan, glue that to the wood, and then cut.
Goal will be to keep it light. This means removing as much wood as possible, using as little spackling as possible, contemplating every gram. My goal is to keep it below 20lbs, all up flying weight. It will be an electric bird, so this would be including the battery packs. This is a steep goal, but hey, one has to have something to aim for.
These will be my main tools for the coming period:
It starts by tracing out the fuse sides on tracing paper. As my aim is to keep it light and scale, I have copied Wendells 'optional lightning holes' and added some of my own. Also I have changed the way the wing and gear attach to the fuse. I have no transportation for a 118" wing and besides that, Wendell designed a 3 part wing in which the center section (fully built and sheeted) is attached to the fuse using bolts. I really don't like that construction, so instead of this I will be fixating the center section to the fuse (non-removable) and leave out sheeting spars and such in the center section, as they serve no purpose other than adding weight.
To this effect I have changed the fuse box sides, to add for slots for the landing gear plate and wing spar box to slot in (not visible yet on this photo)
As I cannot get ply sheets long enough, I have to make the fuse box sides out of 2 parts. I have slotted them together in such a way that, without glue, they already hold. Then glued them using a polyurethane based glue.
Now I will glue the both sheets together at a few lightening holes (which will be removed), glue the traced plan on top of it, and start sawing. That way I will do both side at once, and will be sure they are identical.
This is the point where I am at now. Don't expect this plane to be finished tomorrow, next week, next month or possible even next year. I intend to do/build everything myself, and enjoy myself while doing so.
 01-02-2016, 11:58 AM
#2
Junior Member
Thread Starter
Join Date: Dec 2015
Posts: 11
Likes: 0
Received 0 Likes
on
0 Posts
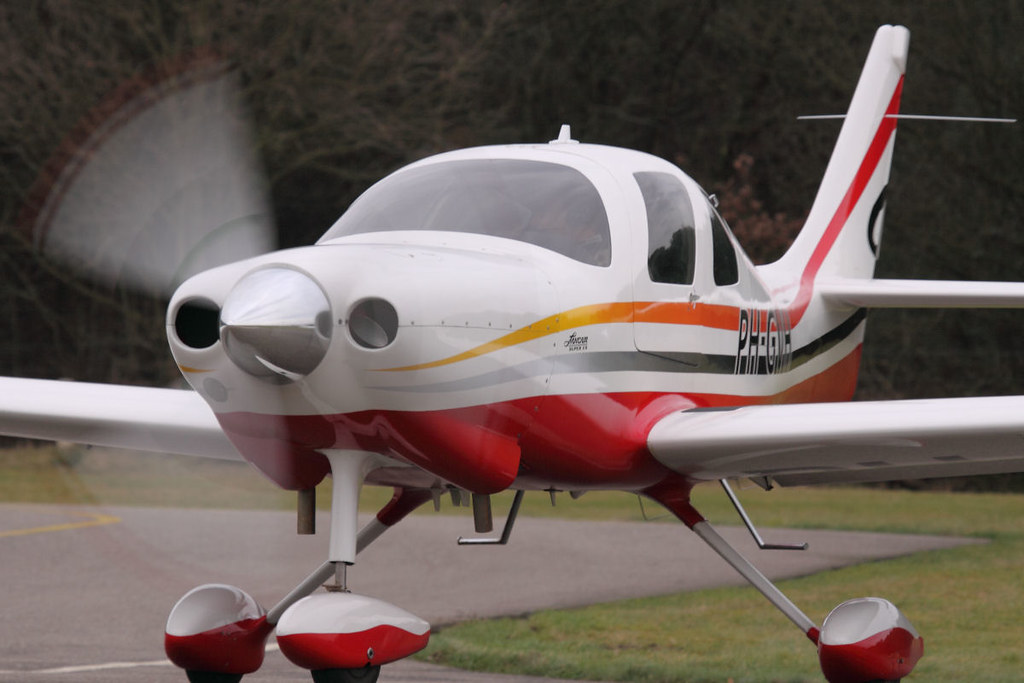
As stated, I am in the lucky circumstances that this plane is based close to my house (about 1hr drive to airport) AND that the owner is more than happy to help/assist, when I contacted him asking if he had pictures, he immediatly invited me to come over, and even to go flying! Ofcourse I could not let that opportunity pass...
It's a beauty, isn't it?
https://www.youtube.com/watch?v=O2MvQPsWIUs Takeoff
https://www.youtube.com/watch?v=aR-cb7nhBDs Landing
https://www.youtube.com/watch?v=AzQLnL9XOK8


I took about 250 pictures of all kinds of details, all surfaces, hinges, panels, hatches, and so on. This gives tons of pictures like:

Flying.. this plane is fully equiped with all avionics, after a quick guide on how to read the displays, it was time for the takeoff. I hadn't flown in a plane of this size before, only smaller (ULV) or way bigger (Airbus/Boeing), so a whole new experience. Compared to the ULV's I have been passenger on, this plane is very stable, much more like it's bigger brothers rather than it's smaller. With the headphones on, the noise is present, but not overwhelming. We had medium visibility today and low clouds (which we avoided), but still there was enough to see.
Then the owner graced me with some stick time (stick only, no pedals, ofcourse). Let me make a few turns, say 5-6 turns to get the feel for it. As with your first driving lesson, I clang on to that stick as if I was hanging over a cliff by it, white knuckles, and so on, but overall I don't think I did bad, I was the only one touching the stick and managed to keep it on it's altitude (~1000ft) while making turns. Ofcourse I overshot all turns, being used to model aircraft which allow you to 'spot-stop' a turn. I did one 360 while keeping it within a margin of about 400 ft. Overall my altitude varied from 900ft to 1100 ft, so it must have been a real rollercoaster for it's owner. The similarities to your first driving lessons, are strinking, people who get on the main roads, also tend to 'swirve' a bit.
On the hole to me an incredible experience, and I'm really gratefull for the owner for letting me experience it. And as if this wasn't enough, he also handed me an USB stick containing all the photo's that were made during the build, as well as the build manual (of the 1:1 aircraft).
In other words.. I have no more excuses.. on with the build!
It's a beauty, isn't it?
https://www.youtube.com/watch?v=O2MvQPsWIUs Takeoff
https://www.youtube.com/watch?v=aR-cb7nhBDs Landing
https://www.youtube.com/watch?v=AzQLnL9XOK8
I took about 250 pictures of all kinds of details, all surfaces, hinges, panels, hatches, and so on. This gives tons of pictures like:
Flying.. this plane is fully equiped with all avionics, after a quick guide on how to read the displays, it was time for the takeoff. I hadn't flown in a plane of this size before, only smaller (ULV) or way bigger (Airbus/Boeing), so a whole new experience. Compared to the ULV's I have been passenger on, this plane is very stable, much more like it's bigger brothers rather than it's smaller. With the headphones on, the noise is present, but not overwhelming. We had medium visibility today and low clouds (which we avoided), but still there was enough to see.
Then the owner graced me with some stick time (stick only, no pedals, ofcourse). Let me make a few turns, say 5-6 turns to get the feel for it. As with your first driving lesson, I clang on to that stick as if I was hanging over a cliff by it, white knuckles, and so on, but overall I don't think I did bad, I was the only one touching the stick and managed to keep it on it's altitude (~1000ft) while making turns. Ofcourse I overshot all turns, being used to model aircraft which allow you to 'spot-stop' a turn. I did one 360 while keeping it within a margin of about 400 ft. Overall my altitude varied from 900ft to 1100 ft, so it must have been a real rollercoaster for it's owner. The similarities to your first driving lessons, are strinking, people who get on the main roads, also tend to 'swirve' a bit.
On the hole to me an incredible experience, and I'm really gratefull for the owner for letting me experience it. And as if this wasn't enough, he also handed me an USB stick containing all the photo's that were made during the build, as well as the build manual (of the 1:1 aircraft).
In other words.. I have no more excuses.. on with the build!
Last edited by Doedelzak; 01-02-2016 at 12:05 PM.
01-02-2016, 12:17 PM
#3
Junior Member
Thread Starter
Join Date: Dec 2015
Posts: 11
Likes: 0
Received 0 Likes
on
0 Posts
As far as the building goes.. I got the fuse box sides cut out, and got some of the lightening holes cut. Didn't do the center section yet, as I'm not entirely sure on the landing gear plate construction. This turned out to be a lucky shot, since the actual landing gear is placed slighty more forward than the drawing depicts. Also traced all fuse balsa parts onto tracing paper and cut them. Between the fuse box sides are balsa sticks, I also cut those to length. Advantage of using tracing paper, is that this also allows me to compensate for differend sizes wood (metric vs imperial). Hostetler planks the fuse with 1/8" balsa (3.1mm), to me this is too much. I'm going to use 2mm (about 5/64 inch).
Tools for now:

The black thingy is to cut sticks from planks. This works like a charm.

Cut slightly oversized:


I also have these cut already, but didn't take a photo of that. Now I have to make the decision on the center section of the fuse, and then it'll be time to actually start on it.
Tools for now:
The black thingy is to cut sticks from planks. This works like a charm.
Cut slightly oversized:
I also have these cut already, but didn't take a photo of that. Now I have to make the decision on the center section of the fuse, and then it'll be time to actually start on it.
01-08-2016, 06:08 AM
#4
Junior Member
Thread Starter
Join Date: Dec 2015
Posts: 11
Likes: 0
Received 0 Likes
on
0 Posts
Looks like no intereset here in another build of this bird. Ah well, gives me more building time.
This is the current state

And I'm nicely on track to keep it well below 20lbs AUW:

Note.. this is in grams, about 1 lbs.
The lightening holes help a lot. Without them the two sides alone weigh about 700 grams (1.55lbs), so this entire construction still weighs less than just the 2 sides without the lightening holes.
This is the current state
And I'm nicely on track to keep it well below 20lbs AUW:
Note.. this is in grams, about 1 lbs.
The lightening holes help a lot. Without them the two sides alone weigh about 700 grams (1.55lbs), so this entire construction still weighs less than just the 2 sides without the lightening holes.
 02-12-2016, 03:41 AM
#7
Junior Member
Thread Starter
Join Date: Dec 2015
Posts: 11
Likes: 0
Received 0 Likes
on
0 Posts
I did not? I am looking at various options. HobbyKing has a few suitable carbon gears, but most likely I'm going to manufacture it myself. Keep in mind this is the fixed gear version.
02-12-2016, 11:13 PM
#8

Join Date: Jul 2007
Location: Auckland, NEW ZEALAND
Posts: 328
Likes: 0
Received 0 Likes
on
0 Posts
Thanks for the comment. TNTlandinggear or Abellhobby could make the main gear, but where do we find the nose gear?
Have you thought about where you will place the batteries, and how to access them for charging or replacement?
I am looking at using the Hacker A100-8 outrunner, its expensive, but so is an IC motor with its noise problems.
Regards
Ross
Have you thought about where you will place the batteries, and how to access them for charging or replacement?
I am looking at using the Hacker A100-8 outrunner, its expensive, but so is an IC motor with its noise problems.
Regards
Ross
02-13-2016, 12:02 PM
#9
Junior Member
Thread Starter
Join Date: Dec 2015
Posts: 11
Likes: 0
Received 0 Likes
on
0 Posts
Hobbycity also has a suitable nose gear. Search for 'strut' and take a look at the strust for 1.20 size. They are very nicely constructed and sturdy.
I'm also going electric and since they weight distrubution will be different then, I'm keeping the batteries in the front. If you look at my pictures, I have designed the 'bottom shelf' in the nose section so that I can strap the battery there, and move it from front to the back of that 'shelf'. I am looking at a Derkum engine, a brushless outrunner of roughly 1kg. Haven't decided yet on 8s or 10s, both will do. AUW should be about 9kg.
I'm also going electric and since they weight distrubution will be different then, I'm keeping the batteries in the front. If you look at my pictures, I have designed the 'bottom shelf' in the nose section so that I can strap the battery there, and move it from front to the back of that 'shelf'. I am looking at a Derkum engine, a brushless outrunner of roughly 1kg. Haven't decided yet on 8s or 10s, both will do. AUW should be about 9kg.
02-13-2016, 12:59 PM
#10
Join Date: Jul 2007
Location: Auckland, NEW ZEALAND
Posts: 328
Likes: 0
Received 0 Likes
on
0 Posts
Thanks again.
I will have a look at Hobby King.
I had a note form Wendell, that with electric the batteries need to be forward.
Do you plan to access the batteries by removing the wing.
Keep in touch please
Regards
Ross
I will have a look at Hobby King.
I had a note form Wendell, that with electric the batteries need to be forward.
Do you plan to access the batteries by removing the wing.
Keep in touch please
Regards
Ross
02-13-2016, 01:12 PM
#11
Join Date: Jul 2007
Location: Auckland, NEW ZEALAND
Posts: 328
Likes: 0
Received 0 Likes
on
0 Posts
I checked Hobby King, the 138mm struts look quite good, I will get a set and see if it is ok.
For US8.60 its worth a try.
How would we attach them to the former and get the nose wheel to turn as required.
By the way if you can get the weight down to 9kg, that will be a tremendous advantage.
Ross
For US8.60 its worth a try.
How would we attach them to the former and get the nose wheel to turn as required.
By the way if you can get the weight down to 9kg, that will be a tremendous advantage.
Ross
 02-14-2016, 10:37 AM
#13
Join Date: Jul 2007
Location: Auckland, NEW ZEALAND
Posts: 328
Likes: 0
Received 0 Likes
on
0 Posts
Thanks Tom, I agree totally about the budget nosegear, I emailed Sierragiant a few days ago with a query about the nose gear, but they have
not replied. I will try Robart
Regards
Ross
not replied. I will try Robart
Regards
Ross
02-15-2016, 03:37 AM
#15
No, I don'y, but I know about quality. When I read that bargain basement items are being considered for large air frames, I become concerned.
02-16-2016, 07:46 PM
#16

Doedelzak, you have a good one going here, the Lancair is one of the sleekest planes out there and a very attractive one also, your's is the first one I have seen being built at this size. I wonder if that plane has it's roots in EAA, there is always 3 or 4 of them at the fly-ins around here, you can't even find a panel line in them and they are slick as snot from one end to the other.
We build alike, I make most every thing related to my builds including interior, lights and small parts found on the out side, my current build is a 1/4 scale super cub, turned into quite a project.
You like company, who don't, so I will follow along just to give you some. You have a good start and it's easy to see your a craftsman, should be a good one.
Leroy
06-25-2016, 06:22 AM
#17
Junior Member
Thread Starter
Join Date: Dec 2015
Posts: 11
Likes: 0
Received 0 Likes
on
0 Posts
That is one of the reasons I chose this bird. Besides just being a beautifull plane (subjectively), it's a modern plane, no rivets or panellines. Or at least, a minimum thereof. No weathering needed, I can make it all shiny :P
It's flying season and I've had other things to do, however, did start on the avionics. Want to make it as scale as possible within weight limitations (it has to be light as well). The owner of this plane is proud of his avionics stack, which is centered by a Garmin G1000 setup. Now I wanted something unique, so I decided to emulate those..
This is the first experimental setup. It contains a raspberry pi, 2 adafruit 3.2" displays, a GPS sensor, a 4-axis gyro/accelerometer and a compass. So whatever you see on the screen, will be actually correct.

The device runs linux, i wrote the emulation in Python. Not entirely done yet, but it's getting there. I'm getting all the data from the sensors already, and finishing the graphics. Here you can see it in action with dummy data:
https://www.youtube.com/watch?v=EpwhlB9i1J4
It's flying season and I've had other things to do, however, did start on the avionics. Want to make it as scale as possible within weight limitations (it has to be light as well). The owner of this plane is proud of his avionics stack, which is centered by a Garmin G1000 setup. Now I wanted something unique, so I decided to emulate those..
This is the first experimental setup. It contains a raspberry pi, 2 adafruit 3.2" displays, a GPS sensor, a 4-axis gyro/accelerometer and a compass. So whatever you see on the screen, will be actually correct.
The device runs linux, i wrote the emulation in Python. Not entirely done yet, but it's getting there. I'm getting all the data from the sensors already, and finishing the graphics. Here you can see it in action with dummy data:
https://www.youtube.com/watch?v=EpwhlB9i1J4
