


Byron (Iron Bay) Gee Bee R2
 01-25-2016, 02:08 PM
#1

I have no idea whether or not a person can still purchase a “Byron” - IRON BAY - Gee Bee R2 kit. I say that because since purchasing the Byron line up of kits and accessories, Iron Bay appears to have made no attempt to improve or even maintain availability and support for Byron products. On the contrary, over the years the Iron Bay website has deteriorated to the point where it is almost non-functional, and the occasional reports back from modelers who attempt to contact the owner are sketchy, at best. Further, modelers who have actually spoken with a real person at Iron Bay, then placed an order, have reported waiting times approaching months to receive what they ordered.
All of that said, you will still find this kit for sale from time to time, so it’s not what we could consider “unavailable.” And IF anyone has had any recent luck with Iron Bay, PLEASE POST IT HERE so other modelers may know what to expect should they wish to order a Gee Bee, or any other Byron kit.
A bit of background on me… I have been a certifiable ‘Gee Bee nut’ since I first viewed the Disney film, “The Rocketeer.” Prior to that film, I was vaguely aware of the Gee Bee racers, but my awareness was based on assuming the airplane was literally a caricature of a real race plane! I had seen cartoons that resembled the real Gee Bee racers – most notably the Models Z, R2 and R1, but had no real knowledge of these being actual race planes from the 30’s…
After seeing the Rocketeer, and also being obsessed with radial engines, the creative juices began to flow and I pondered… “What would be the absolute coolest airplane I could power with a radial engine?” I came up with the Gee Bee R1 and after much searching, found Henry Haffke, his great book on the Granvilles and their many designs, as well as Haffke's Gee Bee plans, available for purchase in several scales.
I ordered a set of R1 plans in 25% and immediately began working on a model. As I recall it was about 1990 and news of the Wolf / Benjamin Gee Bee R2 replica build was circulating throughout the aviation community. As I learned more and more about the various Gee Bee races, I concluded that duplicating the R2, with its smaller engine and cowl, would be more applicable to my crazy scheme.
At the same time, I ordered a Technopower 9 cylinder radial engine, even going so far as having the crankcase anodized to more closely match the look of a P&W Wasp Jr.
I had to resort to making my own fiberglass cowl as there was nothing available for the R2, only the R1.
When my Haffke was nearly framed up, the Byron Gee Bee kit was introduced. I was able to utilize the Byron canopy and decal set for my Haffke.
Henry’s plans for the R1 had the builder refraining from ANY sheeting, leaving the entire structure ‘open framework’ in an effort to save weight. His quarter scale prototype was flown at 14 pounds with a Webra .90 spinning a 16x4.5 prop! It flew well, but was rather fragile and not exact scale – having open framework, thicker airfoil, and a lengthened horizontal stabilizer.
Intending to first fly my Gee Bee with a Quadra 42 gasser, then the Technopower radial, I opted to sheet my Gee Bee in all the scale places. This required that I thin the wing to account for the 3/32” sheeting and make mods in many other areas of construction. I also reduced the stab length to scale. Also, rather than covering my model with iron-on film, I would be using fabric covering on the aft fuselage (open frame) area (like the full scale), and finishing the rest of the model with fiberglass and resin.
Knowing my Gee Bee would be substantially heavier than Henry’s prototype, I wrote to him, describing my intentions. He admonished me NOT to power the Gee Bee with a big, heavy gasser and to avoid adding the weight resulting from my scale efforts. He correctly stated that "the enemy of the Gee Bee is weight and torque" … nothing against Henry, but I ignored his advice and forged ahead on my Gee Bee R2 replica .
.
As mine was nearing completion, I heard stories of Byron Gee Bee’s being completed and flown, and they ALL had a common theme: “Flies GREAT! Landing is a nightmare!” - or - “Flew great, but was badly damaged on the landing”
The Byron, with a G62 and Purr Power muffler/mount, was finishing out at up to 25 pounds.
My Haffke, at exactly the same scale and with a Quadra 42, finished at 18.5 pounds. I was still optimistic it would be a decent handling model…and it WAS!
Even with the Technopower (and McDaniels glow driver and batteries), which upped the weight to 19 pounds, my Gee Bee was a good flying model (as Gee Bee’s go) – see video:
https://www.youtube.com/watch?v=EwSw019aRK8
Despite my Gee Bee success, I had always wanted to build and fly the Byron version of the vaunted R2. Many years passed and I built other golden age racers, including a Haffke Gee Bee Model Z, but the Byron was always on my to-do list.
When the CARF-Models Gee Bee R2 came on the scene, I gravitated towards that model and my exploits are thoroughly illustrated throughout another build thread on the CARF:
http://www.rcuniverse.com/forum/gian...ideos-l-k.html
This thread is for those who have or may come into possession of a Byron (Iron Bay) Gee Bee kit and I will share my building and flying experiences as I go…
All of that said, you will still find this kit for sale from time to time, so it’s not what we could consider “unavailable.” And IF anyone has had any recent luck with Iron Bay, PLEASE POST IT HERE so other modelers may know what to expect should they wish to order a Gee Bee, or any other Byron kit.
A bit of background on me… I have been a certifiable ‘Gee Bee nut’ since I first viewed the Disney film, “The Rocketeer.” Prior to that film, I was vaguely aware of the Gee Bee racers, but my awareness was based on assuming the airplane was literally a caricature of a real race plane! I had seen cartoons that resembled the real Gee Bee racers – most notably the Models Z, R2 and R1, but had no real knowledge of these being actual race planes from the 30’s…
After seeing the Rocketeer, and also being obsessed with radial engines, the creative juices began to flow and I pondered… “What would be the absolute coolest airplane I could power with a radial engine?” I came up with the Gee Bee R1 and after much searching, found Henry Haffke, his great book on the Granvilles and their many designs, as well as Haffke's Gee Bee plans, available for purchase in several scales.
I ordered a set of R1 plans in 25% and immediately began working on a model. As I recall it was about 1990 and news of the Wolf / Benjamin Gee Bee R2 replica build was circulating throughout the aviation community. As I learned more and more about the various Gee Bee races, I concluded that duplicating the R2, with its smaller engine and cowl, would be more applicable to my crazy scheme.
At the same time, I ordered a Technopower 9 cylinder radial engine, even going so far as having the crankcase anodized to more closely match the look of a P&W Wasp Jr.
I had to resort to making my own fiberglass cowl as there was nothing available for the R2, only the R1.
When my Haffke was nearly framed up, the Byron Gee Bee kit was introduced. I was able to utilize the Byron canopy and decal set for my Haffke.
Henry’s plans for the R1 had the builder refraining from ANY sheeting, leaving the entire structure ‘open framework’ in an effort to save weight. His quarter scale prototype was flown at 14 pounds with a Webra .90 spinning a 16x4.5 prop! It flew well, but was rather fragile and not exact scale – having open framework, thicker airfoil, and a lengthened horizontal stabilizer.
Intending to first fly my Gee Bee with a Quadra 42 gasser, then the Technopower radial, I opted to sheet my Gee Bee in all the scale places. This required that I thin the wing to account for the 3/32” sheeting and make mods in many other areas of construction. I also reduced the stab length to scale. Also, rather than covering my model with iron-on film, I would be using fabric covering on the aft fuselage (open frame) area (like the full scale), and finishing the rest of the model with fiberglass and resin.
Knowing my Gee Bee would be substantially heavier than Henry’s prototype, I wrote to him, describing my intentions. He admonished me NOT to power the Gee Bee with a big, heavy gasser and to avoid adding the weight resulting from my scale efforts. He correctly stated that "the enemy of the Gee Bee is weight and torque" … nothing against Henry, but I ignored his advice and forged ahead on my Gee Bee R2 replica
.As mine was nearing completion, I heard stories of Byron Gee Bee’s being completed and flown, and they ALL had a common theme: “Flies GREAT! Landing is a nightmare!” - or - “Flew great, but was badly damaged on the landing”
The Byron, with a G62 and Purr Power muffler/mount, was finishing out at up to 25 pounds.
My Haffke, at exactly the same scale and with a Quadra 42, finished at 18.5 pounds. I was still optimistic it would be a decent handling model…and it WAS!
Even with the Technopower (and McDaniels glow driver and batteries), which upped the weight to 19 pounds, my Gee Bee was a good flying model (as Gee Bee’s go) – see video:
https://www.youtube.com/watch?v=EwSw019aRK8
Despite my Gee Bee success, I had always wanted to build and fly the Byron version of the vaunted R2. Many years passed and I built other golden age racers, including a Haffke Gee Bee Model Z, but the Byron was always on my to-do list.
When the CARF-Models Gee Bee R2 came on the scene, I gravitated towards that model and my exploits are thoroughly illustrated throughout another build thread on the CARF:
http://www.rcuniverse.com/forum/gian...ideos-l-k.html
This thread is for those who have or may come into possession of a Byron (Iron Bay) Gee Bee kit and I will share my building and flying experiences as I go…
 01-25-2016, 02:15 PM
#2
Not my kit, but a good picture of the Byron Gee Bee pieces and parts.
Instructions begin with WING construction and although Byron touted the "option" of building either the 25% scale 75 inch span wing OR the "sport scale" 80 inch wing, there was NO mention either in the Construction manual OR the plans on what to do differently if building the scale 75" wing.
I made measurements, and marked on the plans where the ROOT RIB should begin (or stop) to arrive at a scale 75" span and my mark can be seen in the picture.


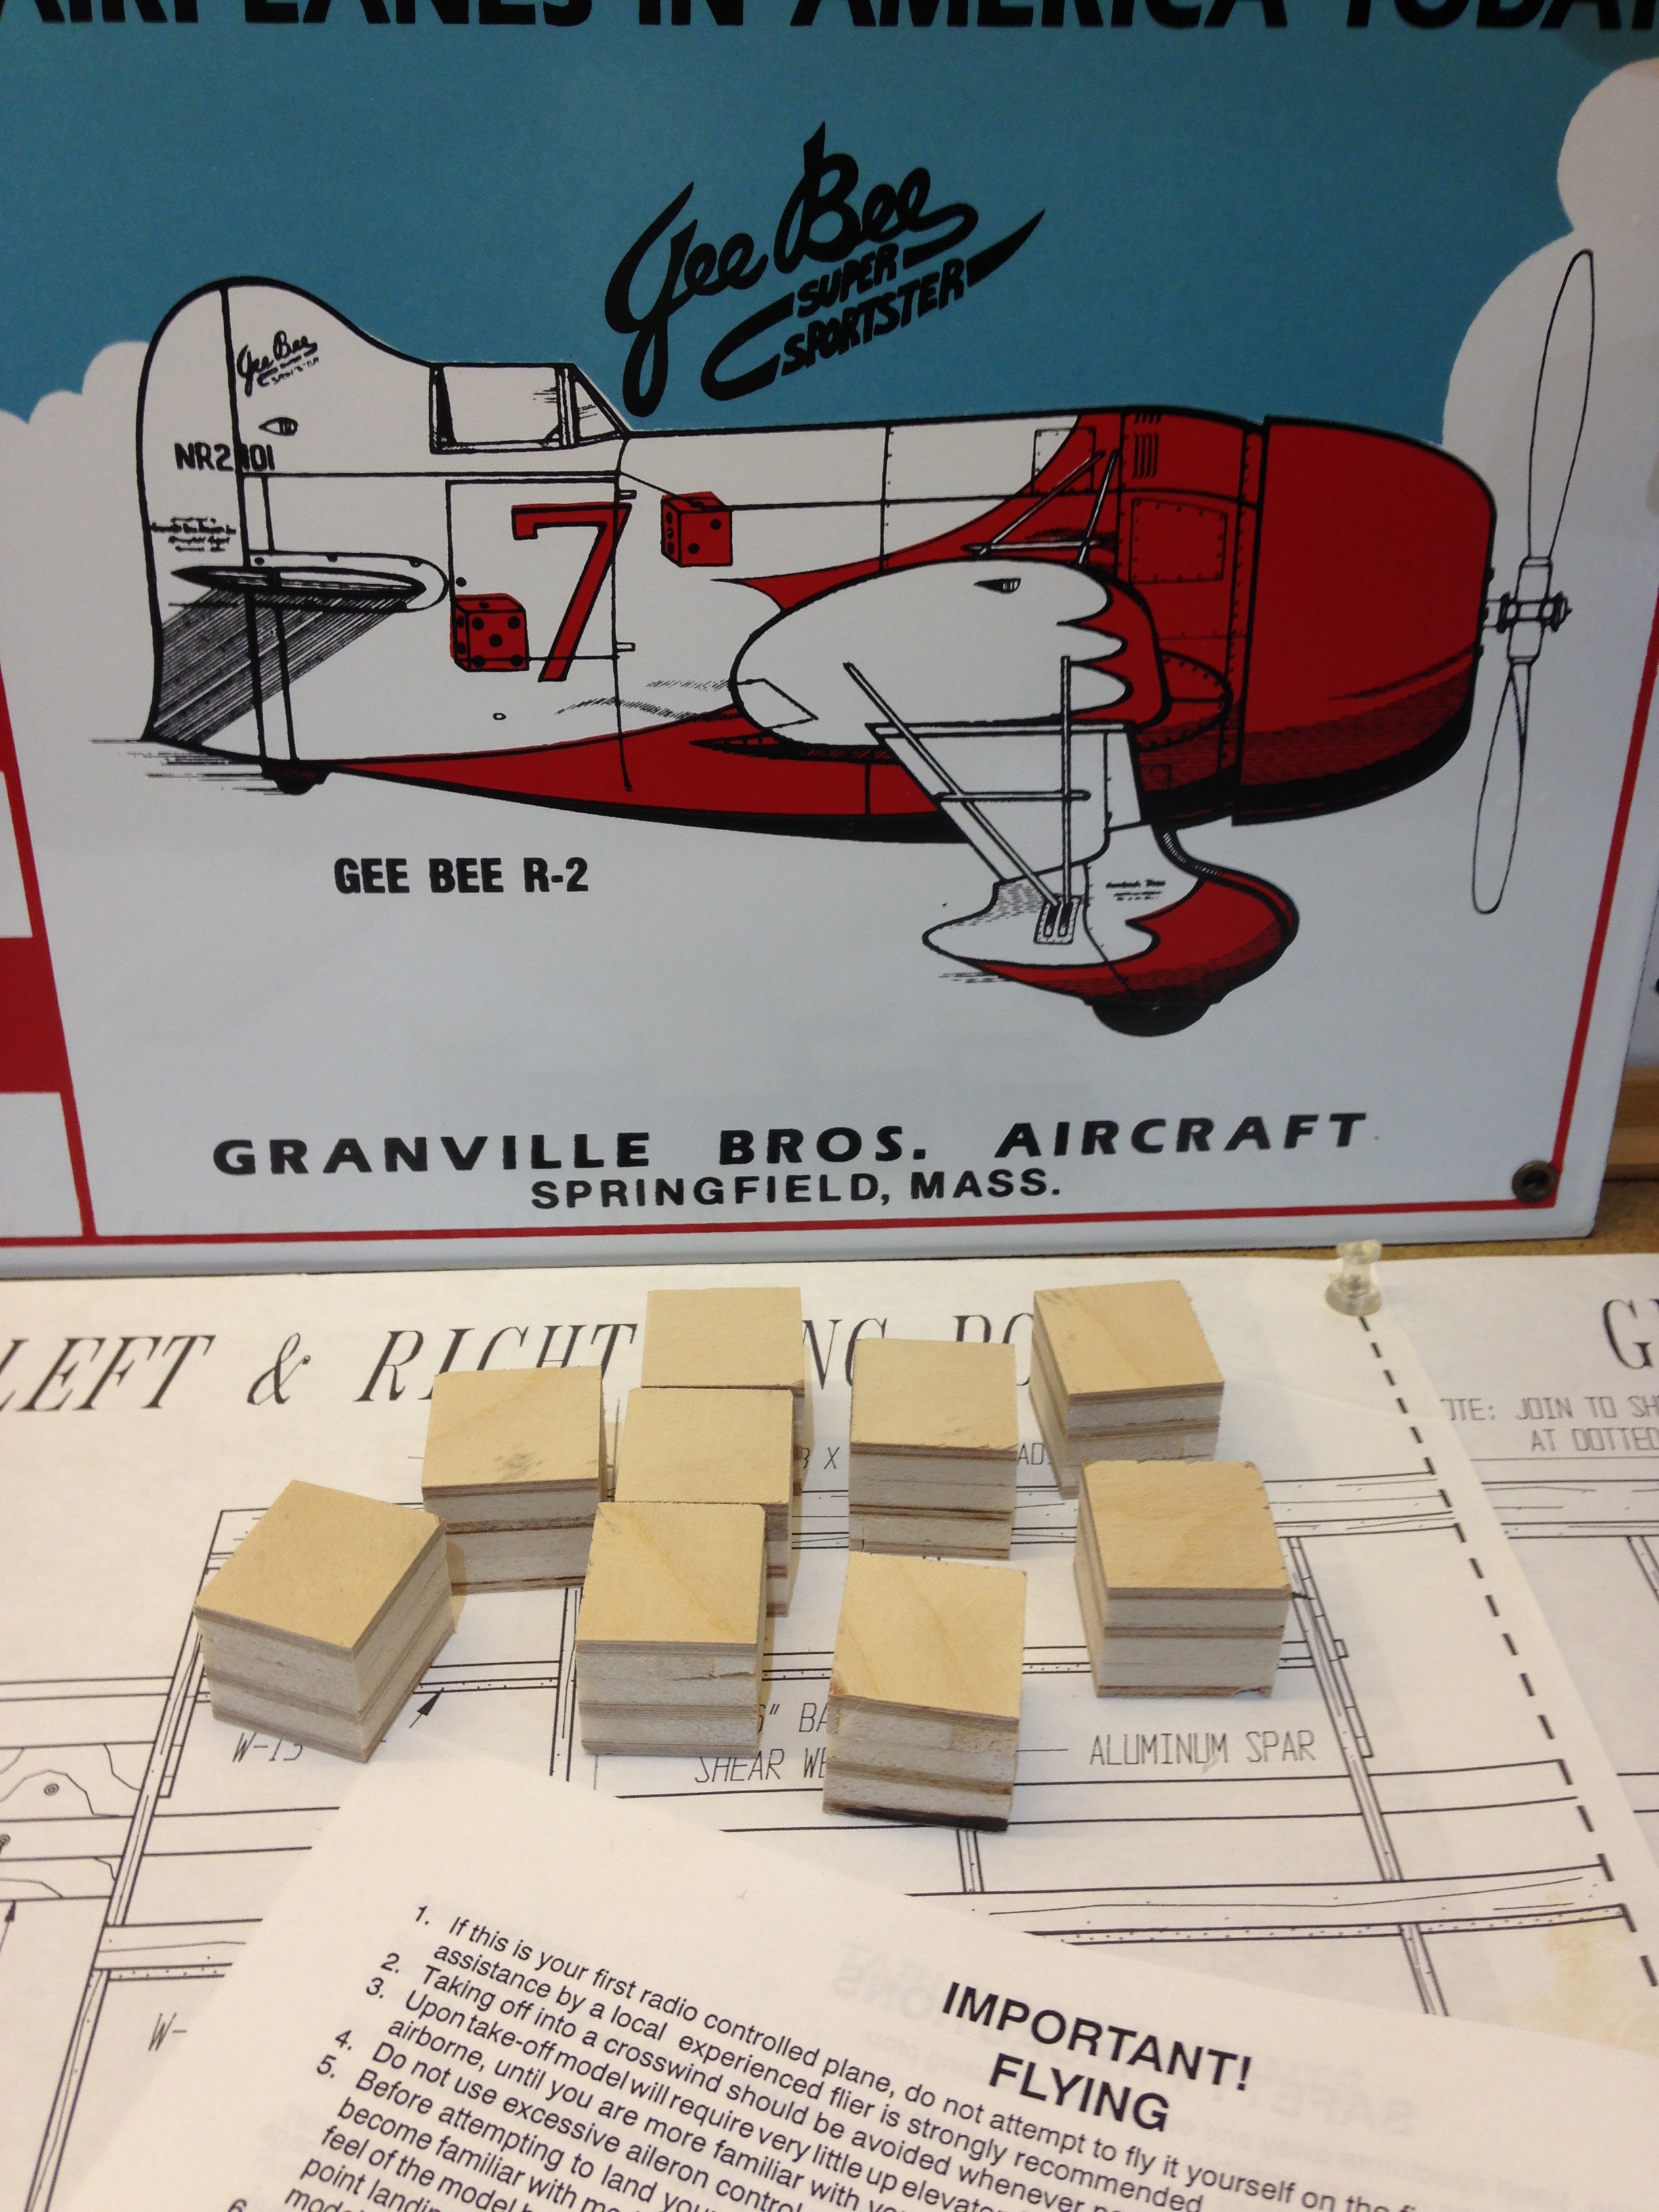

The fiberglass arrow shafts and wing ribs. Laser cutting was excellent, but NONE of the parts were marked with part #s.
The builder makes 6 blocks of equal height which are used to elevate the fiberglass spars up off the building board.
The ribs are slid into place on the arrow shafts and the shafts are attached (I used screws) to the elevation blocks.
The instructions have many other parts being added before any glue is applied... I opted to tack each rib on the spars once perfectly positioned over the plans.
Instructions begin with WING construction and although Byron touted the "option" of building either the 25% scale 75 inch span wing OR the "sport scale" 80 inch wing, there was NO mention either in the Construction manual OR the plans on what to do differently if building the scale 75" wing.
I made measurements, and marked on the plans where the ROOT RIB should begin (or stop) to arrive at a scale 75" span and my mark can be seen in the picture.
The fiberglass arrow shafts and wing ribs. Laser cutting was excellent, but NONE of the parts were marked with part #s.
The builder makes 6 blocks of equal height which are used to elevate the fiberglass spars up off the building board.
The ribs are slid into place on the arrow shafts and the shafts are attached (I used screws) to the elevation blocks.
The instructions have many other parts being added before any glue is applied... I opted to tack each rib on the spars once perfectly positioned over the plans.
Last edited by RichardGee; 01-25-2016 at 05:50 PM.
01-25-2016, 02:26 PM
#3
Progress on a wing half.
Although the ribs are laser cut, DON'T expect the Gee Bee wing to "fall together"...
I had long labored under the assumption that the Byron, with its "laser cut wing parts" would build like many of the other laser cut kits I had built, but such was not the case.
Oh, it builds just fine, but the builder (that's YOU) is expected to measure and cut MANY of the pieces necessary to construct the wing (like spars, trailing edge stock, leading edge stock, sheer webs, and sheeting). There were very few laser cut parts. The rest is good old fashioned cutting, fitting and gluing balsa together.
Construction was enjoyable and the idea of arrow-straight fiberglass shafts aligning the ribs, then anchoring them to the building board is well-engineered. Wash-out is built into the wing by slightly elevating the trailing edge wing tip with an additional 1/8" spacer added to the anchor block at that point.
Once the top of the wing is sheeted, it is removed and re-anchored to the blocks, BUT additional height must be added to the blocks to elevate the wing above the building board to allow for the airfoil. Again, the 1/8" spacer was added to a block, but this time at the leading edge of the wing tip to maintain wash-out.
With the top of the wing sheeted and Once the first piece of sheeting is firmly glued to the bottom of the wing, the wing shape (and wash-out) is LOCKED into place. The remainder of the wing is sheeted.
Last edited by RichardGee; 01-25-2016 at 05:53 PM.
01-25-2016, 03:12 PM
#4
The leading edge is added.
After cutting, fitting and gluing top and bottom sheeting, the wing tips are cut from a large balsa block and carved to close to final shape before gluing.
The open area (not sheeted) between wing and aileron is cut away. Wing trailing edge and leading edge of of the ailerons are capped with balsa.


After cutting, fitting and gluing top and bottom sheeting, the wing tips are cut from a large balsa block and carved to close to final shape before gluing.
The open area (not sheeted) between wing and aileron is cut away. Wing trailing edge and leading edge of of the ailerons are capped with balsa.
Last edited by RichardGee; 01-25-2016 at 05:53 PM.
01-26-2016, 04:23 AM
#5

Hostetler has 3 sizes of the Gee Bee Z, if your tastes run in that direction. http://www.hostetlersplans.com/geebeez.html
01-26-2016, 06:59 AM
#6
Hostetler has 3 sizes of the Gee Bee Z, if your tastes run in that direction. http://www.hostetlersplans.com/geebeez.html
01-26-2016, 07:46 AM
#7
The wing halves fully sheeted and ailerons cut away. Leading and trailing edges capped with balsa.
Another feature unique to this kit is 'aileron counterweights' - counter-weighting control surfaces is common in full-scale aircraft, but not so much in models.
When this kit was designed, powerful digital servos were not yet available to the modeling public. However, reducing the force necessary to deflect a surface is always a good thing, regardless of the equipment available, so I opted to follow Byron's instructions and install the counterweights. The chances of control surface flutter are also reduced by counter-weighing.
When properly set up, the aileron will balance on the leading edge, neither falling fore or aft.
The wings are very robust and once fiberglassed, will easily handle the G-forces generated by any maneuver this racer can pull off.
01-26-2016, 07:59 AM
#8
As I often do when constructing any kit, I jumped to another section of the build (while glue was drying on the wings)
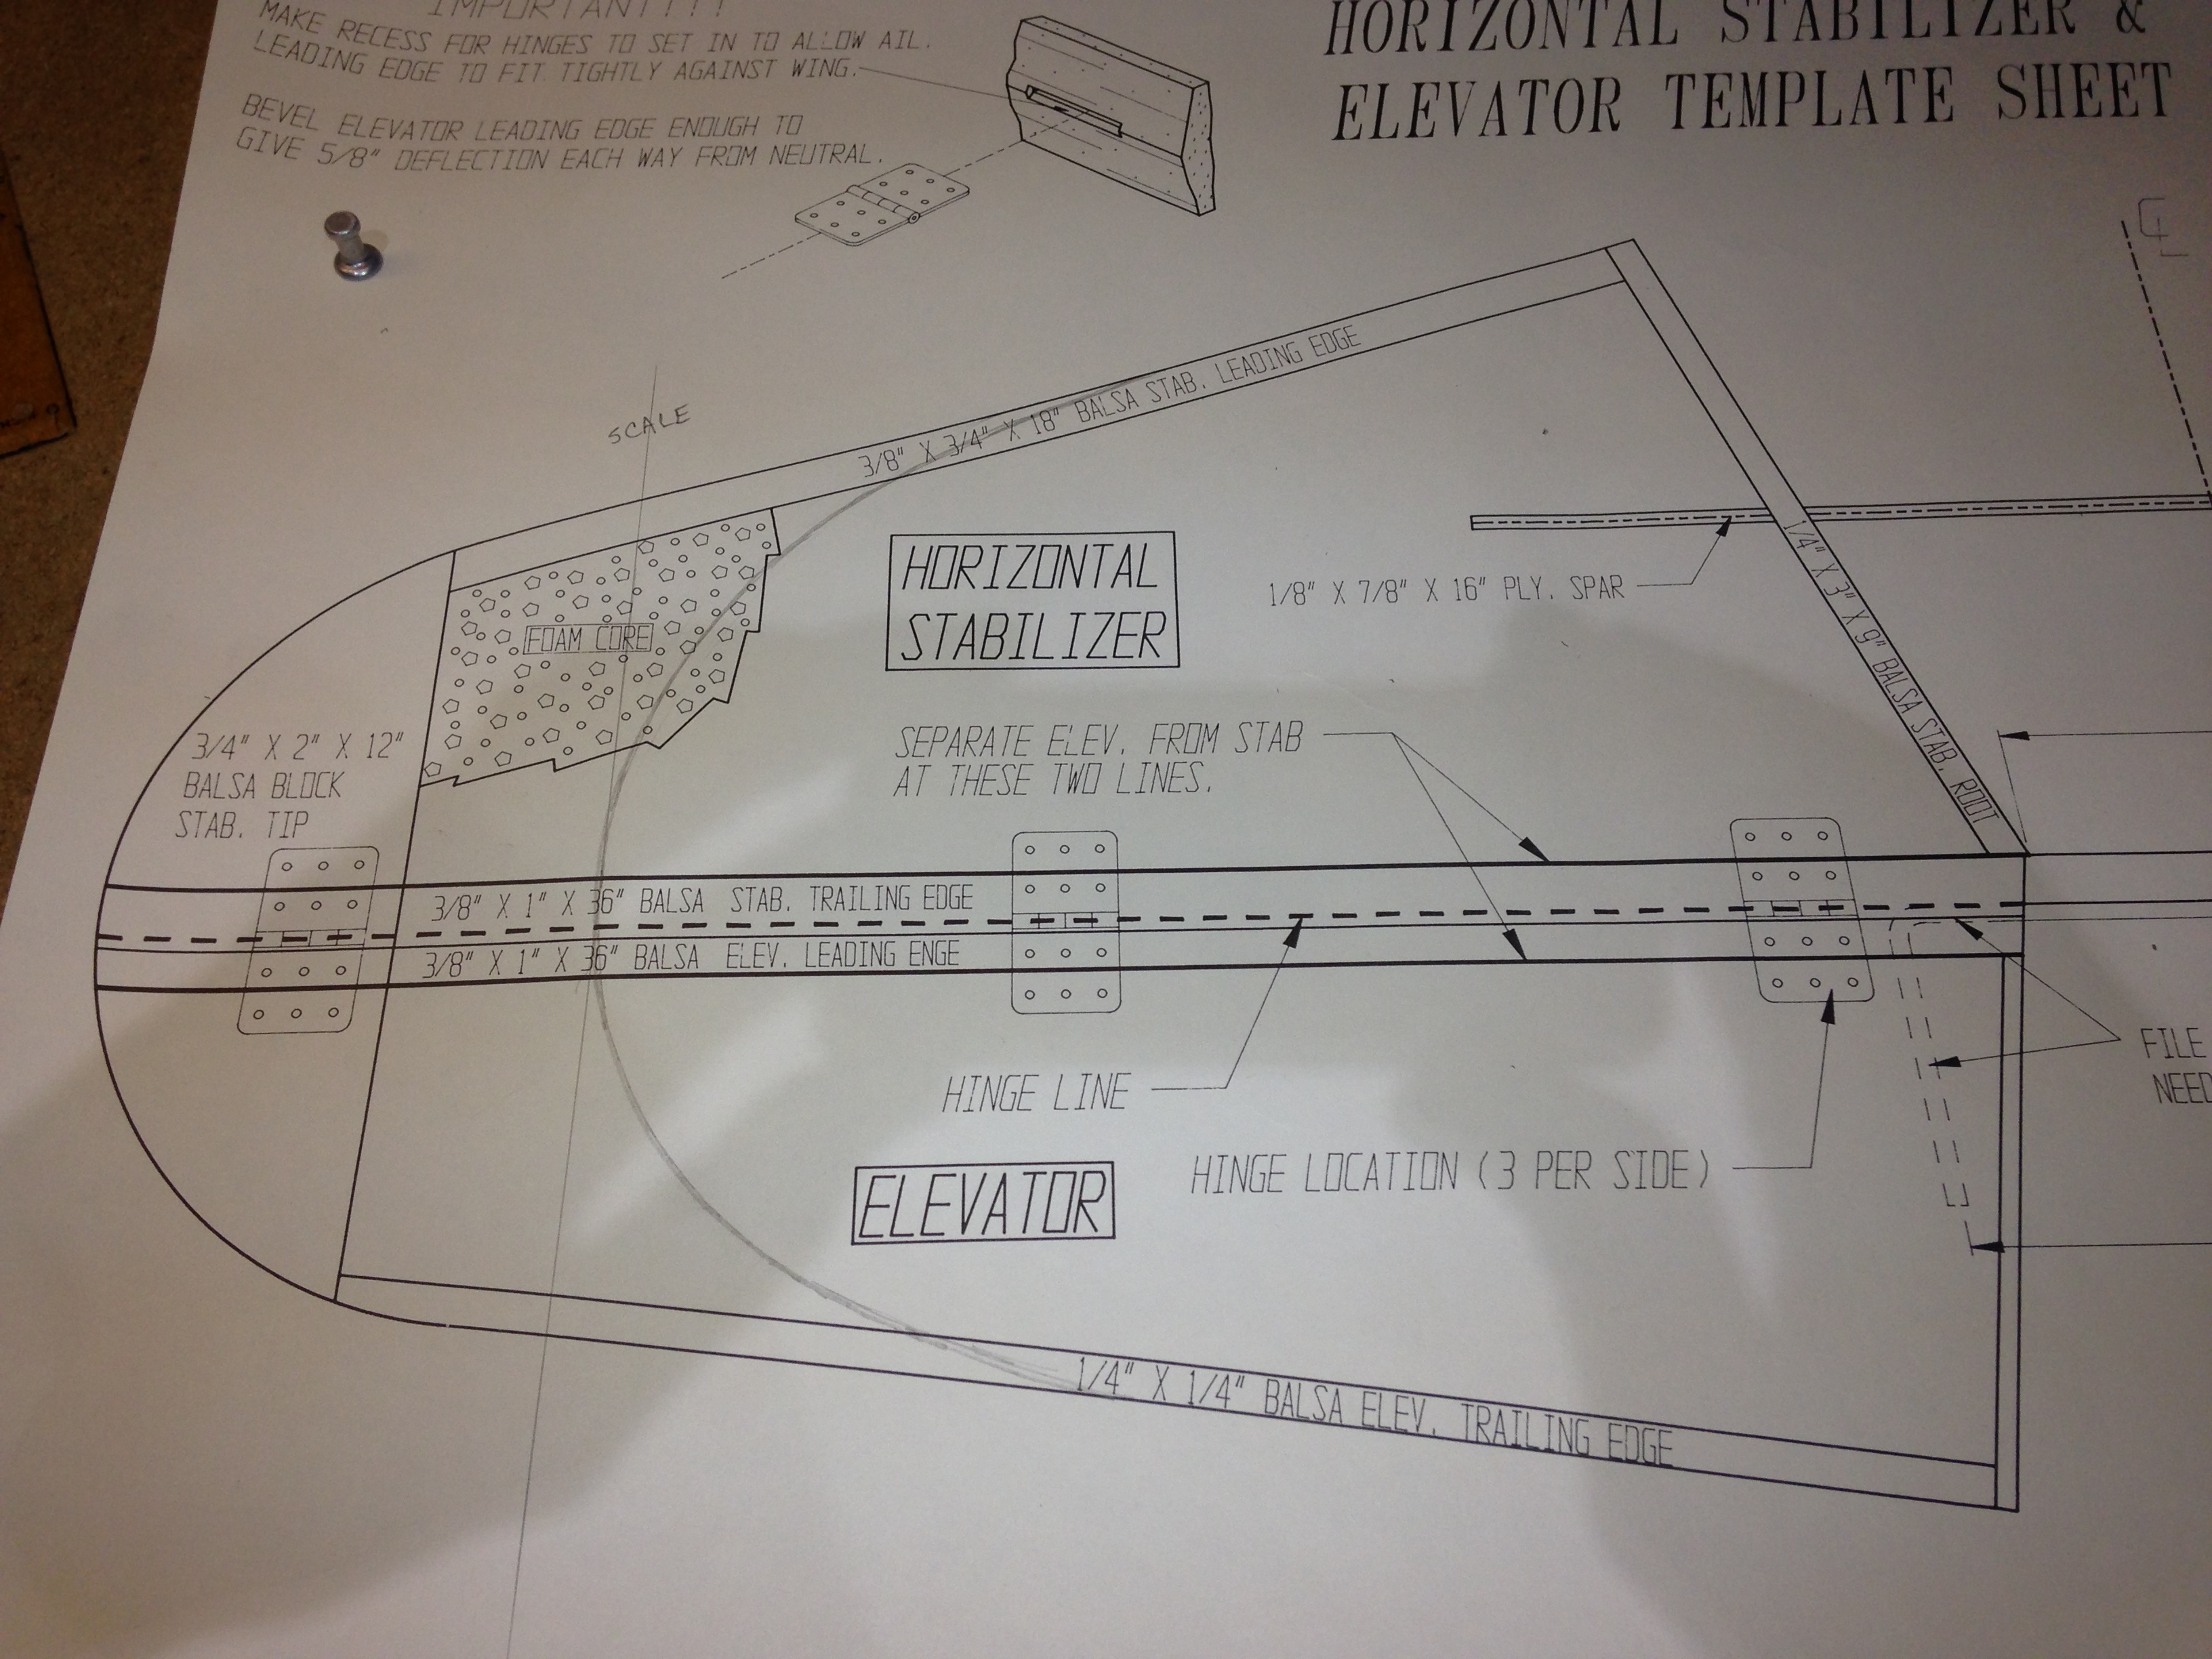
Like so many Gee Bee models, the Byron features a MUCH longer horizontal stabilizer. I can only assume this increases stability at slower speeds when the massive fuselage diameter begins to 'blank' out the slip stream and upset the flow of air over the tail. However, having flown both my Haffke and the CARF Gee Bee's with scale-length stabs, I am not so sure that extending the span provides much improvement. After all, the Gee Bee was never meant to be landed like a Cub!
The deviation from scale, created by the long stabs, is quite unsightly (to my eye) and so, as Delmar Benjamin said of the R2, "sacrifices must be made"
You can see a huge difference between the Byron stab and scale length (see the line I drew on the plan) and see the amount of foam cut away from the stab length.


Sheeting the stabs proved troublesome, as I assumed I could use the same water-based contact cement I had used on my shop countertops... but for some strange reason, the DAP Weldwood contact cement did NOT WORK AT ALL. It was as if there was NO contact cement whatsoever!
So, I resorted to Gorilla Glue.
Although messy, Gorilla Glue worked well.
Once sheeted, leading and trailing edge stock was glued using epoxy and everything was sanded to shape.
The stab tips are made the same way as the wing tips... balsa blocks, cut and shaped.
After the stab halves were complete and sanded, the elevators are cut away and will be capped with balsa like the ailerons.
Like so many Gee Bee models, the Byron features a MUCH longer horizontal stabilizer. I can only assume this increases stability at slower speeds when the massive fuselage diameter begins to 'blank' out the slip stream and upset the flow of air over the tail. However, having flown both my Haffke and the CARF Gee Bee's with scale-length stabs, I am not so sure that extending the span provides much improvement. After all, the Gee Bee was never meant to be landed like a Cub!
The deviation from scale, created by the long stabs, is quite unsightly (to my eye)
and so, as Delmar Benjamin said of the R2, "sacrifices must be made" You can see a huge difference between the Byron stab and scale length (see the line I drew on the plan) and see the amount of foam cut away from the stab length.
Sheeting the stabs proved troublesome, as I assumed I could use the same water-based contact cement I had used on my shop countertops... but for some strange reason, the DAP Weldwood contact cement did NOT WORK AT ALL. It was as if there was NO contact cement whatsoever!
So, I resorted to Gorilla Glue.
Although messy, Gorilla Glue worked well.
Once sheeted, leading and trailing edge stock was glued using epoxy and everything was sanded to shape.
The stab tips are made the same way as the wing tips... balsa blocks, cut and shaped.
After the stab halves were complete and sanded, the elevators are cut away and will be capped with balsa like the ailerons.
01-26-2016, 08:07 AM
#9
Again, jumping ahead while glue set up on the stabs... I attacked the landing gear.
Although extruded from a form of plastic, the Byron gear appear well engineered. A buddy of mine has managed to break them, but only from a severely botched landing.
The gear oleos feature a 'progressive' spring rate utilizing two springs... one soft, one firm.
Wheel collars are captured inside the Byron wheel hubs and there are several fastening points (for the upper gear covers and wheelpants) not shown in my pictures, that have yet to be completed.
01-26-2016, 08:25 AM
#10
Byron did their homework when designing this kit. A Zenoah G62 and Byron Purr Power muffler/mount is shown and recommended in the assembly manual. The firewall mounting system is specifically designed for this power package and is well engineered. HOWEVER, that was 20+ years ago!! Since that time, many excellent model aircraft engines have become available.
Being a big fan of twins, I am heavily leaning in that direction for the perfect powerplant. Multi-cylinder engines vibrate SO much less than singles.
IF a builder were so inclined, even a radial could be utilized.
The selection of suitable engines is long and distinguished... and now with the availability of FOUR STROKE gas, a far more pleasing and scale sound can be achieved. The following are some excellent engine choices (besides the G62) for this Gee Bee -


Roto Motors 85cc 4 stroke twin, Saito 84cc four stroke radial, DA70 twin, Evolution 99cc (glow) radial, Saito 61cc four stroke twin, Valach 60cc 4 stroke single, and Zenoah G62
Another suitable engine might be the TorqPro 70cc four stroke.
A "scale" sized prop would be 24" diameter and any of these engines (except ZG62) is capable of spinning a 24" prop w/o any over-heating.
Being a big fan of twins, I am heavily leaning in that direction for the perfect powerplant. Multi-cylinder engines vibrate SO much less than singles.
IF a builder were so inclined, even a radial could be utilized.
The selection of suitable engines is long and distinguished... and now with the availability of FOUR STROKE gas, a far more pleasing and scale sound can be achieved. The following are some excellent engine choices (besides the G62) for this Gee Bee -
Roto Motors 85cc 4 stroke twin, Saito 84cc four stroke radial, DA70 twin, Evolution 99cc (glow) radial, Saito 61cc four stroke twin, Valach 60cc 4 stroke single, and Zenoah G62
Another suitable engine might be the TorqPro 70cc four stroke.
A "scale" sized prop would be 24" diameter and any of these engines (except ZG62) is capable of spinning a 24" prop w/o any over-heating.
Last edited by RichardGee; 01-28-2016 at 11:32 AM.
01-26-2016, 10:07 AM
#11

Just an FYI there are several companies making large scale Gee Gee kits other than Iron Bay. These guys for instance offer full kits for the R2, Y, and Z models. This are big airplanes 85" to 90" wingspans. They also make a Laird-Turner, Laird Super Solution, and a R-4 Firecracker if you're interested in other racers.
http://www.jackdevinemodels.com/
http://www.jackdevinemodels.com/
01-26-2016, 03:12 PM
#12
Just an FYI there are several companies making large scale Gee Gee kits other than Iron Bay. These guys for instance offer full kits for the R2, Y, and Z models. This are big airplanes 85" to 90" wingspans. They also make a Laird-Turner, Laird Super Solution, and a R-4 Firecracker if you're interested in other racers.
http://www.jackdevinemodels.com/
http://www.jackdevinemodels.com/
Mike
Do some research on Jack Devine before spending $$$.
01-26-2016, 07:14 PM
#13

I just want to throw this out there, that a buddy of mine had one of these back when it was first released... He was a GREAT flier. One of the best people I have ever seen at scale takeoffs and landings... And even HE kept breaking the plane...
Just so you know his credentials..
He was Byrons Ducted fan Demo pilot that traveled to airshows around the country... and was a standout pilot at these events...
He flew the 400 pound 30 foot wing B29 for the last several years at the Byron aviation show.... with no damage that I know of..
He had the only SR71's Byron ever made (2 of them)
But he had just as much trouble with the short GeeBees as anyone else. So I would build light, and don't risk an expensive motor... Because like I have always said ... "For every two GeeBees taking off on youtube..they only show ONE landing) !!!!!!
hahahahah... Heck even my GP 1/4 scale went in after I taped the camera on the wing.. makes for an exciting video !
01-26-2016, 10:00 PM
#14
I just want to throw this out there, that a buddy of mine had one of these back when it was first released... He was a GREAT flier. One of the best people I have ever seen at scale takeoffs and landings... And even HE kept breaking the plane...
Just so you know his credentials..
He was Byrons Ducted fan Demo pilot that traveled to airshows around the country... and was a standout pilot at these events...
He flew the 400 pound 30 foot wing B29 for the last several years at the Byron aviation show.... with no damage that I know of..
He had the only SR71's Byron ever made (2 of them)
But he had just as much trouble with the short GeeBees as anyone else. So I would build light, and don't risk an expensive motor... Because like I have always said ... "For every two GeeBees taking off on youtube..they only show ONE landing) !!!!!!
hahahahah... Heck even my GP 1/4 scale went in after I taped the camera on the wing.. makes for an exciting video !
Just so you know his credentials..
He was Byrons Ducted fan Demo pilot that traveled to airshows around the country... and was a standout pilot at these events...
He flew the 400 pound 30 foot wing B29 for the last several years at the Byron aviation show.... with no damage that I know of..
He had the only SR71's Byron ever made (2 of them)
But he had just as much trouble with the short GeeBees as anyone else. So I would build light, and don't risk an expensive motor... Because like I have always said ... "For every two GeeBees taking off on youtube..they only show ONE landing) !!!!!!
hahahahah... Heck even my GP 1/4 scale went in after I taped the camera on the wing.. makes for an exciting video !

Like the full scale Gee Bee, a scale model must be flown 100% of the time, from take off, to touch down and roll out.
This airplane is not for the faint of heart.
I suppose those of us who continue to build and fly the plane are "adrenaline junkies" of sorts...
I also happen to LOVE the "art deco" airplane, auto, and building designs from the golden age.. and the Gee Bee is THE personification of that wonderful era.
01-27-2016, 06:29 AM
#15
I completely understand every ones love for GeeBees...
I just wanted to mention that even though this one was slightly bigger than most R2's out there .. it will still bite back , hahahha
have fun with it I hope you post some video when its done..
I just wanted to mention that even though this one was slightly bigger than most R2's out there .. it will still bite back , hahahha
have fun with it I hope you post some video when its done..
01-27-2016, 06:59 AM
#16
Thanks for the heads up. I think if I were to build a Gee Bee I would lean more toward the Hosteler 29% Gee Bee Z. National balsa offers a short kit for this one.
I agree with you Richard the scale Gee Bee is bit of a hand full as the Full scale Gee Bees were back in the day.
I agree with you Richard the scale Gee Bee is bit of a hand full as the Full scale Gee Bees were back in the day.
01-27-2016, 07:04 AM
#17

I guess this is "true" scale modeling as the aircraft even mimics the full scale in the handling department. Good to those that take the challenge in building and flying this unique aircraft.
01-28-2016, 12:22 PM
#18
Gluing stab halves, with ply center brace/spar to the trailing edge stock.
I deviated from the the instructions which said to rest both stab halves in the foam cradles (from which they were originally cut).
I have discarded the foam cradles! I also ran into this when cutting away the elevator portions of the stab... it said to set them in the foam cradles when cutting.
My method insured a FLAT training edge. The centerlines of both the stabs and trailing edge stock were marked and aligned when gluing.
"Well hey, Iron Bay! It would have been nice if the instructions mentioned ANYWHERE that the foam cradles should be SAVED."
I did use them for cementing the balsa sheeting, but then threw them away.
Having written instruction manuals myself, I can attest to the fact that the Byron/Iron Bay IS lacking in helpful details...


Now the TE will be sanded to shape.
Leading edge stock will be glued to each elevator half and shaped.
I deviated from the the instructions which said to rest both stab halves in the foam cradles (from which they were originally cut).
I have discarded the foam cradles! I also ran into this when cutting away the elevator portions of the stab... it said to set them in the foam cradles when cutting.
My method insured a FLAT training edge. The centerlines of both the stabs and trailing edge stock were marked and aligned when gluing.
"Well hey, Iron Bay! It would have been nice if the instructions mentioned ANYWHERE that the foam cradles should be SAVED."
I did use them for cementing the balsa sheeting, but then threw them away.
Having written instruction manuals myself, I can attest to the fact that the Byron/Iron Bay IS lacking in helpful details...
Now the TE will be sanded to shape.
Leading edge stock will be glued to each elevator half and shaped.
Last edited by RichardGee; 01-28-2016 at 12:25 PM.
01-29-2016, 08:20 AM
#20
My Feedback: (23)
Ditto on what Tom said earlier about Jack Devine..
Stay away from this guy at all costs as I'l still waiting for a pre-paid for, Laird Solution kit from him from 10 years ago..
Moving forward, I'll be watching this thread with great interest as I have one of these Byron beauties 1/2 built and waiting for my motivation to kick in and finish it...
Stay away from this guy at all costs as I'l still waiting for a pre-paid for, Laird Solution kit from him from 10 years ago..
Moving forward, I'll be watching this thread with great interest as I have one of these Byron beauties 1/2 built and waiting for my motivation to kick in and finish it...
01-30-2016, 04:38 PM
#22
Completed stab and elevators with hinges and joining control arm Y unit
I elected to go with Robart Hinge Point hinges instead of the included DuBro flat hinges.
I find hinge points to be easier in every way to install.
The instructions say to "tape" the wing halves to the fuselage for positioning the internal formers F2 and F3, but I think my way is much better... S hooks and rubber bands
This way, the wings can be shifted for proper position, while still remaining tight against fuselage wing roots.


A PINNACLE moment of any build... when wing and tail are mated to the fuselage
Fit is very good, but not perfect. A bit of fiddling is in store.
Horizontal stab is closely aligned as well. Not alot of fussing to line everything up.
I elected to go with Robart Hinge Point hinges instead of the included DuBro flat hinges.
I find hinge points to be easier in every way to install.
The instructions say to "tape" the wing halves to the fuselage for positioning the internal formers F2 and F3, but I think my way is much better... S hooks and rubber bands
This way, the wings can be shifted for proper position, while still remaining tight against fuselage wing roots.
A PINNACLE moment of any build... when wing and tail are mated to the fuselage
Fit is very good, but not perfect. A bit of fiddling is in store.
Horizontal stab is closely aligned as well. Not alot of fussing to line everything up.
01-30-2016, 05:26 PM
#23
Richard have you ever seen one of the fiber glass half scale R2's ?
They used to have a very nice one up at the Owattona Warbird and classics fly. Just amazing at that size, and also very decent on the ground. Unfortunately theirs snapped at the top of a slow rather low loop.. Just as it started to fly it snapped back the other direction and thumped into the bean field. I think that plane had a small ultra light engine? and wheel barrow tires and wheels !
I believe the kit was out of France if I recall correctly.
01-30-2016, 07:03 PM
#24
My S hook idea wasn't going to work once the extruded wing receptacles were clamped to formers F2 and F3... so
I opted to drill and tap for 8x32 screws that could be threaded in just far enough to provide a solid anchor for the rubber bands, but NOT so far as to interfere with the formers.
Instructions for setting up correct dihedral - being carried out in the photos...
Fuselage is set up to be absolutely level.
For the 75" span version, 8.375" supports go under W9 at each wing tip.
Formers are installed (no glue) and the aluminum wing receptacles are epoxied/clamped to the formers; first F2 then the rear former, F3
01-30-2016, 07:10 PM
#25
Richard have you ever seen one of the fiber glass half scale R2's ?
They used to have a very nice one up at the Owattona Warbird and classics fly. Just amazing at that size, and also very decent on the ground. Unfortunately theirs snapped at the top of a slow rather low loop.. Just as it started to fly it snapped back the other direction and thumped into the bean field. I think that plane had a small ultra light engine? and wheel barrow tires and wheels !
I believe the kit was out of France if I recall correctly.
They used to have a very nice one up at the Owattona Warbird and classics fly. Just amazing at that size, and also very decent on the ground. Unfortunately theirs snapped at the top of a slow rather low loop.. Just as it started to fly it snapped back the other direction and thumped into the bean field. I think that plane had a small ultra light engine? and wheel barrow tires and wheels !
I believe the kit was out of France if I recall correctly.
The latest revised version of the CARF-Models 31% Gee Bee R2 is VERY close to exact scale (thanks to several mods that I suggested
) Not blowing my own horn, but facts are facts.This Byron (except for the airfoil and stock stab span) is pretty darn close too.
Bigger almost always flies better... this applies to Gee Bee Super Sportsters as well, but not nearly as much as other designs. The larger the R2, the longer runway that is required... and wing loadings climb precipitously...
That is why most designers alter the Gee Bee in an effort to improve handling.