Go Back  RCU Forums > RC Airplanes > Kit Building
Reload this Page >

Father, Son GP .40 Cub build..

Community
Search
Notices
Kit Building If you're building a kit and have questions or want to discuss kit building post it here.

Father, Son GP .40 Cub build..

Thread Tools
 
Search this Thread
 
Old 03-02-2016, 02:03 PM
  #26  
MFIGHT43
Thread Starter
 
MFIGHT43's Avatar
 
Join Date: Oct 2015
Location: Brighton, ColoRADo
Posts: 198
Received 4 Likes on 4 Posts
Default

Firewall epoxied in...
Attached Thumbnails Click image for larger version

Name:	image.jpeg
Views:	75
Size:	1.64 MB
ID:	2150450  
Old 03-03-2016, 02:04 PM
  #27  
TomCrump
 
TomCrump's Avatar
 
Join Date: Apr 2003
Location: Traverse City, MI
Posts: 7,614
Likes: 0
Received 5 Likes on 5 Posts
Default

The fuselage is coming along nicely. when will you install the firewall ?
Old 03-04-2016, 05:56 PM
  #28  
MFIGHT43
Thread Starter
 
MFIGHT43's Avatar
 
Join Date: Oct 2015
Location: Brighton, ColoRADo
Posts: 198
Received 4 Likes on 4 Posts
Default More fuselage work...

Firewall installed and instrument panel/ fwd fuselage installed
Attached Thumbnails Click image for larger version

Name:	image.jpeg
Views:	49
Size:	1.68 MB
ID:	2150894   Click image for larger version

Name:	image.jpeg
Views:	40
Size:	1.79 MB
ID:	2150895   Click image for larger version

Name:	image.jpeg
Views:	44
Size:	1.57 MB
ID:	2150896  
Old 03-05-2016, 01:50 AM
  #29  
TomCrump
 
TomCrump's Avatar
 
Join Date: Apr 2003
Location: Traverse City, MI
Posts: 7,614
Likes: 0
Received 5 Likes on 5 Posts
Default

I saw post 26 after I posted my firewall question.

You are making good progress. Will you add any detail to the instrument panel and cockpit ?
Old 03-05-2016, 06:01 AM
  #30  
MFIGHT43
Thread Starter
 
MFIGHT43's Avatar
 
Join Date: Oct 2015
Location: Brighton, ColoRADo
Posts: 198
Received 4 Likes on 4 Posts
Default

Most likely, yes. We have the Robart scale landing gear to tackle next.
Old 03-05-2016, 01:03 PM
  #31  
TomCrump
 
TomCrump's Avatar
 
Join Date: Apr 2003
Location: Traverse City, MI
Posts: 7,614
Likes: 0
Received 5 Likes on 5 Posts
Default

Originally Posted by MFIGHT43
Most likely, yes. We have the Robart scale landing gear to tackle next.
Cool. The Cub's IP isn't hard to duplicate and it would add some nice interest to the cockpit. The Robart LG will definitely be a nice addition.
Old 03-05-2016, 08:27 PM
  #32  
MFIGHT43
Thread Starter
 
MFIGHT43's Avatar
 
Join Date: Oct 2015
Location: Brighton, ColoRADo
Posts: 198
Received 4 Likes on 4 Posts
Default

Moving along with a few more hours in. Aft stabilizer deck installed. Also got the motor installed. Going with the inverted position to present a more scale like cowl appearance. We are using an ASP 61F.
Attached Thumbnails Click image for larger version

Name:	image.jpeg
Views:	52
Size:	1.26 MB
ID:	2151071   Click image for larger version

Name:	image.jpeg
Views:	47
Size:	1.63 MB
ID:	2151072   Click image for larger version

Name:	image.jpeg
Views:	48
Size:	1.86 MB
ID:	2151073  
Old 03-16-2016, 06:40 PM
  #33  
MFIGHT43
Thread Starter
 
MFIGHT43's Avatar
 
Join Date: Oct 2015
Location: Brighton, ColoRADo
Posts: 198
Received 4 Likes on 4 Posts
Default Landing gear installed

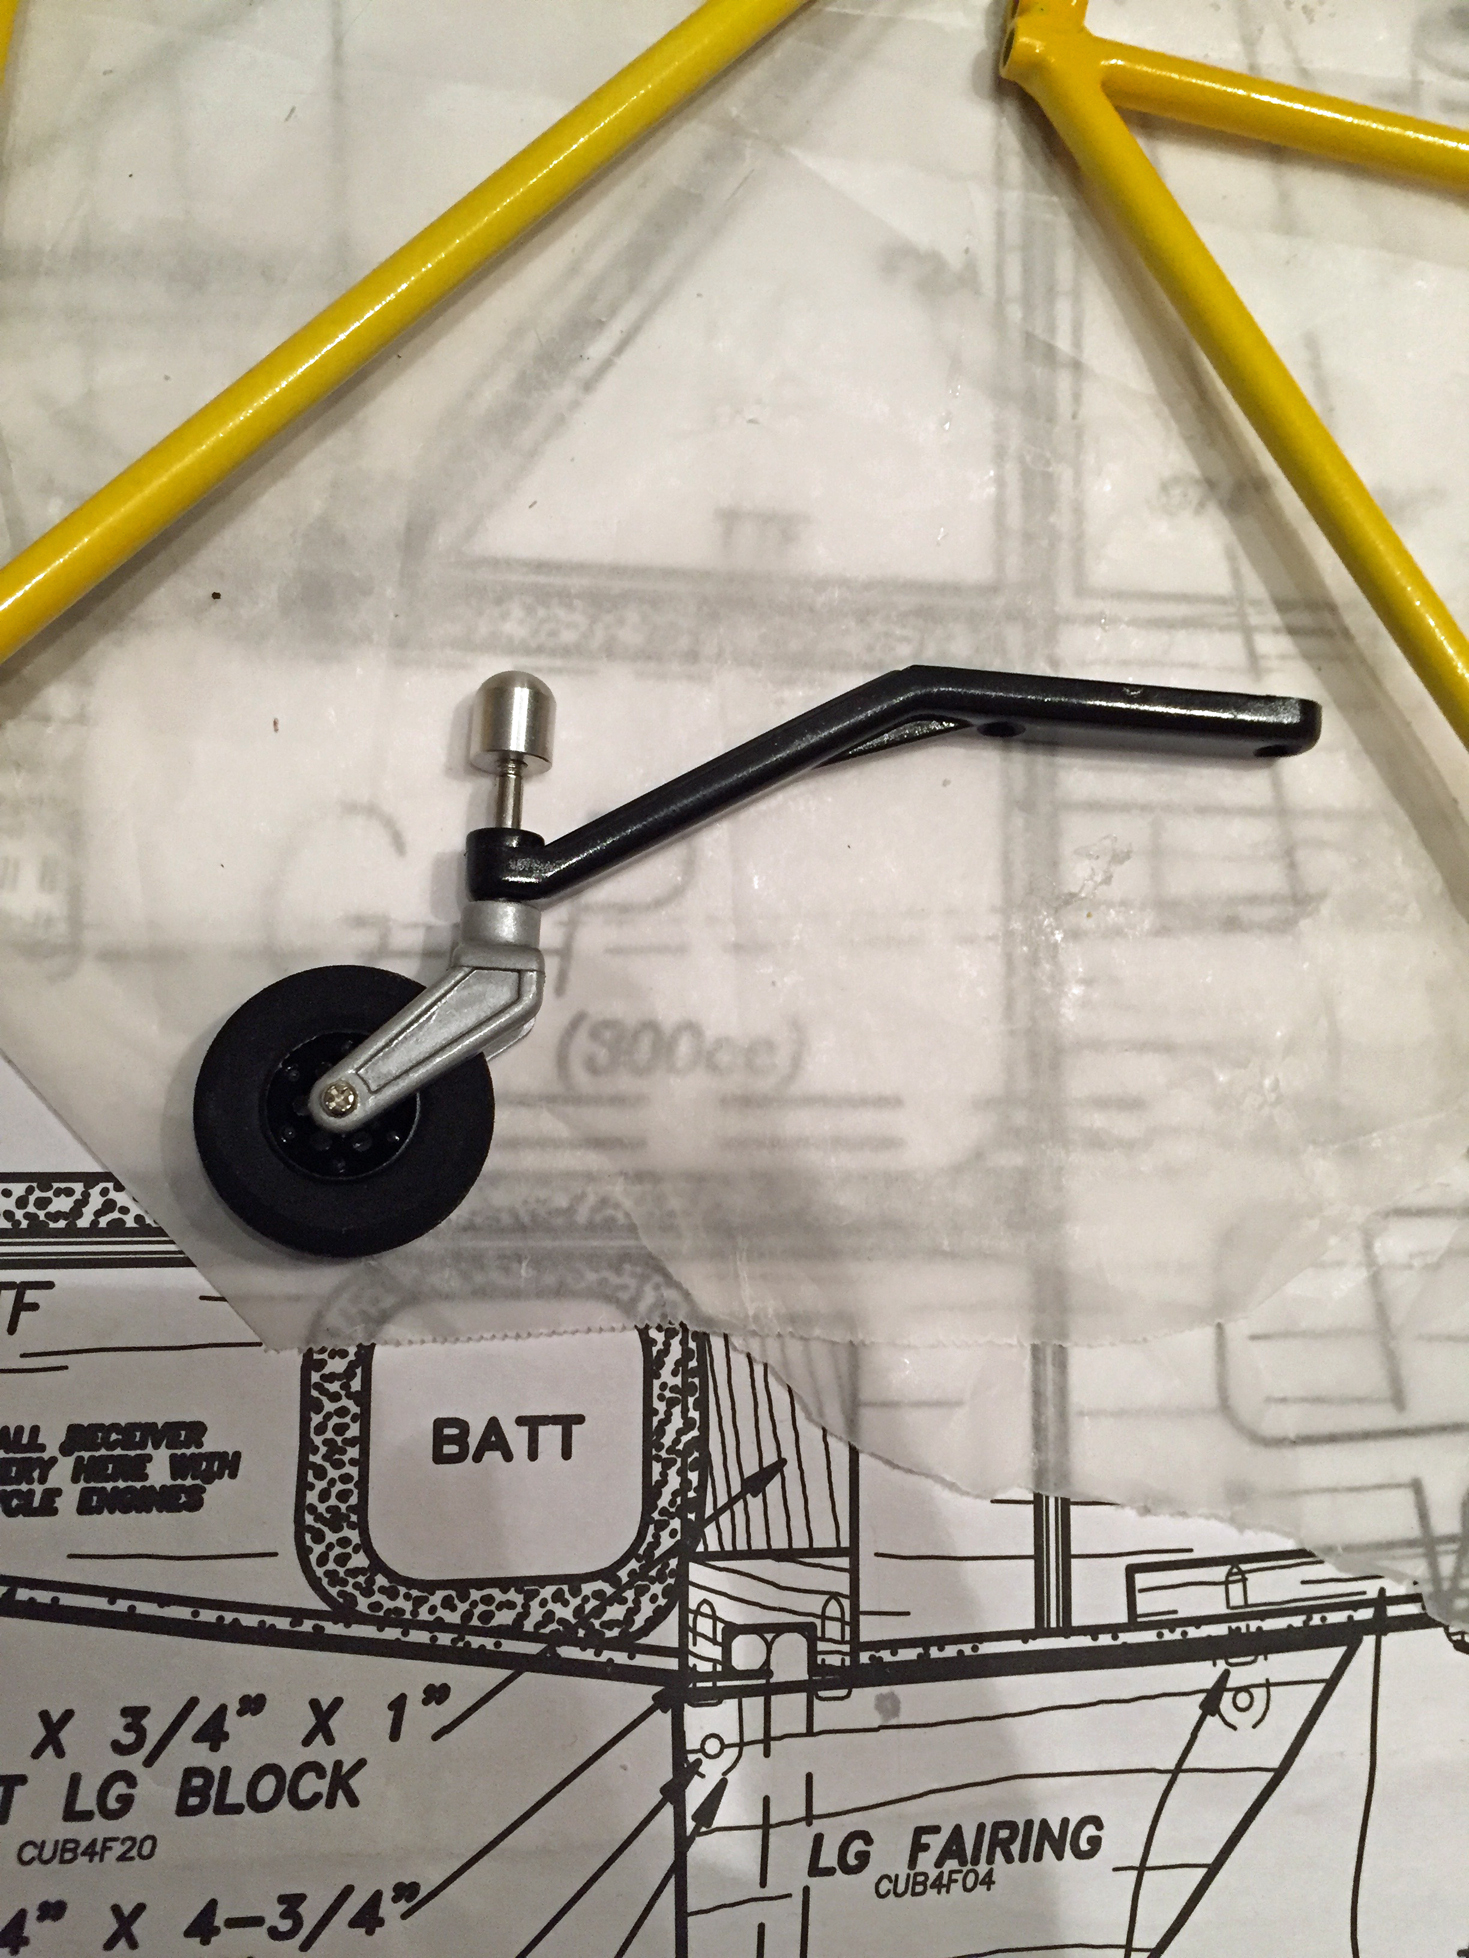
We got a moment to work some more on the cub build, yay! Installation has come along for the Robart scale landing gear. These are not exactly the right size as the airframe is actually 18% scale and the gear is 20% scale. But they will do and are better than the stock wire gear. Will have to paint them up when the time comes.
Attached Thumbnails Click image for larger version

Name:	image.jpeg
Views:	76
Size:	1.38 MB
ID:	2152903  
Old 03-26-2016, 04:37 AM
  #34  
TomCrump
 
TomCrump's Avatar
 
Join Date: Apr 2003
Location: Traverse City, MI
Posts: 7,614
Likes: 0
Received 5 Likes on 5 Posts
Default

The Robart landing gear looks great on your Cub.
Old 04-02-2016, 06:42 AM
  #35  
MFIGHT43
Thread Starter
 
MFIGHT43's Avatar
 
Join Date: Oct 2015
Location: Brighton, ColoRADo
Posts: 198
Received 4 Likes on 4 Posts
Default

Thanks! We have had a long break due to vacation and me away on a trip. We made a little progress in recent days on the fuselage. Bottom sheeting is on and sanded, rear stringer dowels installed and the stabilizers too. Shouldn't be too long before final assembly.
Attached Thumbnails Click image for larger version

Name:	image.jpeg
Views:	48
Size:	1.58 MB
ID:	2155555   Click image for larger version

Name:	image.jpeg
Views:	52
Size:	1.39 MB
ID:	2155556  
Old 04-02-2016, 01:49 PM
  #36  
TomCrump
 
TomCrump's Avatar
 
Join Date: Apr 2003
Location: Traverse City, MI
Posts: 7,614
Likes: 0
Received 5 Likes on 5 Posts
Default

[QUOTE=MFIGHT43;12197419

. Shouldn't be too long before final assembly.[/QUOTE]

I like ther final assembly stage. I took this pic yesterday.
Attached Thumbnails Click image for larger version

Name:	DSCN0097.JPG
Views:	76
Size:	3.63 MB
ID:	2155659  
Old 04-14-2016, 06:26 PM
  #37  
MFIGHT43
Thread Starter
 
MFIGHT43's Avatar
 
Join Date: Oct 2015
Location: Brighton, ColoRADo
Posts: 198
Received 4 Likes on 4 Posts
Default

We Made some progress recently. We chose to mount the engine inverted to make a more scale appearance. So the exhaust was an issue with the fuselage and thus we made a clearance area to fit. It think it came out well.
Attached Thumbnails Click image for larger version

Name:	image.jpeg
Views:	47
Size:	1.58 MB
ID:	2157422   Click image for larger version

Name:	image.jpeg
Views:	45
Size:	1.12 MB
ID:	2157423   Click image for larger version

Name:	image.jpeg
Views:	46
Size:	1.27 MB
ID:	2157424  
Old 04-14-2016, 11:18 PM
  #38  
MFIGHT43
Thread Starter
 
MFIGHT43's Avatar
 
Join Date: Oct 2015
Location: Brighton, ColoRADo
Posts: 198
Received 4 Likes on 4 Posts
Default

Did some paint work today ! Decided aluminum firewall was scale and painted cockpit yellow.
Attached Thumbnails Click image for larger version

Name:	image.jpeg
Views:	48
Size:	1.74 MB
ID:	2157443   Click image for larger version

Name:	image.jpeg
Views:	50
Size:	1.53 MB
ID:	2157444  
Old 04-16-2016, 03:28 PM
  #39  
MFIGHT43
Thread Starter
 
MFIGHT43's Avatar
 
Join Date: Oct 2015
Location: Brighton, ColoRADo
Posts: 198
Received 4 Likes on 4 Posts
Default

Installed control rods and servos today. Now finish sanding and installing wing struts and scale details before covering and final paint items. Can't wait to do the finishing touches!

Attached Thumbnails Click image for larger version

Name:	image.jpeg
Views:	158
Size:	1.84 MB
ID:	2157652  
Old 04-18-2016, 05:28 PM
  #40  
MFIGHT43
Thread Starter
 
MFIGHT43's Avatar
 
Join Date: Oct 2015
Location: Brighton, ColoRADo
Posts: 198
Received 4 Likes on 4 Posts
Default

Ready to cover!
Attached Thumbnails Click image for larger version

Name:	image.jpeg
Views:	74
Size:	1.34 MB
ID:	2158001  

Last edited by MFIGHT43; 04-18-2016 at 07:39 PM.
Old 04-20-2016, 12:07 PM
  #41  
TomCrump
 
TomCrump's Avatar
 
Join Date: Apr 2003
Location: Traverse City, MI
Posts: 7,614
Likes: 0
Received 5 Likes on 5 Posts
Default

Originally Posted by MFIGHT43
Ready to cover!
She's gonna look great !
Old 04-21-2016, 08:55 AM
  #42  
MFIGHT43
Thread Starter
 
MFIGHT43's Avatar
 
Join Date: Oct 2015
Location: Brighton, ColoRADo
Posts: 198
Received 4 Likes on 4 Posts
Default

Thanks Tom! We are excited to complete her! Here's some progress:

Fresh from paint:

We did some research on the Interwebs to replicate the original tailwheel setup.

Tail feathers covered:


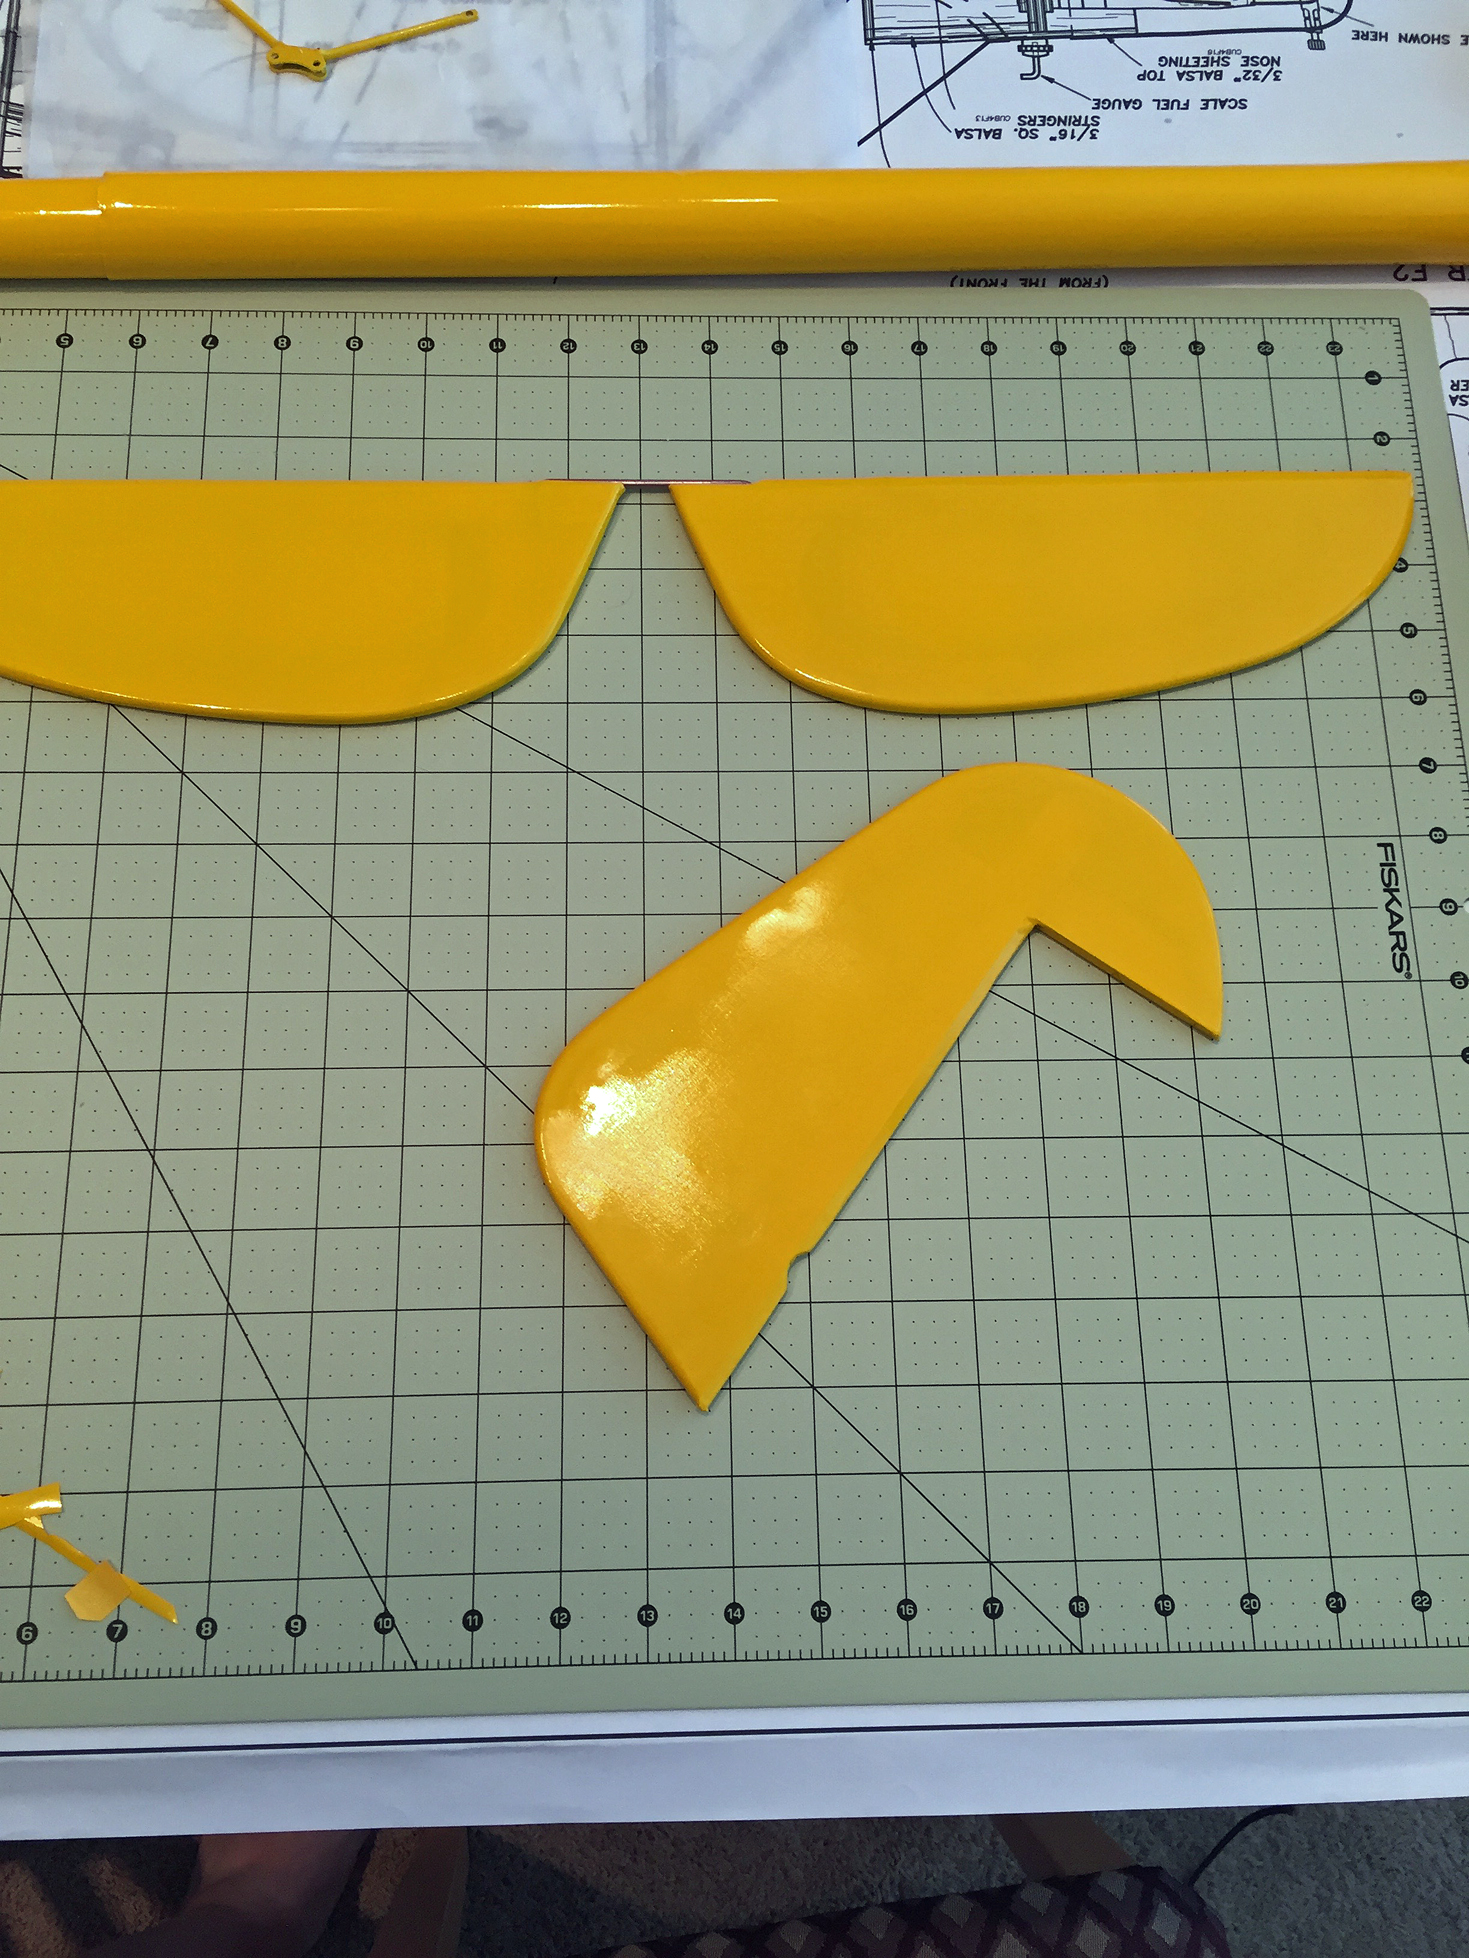
We are covering in Coverite Fabric thats pre-painted. So far I really like using this stuff!
Attached Thumbnails Click image for larger version

Name:	CubTailWheel1.jpg
Views:	148
Size:	1.99 MB
ID:	2158337   Click image for larger version

Name:	CubTailWheel2.jpg
Views:	159
Size:	1.62 MB
ID:	2158338   Click image for larger version

Name:	CubTailFeathers.jpg
Views:	157
Size:	1.86 MB
ID:	2158339  
Old 04-21-2016, 09:55 AM
  #43  
pilotbum
 
pilotbum's Avatar
 
Join Date: May 2003
Location: Denver, CO
Posts: 144
Likes: 0
Received 0 Likes on 0 Posts
Default

Where did you get the Coverite? I thought that stuff was no longer available?
Old 04-21-2016, 11:11 AM
  #44  
TomCrump
 
TomCrump's Avatar
 
Join Date: Apr 2003
Location: Traverse City, MI
Posts: 7,614
Likes: 0
Received 5 Likes on 5 Posts
Default

Originally Posted by pilotbum
Where did you get the Coverite? I thought that stuff was no longer available?

Tower carries it. http://www3.towerhobbies.com/cgi-bin...P?I=LXB185&P=8

I believe that Super Coverite has been discontinued.
Old 04-21-2016, 11:23 AM
  #45  
MFIGHT43
Thread Starter
 
MFIGHT43's Avatar
 
Join Date: Oct 2015
Location: Brighton, ColoRADo
Posts: 198
Received 4 Likes on 4 Posts
Default

Exactly right, Tower Hobbies. 21st Century Fabric. Only downside is there is no more matching paint. Have to use Top Flite Paint, which is close.

Last edited by MFIGHT43; 04-21-2016 at 01:06 PM.
Old 04-23-2016, 02:29 PM
  #46  
MFIGHT43
Thread Starter
 
MFIGHT43's Avatar
 
Join Date: Oct 2015
Location: Brighton, ColoRADo
Posts: 198
Received 4 Likes on 4 Posts
Default

A little peek... Fuselage mostly finished... LOVING the fabric Coverite!

Attached Thumbnails Click image for larger version

Name:	image.jpeg
Views:	166
Size:	1.36 MB
ID:	2158703   Click image for larger version

Name:	image.jpeg
Views:	170
Size:	1.38 MB
ID:	2158704  
Old 04-23-2016, 04:20 PM
  #47  
JCOKEEFE
My Feedback: (2)
 
Join Date: Feb 2002
Location: Fairfield Glade, TN
Posts: 549
Likes: 0
Received 1 Like on 1 Post
Default

Nice job! A build!. I love it!!.
Old 04-23-2016, 07:16 PM
  #48  
MFIGHT43
Thread Starter
 
MFIGHT43's Avatar
 
Join Date: Oct 2015
Location: Brighton, ColoRADo
Posts: 198
Received 4 Likes on 4 Posts
Default

Thanks for the kind words!
Old 05-07-2016, 01:43 PM
  #49  
MFIGHT43
Thread Starter
 
MFIGHT43's Avatar
 
Join Date: Oct 2015
Location: Brighton, ColoRADo
Posts: 198
Received 4 Likes on 4 Posts
Default

The devil is in the details! Paint paint paint..


Had to flair the cowl a bit for the header..

Attached Thumbnails Click image for larger version

Name:	image.jpeg
Views:	159
Size:	1.31 MB
ID:	2161320   Click image for larger version

Name:	image.jpeg
Views:	172
Size:	1.23 MB
ID:	2161321  
Old 05-13-2016, 11:06 AM
  #50  
David Bathe
 
David Bathe's Avatar
 
Join Date: Mar 2008
Location: Oslo, NORWAY
Posts: 1,276
Likes: 0
Received 14 Likes on 8 Posts
Default

I remember the build well. I did the clipped version. Powered originally by a.46FX way to much power. Dropped to a 46.LA still over powered.
What does it all mean: Hold back on the power or you'll never get a straight take off run. I used 25% maximum and it tracked well. Once airborn, extra power will mean a constant and disagreeable climb so be ready to make a throttle to elevator mix. I eventually mixed (a lot of them) mind to be neutral in all axis which allowed it to be flown with quite astonishing precision. Great fun but ultimately pointless. Best times where had slowly chugging about and doing low speed, on the stall aerobatics... just as piper intended. Have fun, great build, love to all.


Contact Us - Manage Preferences - Archive - Advertising - Cookie Policy - Privacy Statement - Terms of Service -

Copyright © 2024 MH Sub I, LLC dba Internet Brands. All rights reserved. Use of this site indicates your consent to the Terms of Use.