


SIG Kadet Senior build
 04-26-2017, 07:00 PM
#1

Thread Starter
Join Date: Dec 2012
Location: GulfportMS
Posts: 15
Likes: 0
Received 0 Likes
on
0 Posts
Hey everyone,
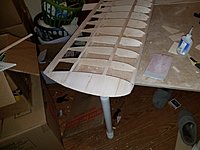
This will be my first kit that I will be doing so this will be a lot of trial and error on my part. I won't try to speed through this build, so that I don't need up my Kadet Senior. I do plan on modifying this to be a tail dragged, and I will be running it as an electric flyer, but I am unsure what motor system to run. I am currently looking at the Rimfire .46 motor using either multiple 22.2v lipos in a parallel, or a single 22.2v Lipo. I Abought my kit a few weeks ago and finally was able to work on it. I'm starting with the wing portion and working on the right wing first. I cut most of the ribs out and test fit them. I don't plan on gluing down anything until I smooth out the plans so that the ribs can be properly placed. If anyone has any hints I would greatly appreciate the assistance. I will hopefully have a daily updateon my build.
[ATTACH]2211987[/IMG]
[ATTACH]2211988[/IMG][ATTACH]2211989[/IMG]
 04-27-2017, 06:44 PM
#2
Thread Starter
Join Date: Dec 2012
Location: GulfportMS
Posts: 15
Likes: 0
Received 0 Likes
on
0 Posts
Day 2:
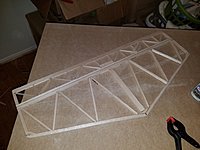
I didn't do to much today with the Kadet Senior, mostly due to the fact that I have an early day tomorrow for work. I have to help weight an F/A18B in the morning. Tonight I started gluing the right wing together and ran into a snag that took me roughly 30-40 mins to figure out. I thought that all the pieces that were needed was precut, but after looking and finally figuring it out, I was able to get the piece I was needed. The part that threw me for a loop was the 16" double former piece that was supposed to be glued to the lower forward former. While test fitting the piece I noticed that I would have to trim some of the doubler piece to fit next to the first W3 rib coming from the center of the wing.
[ATTACH]2212162[/IMG]
Also I do have a question for those who have built this aircraft, did any of the ribs need to be trimmed down in the section for the former?
When I get home from work (enlisted in the Navy), I am going to try and get the rest of the right wing complete, but obviously depends on what time as I get off.... As of right now I have the leading edge pinned in place waiting to be glued. Here is how it sits as of right now....
[ATTACH]2212163[/IMG]
 04-28-2017, 07:24 AM
#5
A former is a fuselage part you are talking about a wing spar. On an airplane with a constant cord wing and straight wing spars I like to stack and compare the ribs and do any sanding necessary to get them to the same size and the spar slots even. The problem seems to occur more with die cut rather than laser cut kits but I have seen a shallow spar slots on both. If the rib has a different number or a letter after it check to see if the instructions/plans show sheeting in the same area. Sometimes you will have the rib shorter to allow for the center sheeting so it butts up even against the spar. What is your Navy MOS? Thank you for your service and sacrifice!
Mike
Mike
04-28-2017, 07:31 AM
#6
Thread Starter
Join Date: Dec 2012
Location: GulfportMS
Posts: 15
Likes: 0
Received 0 Likes
on
0 Posts
For the life of me I couldn't recall what the soar was called.. Lol. My rate is AME or Aviation structural mechanic safety equipmentman, I work with ejection seats and environmental control system. So basically a hvac tech but on planes..
04-28-2017, 08:07 AM
#7
My Feedback: (5)

Join Date: Nov 2007
Location: Vacaville,
CA
Posts: 275
Likes: 0
Received 0 Likes
on
0 Posts
Subscribed Longfang I look forward to your build thread, she'll be a good plane for a first build and thanks for your service! Any Kadet is a great plane and using a Rimfire .46 on the Senior would be a great choice, it should have plenty of power. I'm not sure what your electric experience is but I'd suggest using a 3s or 4s, 4000 to 5000mAh battery with a 80a ESC.
04-28-2017, 08:27 AM
#8

I'm understanding "formers" to be the spars. The ribs that allow the spar to stand proud, by 1/8", are the center section ribs. The 1/8" allows for the 1/8" center sheeting to be butted up to the spars.
04-28-2017, 05:37 PM
#10

DAMN!!!!!!!!!!!!!!!!!!
ANOTHER NAVY WINGED PYRO-JUNKY!!!!!!!!!!!!!!!!!!
Sorry, just couldn't resist. I work with a former F-18 AME and am myself a former EA-6B Prowler ComNavRadar Tech. Is your command in Gulfport a training site or is it an operational squadron?
ANOTHER NAVY WINGED PYRO-JUNKY!!!!!!!!!!!!!!!!!!
Sorry, just couldn't resist. I work with a former F-18 AME and am myself a former EA-6B Prowler ComNavRadar Tech. Is your command in Gulfport a training site or is it an operational squadron?
04-28-2017, 07:04 PM
#11
Thread Starter
Join Date: Dec 2012
Location: GulfportMS
Posts: 15
Likes: 0
Received 0 Likes
on
0 Posts
I am actually stationed in Virginia Beach, my squadron is one of 3 Strike fighter Composite commands. And the only one that still has maintainers that are all navy. I'm in VFC-12, we fly old FA18 A+ and one FA18 B. We are reserve Squadron base there. I have to update my location. I was once stationed in Gulfport as a Seabee.. I chose to change my rate to stay in the navy..
Day 3:
No update on the build tonight as I took the night off from building.. And I'm in need of some supplies for cutting. But was wondering if anyone could recommend where to setup the ailerons on the wings?
Day 3:
No update on the build tonight as I took the night off from building.. And I'm in need of some supplies for cutting. But was wondering if anyone could recommend where to setup the ailerons on the wings?
04-28-2017, 07:05 PM
#12
Thread Starter
Join Date: Dec 2012
Location: GulfportMS
Posts: 15
Likes: 0
Received 0 Likes
on
0 Posts
I am actually stationed in Virginia Beach, my squadron is one of 3 Strike fighter Composite commands. And the only one that still has maintainers that are all navy. I'm in VFC-12, we fly old FA18 A+ and one FA18 B. We are reserve Squadron base there. I have to update my location. I was once stationed in Gulfport as a Seabee.. I chose to change my rate to stay in the navy..
Day 3:
No update on the build tonight as I took the night off from building.. And I'm in need of some supplies for cutting. But was wondering if anyone could recommend where to setup the ailerons on the wings?
Day 3:
No update on the build tonight as I took the night off from building.. And I'm in need of some supplies for cutting. But was wondering if anyone could recommend where to setup the ailerons on the wings?
04-29-2017, 03:34 PM
#13
Ok my two cents.
I have built several of the senior and senioritas. There are a couple of things i do to help with strength and make it more fun to fly. One a take out half the dihedral, you can do this by tipping one center rib per instructions and making one square. And cutting a new dihedral brace (its not that hard And it will still fly fine with three channels). The next thing when you get too the fuss. I cut new stringers out of basswood. Or you can buy 1/4 square spruce. Making them long enough for the two bottom ones to extend from the firewall to the tail. And the two top ones to extend from the glarescreen to the leading edge of the horizontal stabilizer. You will need to notch out the top two were makes a sharp bind down towpthe the tail aft of or right at the trailing edge of the wing. But that is what i do.
Looks like you are getting a great start. And just have fun
04-29-2017, 08:14 PM
#14
Thread Starter
Join Date: Dec 2012
Location: GulfportMS
Posts: 15
Likes: 0
Received 0 Likes
on
0 Posts
Day 4:
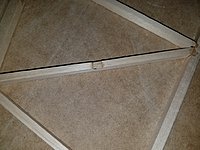
Decided to put together the left portion of the wing, minus wingtip. This wing went together a lot easier than the right one.
[ATTACH]2212410[/IMG]
[ATTACH]2212411[/IMG]
More than likely due to understanding how it is set up
[ATTACH]2212412[/IMG]
The only thing that I am having issues with now is the leading edge, I am having a hard time getting the birds mouth joint (front of rib) to all sit correctly. I've gotten to the point of gluing in the balsa sheathing in between the ribs.
[ATTACH]2212413[/IMG]
Just need to find my sanding block I have. Also still need to make my Wingtip gauge and Dyhedral gauge.
Pork chop, this will be my first endeavor in the electric rc world, besides the old new bright Rc' s I played with as a child. I will admit that I am not electrally smart.. If you could give you opinion on what gear to get I will greatly appreciate it.
Captcrunch44, I like the idea of setting one wing with no Dyhedral angle and adding the angle to the other wing, it sounds really simple.
Question for the group, along which rib section should I plan to modify for ailerons?
05-01-2017, 05:32 PM
#17
Thread Starter
Join Date: Dec 2012
Location: GulfportMS
Posts: 15
Likes: 0
Received 0 Likes
on
0 Posts
So tool the day off from building yesturday... well tried to copy the dihedral gauge off the plans yesterday. It didn't work out well.
Day 5:
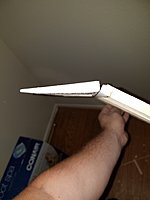
Today I started the fuselage, so far it's going well. I do know I'll have to go to the local hobby shop and see if they have any 1/4" as spruce... I accidentally used a few pieces in the wrong spot..
[ATTACH]2212808[/IMG]
After I realized my mistake I switched to the other side fuselage piece, which went a lot easier... after I figured an easy way to hold the pieces together..
[ATTACH]2212809[/IMG][ATTACH]2212809[/IMG]
I definitely need to buy more blades for cutting the spruce pieces. Not sure how much I'll get done because this week I have my semi annual prt, and this weekend is still weekend.. "Yay" spending the weekend with the reservists... I despise still weekend..
Day 5:
Today I started the fuselage, so far it's going well. I do know I'll have to go to the local hobby shop and see if they have any 1/4" as spruce... I accidentally used a few pieces in the wrong spot..
[ATTACH]2212808[/IMG]
After I realized my mistake I switched to the other side fuselage piece, which went a lot easier... after I figured an easy way to hold the pieces together..
[ATTACH]2212809[/IMG][ATTACH]2212809[/IMG]
I definitely need to buy more blades for cutting the spruce pieces. Not sure how much I'll get done because this week I have my semi annual prt, and this weekend is still weekend.. "Yay" spending the weekend with the reservists... I despise still weekend..
05-03-2017, 02:05 AM
#21
So tool the day off from building yesturday... well tried to copy the dihedral gauge off the plans yesterday. It didn't work out well.
Day 5:
Today I started the fuselage, so far it's going well. I do know I'll have to go to the local hobby shop and see if they have any 1/4" as spruce... I accidentally used a few pieces in the wrong spot..
[ATTACH]2212808[/IMG]
After I realized my mistake I switched to the other side fuselage piece, which went a lot easier... after I figured an easy way to hold the pieces together..
[ATTACH]2212809[/IMG][ATTACH]2212809[/IMG]
I definitely need to buy more blades for cutting the spruce pieces. Not sure how much I'll get done because this week I have my semi annual prt, and this weekend is still weekend.. "Yay" spending the weekend with the reservists... I despise still weekend..
Wood Products from Aircraft Spruce
Last edited by Hydro Junkie; 05-03-2017 at 02:21 AM.
05-05-2017, 03:47 PM
#22
My Feedback: (5)
Join Date: Nov 2007
Location: Vacaville,
CA
Posts: 275
Likes: 0
Received 0 Likes
on
0 Posts
Longfang556, I am no expert on this subject either since all my years of modeling are with glow engines. My new club I needed to join is an electric only club which was tough at first but I've come to enjoy electric models too. This setup on my Kadet Senior (ARF) was recommended to me and was used by another modeler and has great power. Not super fast but climbs like a banshee! I also decided to convert it to a taildragger.
- Value Hobby G-Force .46 400Kv $37
- APC 15x8e prop
- Value Hobby Skywalker 80a ESC $35
- Value Hobby G-Force 4s 30c 4000mAh Battery $38, (5s or 6s 5000 would be a better choice but more money)
- Sig Kadet cowl $30, (Sport eg ARF version)
- Sig Kadet landing gear $20, (Sport eg ARF version)
- Sig Kadet Electric motor mount assembly $16, (Sport eg ARF version)
Last edited by Pork Chop; 05-05-2017 at 05:37 PM.
05-09-2017, 04:55 PM
#23
Thread Starter
Join Date: Dec 2012
Location: GulfportMS
Posts: 15
Likes: 0
Received 0 Likes
on
0 Posts
Day 13: Major update
So after having drill weekend and some time waiting for some material for the Senior, I finished the horizontal stabs and almost finished the right wing. I did remove the dihedral from this wing to aid in building the ailerons. Still need to install the sheathing in between the ribs.
Some things that I bought for this was some dubro hinges and a 150 grit sanding block. I did make a mistake with one of the balsa pieces fort the rear wing. At first I thought that I had to make the center piece with 2 1/4"x3x8" piece of balsa. So I tried to fix it and will probably work on it more.

After finishing the rear wing I made a big to give the hinge proper spacing, and I am happy with the results. Still need to get a proper measurement for the throws...


After covering the Wingtip this is how it sits now and I will somehow fix it later before I cover it.

If anyone has anymore tips or tricks I will greatly appreciate it and will hopefully employ them in this build or even my next. I am looking into getting the cowl from a sig senior sport and the electric motor mount and possibly the landing gear.
For the rudder I am contemplating doing a pull pull system to work in conjunction with the tail wheel. Does anyone have any experience doing this and is this worth the time doing?
So after having drill weekend and some time waiting for some material for the Senior, I finished the horizontal stabs and almost finished the right wing. I did remove the dihedral from this wing to aid in building the ailerons. Still need to install the sheathing in between the ribs.
Some things that I bought for this was some dubro hinges and a 150 grit sanding block. I did make a mistake with one of the balsa pieces fort the rear wing. At first I thought that I had to make the center piece with 2 1/4"x3x8" piece of balsa. So I tried to fix it and will probably work on it more.
After finishing the rear wing I made a big to give the hinge proper spacing, and I am happy with the results. Still need to get a proper measurement for the throws...
After covering the Wingtip this is how it sits now and I will somehow fix it later before I cover it.
If anyone has anymore tips or tricks I will greatly appreciate it and will hopefully employ them in this build or even my next. I am looking into getting the cowl from a sig senior sport and the electric motor mount and possibly the landing gear.
For the rudder I am contemplating doing a pull pull system to work in conjunction with the tail wheel. Does anyone have any experience doing this and is this worth the time doing?
05-09-2017, 05:20 PM
#24
I have a pair of questions for those that have built a Senior:
1) Is adding "washout" worth it on a flat wing?
2) Would it be better to add "spoilers" like on the A-6 Intruder rather than full fledged ailerons? I'm thinking adverse yaw in this case, due to the aileron adding drag while in a downward deflection
1) Is adding "washout" worth it on a flat wing?
2) Would it be better to add "spoilers" like on the A-6 Intruder rather than full fledged ailerons? I'm thinking adverse yaw in this case, due to the aileron adding drag while in a downward deflection
05-09-2017, 06:02 PM
#25

My Feedback: (6)
I have two Kadet Seniors with barn door ailerons, one with a high wing and about half the normal dihedral and the other low-wing with normal dihedral. Adverse yaw isn't a serious problem: both turn fine with just ailerons, though of course it's even prettier with some rudder. Both of them do have considerable aileron differential.
I've wondered myself about whether spoilers wouldn't be better than ailerons for the reason you give. I don't know enough about aerodynamics to answer the question, but there must be some reason why so many planes use ailerons and so few use spoilers.
I've wondered myself about whether spoilers wouldn't be better than ailerons for the reason you give. I don't know enough about aerodynamics to answer the question, but there must be some reason why so many planes use ailerons and so few use spoilers.