


Northeast Aerodynamics Sport-Air Build
 09-27-2018, 02:34 AM
#151

Thread Starter
The battery is finally off back order from Tower Hobbies! I should be receiving my order next week so I'll be able to wrap this project up. I will document here how I set the CG and then I'll have the customary final photo shoot, so stay tuned...
 09-28-2018, 02:55 AM
#153
Thread Starter
10-03-2018, 04:42 PM
#154
Thread Starter

My long awaited parts came in yesterday, so I finished up the remaining few items that were needed to get done. Now it's time to set the CG and find out if and how much weight will need to be added. You can see that I use a Xicoy Weight and Balance Meter, this does a great job and is super accurate. If you look at the label, you can see where I purchased it from and how much I paid...ouch!!!
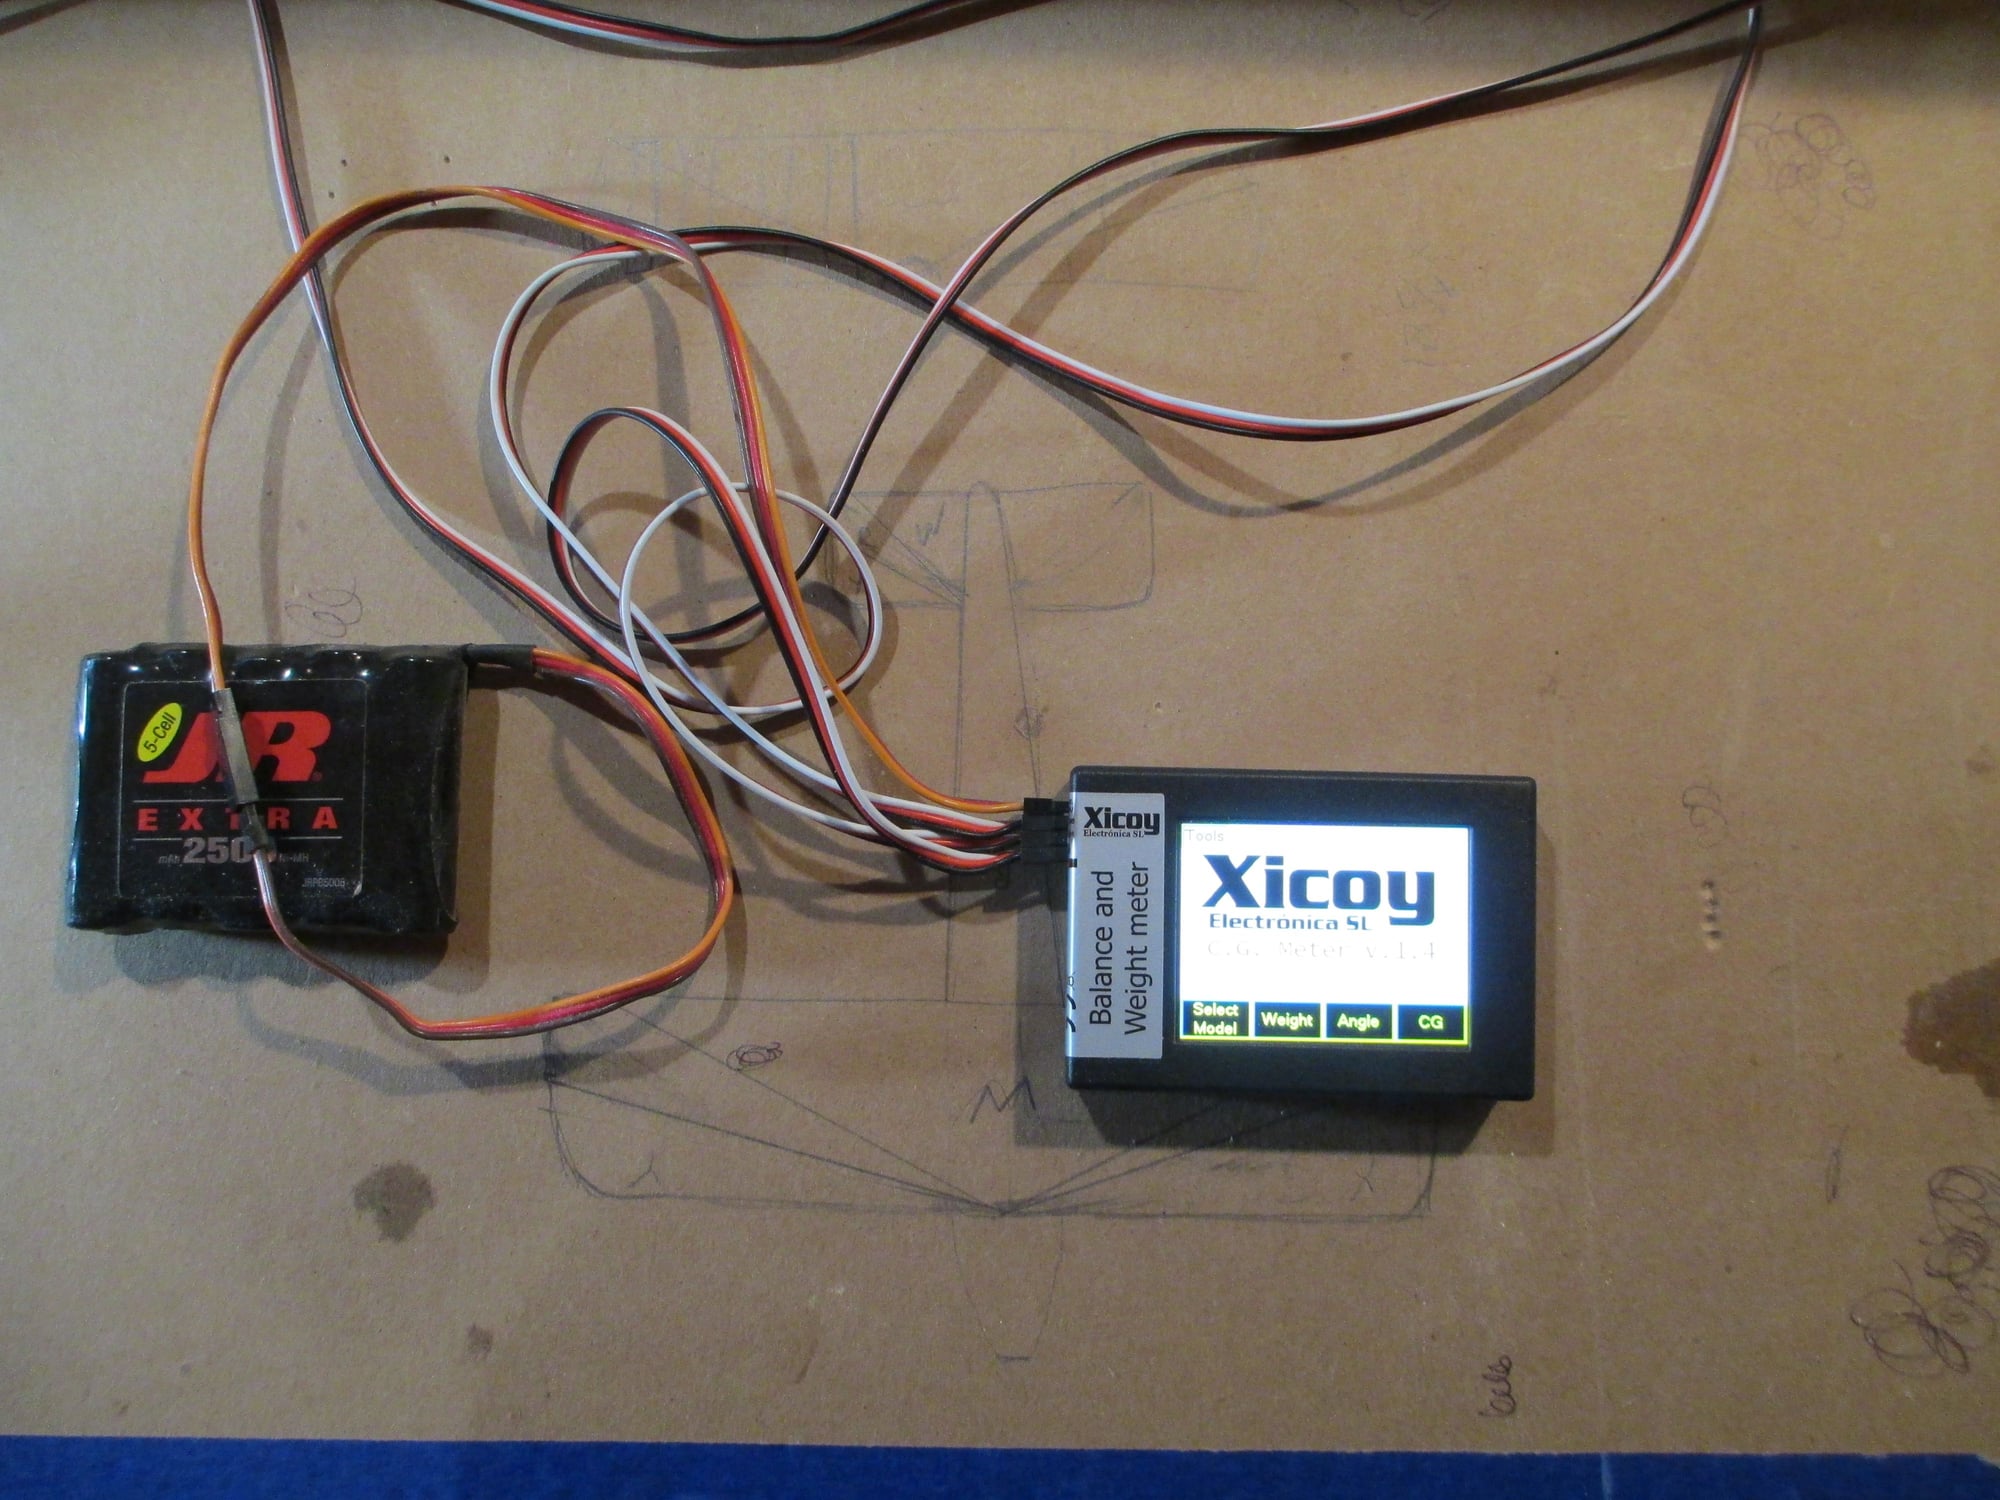
Hooking it up to a battery to power it up, this is the opening screen shot.

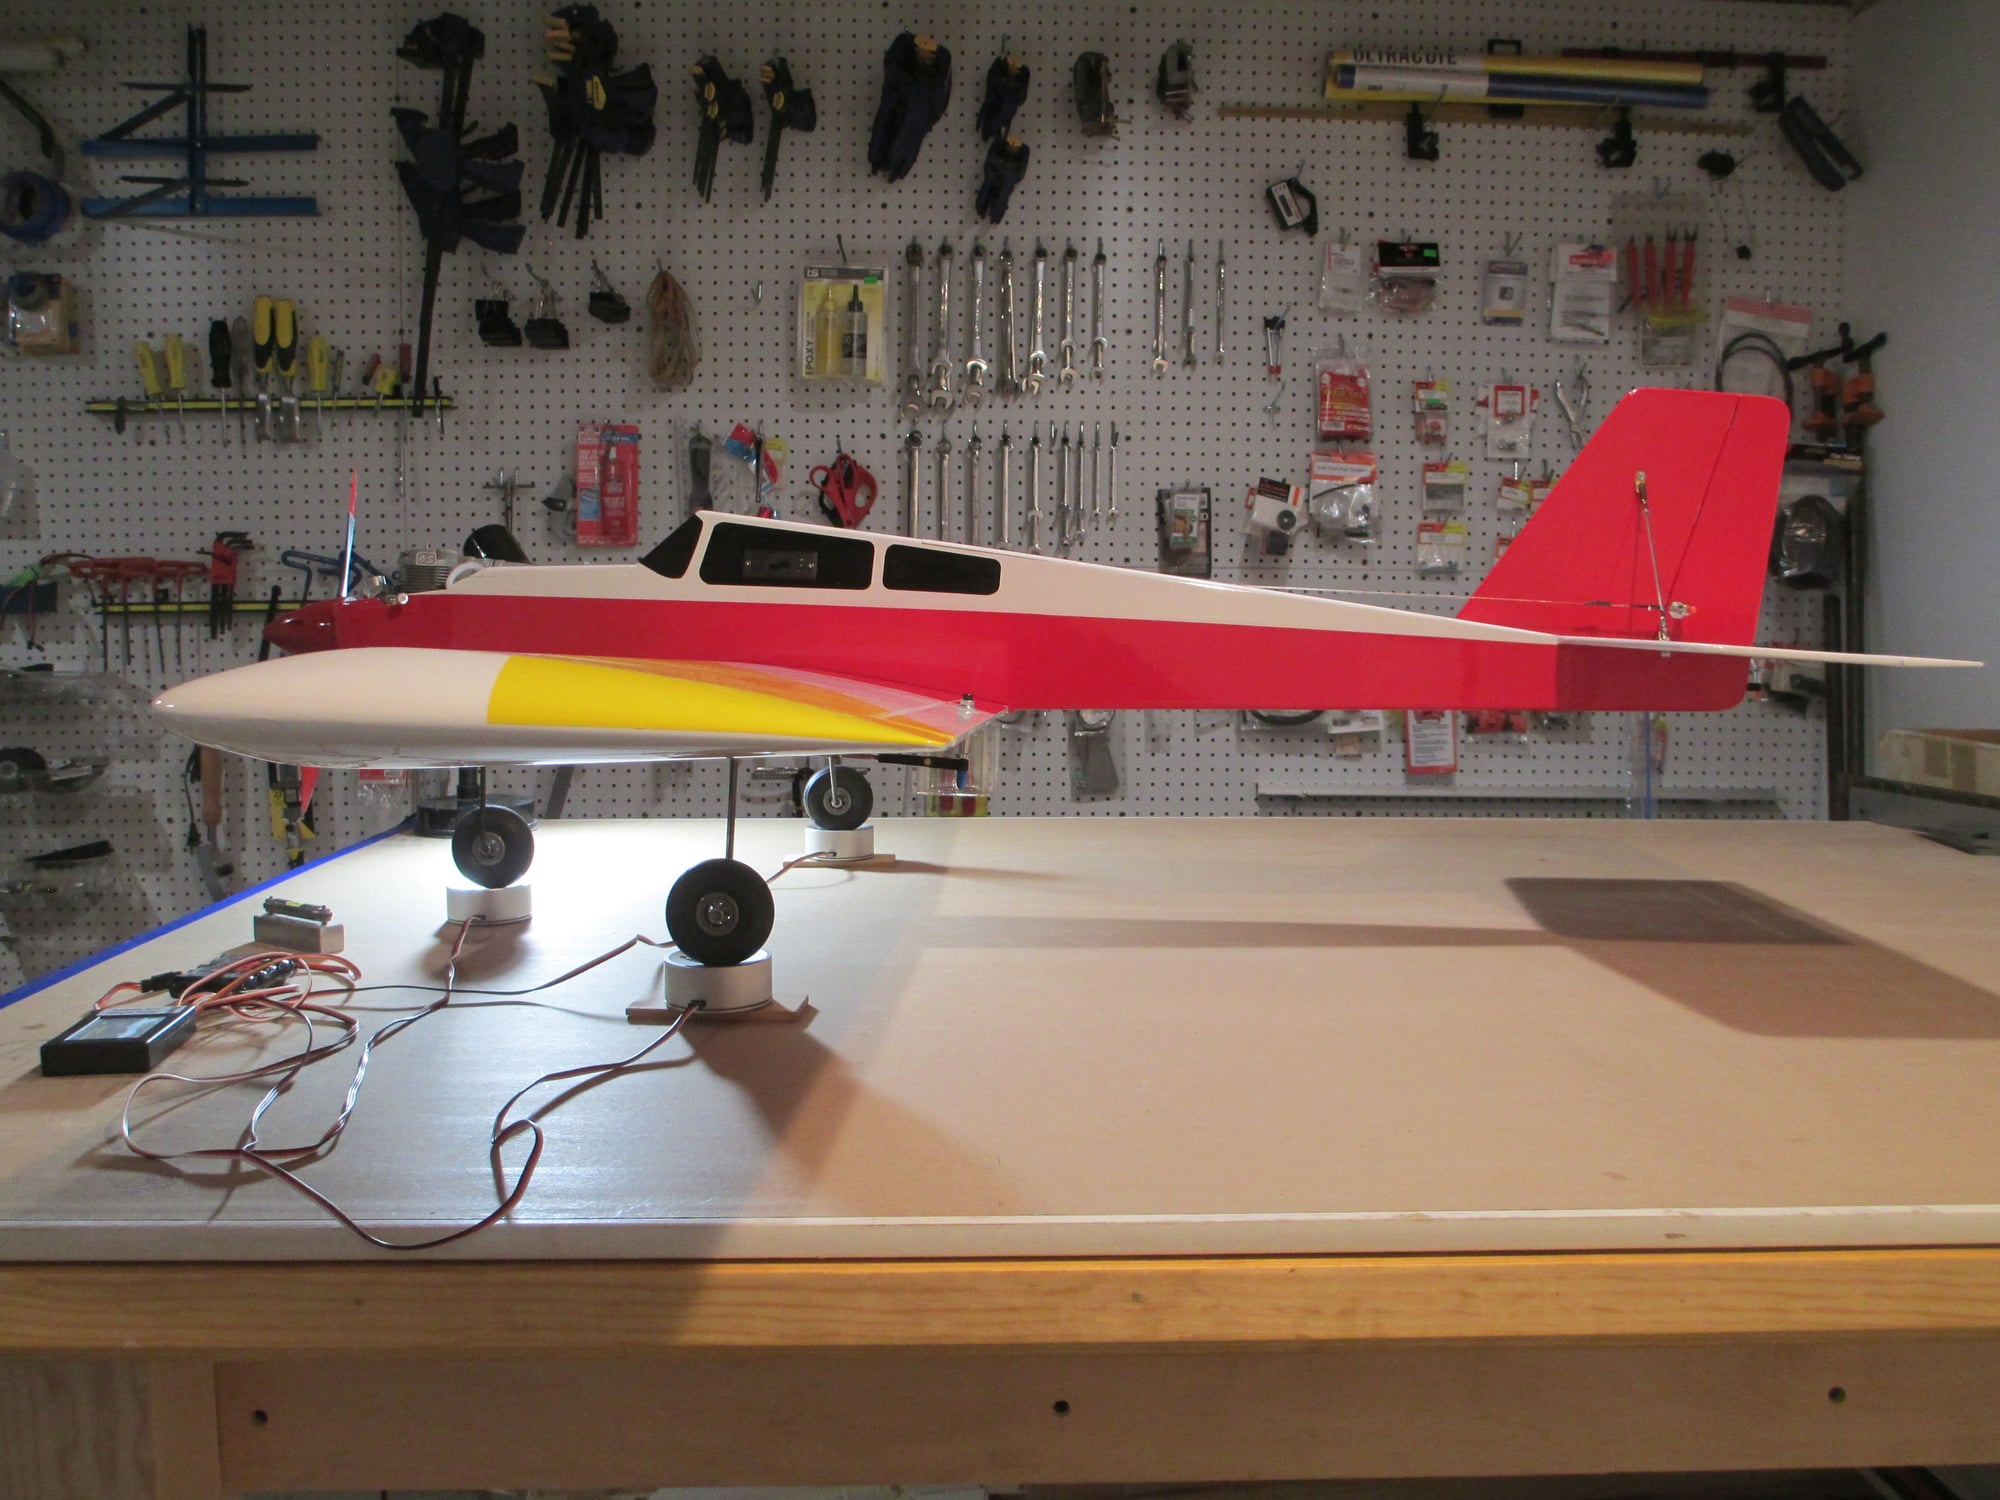
Before placing the plane on the scales but after the unit is powered up, you must first calibrate the weight scale by pressing the Tare button and zero out the scale. The plane's wheels can then be placed on each scale pad where the total weight of the plane is displayed on the screen along with the lateral balance of the plane. I was shooting for 5.5 pounds, but as you can see I missed my mark.
 Lateral balance was money, so no adjustments are needed.
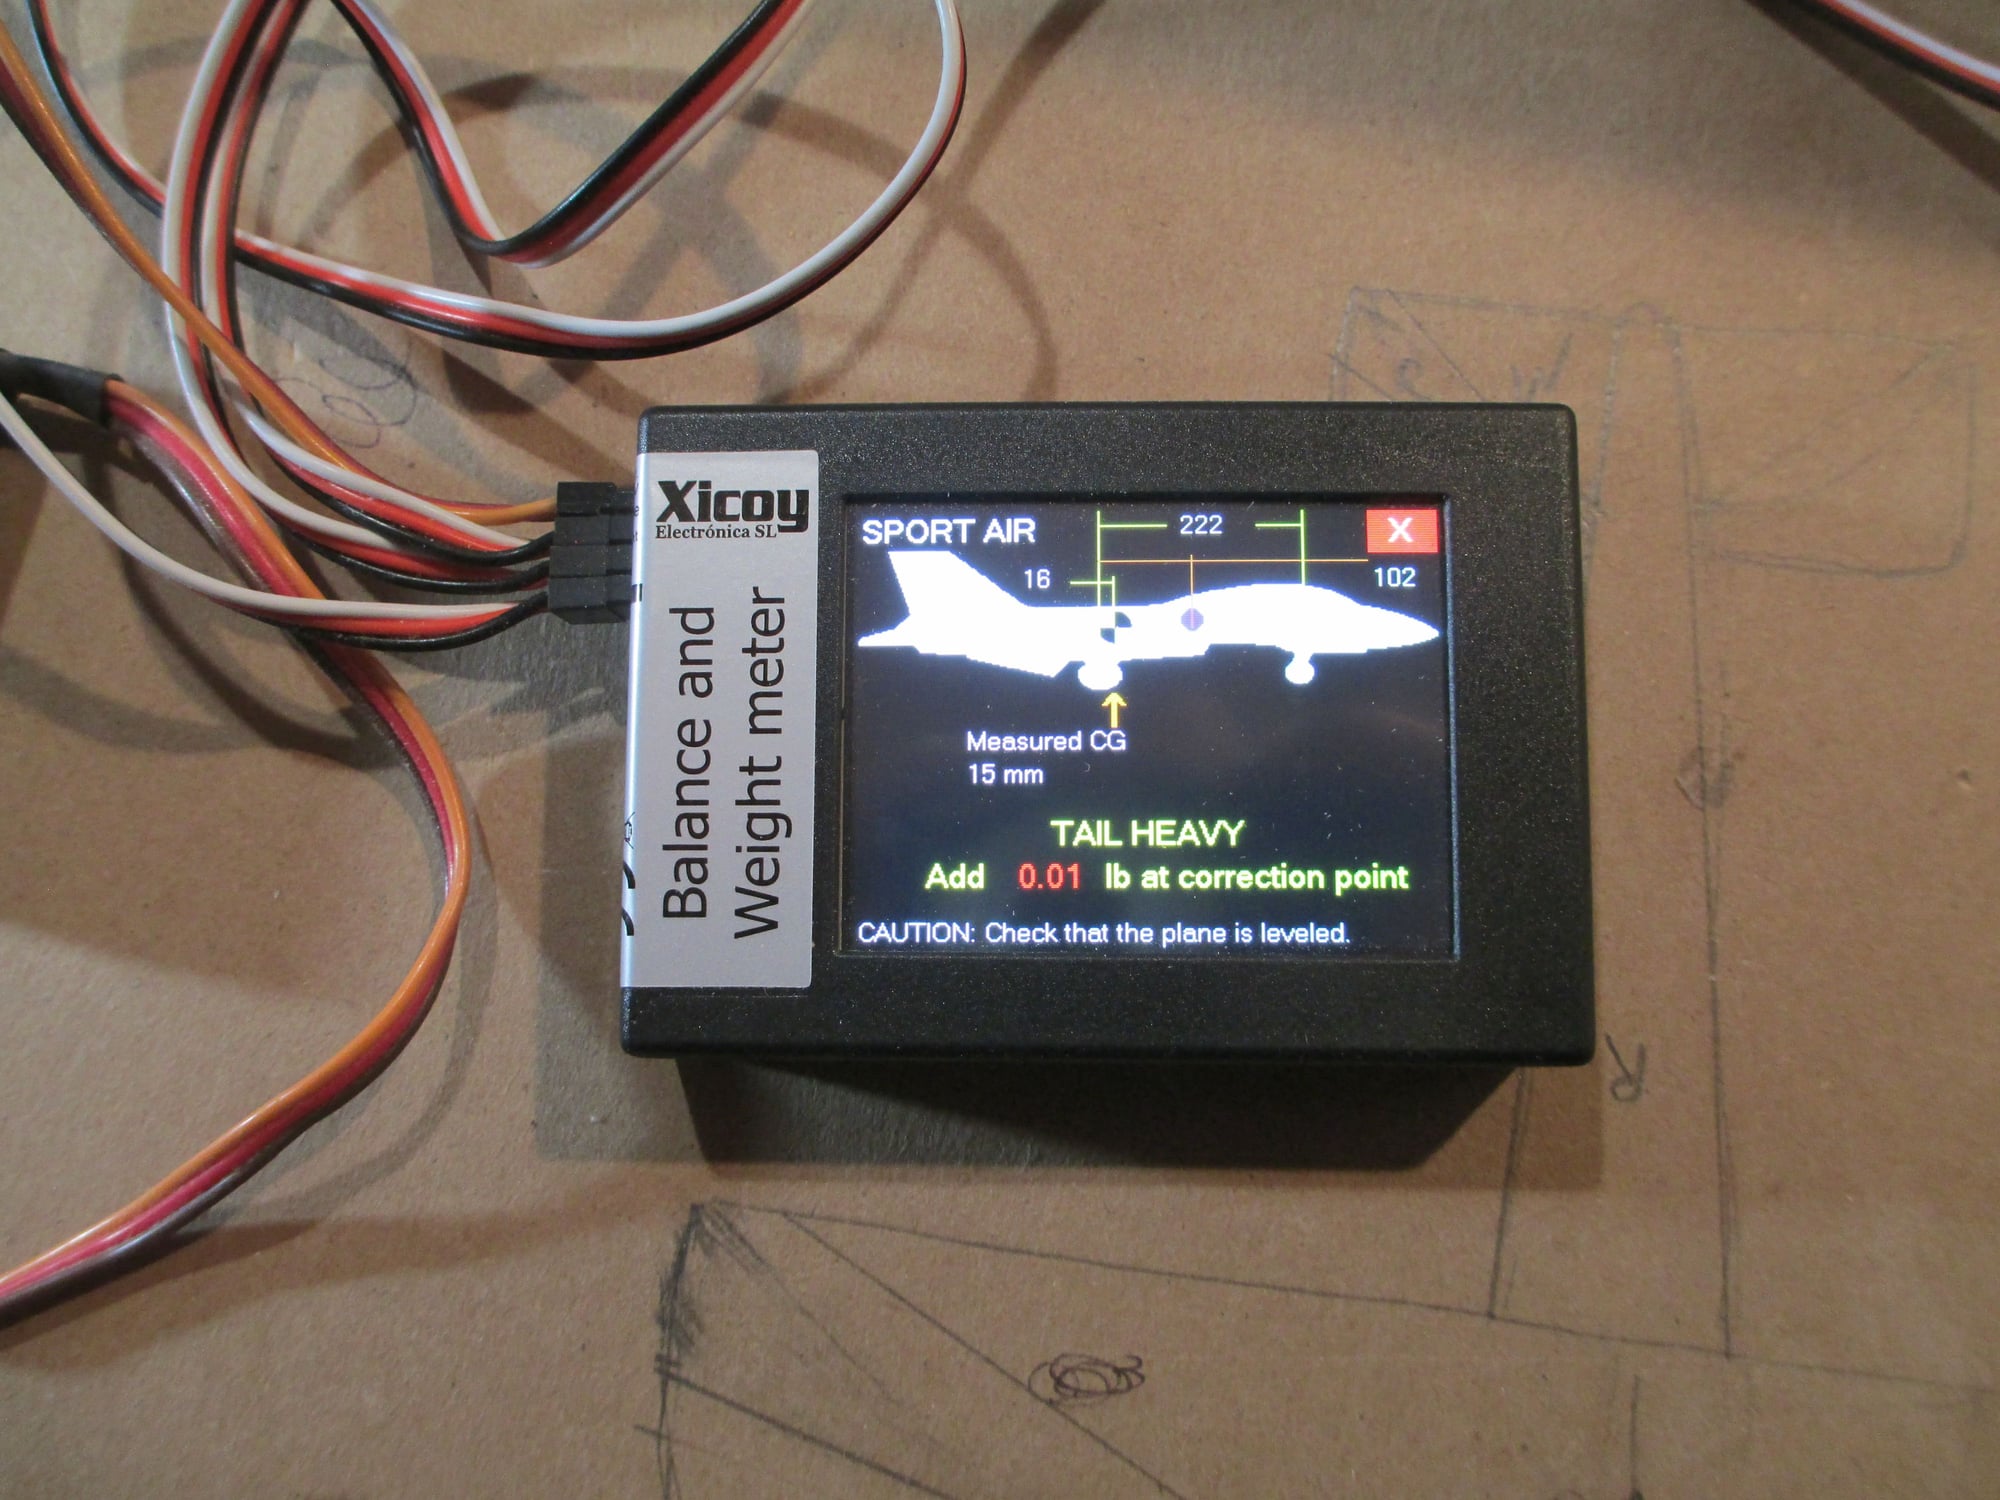
After inputting certain dimensions into the Balance and Weight Meter, it will indicate to you how much weight will need to be added (if necessary) to achieve the desired CG.
There is a lot to like about using this type of meter over other more commonly used balancing devices. I've never felt comfortable having a plane's wing rest on the small pads of a CG balancer. On heavier models, that's just too much weight to place on a small area.
Another type of balance is laterally balancing a plane. Many skip this type of balance altogether. An overlooked imbalance here is usually covered up by using the sub-trim on your transmitter when in flight, not a good idea. This balancer makes it a snap to check how well your plane is laterally balanced by indicating the weight placed on the left and right scale pads. If one side needs adjustment it is usually easy to place the needed weight on the light side by removing the aileron hatch cover and securing a weight through the opening.
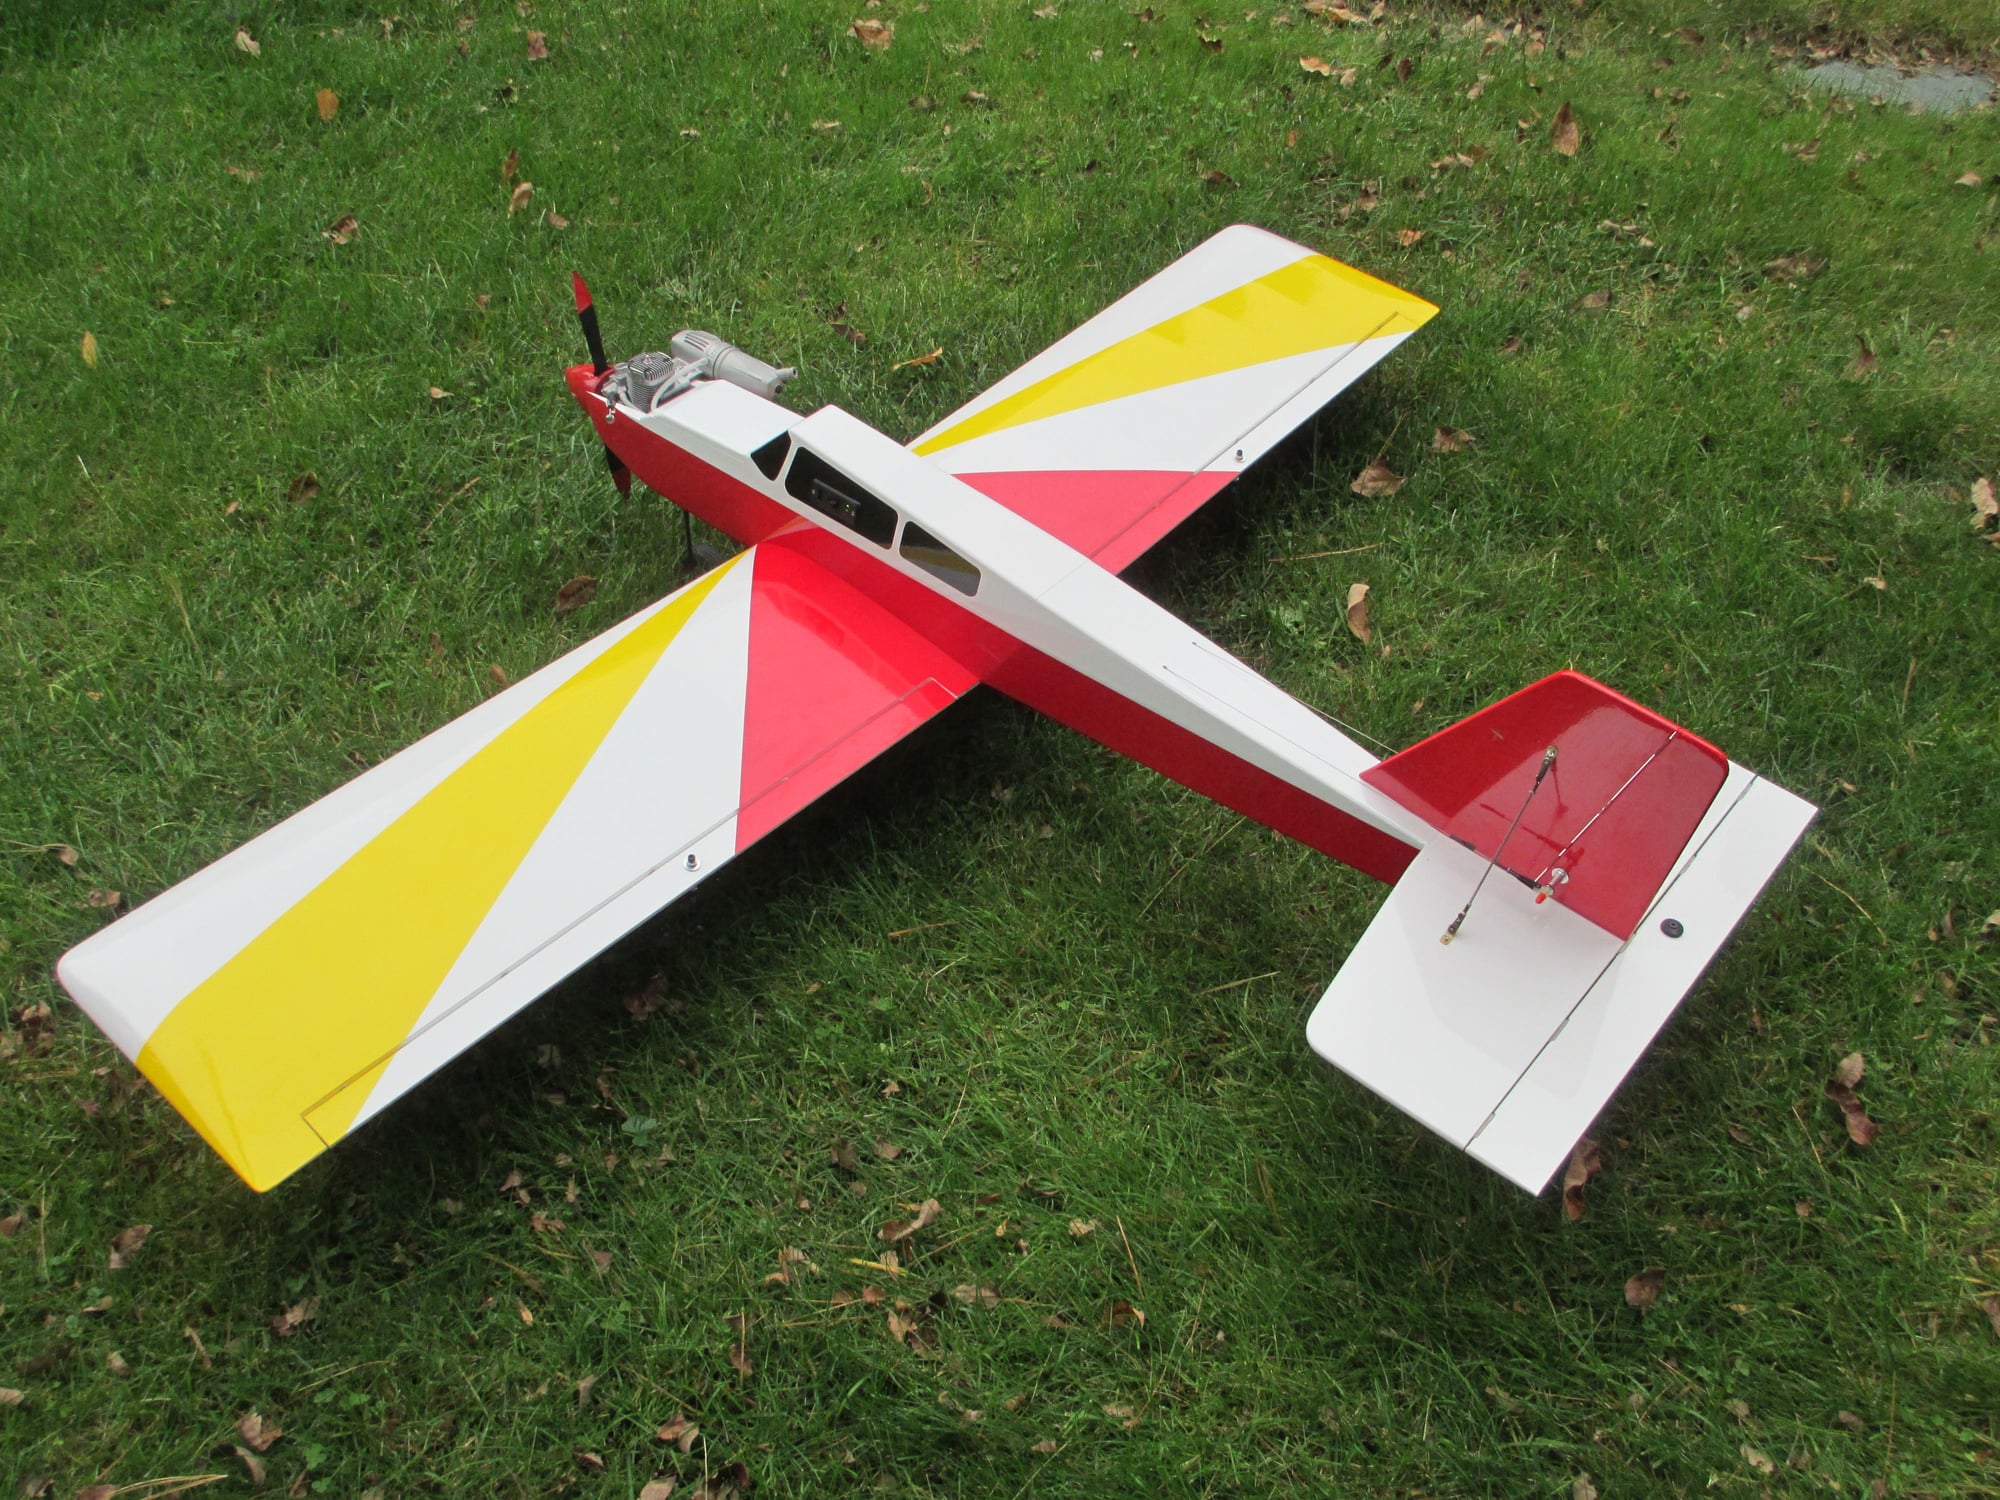
This planes CG dimensions are between 3.000 - 3.5 inches (back from the leading edge). I input 3.25 inches for my desired CG. The plane was leveled out which is an important step. I guess I got lucky because not only was the planes lateral balance money, so was the CG!!!
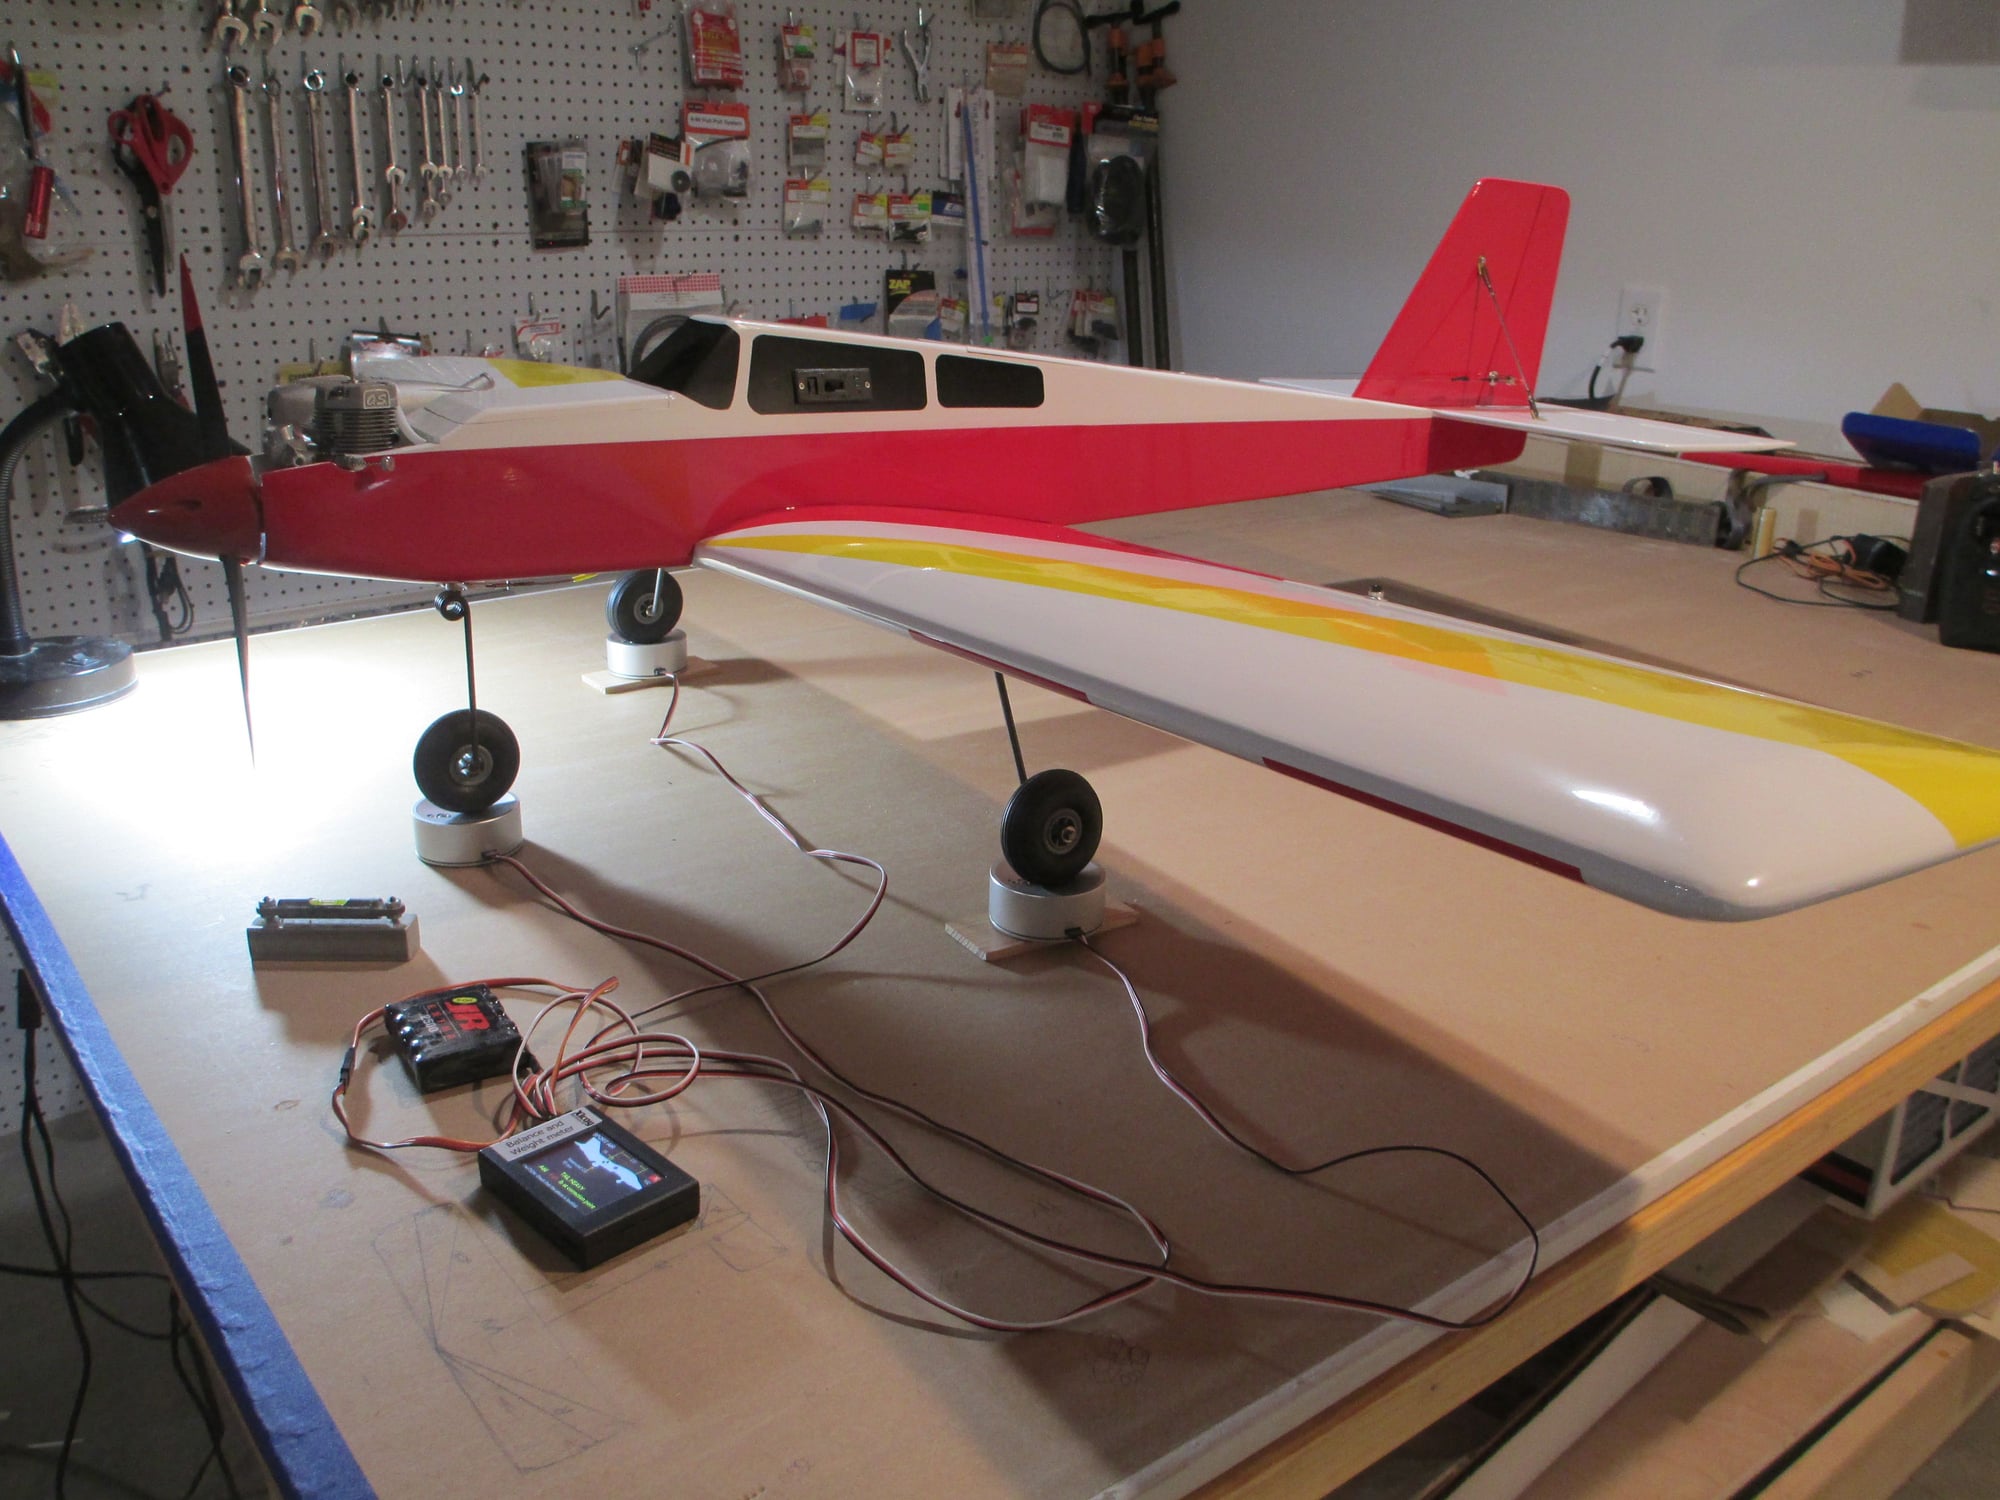
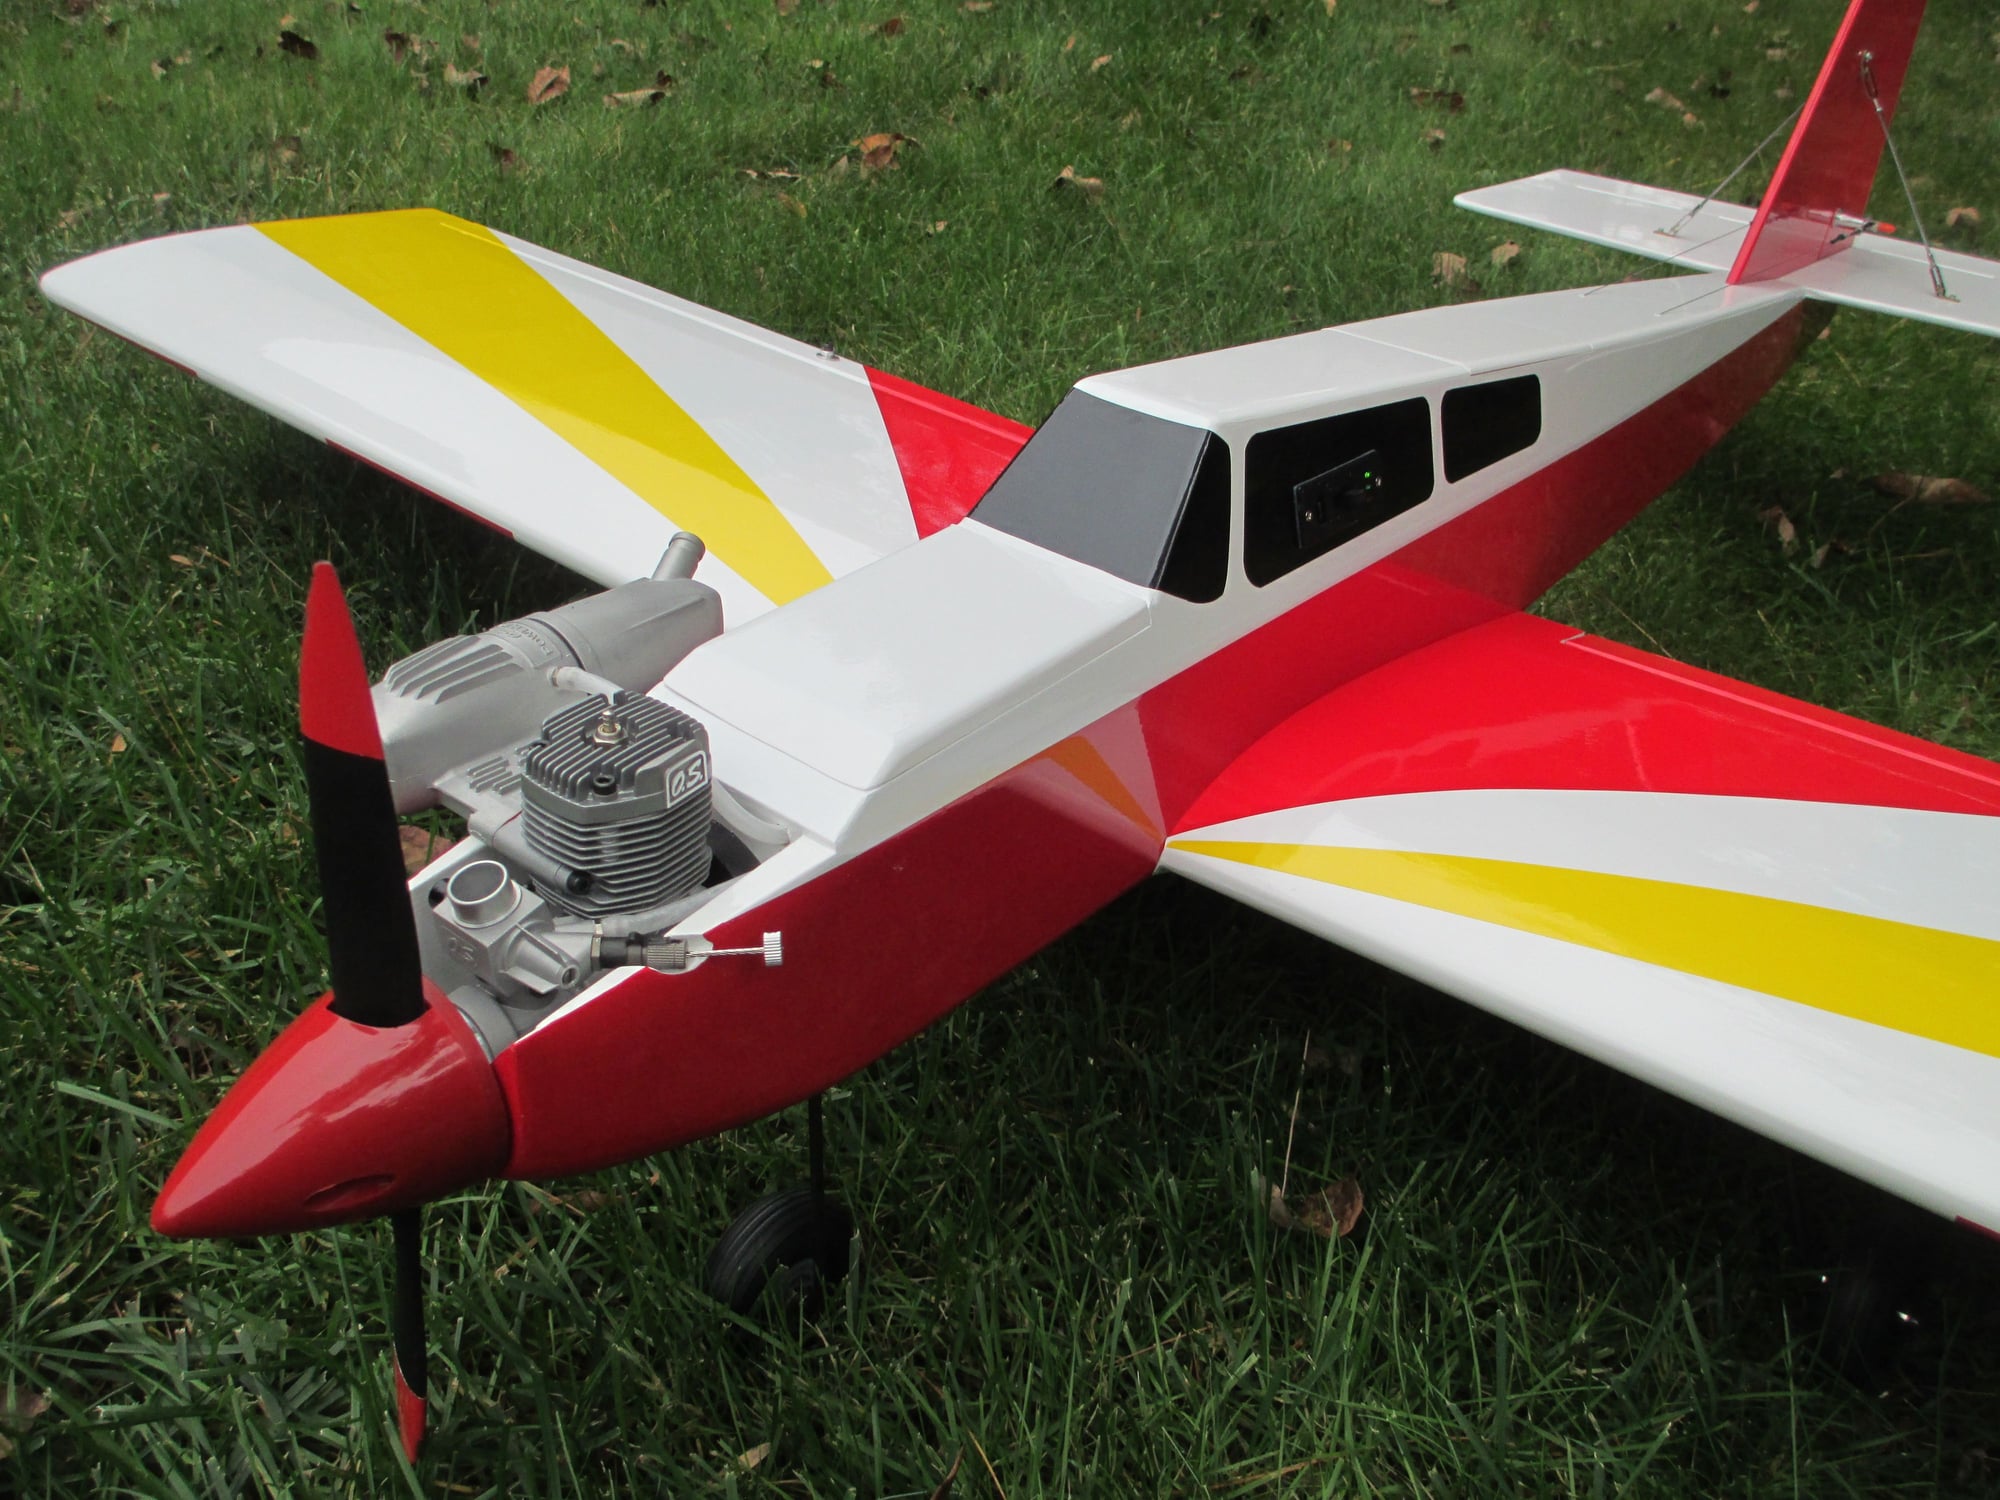
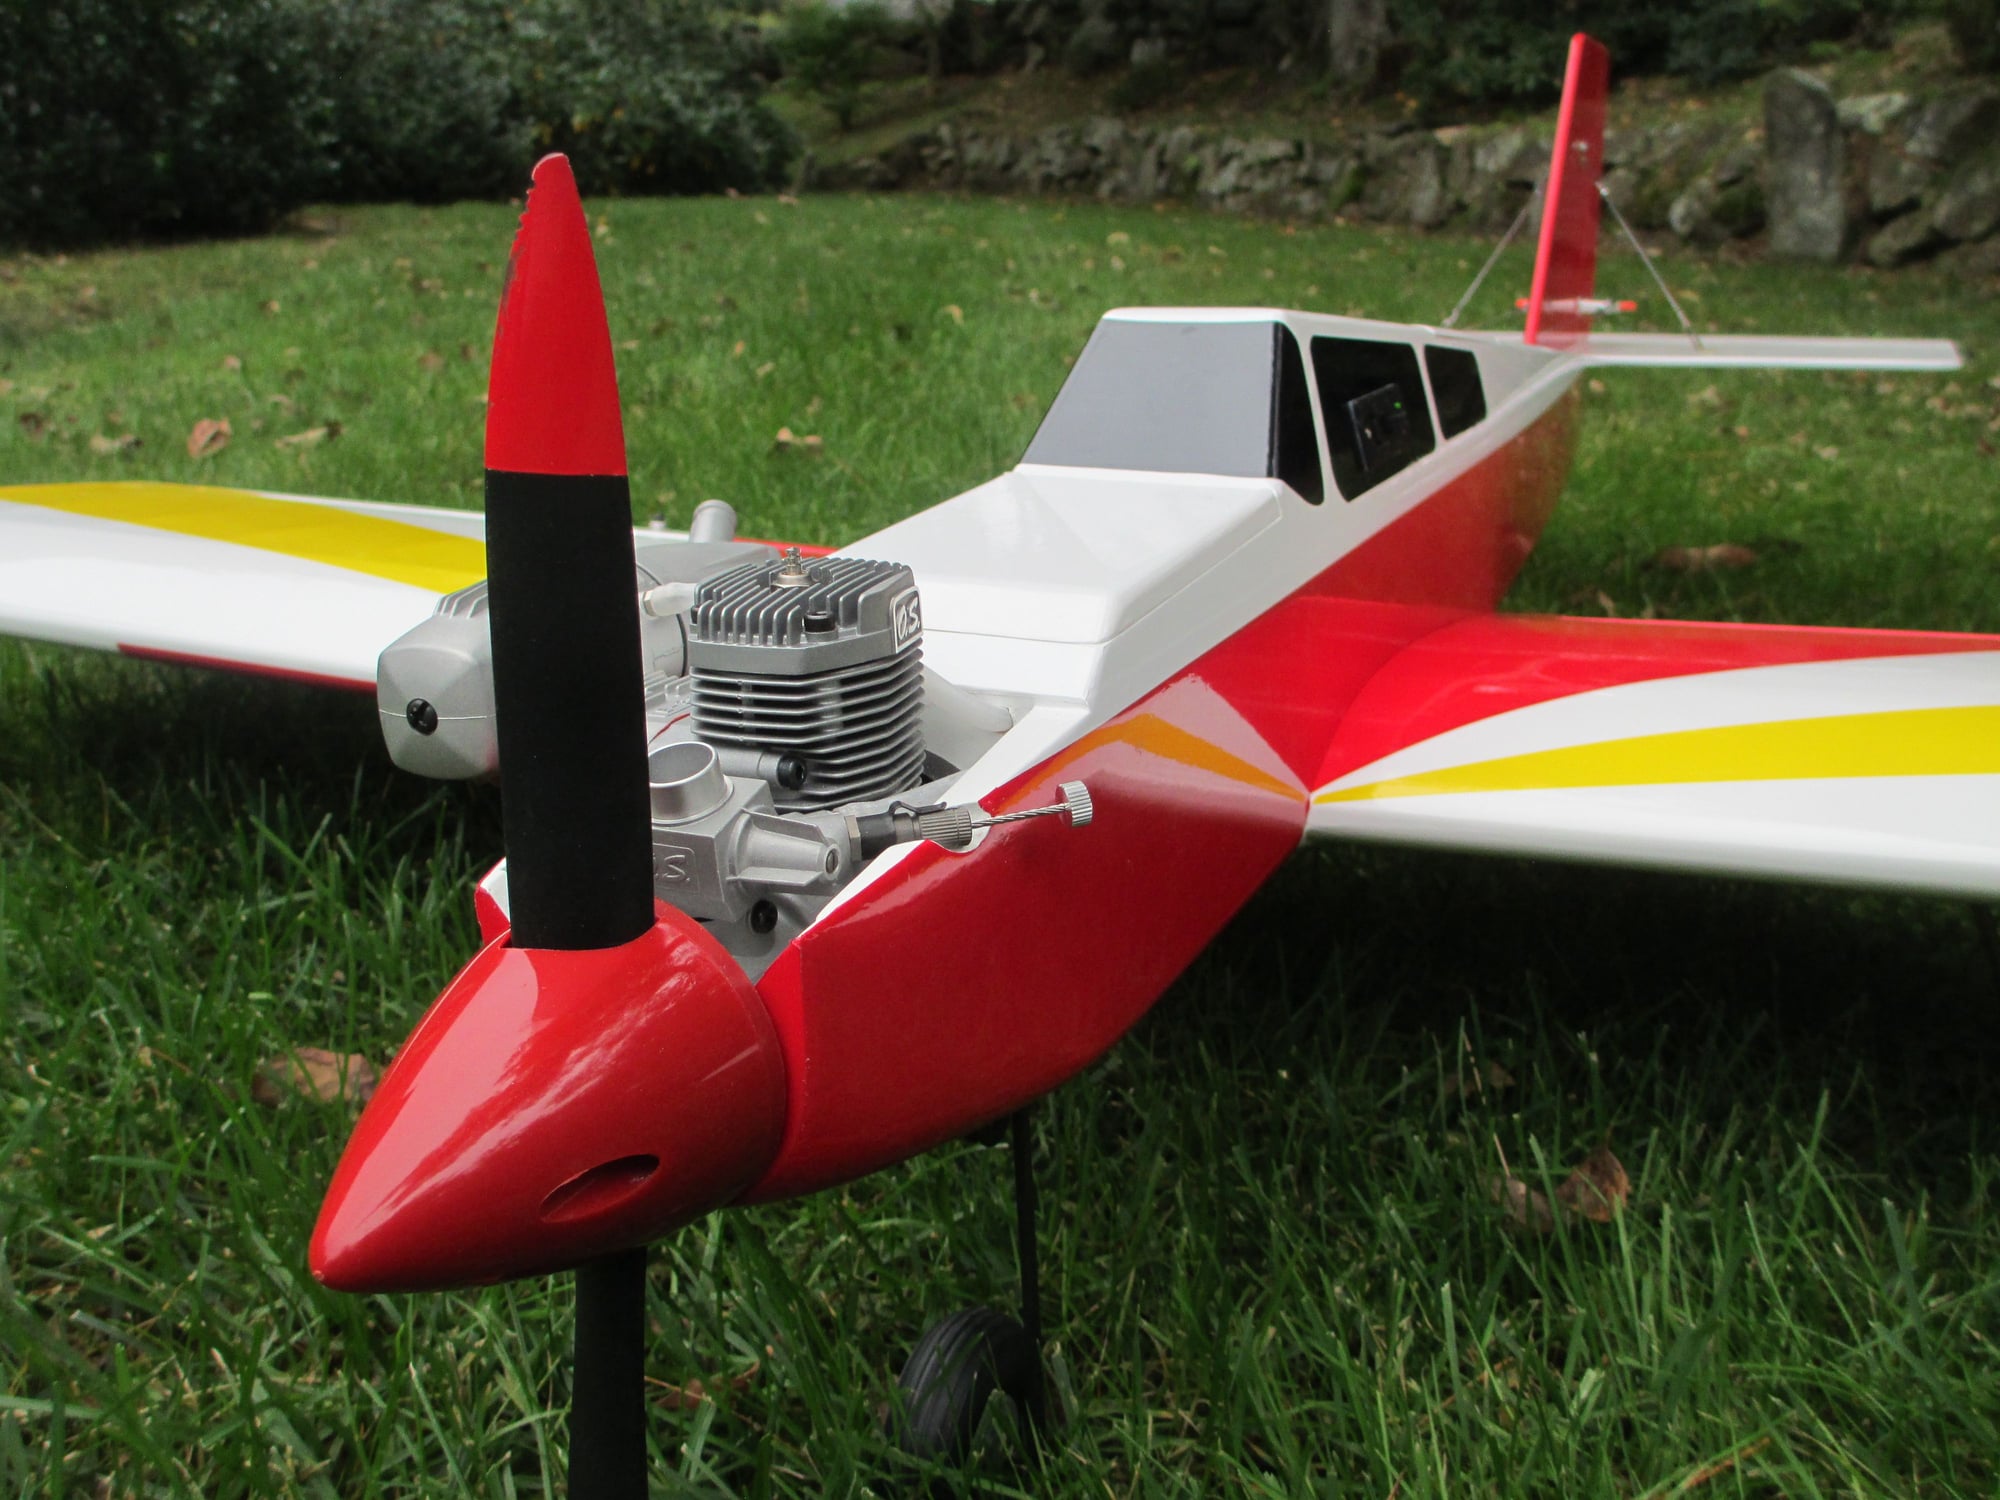
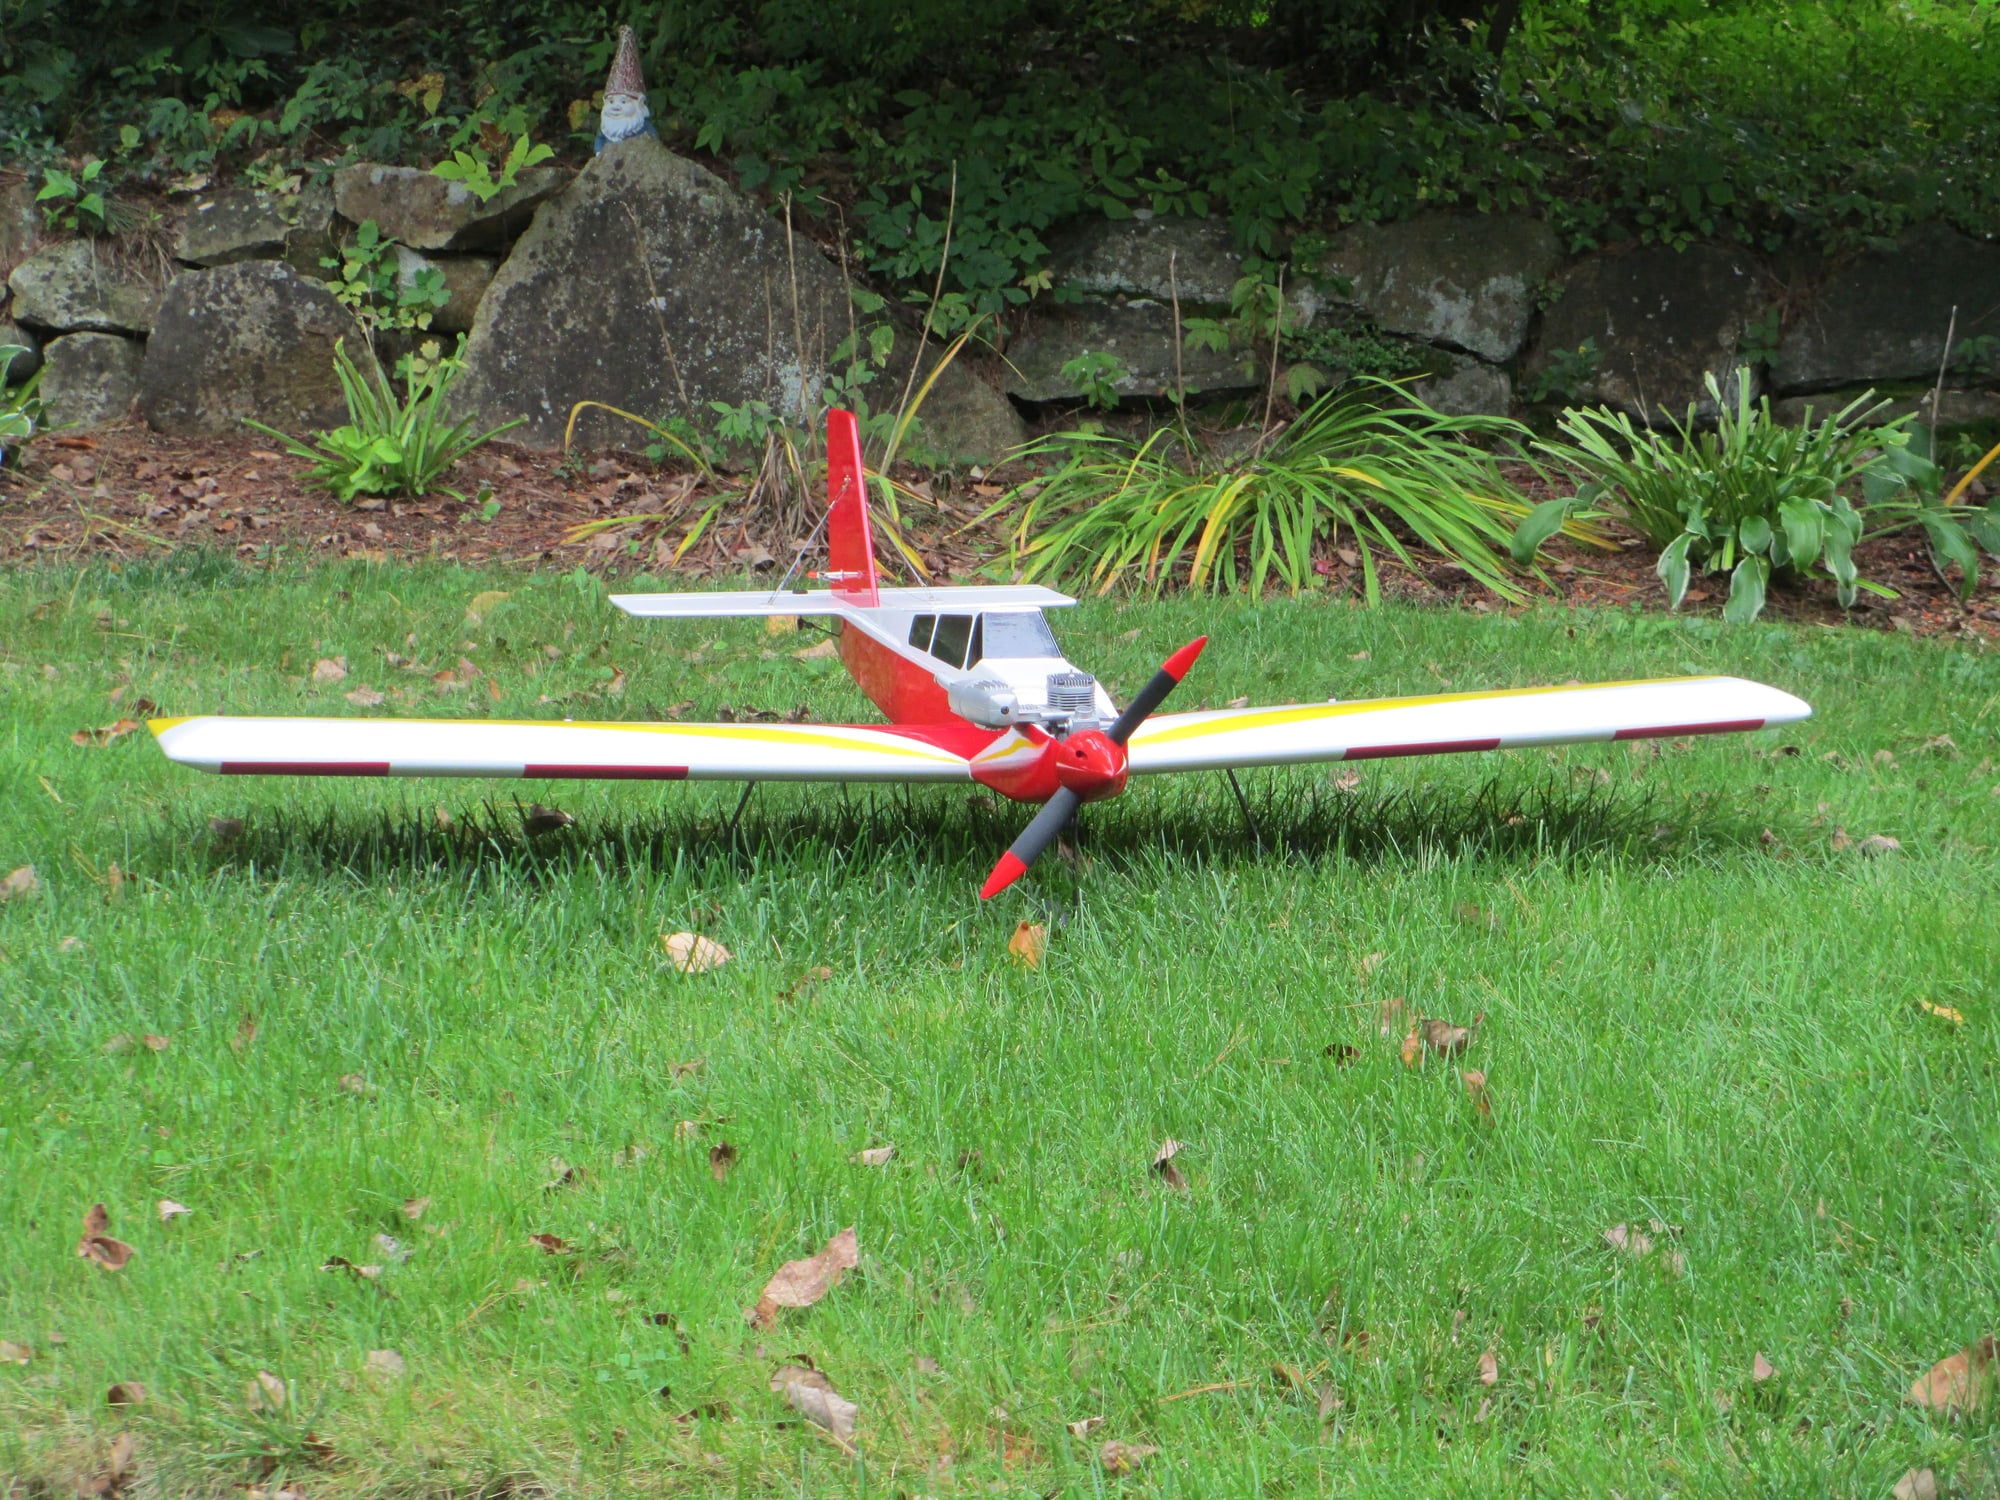
After a good cleaning, all that's left is to charge the battery and fuel her up for the maiden!!!
Last edited by VincentJ; 10-04-2018 at 08:01 AM.
10-04-2018, 05:48 PM
#157

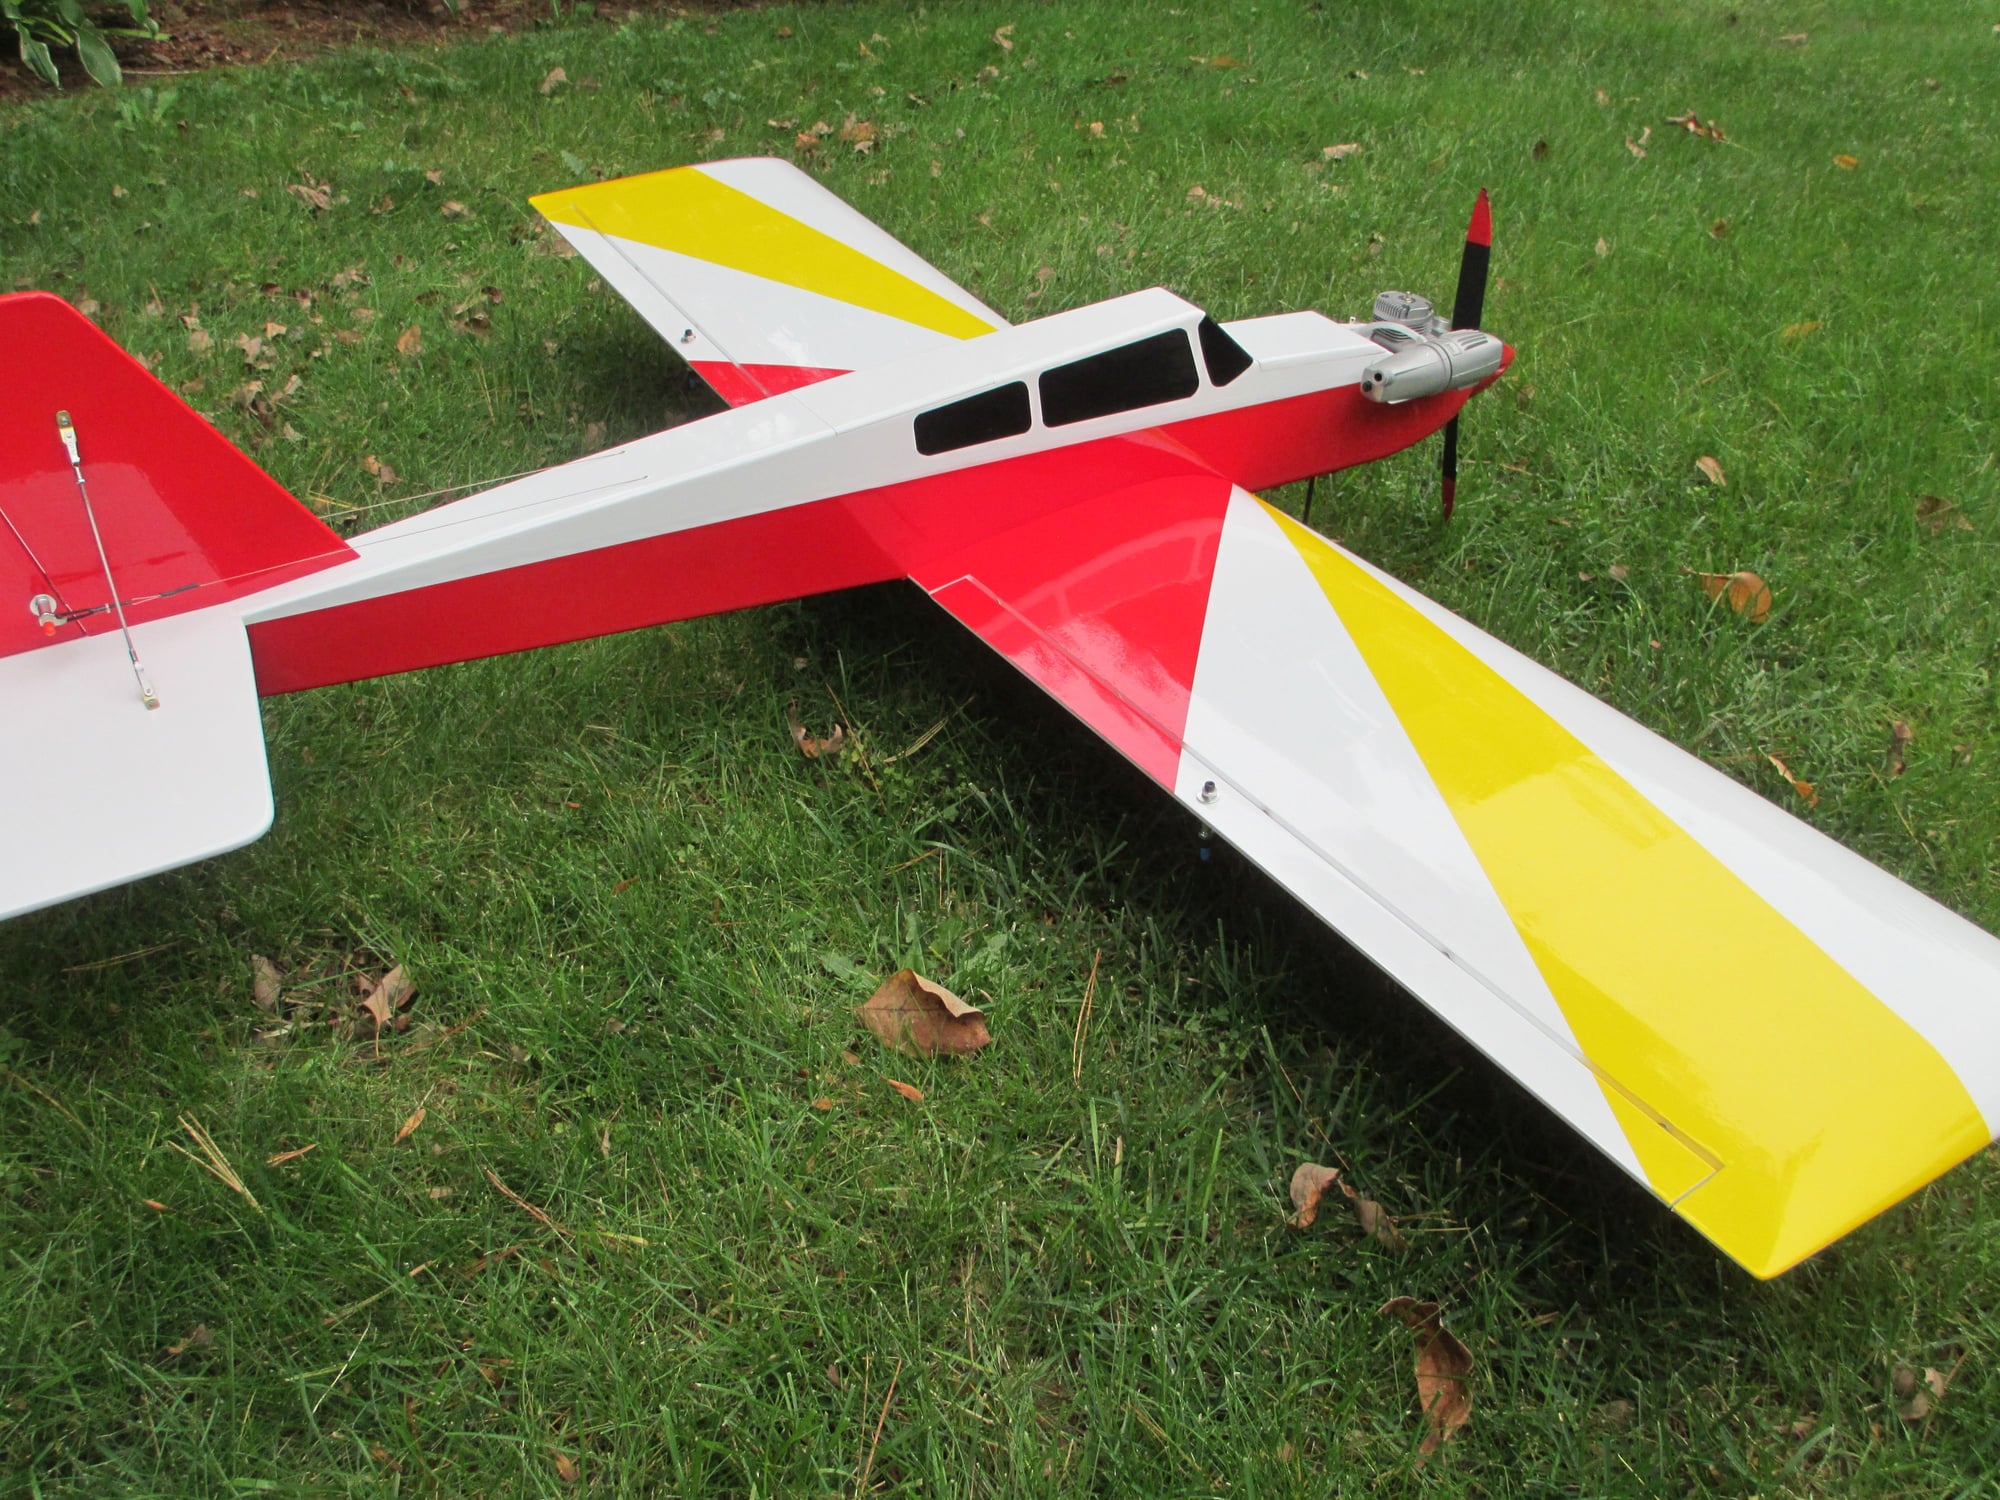
A very attractive airplane.
10-05-2018, 03:51 AM
#158
Thread Starter
Thanks guys, I hope to have a video of the maiden flight to post as soon as it happens. I will also as per my usual thread ending, give a complete list of parts that I used on this project along with web site links for you should you wish to duplicate anything that I did on this model.
Last edited by VincentJ; 10-05-2018 at 09:32 AM.
10-06-2018, 04:38 AM
#160

My long awaited parts came in yesterday, so I finished up the remaining few items that were needed to get done. Now it's time to set the CG and find out if and how much weight will need to be added. You can see that I use a Xicoy Weight and Balance Meter, this does a great job and is super accurate. If you look at the label, you can see where I purchased it from and how much I paid...ouch!!!
After a good cleaning, all that's left is to charge the battery and fuel her up for the maiden!!!
Plane sure looks good. Surely reminds me of the 80's era.....
10-06-2018, 12:11 PM
#161
Thread Starter
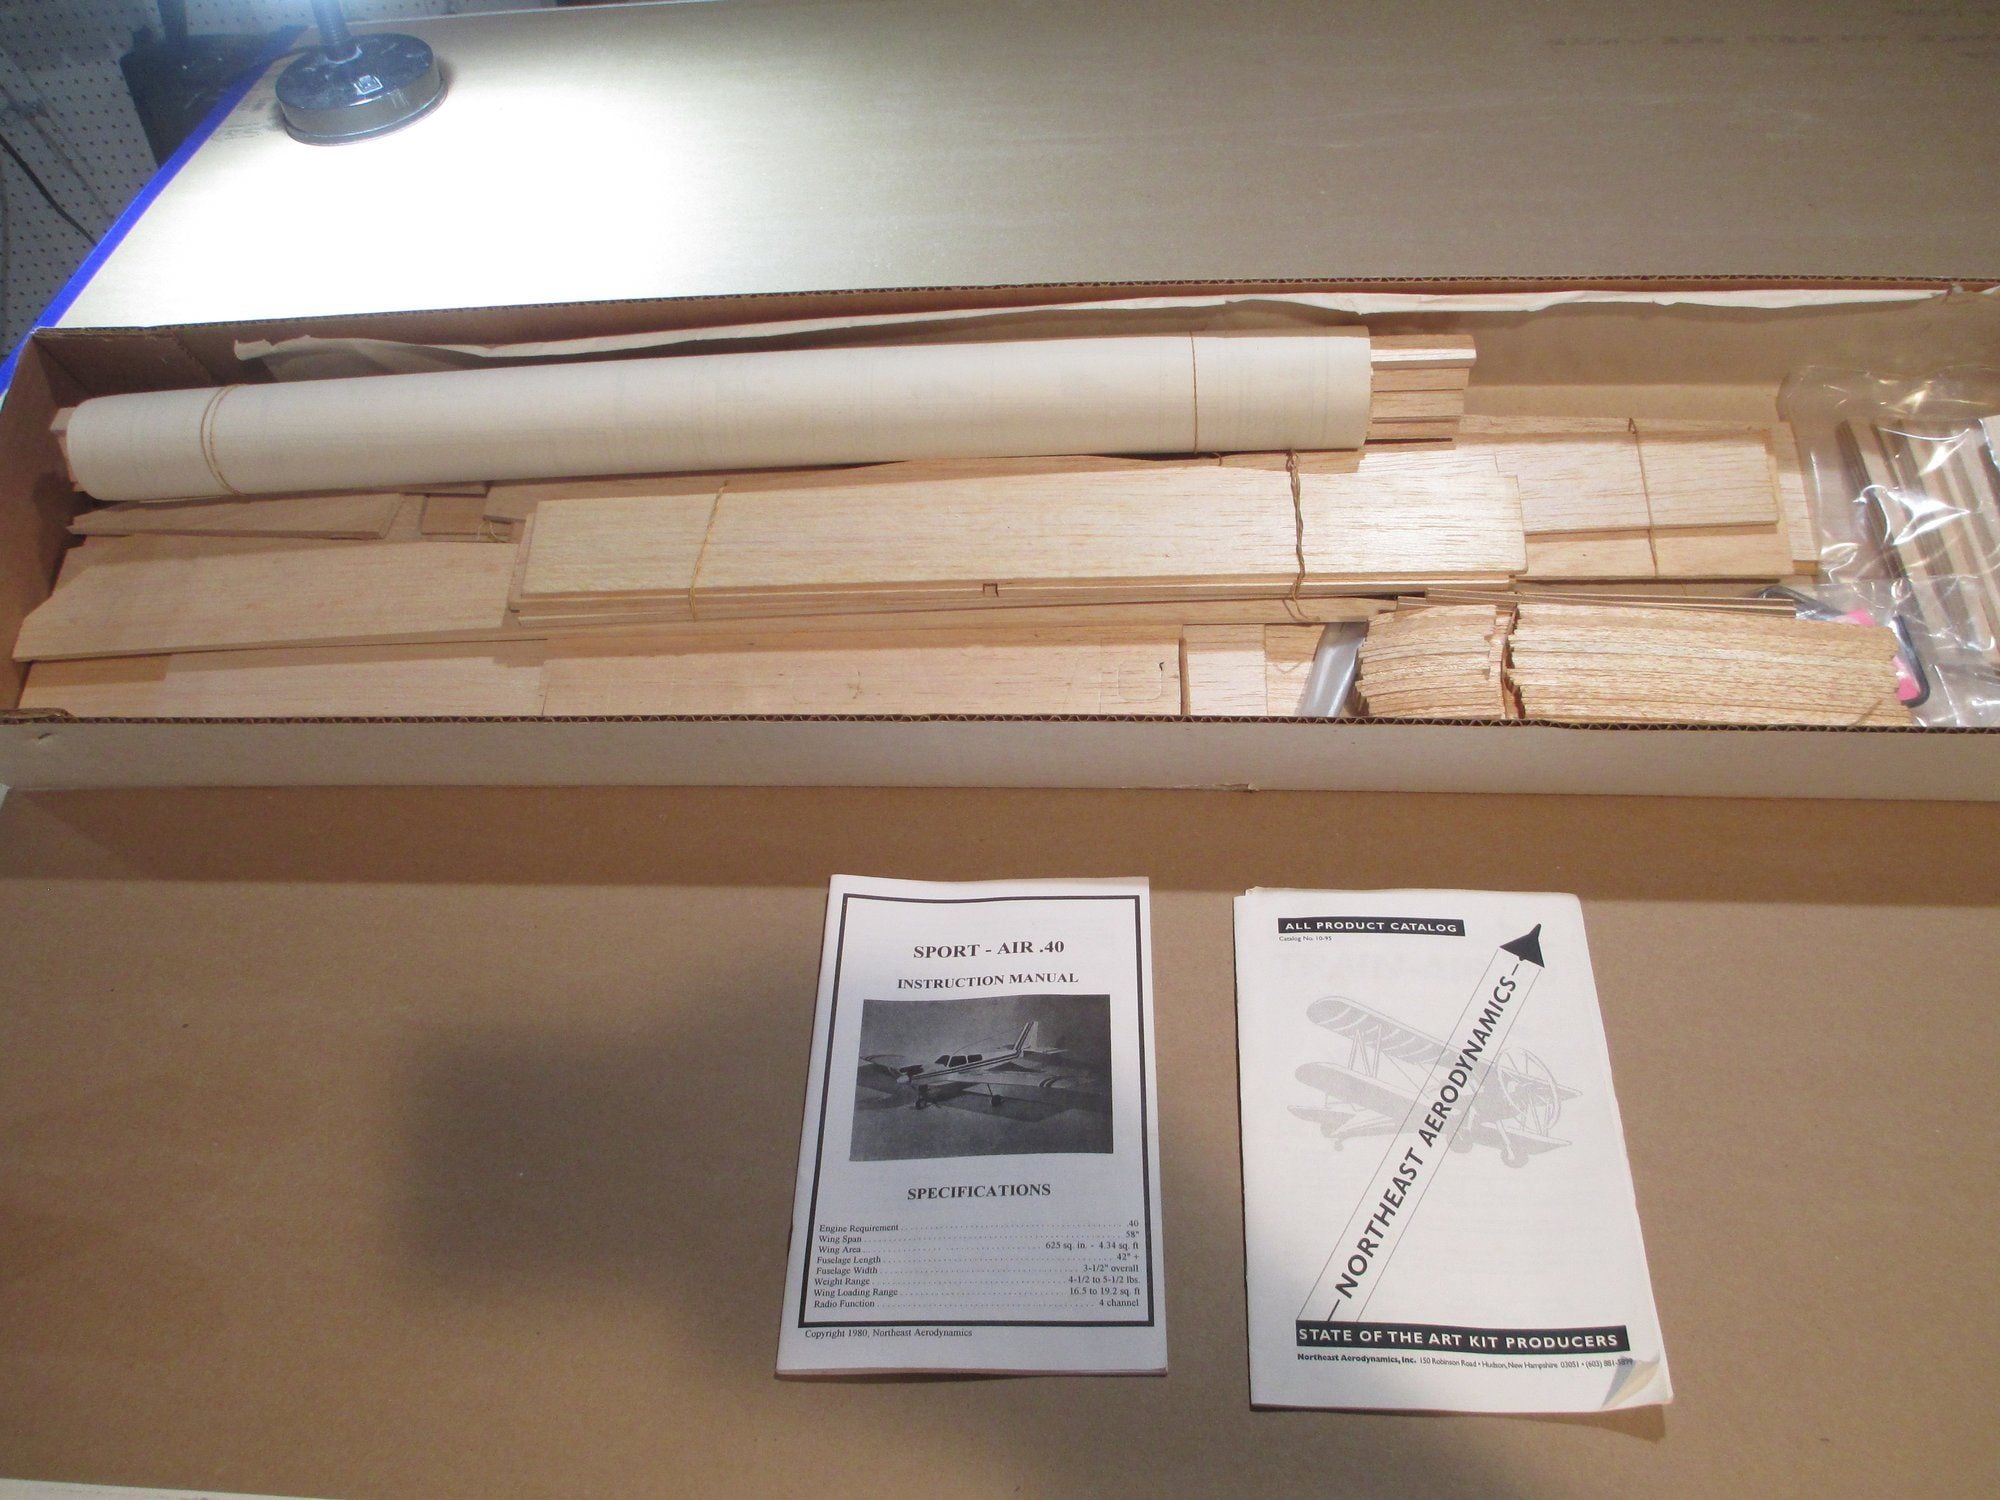
It all started with this, 28 days of construction and ready for covering...
 Hope you enjoy the pictures!
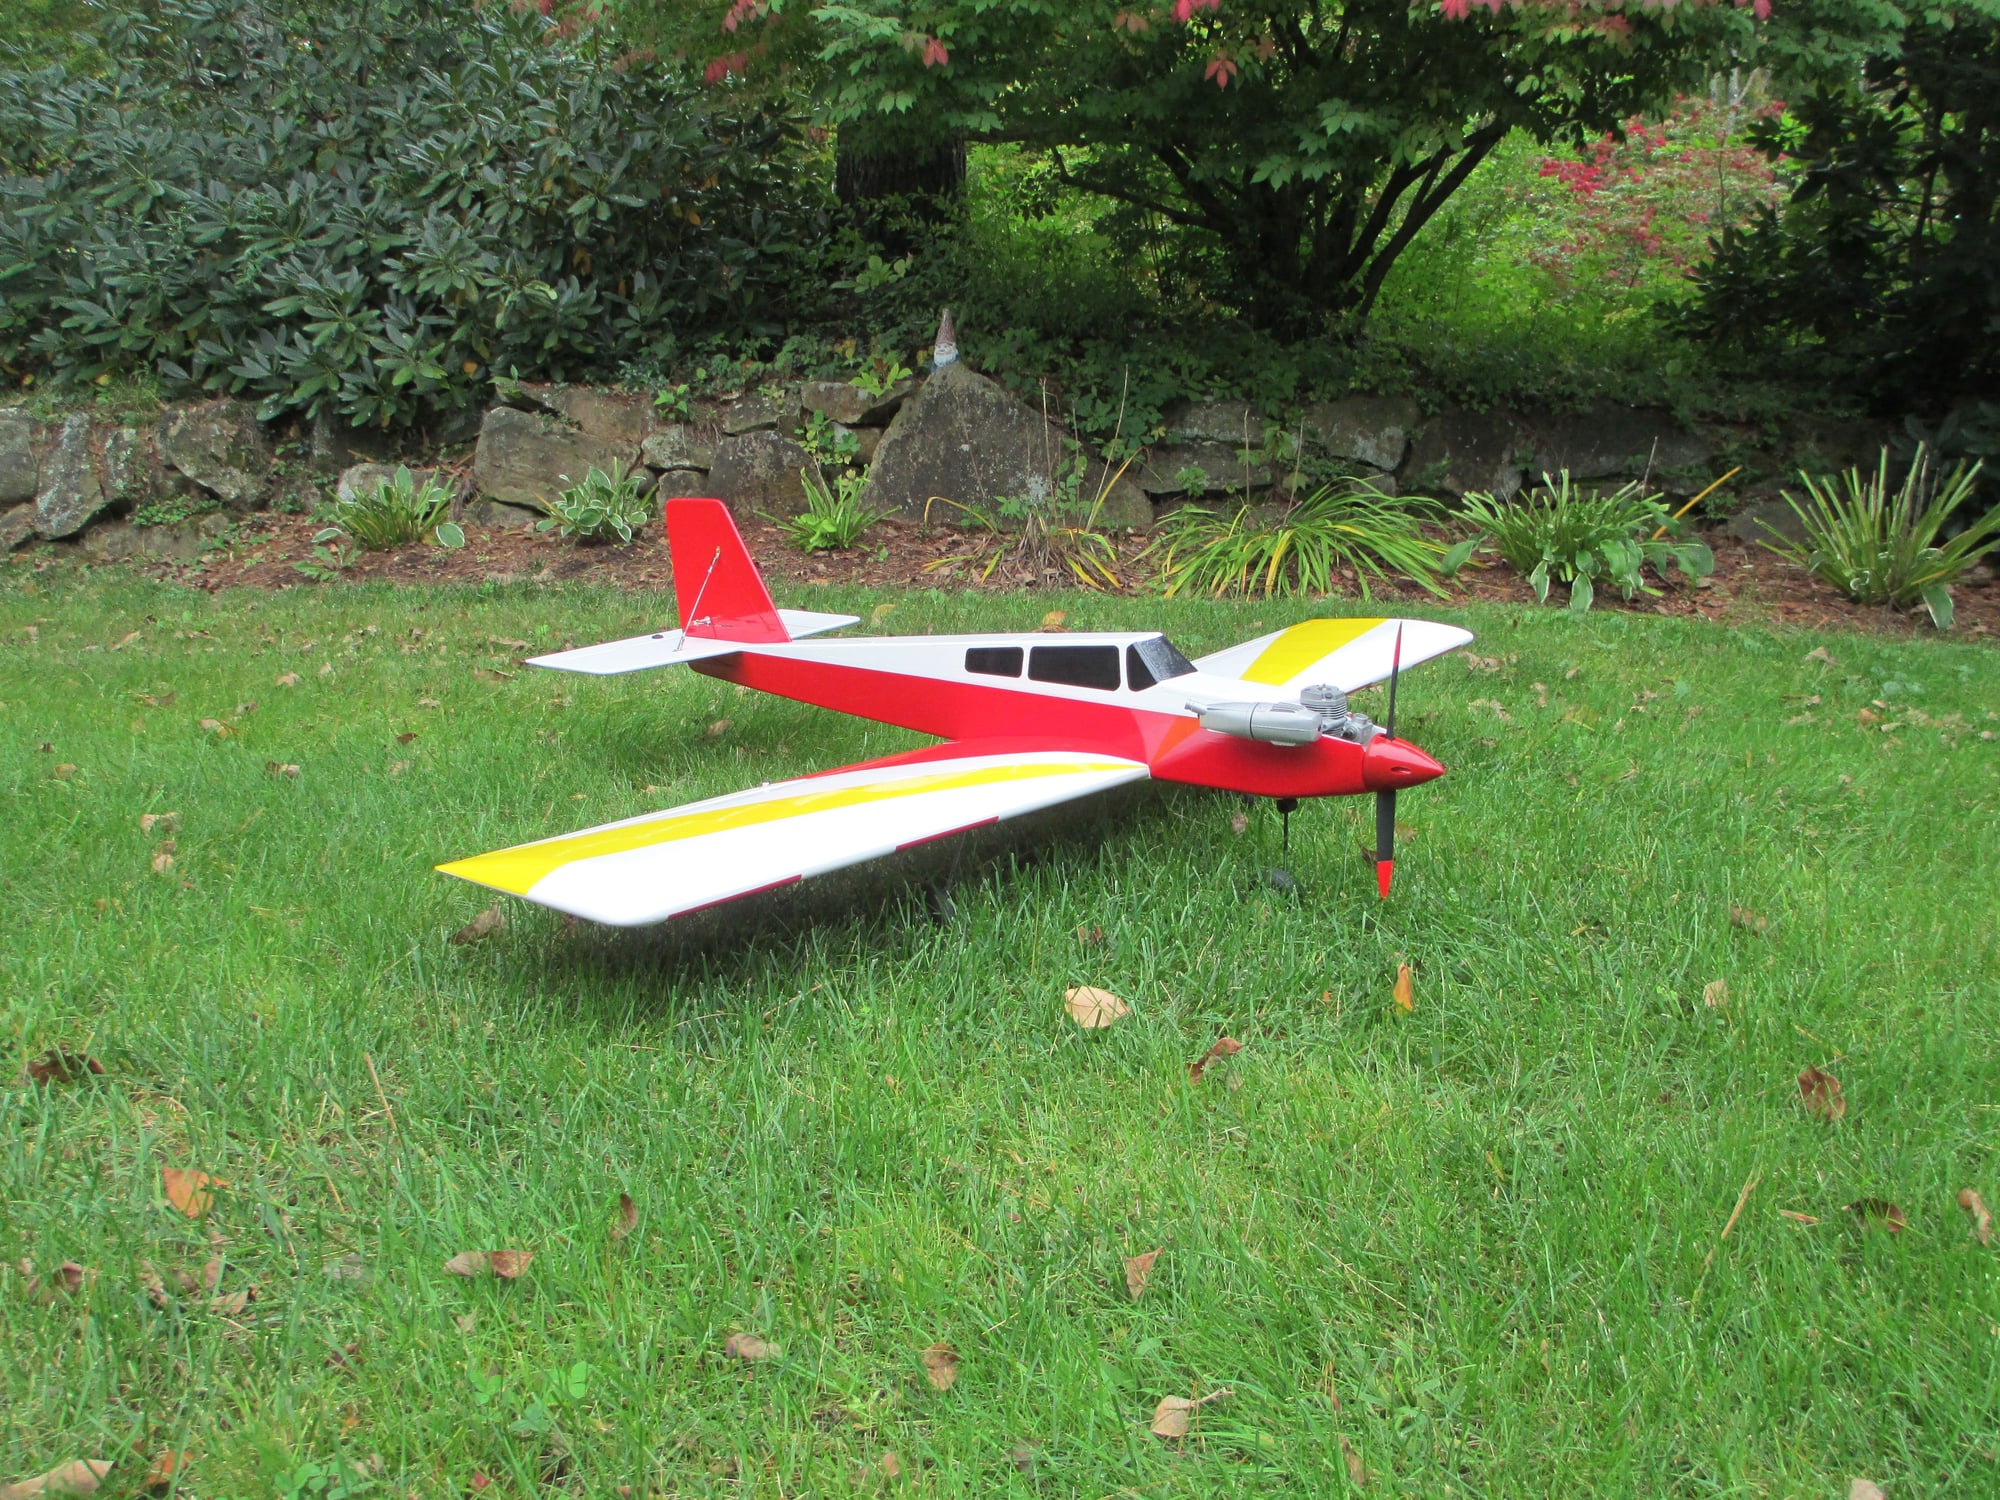


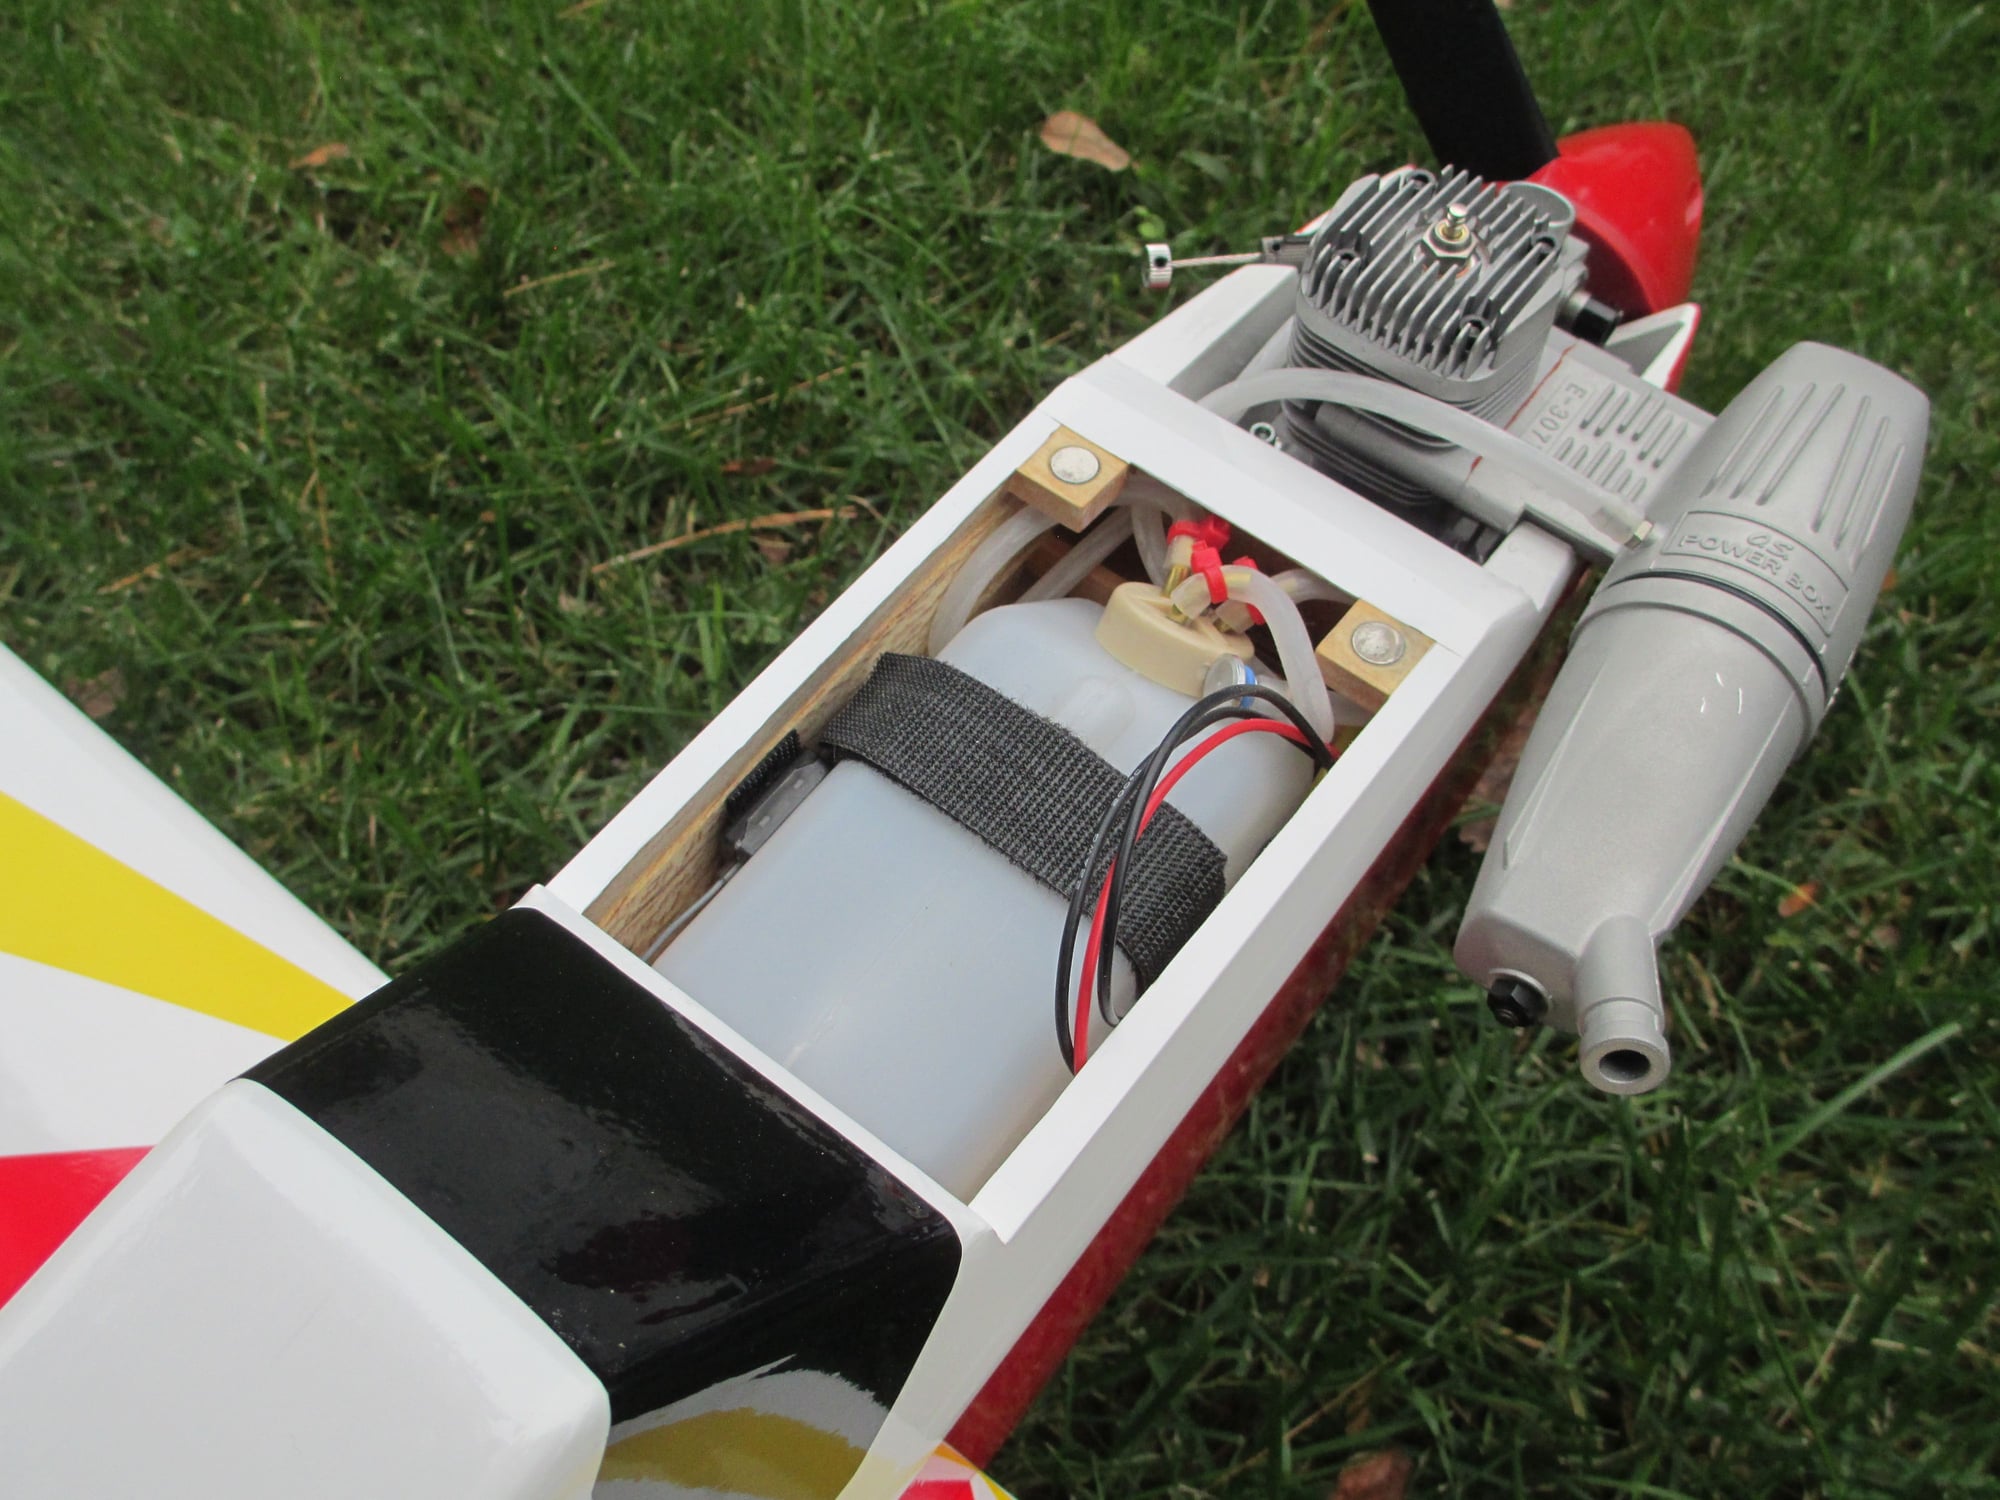
I don't use any foam under any of my tanks, I use a length of hook and loop tape which I secure to the bottom of the tank and the wood beneath. It not only does a great job of making sure the tank doesn't move, it does a great job in absorbing vibrations. One hook and loop strap over the top and you're good to go. Try it if you haven't already...
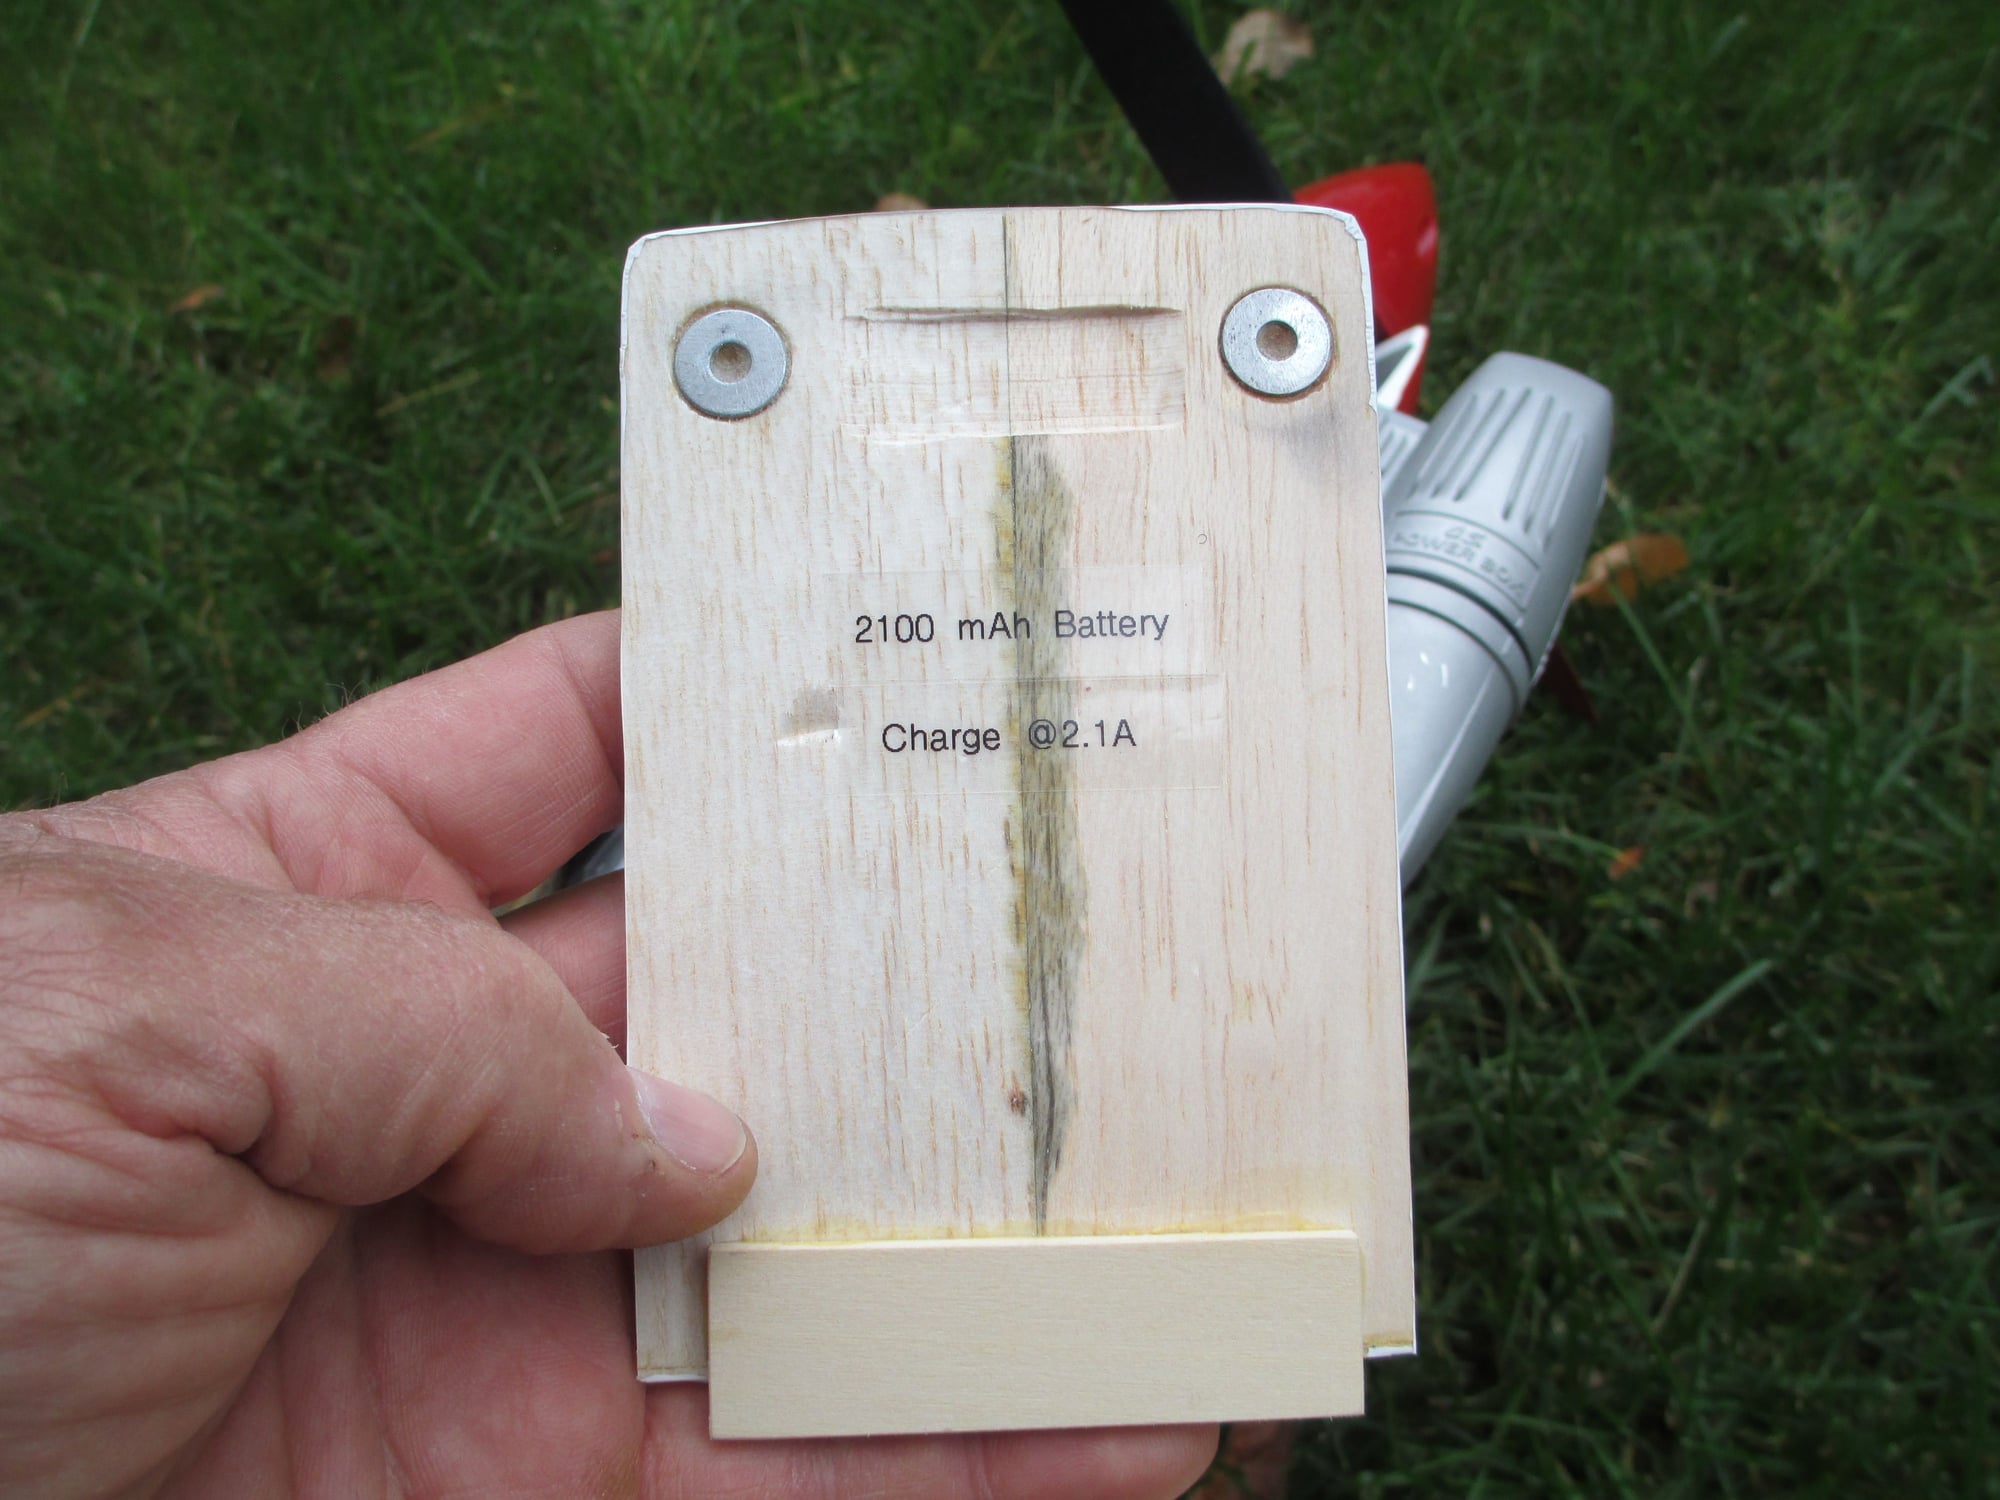
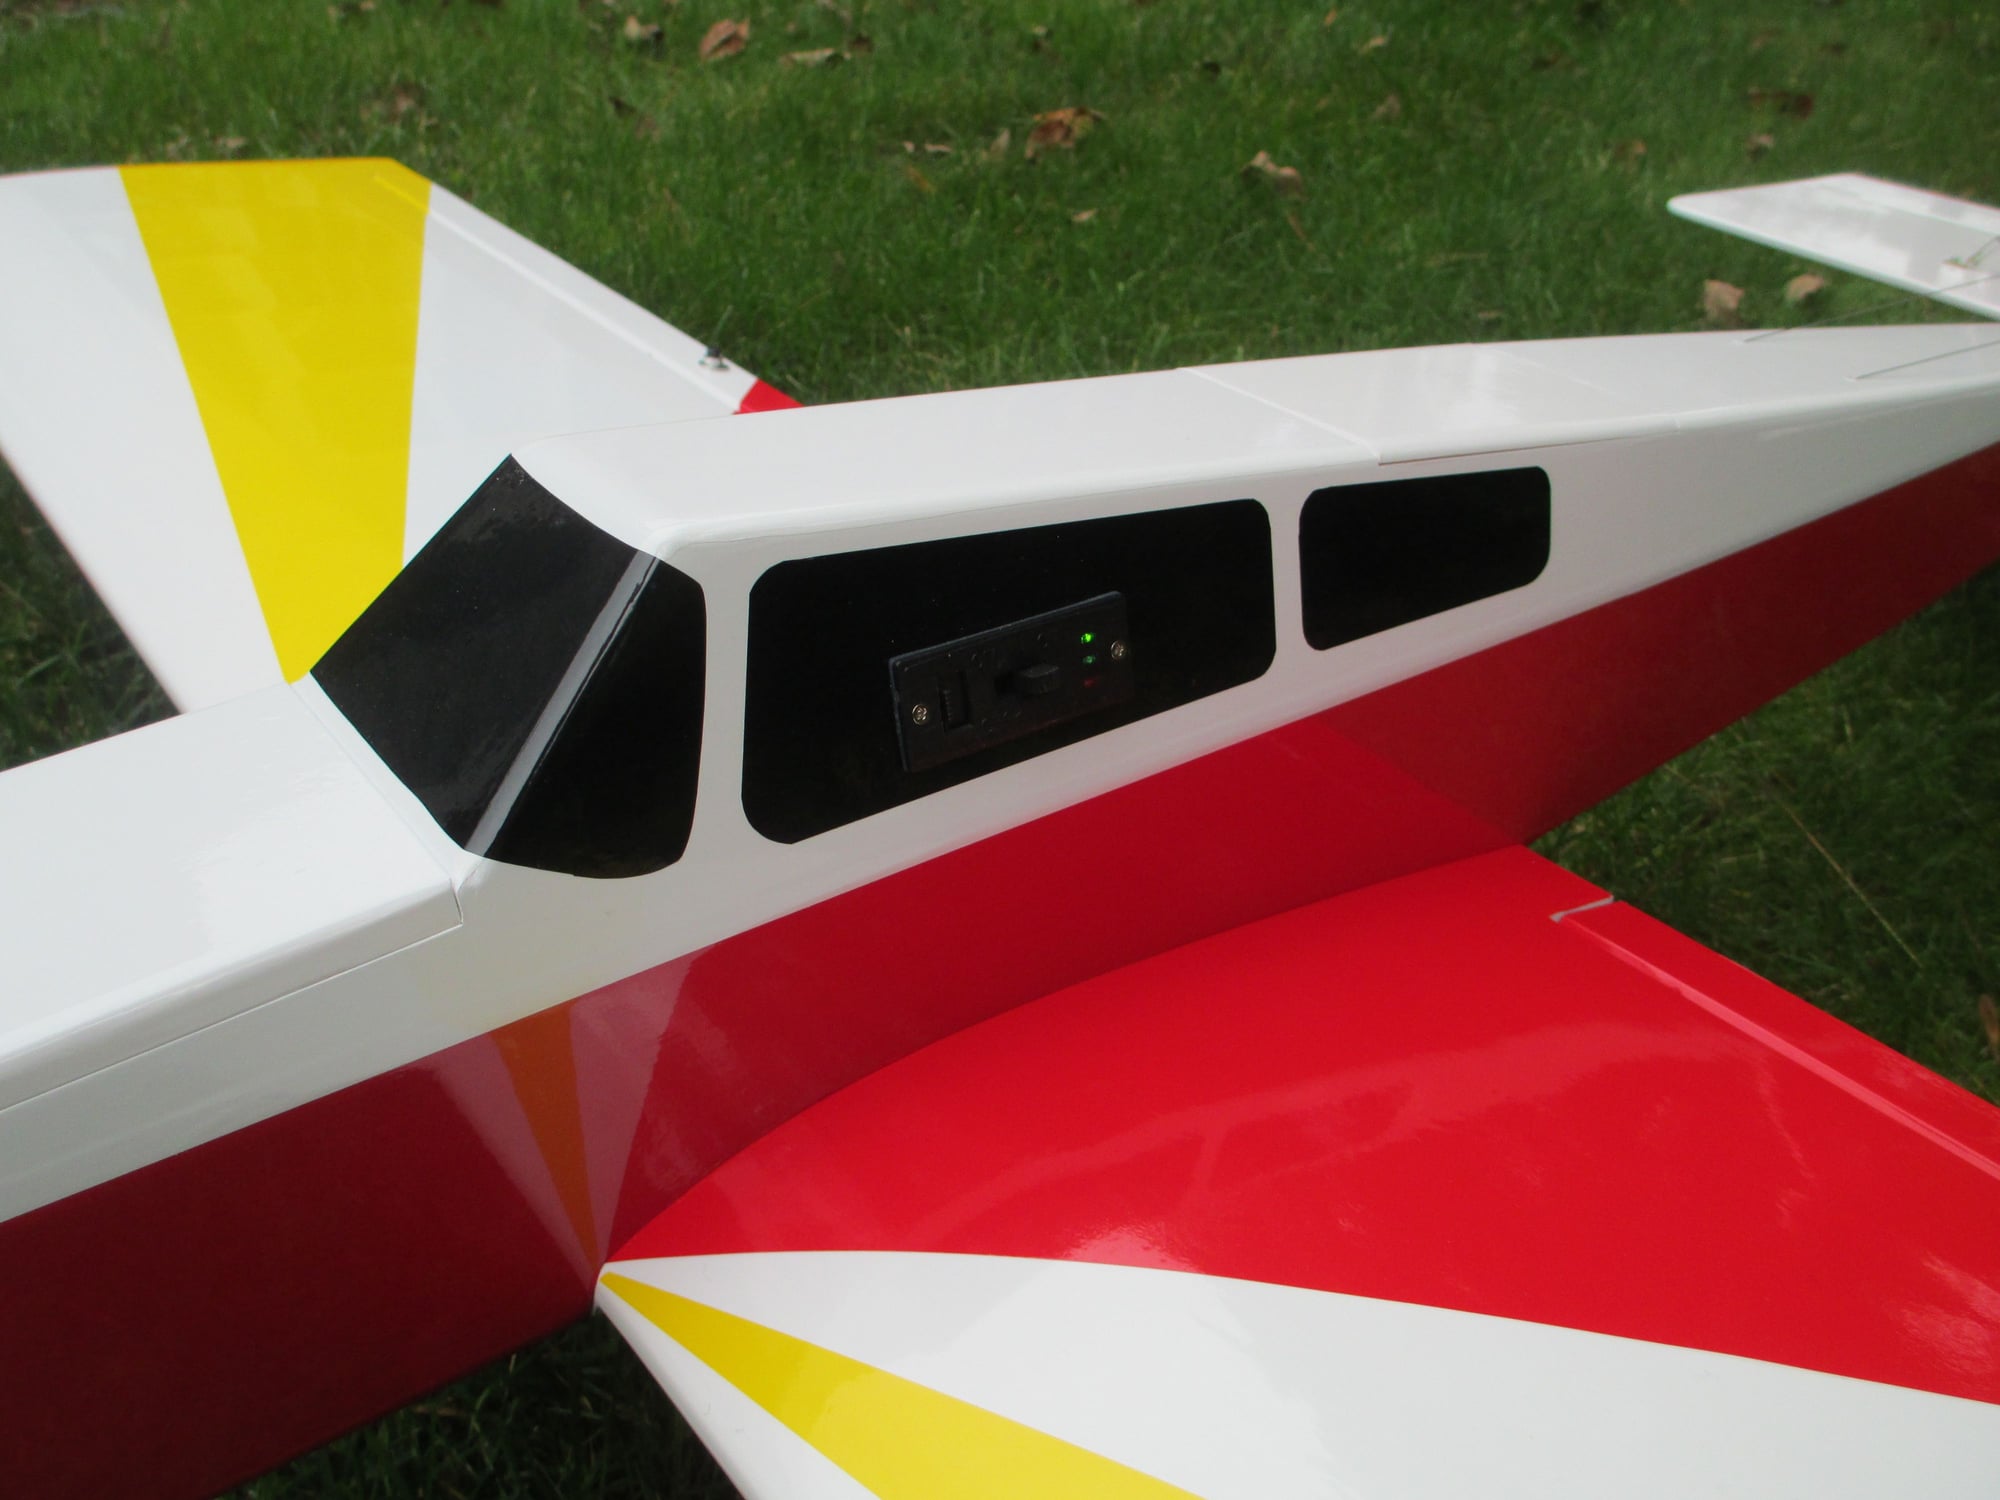
How many times have you forgotten how much to charge your battery? I thought I would take the guess work out for Bob by having that important information right under the hatch...

Last edited by VincentJ; 10-06-2018 at 03:08 PM.
10-06-2018, 02:51 PM
#163
Thread Starter
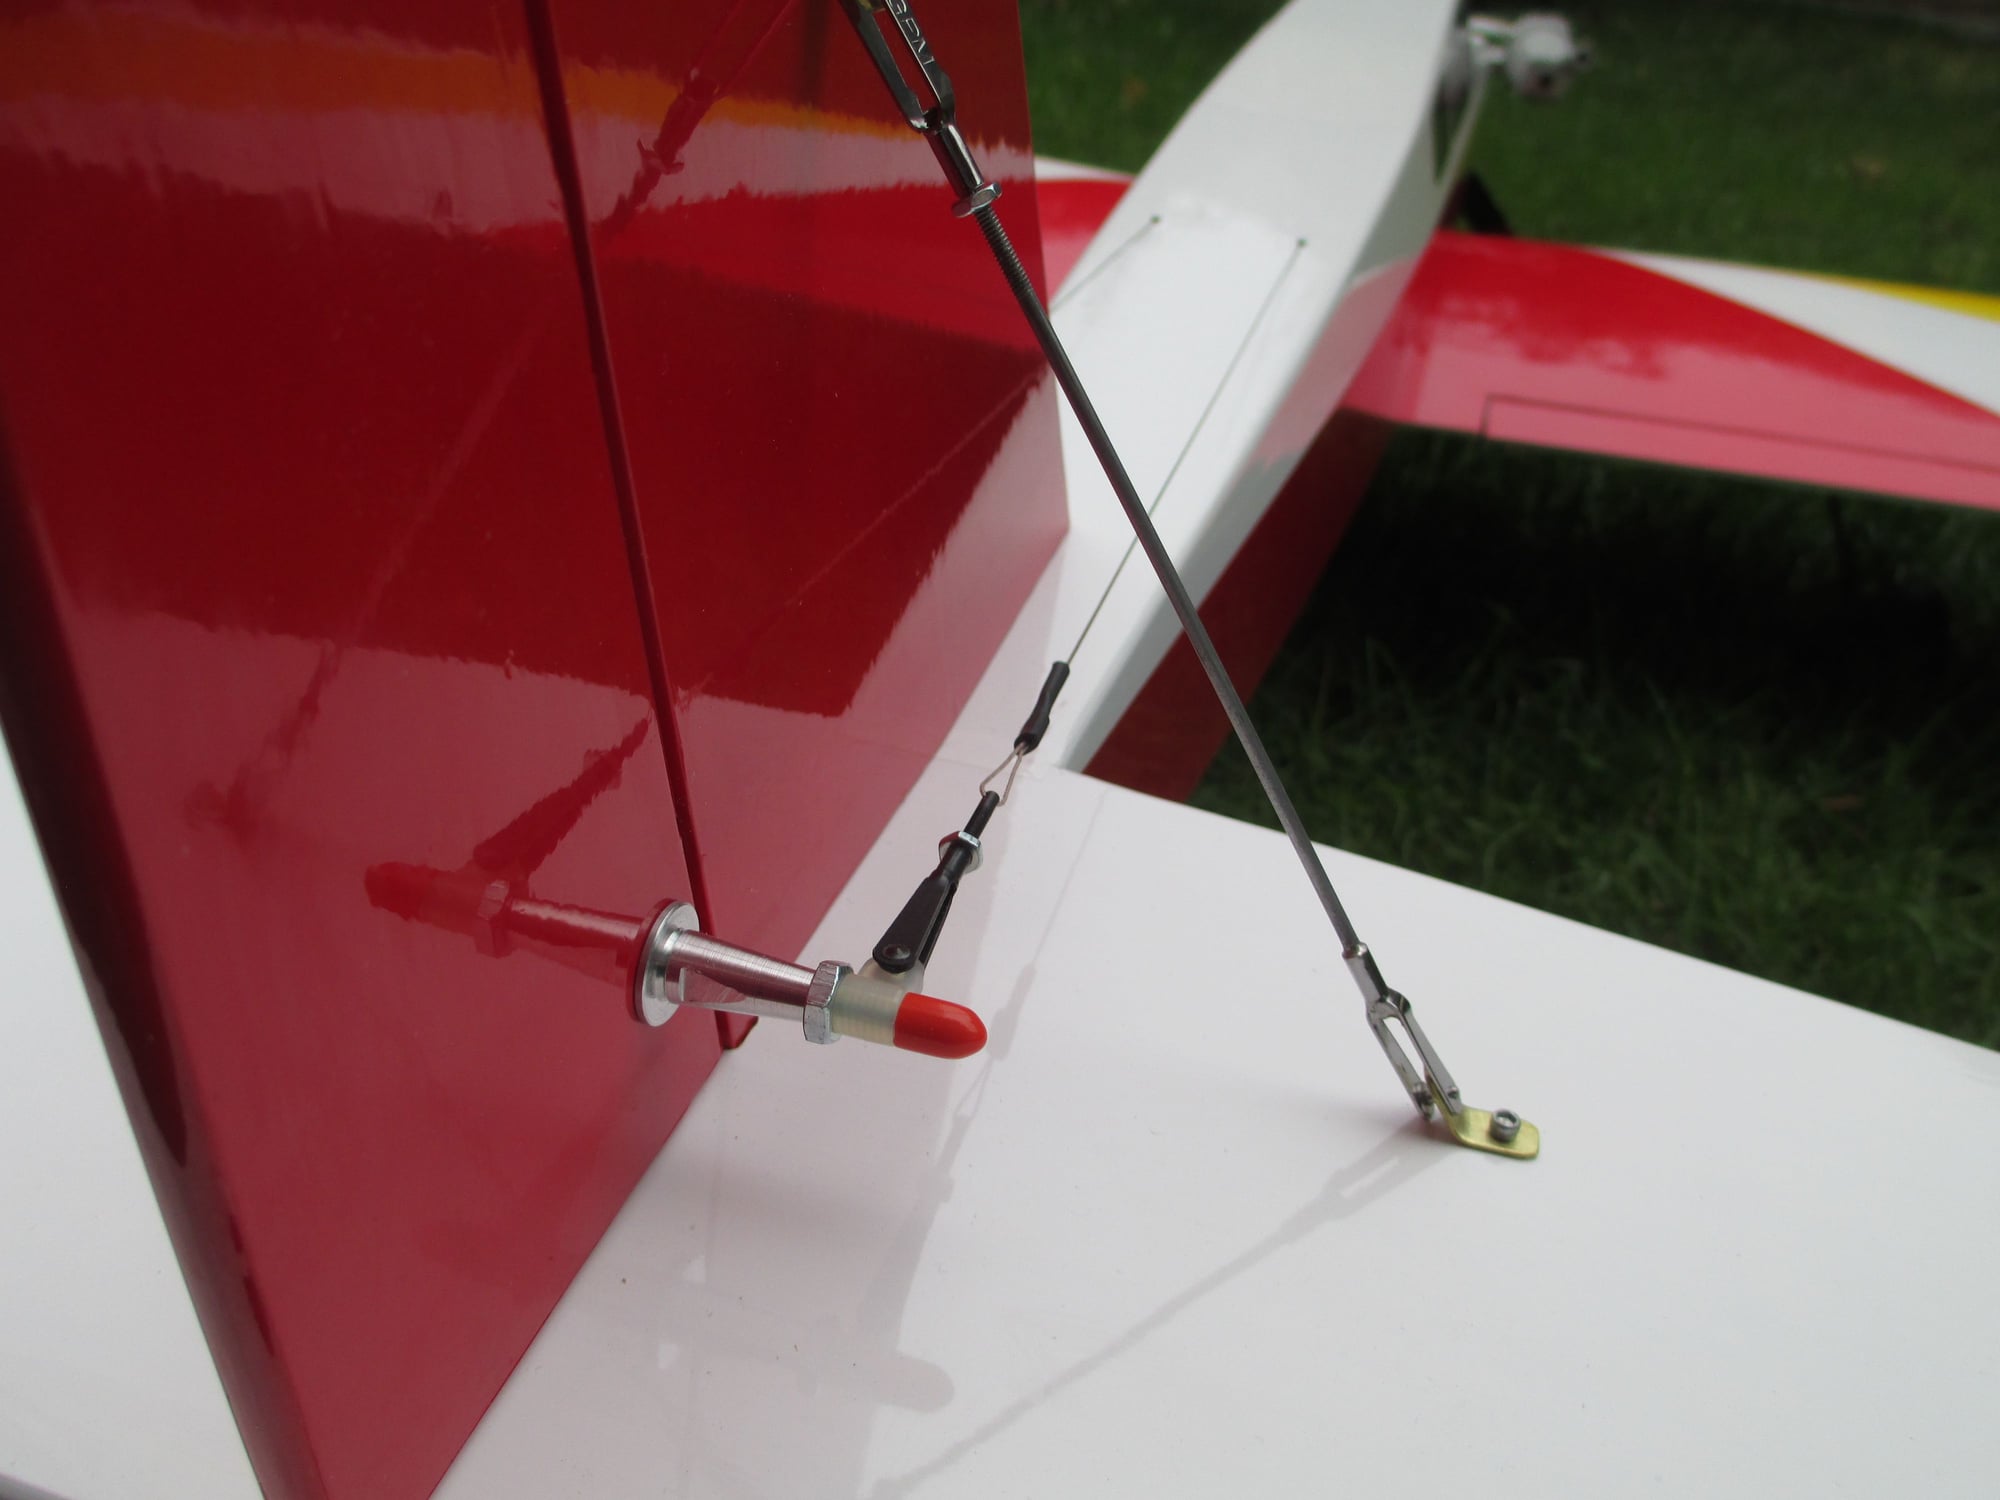
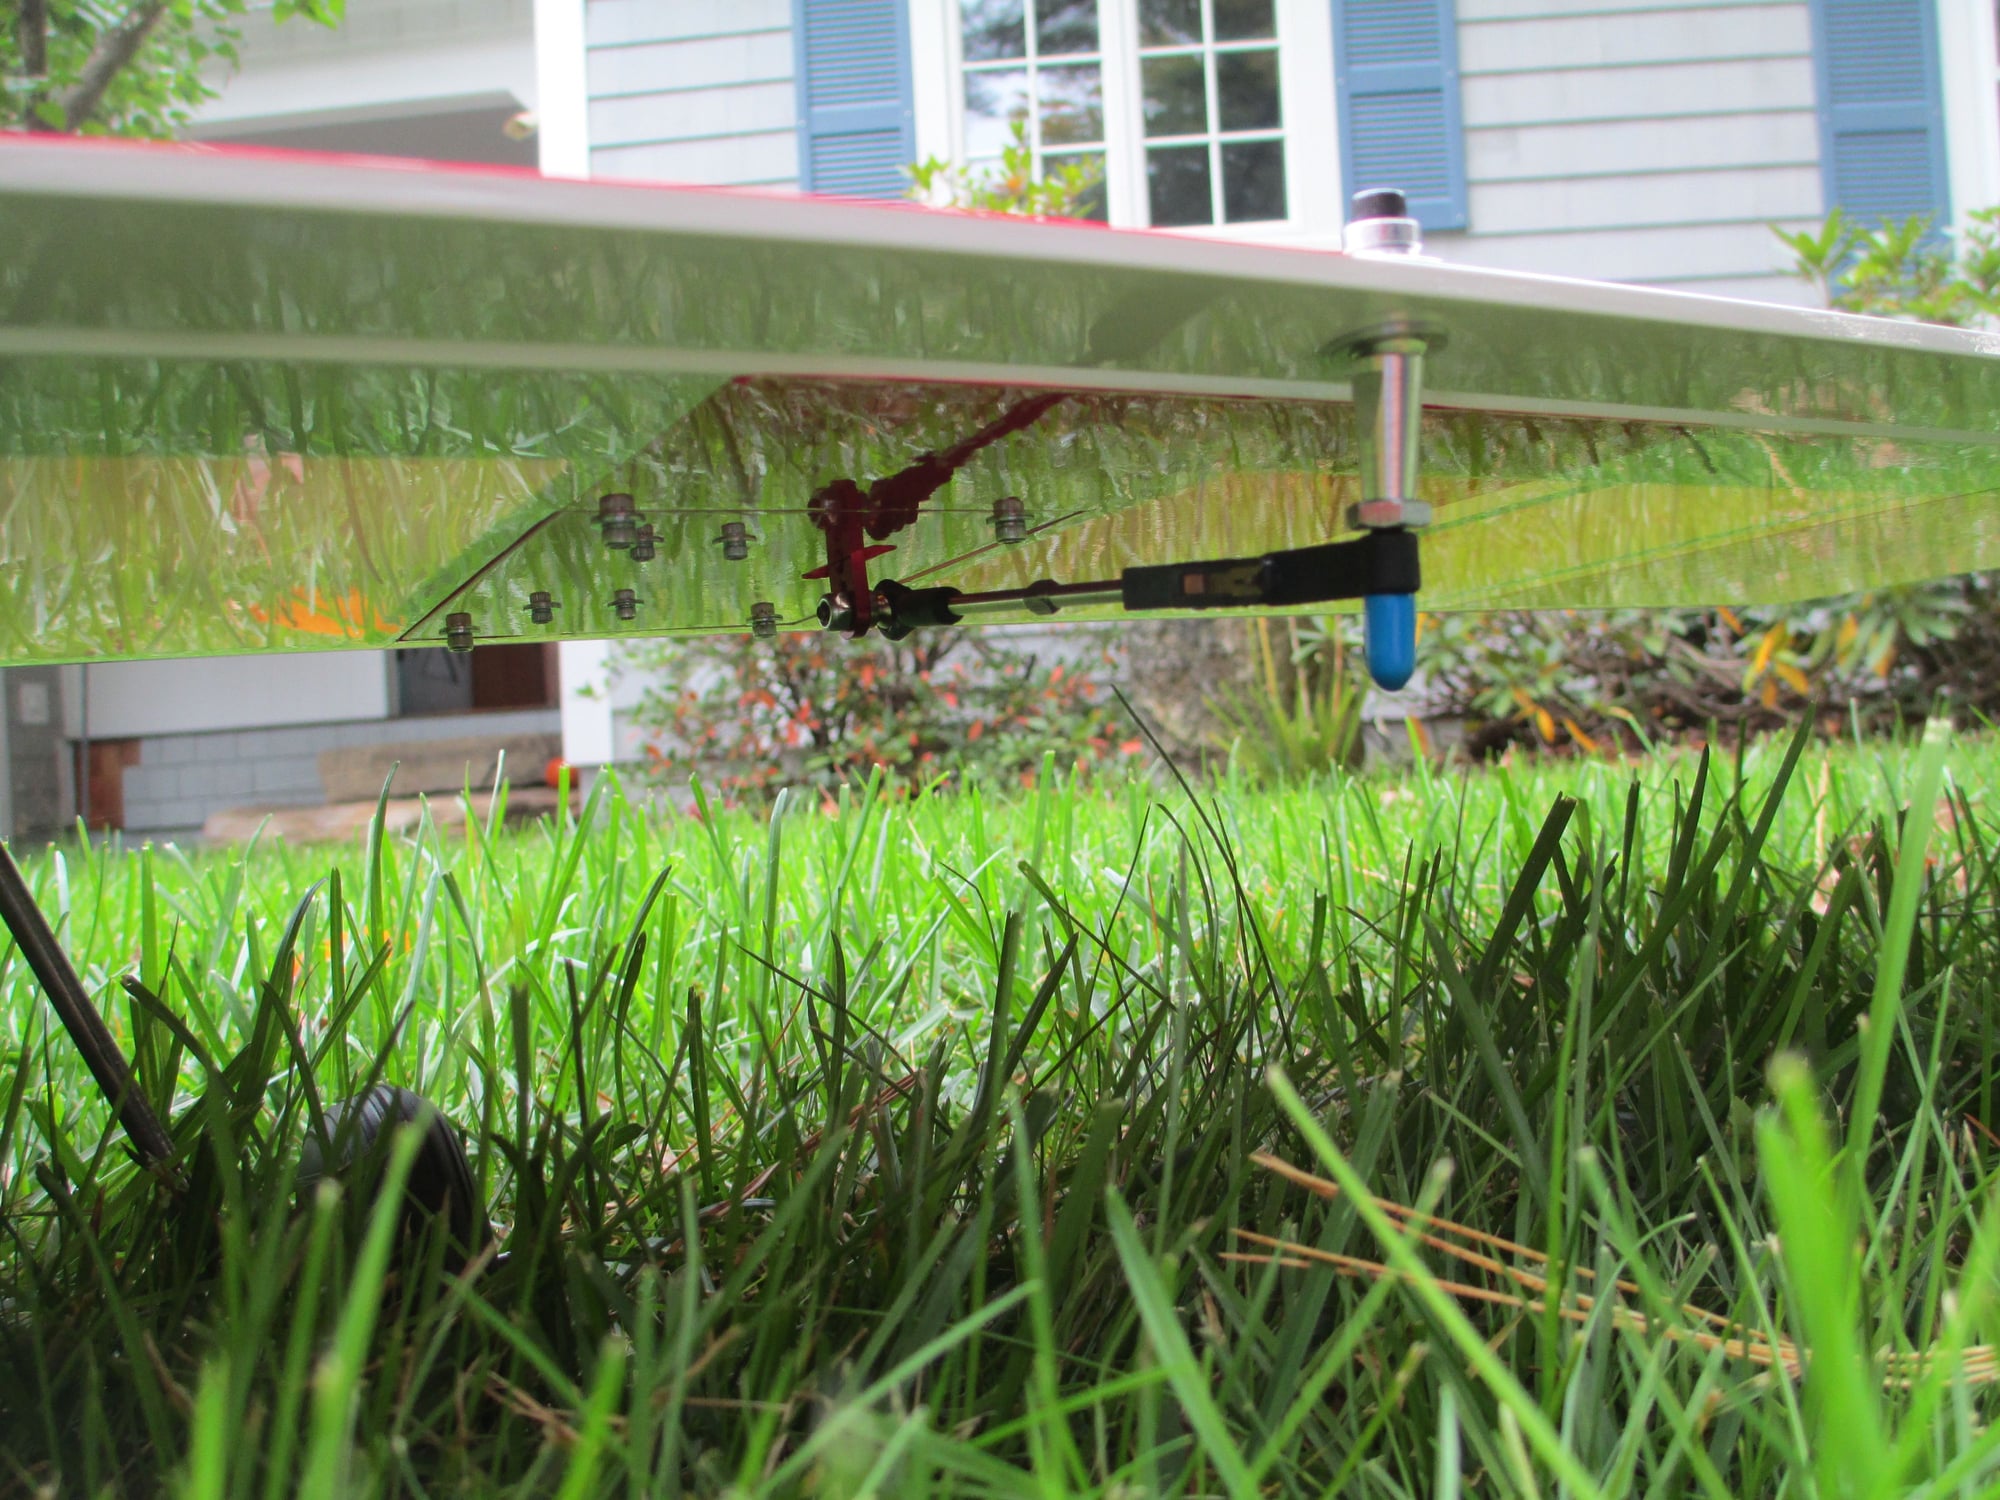
The horn for the rudder is just like the one used for the aileron except it extends out on both sides of the rudder. Hard mounts are placed under them so when tightened down it doesn't crush the balsa. I will post a link of all the parts that I used here in a few days. Keep checking in!
Last edited by VincentJ; 10-07-2018 at 12:01 AM.
 10-06-2018, 04:11 PM
#165


Join Date: Sep 2009
Location: North Port, FL
Posts: 1,647
Likes: 0
Received 0 Likes
on
0 Posts
The horn for the rudder is just like the one used for the aileron except it extends on both sides of the rudder. Hard mounts are placed under them so when tightened down it doesn't crush the balsa. I will post a link for all the parts that I used here in a few days. Keep checking in!
10-06-2018, 11:50 PM
#166
Thread Starter
Yes, in this case the rudder was a solid sheet of balsa. A 5/16" hole was drilled (the same diameter as the hardwood dowel that I used), which was then epoxied into position. (See Post #92 on Page 4 as an example.)
Last edited by VincentJ; 10-06-2018 at 11:55 PM.
10-07-2018, 10:46 AM
#167
Thread Starter
Great news! The maiden went very well, quite the gathering of people watching... I'll post video as soon as it becomes available to me. CG was right on the money, only one or two clicks needed on the elevator, everything else was money. The engine started right up and I had it adjusted in about a minute or two of running time. I don't think we even burned a 1/4 of a tank. Refueled , then took off! I think Bob was a very happy man, and to tell you the truth so was I.
Last edited by VincentJ; 10-07-2018 at 10:50 AM.
10-07-2018, 11:57 AM
#168
Join Date: Sep 2009
Location: North Port, FL
Posts: 1,647
Likes: 0
Received 0 Likes
on
0 Posts
Thanks VJ! I must have missed that when I was reading through the thread. Congrats on the maiden!!
10-07-2018, 12:16 PM
#169
Thread Starter
Northeast Aerodynamics Sport-Air Build Sheet
Weight- 6.24 pounds
CG- 3.250 inches
5 Channels
Glue- Titebond II, Bob Smith 30 minute Epoxy
Covering- UltraCote https://www.horizonhobby.com/categor...nd-accessories
Engine- OS 46AX II https://www.osengines.com/engines-ai...548/index.html
Prop- APC 11x7 https://www.apcprop.com/product/11x7/
Wheels- Three 2-1/2" Sullivan SkyLite S875 https://www.towerhobbies.com/cgi-bin/wti0001p?&I=LXFV54&P=SM
Motor Mount- David Brown Glass Filled Nylon Motor Mount #4045 Fiber Filled Motor Mounts (Standard) ? Ohio Superstar Products
Fuel Tank- Sullivan 8 ounce Slant Style No.439 Slant Type ? Sullivan
Fuel Line- Sullivan Silicone Tubing 3/32"ID No.S205 S205 ? 3/32? Silicone Tubing 2? ? Sullivan
Battery- LifeSource LiFe 6.6V 2100 mAh https://www.towerhobbies.com/cgi-bin/wti0001p?&I=LXHDKJ&P=7
Battery Balance Lead Extension- Venom 2S Part # 17043 https://www.towerhobbies.com/cgi-bin/wti0001p?&I=LXGYGV&P=7
Heavy Duty Charge Switch- MPI 6272 w/Dean's Connector R/C Connectors (2 of 3)
Servos- Five Savox SC-0254MG Standard Digital Servo https://www.amainhobbies.com/savox-s...0254mg/p183311
Servo Arm- Two SWB 1.00" Half Arm (used on Ailerons) 4-40 Tapped Futaba Aluminum Servo Arms Tapped for 4/40 - SWB MFG
Charge Receptacle- Three Ernst #147 (used for aileron and bind conn.) https://www.hobbytown.com/charge-receptacle-hitec-jr-by-ernst-manufacturing-ern147/p39
Titanium Pro-Links- Two 2-1/2" (used on ailerons) https://www.horizonhobby.com/titaniu...282%29-han3552
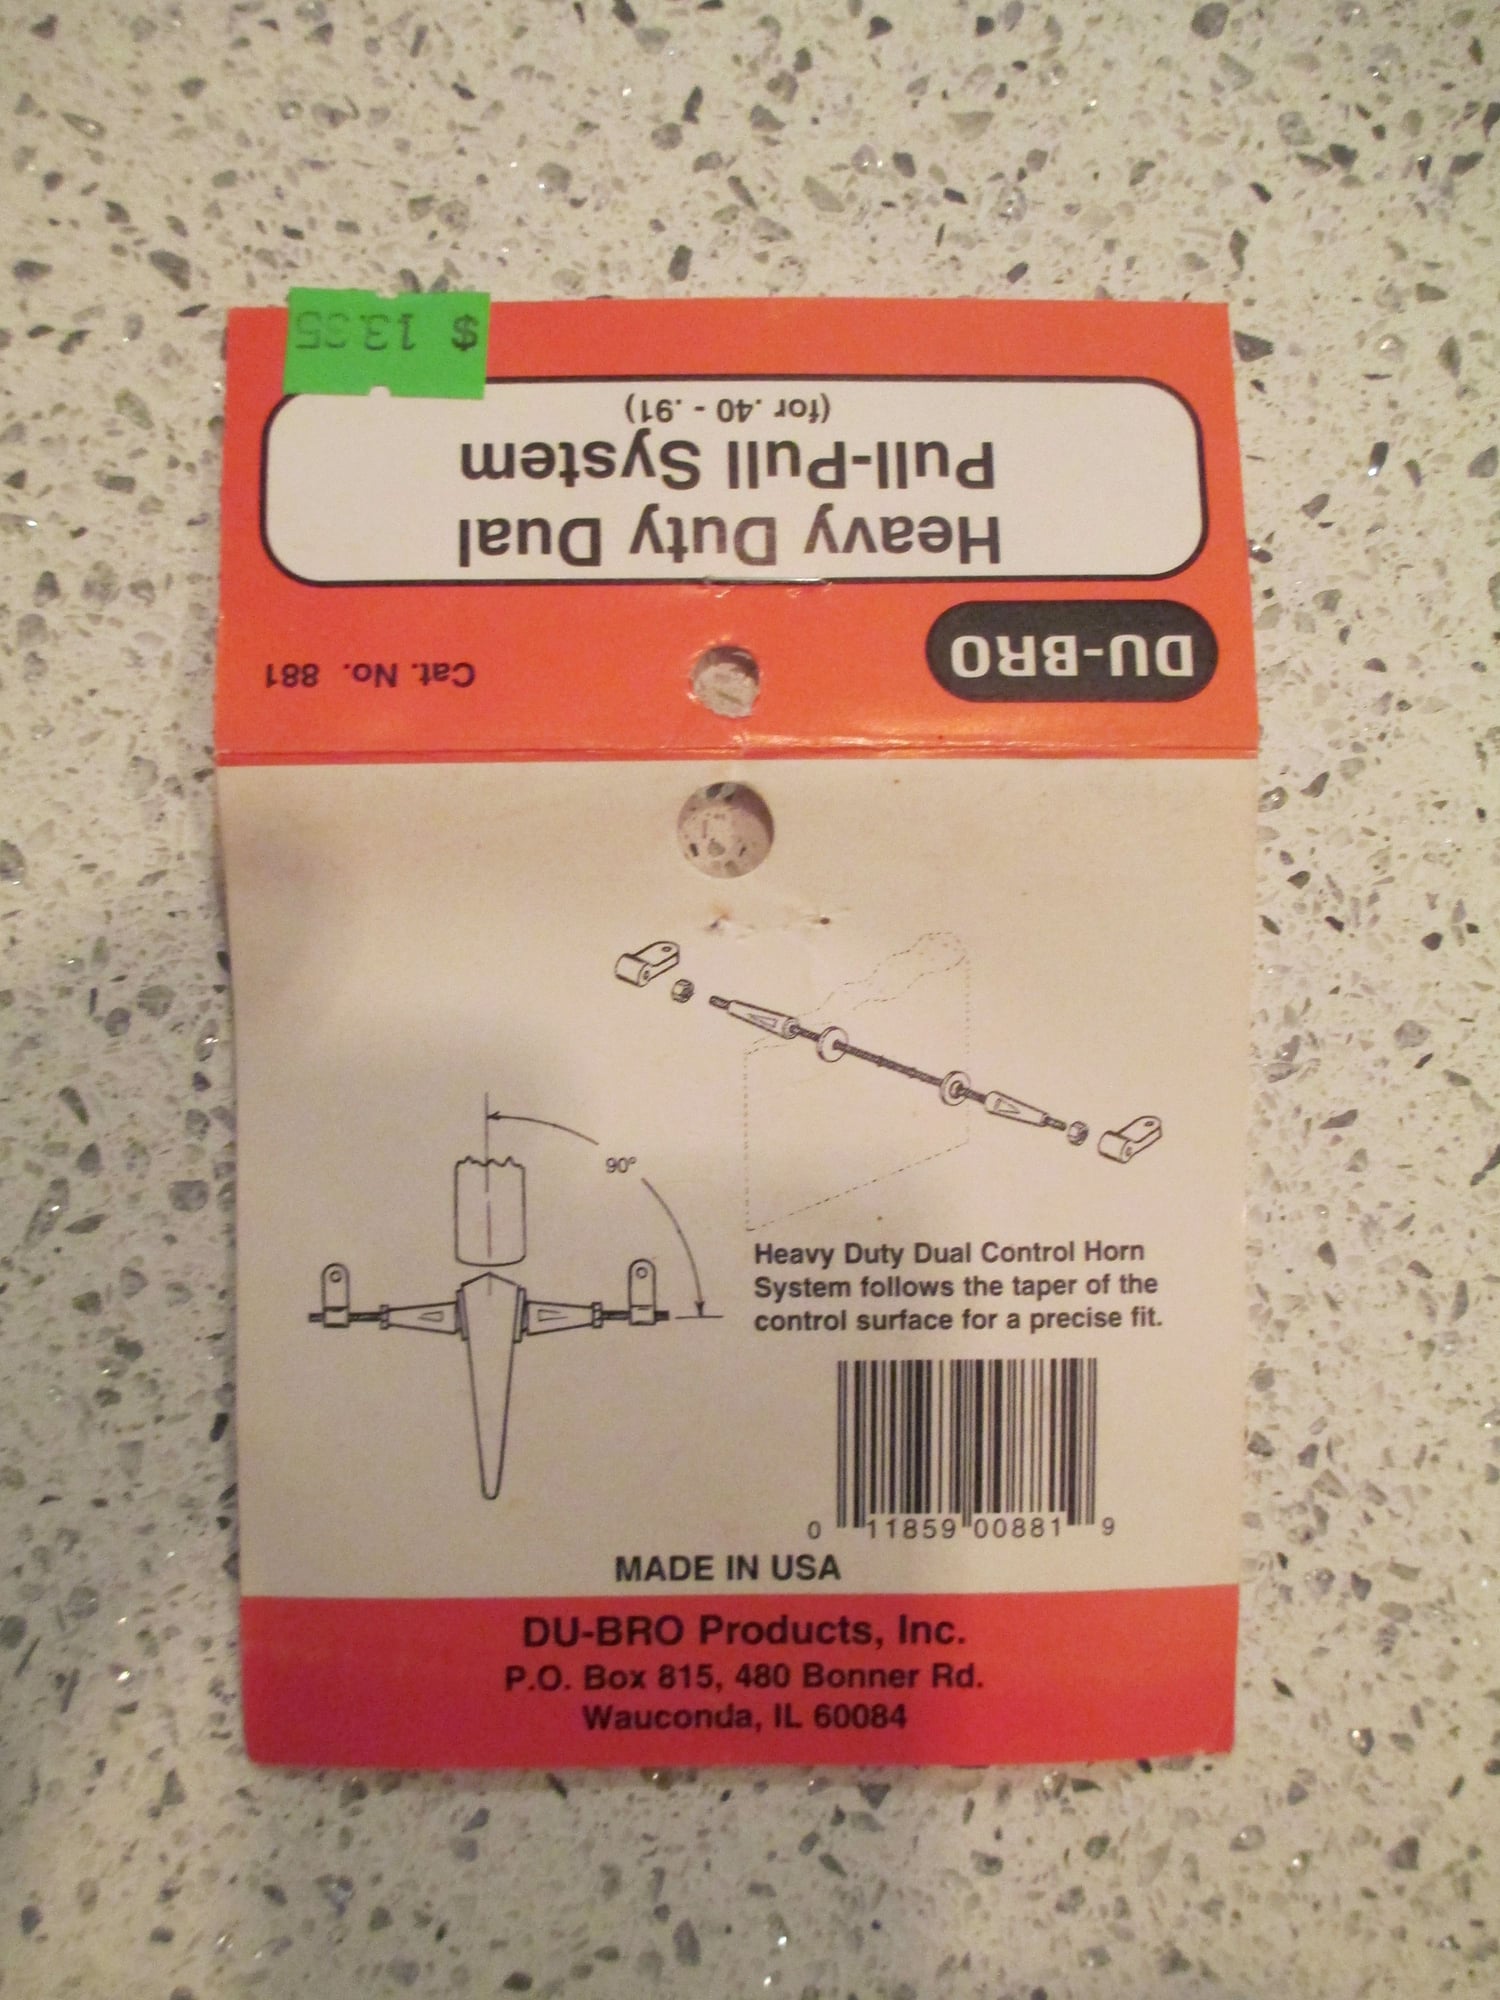
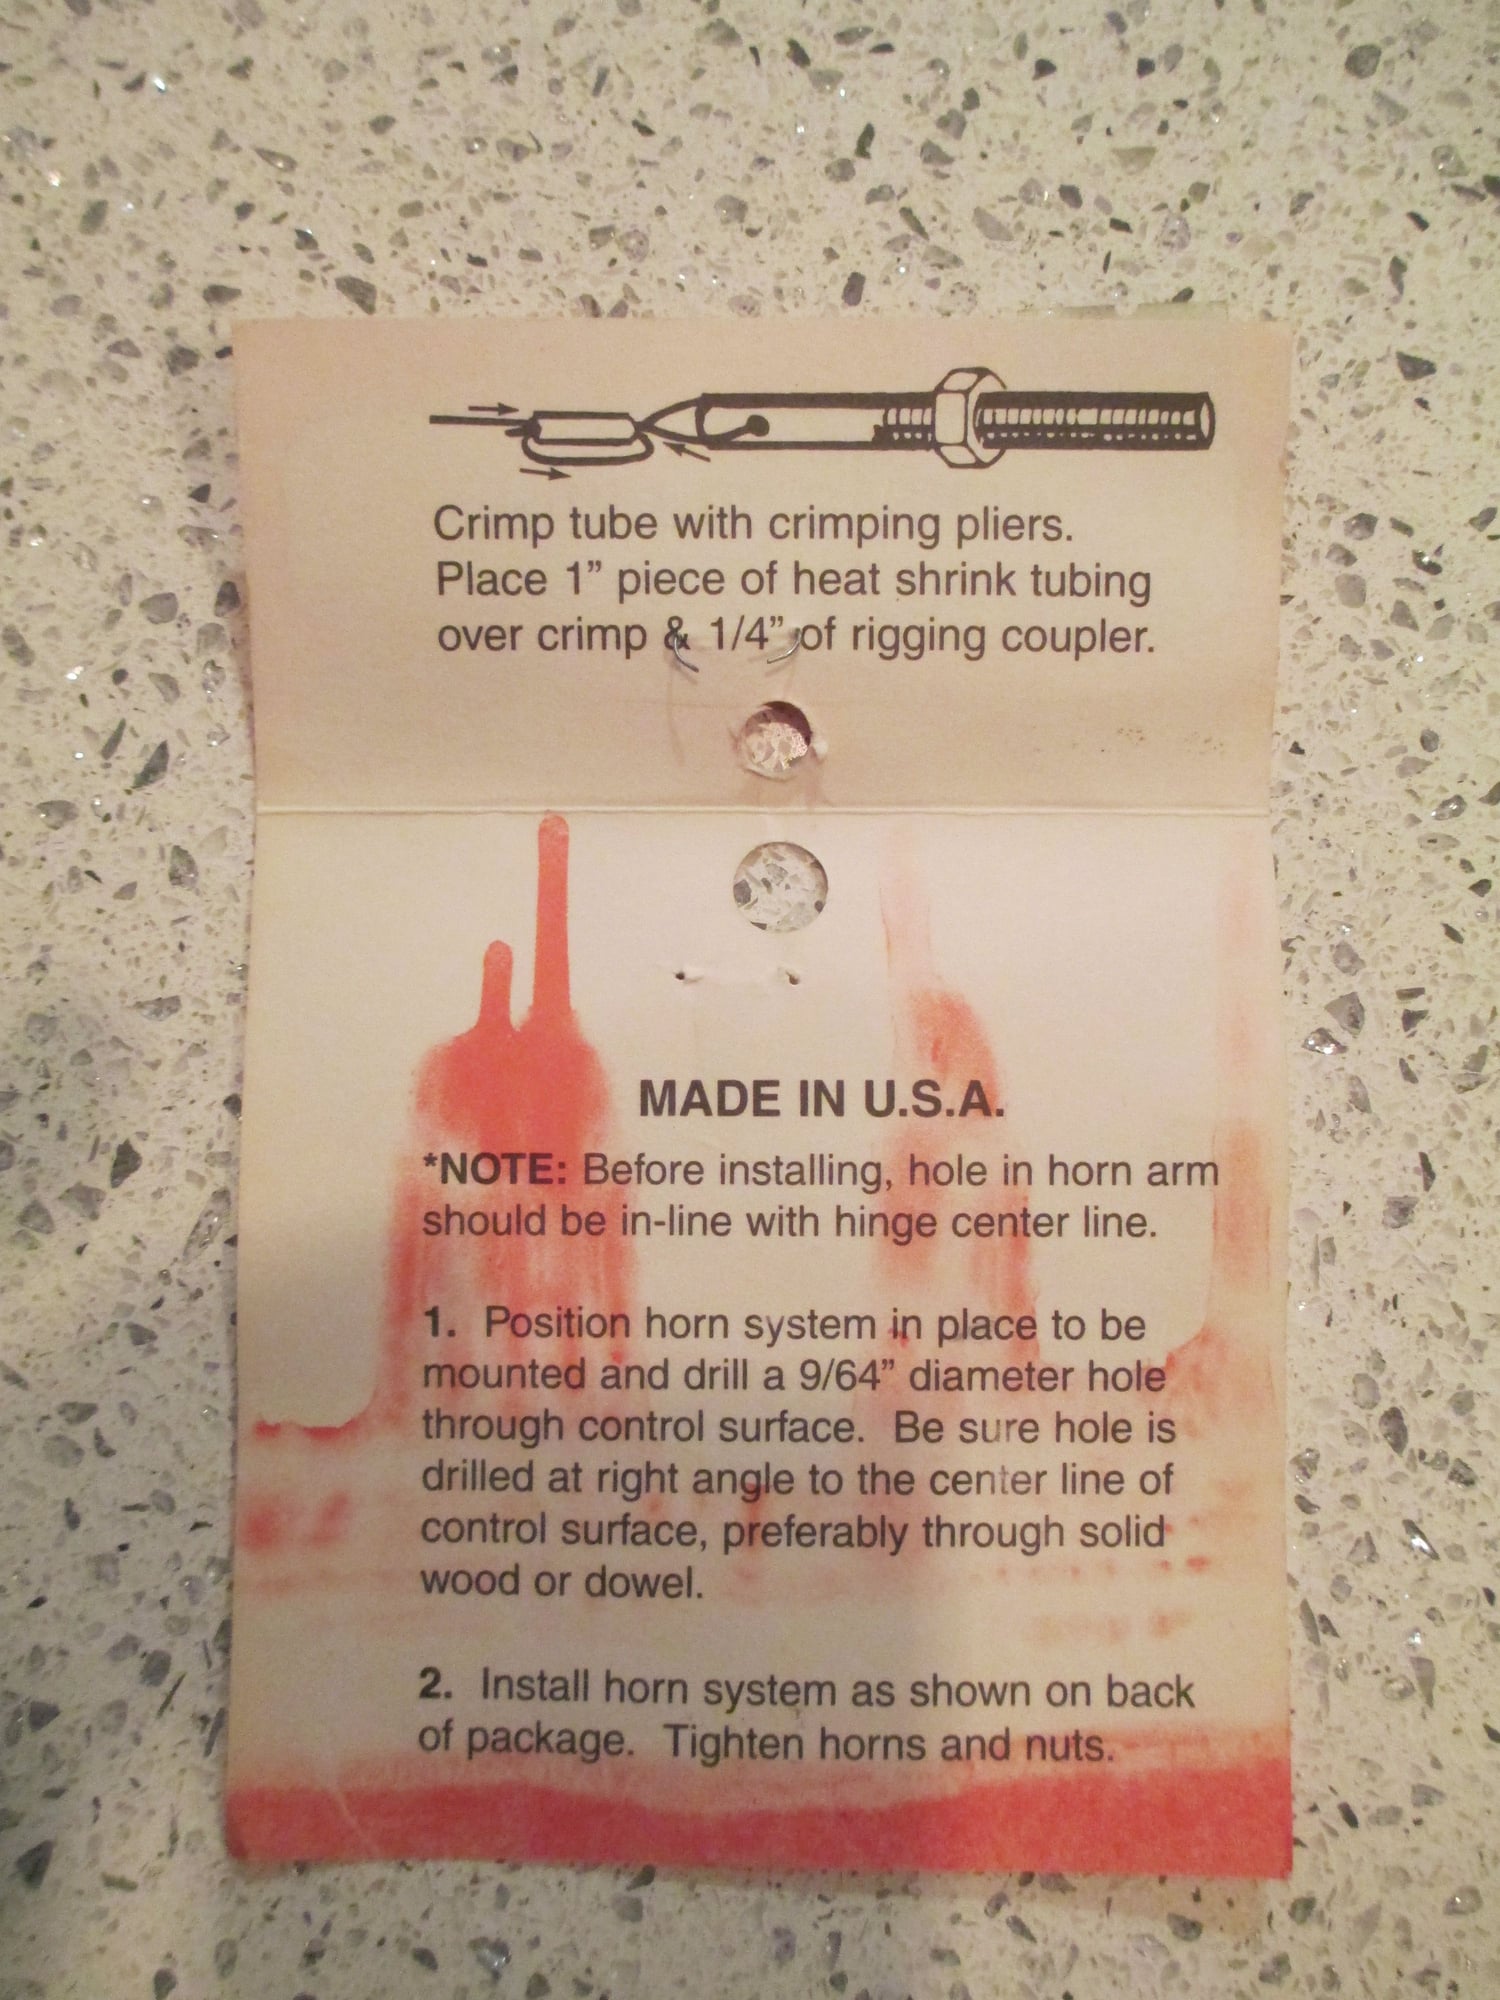
Pull-Pull- Du-Bro Heavy Duty #881 https://www.towerhobbies.com/cgi-bin/wti0001p?&I=LXEMF6
Control Horn- Three Du-Bro HD Adjustable Control Horn #912 (aileron, elevator) https://www.towerhobbies.com/cgi-bin/wti0001p?&I=LXGWD8
Hinges- 1/8" Steel Pin Hinge Points (used on ailerons) https://robart.com/collections/contr...inge-points-15
Weight- 6.24 pounds
CG- 3.250 inches
5 Channels
Glue- Titebond II, Bob Smith 30 minute Epoxy
Covering- UltraCote https://www.horizonhobby.com/categor...nd-accessories
Engine- OS 46AX II https://www.osengines.com/engines-ai...548/index.html
Prop- APC 11x7 https://www.apcprop.com/product/11x7/
Wheels- Three 2-1/2" Sullivan SkyLite S875 https://www.towerhobbies.com/cgi-bin/wti0001p?&I=LXFV54&P=SM
Motor Mount- David Brown Glass Filled Nylon Motor Mount #4045 Fiber Filled Motor Mounts (Standard) ? Ohio Superstar Products
Fuel Tank- Sullivan 8 ounce Slant Style No.439 Slant Type ? Sullivan
Fuel Line- Sullivan Silicone Tubing 3/32"ID No.S205 S205 ? 3/32? Silicone Tubing 2? ? Sullivan
Battery- LifeSource LiFe 6.6V 2100 mAh https://www.towerhobbies.com/cgi-bin/wti0001p?&I=LXHDKJ&P=7
Battery Balance Lead Extension- Venom 2S Part # 17043 https://www.towerhobbies.com/cgi-bin/wti0001p?&I=LXGYGV&P=7
Heavy Duty Charge Switch- MPI 6272 w/Dean's Connector R/C Connectors (2 of 3)
Servos- Five Savox SC-0254MG Standard Digital Servo https://www.amainhobbies.com/savox-s...0254mg/p183311
Servo Arm- Two SWB 1.00" Half Arm (used on Ailerons) 4-40 Tapped Futaba Aluminum Servo Arms Tapped for 4/40 - SWB MFG
Charge Receptacle- Three Ernst #147 (used for aileron and bind conn.) https://www.hobbytown.com/charge-receptacle-hitec-jr-by-ernst-manufacturing-ern147/p39
Titanium Pro-Links- Two 2-1/2" (used on ailerons) https://www.horizonhobby.com/titaniu...282%29-han3552
Pull-Pull- Du-Bro Heavy Duty #881 https://www.towerhobbies.com/cgi-bin/wti0001p?&I=LXEMF6
Control Horn- Three Du-Bro HD Adjustable Control Horn #912 (aileron, elevator) https://www.towerhobbies.com/cgi-bin/wti0001p?&I=LXGWD8
Hinges- 1/8" Steel Pin Hinge Points (used on ailerons) https://robart.com/collections/contr...inge-points-15
Last edited by VincentJ; 10-07-2018 at 02:06 PM.
10-07-2018, 02:56 PM
#170
Join Date: Sep 2009
Location: North Port, FL
Posts: 1,647
Likes: 0
Received 0 Likes
on
0 Posts
Thanks for the links VJ! I don't see the control horn used for the rudder. I'm not sure how the control horns used for the aileron and elevator work or go together by looking at the stock pic in the link.
10-07-2018, 04:02 PM
#171
Thread Starter
10-07-2018, 04:05 PM
#172
Thread Starter
This is what I took, sorry it's not so good, still waiting on the other videos. It was airborne in just a few feet, just two clicks of elevator trim was needed for hands free flight.
https://www.youtube.com/watch?v=Jwspk-1aMCA&feature=youtu.be
I hope that you've all enjoyed this thread and maybe you even learned a little something along the way. This project was a lot of fun for me to build. Until my next project finds its way to my build table, thanks for following! VJ out...
https://www.youtube.com/watch?v=Jwspk-1aMCA&feature=youtu.be
I hope that you've all enjoyed this thread and maybe you even learned a little something along the way. This project was a lot of fun for me to build.
Until my next project finds its way to my build table, thanks for following! VJ out...
Last edited by VincentJ; 10-07-2018 at 04:18 PM.
 10-08-2018, 04:11 AM
#175
Great news! The maiden went very well, quite the gathering of people watching... I'll post video as soon as it becomes available to me. CG was right on the money, only one or two clicks needed on the elevator, everything else was money. The engine started right up and I had it adjusted in about a minute or two of running time. I don't think we even burned a 1/4 of a tank. Refueled , then took off! I think Bob was a very happy man, and to tell you the truth so was I.
Congrats to you for successfully building and flying this nice model.
Congrats to Bob for being smart enough to commission you to do it !