Go Back  RCU Forums > RC Airplanes > Kit Building
Reload this Page >

Sig kougar leading edge issue

Community
Search
Notices
Kit Building If you're building a kit and have questions or want to discuss kit building post it here.

Sig kougar leading edge issue

Thread Tools
 
Search this Thread
 
Old 02-17-2019, 03:41 AM
  #1  
larscato
Thread Starter
 
Join Date: Oct 2007
Location: SortlandSortland, NORWAY
Posts: 85
Likes: 0
Received 0 Likes on 0 Posts
Default Sig kougar leading edge issue

Hi
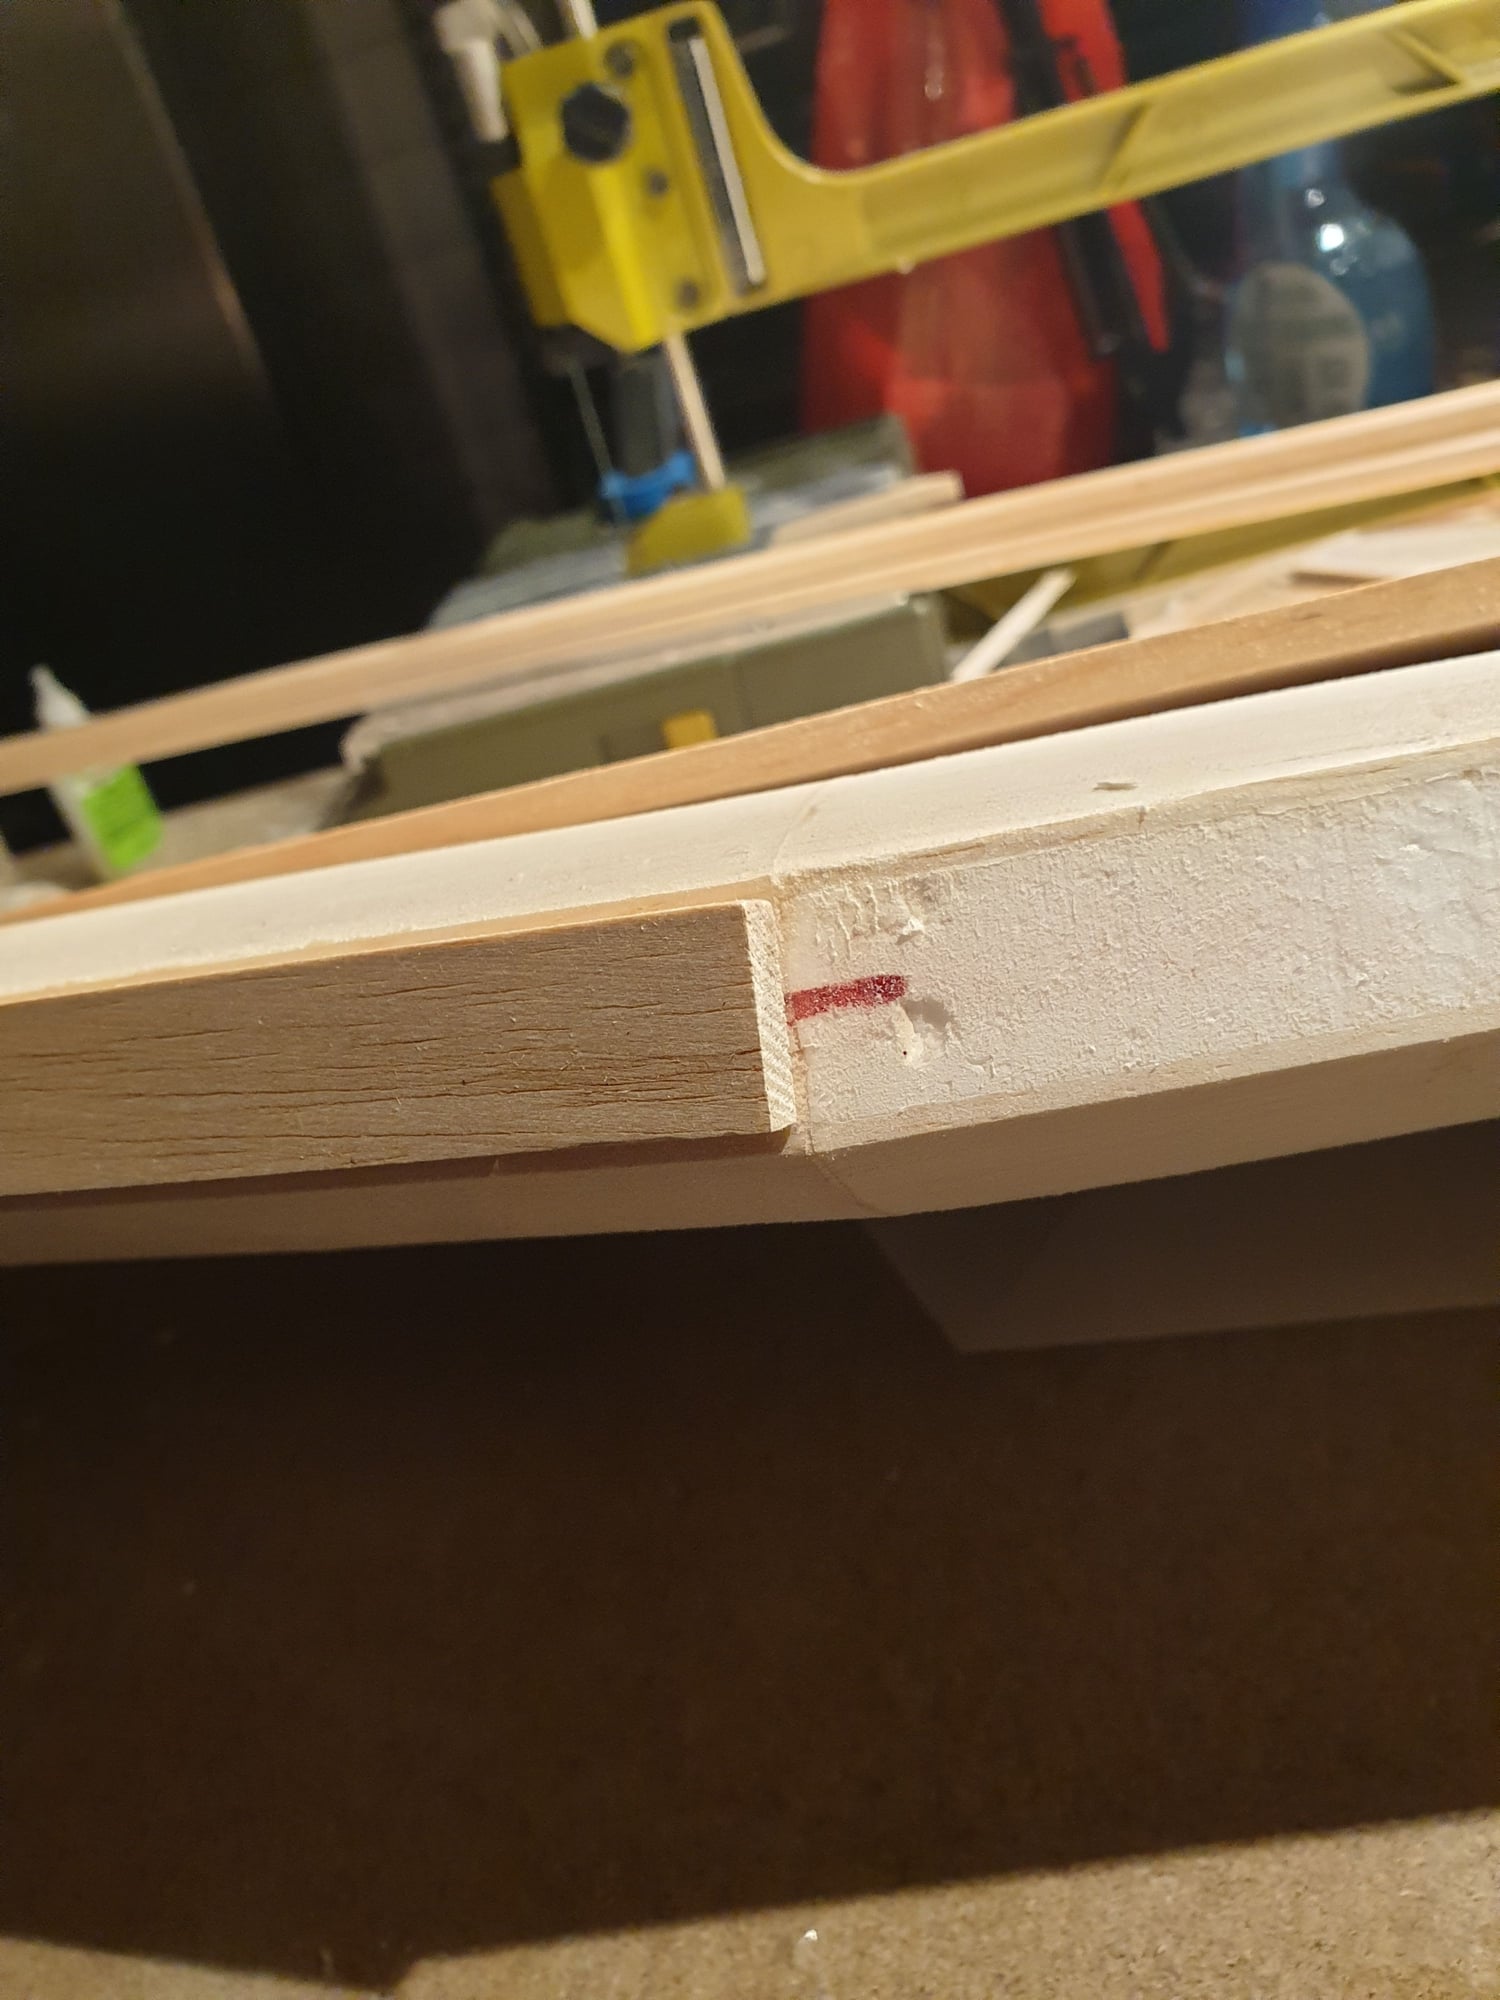
I am building a Sig kougar and ran into an issue when trying to fit the 1/4x3/4" leading edge. It fits fine at he wing tip but it looks like the wing is to tick at the wing root. It is not wide enough to cover the sheeting on the wing and i wil have to sand the sheeting down to the wing core to get a nice transition. Is this the way it is supposed to be?

Lars


​​​​

Last edited by larscato; 02-17-2019 at 04:28 AM.
Old 02-17-2019, 05:57 AM
  #2  
R8893
My Feedback: (20)
 
Join Date: Oct 2002
Location: Cincinnati, OH,
Posts: 973
Likes: 0
Received 11 Likes on 10 Posts
Default

When I have had that issue I added a strip pf balsa to the top and bottom of the leading edge.
Old 02-17-2019, 07:35 AM
  #3  
speedracerntrixie
My Feedback: (29)
 
speedracerntrixie's Avatar
 
Join Date: Jun 2010
Location: Happy Valley, Oregon
Posts: 9,515
Received 176 Likes on 151 Posts
Default

Either replace the peice with 1”x1/4 or glue a peice of 1/16” balsa on first and then the supplies LE stock.
Old 02-17-2019, 12:47 PM
  #4  
Truckracer
My Feedback: (19)
 
Join Date: Apr 2004
Location: Des Moines, IA
Posts: 5,342
Received 44 Likes on 43 Posts
Default

Yup, add additional wood or replace as needed. Sometimes the included stock just isn't the right size for the application.
Old 02-18-2019, 04:10 PM
  #5  
BalsaGhost
 
Join Date: Mar 2018
Location: Cincinnati, OH
Posts: 45
Likes: 0
Received 2 Likes on 2 Posts
Default

My kit had the same issue!

I just added some balsa like everyone else and started sanding.

Also, I flew the Kougar every time I went to the field last year. It's a helluva design and is a blast to fly. No wonder it's been around for 4 decades.
Old 02-18-2019, 05:08 PM
  #6  
Hydro Junkie
 
Hydro Junkie's Avatar
 
Join Date: Nov 2004
Location: Marysville, WA
Posts: 10,524
Received 130 Likes on 123 Posts
Default

I would just replace the pieces supplied with a new piece wide enough to cover the entire leading edge, height wise. After that, a small block plane or belt sander would be used to take off a majority of the extra balsa prior to the final sanding. This would eliminate the chance of any hard spots that could result from adding additional material to the supplied pieces
Old 02-18-2019, 06:40 PM
  #7  
BalsaGhost
 
Join Date: Mar 2018
Location: Cincinnati, OH
Posts: 45
Likes: 0
Received 2 Likes on 2 Posts
Default

Originally Posted by Hydro Junkie
I would just replace the pieces supplied with a new piece wide enough to cover the entire leading edge, height wise. After that, a small block plane or belt sander would be used to take off a majority of the extra balsa prior to the final sanding. This would eliminate the chance of any hard spots that could result from adding additional material to the supplied pieces

I used good ol' Titebond wood glue, which sanded easily enough for shaping. I keep moving further and further away from CA on every build.
Old 02-18-2019, 06:49 PM
  #8  
Hydro Junkie
 
Hydro Junkie's Avatar
 
Join Date: Nov 2004
Location: Marysville, WA
Posts: 10,524
Received 130 Likes on 123 Posts
Default

Originally Posted by BalsaGhost
I used good ol' Titebond wood glue, which sanded easily enough for shaping. I keep moving further and further away from CA on every build.
I never said anything about CA as there are many types of adhesives that will harden balsa, just like CA
Old 02-18-2019, 07:17 PM
  #9  
BalsaGhost
 
Join Date: Mar 2018
Location: Cincinnati, OH
Posts: 45
Likes: 0
Received 2 Likes on 2 Posts
Default

I should probably drink less beer when I post.
Old 02-18-2019, 07:40 PM
  #10  
Hydro Junkie
 
Hydro Junkie's Avatar
 
Join Date: Nov 2004
Location: Marysville, WA
Posts: 10,524
Received 130 Likes on 123 Posts
Default

On the contrary, you said what works for you and I don't have an issue with that. You also said you don't normally use CA, to which I just pointed out is only one of several kinds of adhesives that will harden balsa and affect how it sands, or other ways of finishing it. As far as I'm concerned it's all good
Old 02-18-2019, 09:22 PM
  #11  
Pylonracr
 
Pylonracr's Avatar
 
Join Date: Apr 2011
Location: Reno, NV
Posts: 918
Likes: 0
Received 5 Likes on 5 Posts
Default

I have run into that problem several times. Cut the first 6" or so off the supplied leading edge and replace with a piece out of your junk box. Simple

Scott
Old 02-19-2019, 04:45 AM
  #12  
speedracerntrixie
My Feedback: (29)
 
speedracerntrixie's Avatar
 
Join Date: Jun 2010
Location: Happy Valley, Oregon
Posts: 9,515
Received 176 Likes on 151 Posts
Default

Should we discuss the advantage to making the LE radius at the root a bit sharper then at the tip? Maybe a bit off topic but maybe not.
Old 02-19-2019, 07:54 AM
  #13  
Pylonracr
 
Pylonracr's Avatar
 
Join Date: Apr 2011
Location: Reno, NV
Posts: 918
Likes: 0
Received 5 Likes on 5 Posts
Default

Maybe off topic, maybe not.... Since we are discussing leading edge construction now would be a good time to design in the flight characteristics one wishes the plane to exhibit.

Scott
Old 02-19-2019, 08:05 AM
  #14  
jollyroger
My Feedback: (6)
 
Join Date: Mar 2002
Location: central Lake, MI
Posts: 510
Likes: 0
Received 2 Likes on 2 Posts
Default

I don't remember what I did with that. I do remember all the shaving and sanding to the leading edge and wingtips that covered the back lawn . LOL
I made the mistake of covering mine in brushed aluminum Ultrcote. After a few yards out it was barely visible, sorta like a Romulan cloaking device.
Last spring I tore it all off and recovered it to resemble USAF trainer with Safety orange and white. Much better now.
Mine's powered with a Scorpion 3026-10 4s and 11X5.5 prop. A comfortable speed for me. With a 5S and 10X7, the anxiety levels get too high.
Old 02-19-2019, 09:05 AM
  #15  
Truckracer
My Feedback: (19)
 
Join Date: Apr 2004
Location: Des Moines, IA
Posts: 5,342
Received 44 Likes on 43 Posts
Default

Originally Posted by speedracerntrixie
Should we discuss the advantage to making the LE radius at the root a bit sharper then at the tip? Maybe a bit off topic but maybe not.
Not off topic at all in my opinion. Back in the day (and I do mean way back) we use to use that technique to tame some of the SIG planes to make them more enjoyable to fly. This may be getting into sacred territory bordering on blasphemy but SIG is only 60 miles from my house and I knew most of the people who designed those old SIG kits and they were friends. I don't know any of those people who actually used a known NACA or otherwise designed airfoil. Locally we use to joke and call their airfoils "Zip, French Curve or shoe sole" airfoils. Also referred to as "Looks About Right" or LRB airfoils. The resulting airfoils could have some strange stall characteristics at times. Some of those kits could get "exciting" if one shaped the tip LE too sharp. Some of us often suggested making the tip LE radius more more rounded compared to the root. At minimum, we suggested keeping the LE radius consistent from root to tip and the planes flew much better while still maintaining decent snap and spin characteristics. So Speedracer and Pylonracr, your suggestions have merit based on history.

Now a disclaimer: Nothing wrong with those old SIG kits and they were produced and flown in unknown thousands, maybe even millions? But like most things in our hobby, a bit of understanding goes a long ways and can make the building / flying experience more pleasant.

Last edited by Truckracer; 02-19-2019 at 11:52 AM.
Old 02-23-2019, 04:08 AM
  #16  
CK1
My Feedback: (60)
 
CK1's Avatar
 
Join Date: Apr 2002
Posts: 1,552
Received 24 Likes on 17 Posts
Default

From my limited 30 years of experience it is usually best to follow the plans and use a consistent leading edge from root to tip . Too sharp of a leading edge will allow a quicker stall but also make a more response but less predictable plane. Read that as don't do it you'll crash faster . The Kougar is an excellent flyer as built per plans without airfoil modification
Old 02-23-2019, 05:06 PM
  #17  
Truckracer
My Feedback: (19)
 
Join Date: Apr 2004
Location: Des Moines, IA
Posts: 5,342
Received 44 Likes on 43 Posts
Default

Look at 20 kit built planes and I bet you find 20 different LE shapes. Nobody really does it the same and the instructions don't address the radius issue. You may have one view of an airfoil cross section if you are lucky. I've built some high end kits that supplied shaping templates for both the root and tip LE. Some pattern planes stated LE radius on the plans. It was especially critical on pylon racers where a sharp LE could make a plane unstable in pitch and snap happy in high "G" turns.
Old 02-23-2019, 06:43 PM
  #18  
speedracerntrixie
My Feedback: (29)
 
speedracerntrixie's Avatar
 
Join Date: Jun 2010
Location: Happy Valley, Oregon
Posts: 9,515
Received 176 Likes on 151 Posts
Default


If you look closely you can see the the TE of the inboard section actually has some sweep, outboard of the wing struts the TE is straight.
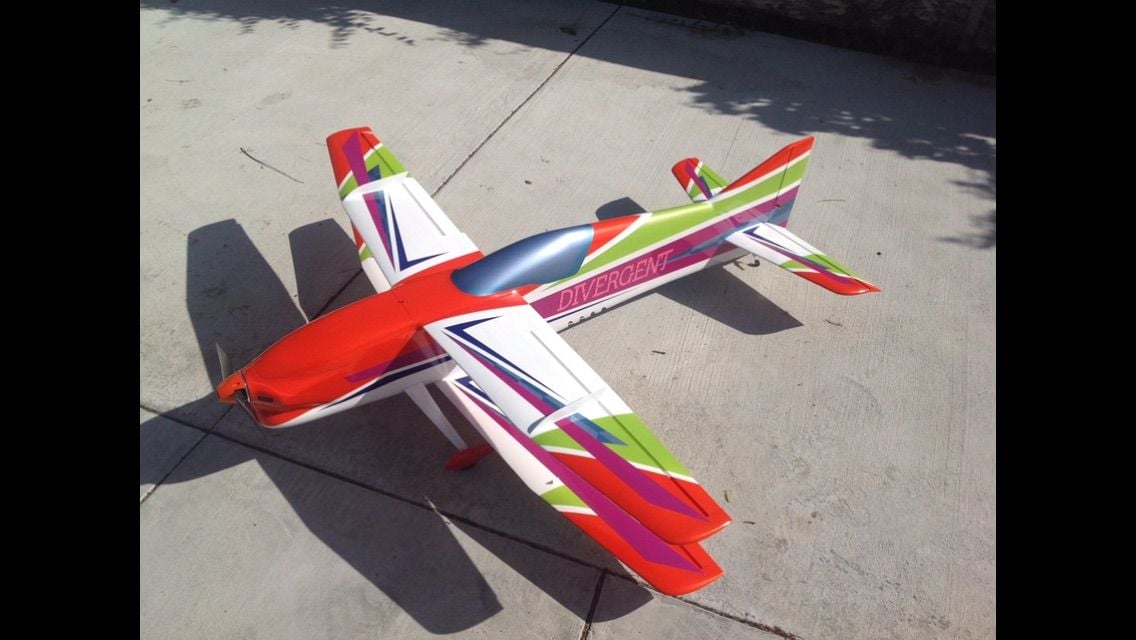
The reasoning for making the root LE sharper then the tip LE is to help promote the inboard section of the wing to stall before the tips. The theory is that the airplane will stall more predictable and with more control. When I designed my Divergent pattern airplane I used this technique not only on the wings but the stabs as well. The feature was designed into the airfoils. Another feature I used was the airfoil percentage thickness was actually increased from root to tip. It's a double taper wing so at half span the cord was reduced by 1.75" but thickness remained the same, at the tip the cord is 6.5" which is 50% of the root cord but looses only 35% thickness. The TE of the wing is fairly sharp at the root as well but 3/16" thick at the tip. The end result is an airplane that is extremely predictable and must be forced to stall. In fact both snap rolls and spin entries are now flown through with virtually no stall presence.
Old 02-23-2019, 08:18 PM
  #19  
Pylonracr
 
Pylonracr's Avatar
 
Join Date: Apr 2011
Location: Reno, NV
Posts: 918
Likes: 0
Received 5 Likes on 5 Posts
Default

The leading edge of the wing is critical in the flying and stall characteristics of the wing. Post 16 is the response I expected when I first commented on LE shape. To each his own, I expect my planes to perform in the manor I will fly them. Race planes are kind of picky.

That being said... Shawn, if you fly through a spin entry it is not really a spin, is it. don't get me started on that...

Scott

Last edited by Pylonracr; 02-23-2019 at 08:21 PM.
Old 02-23-2019, 08:37 PM
  #20  
Truckracer
My Feedback: (19)
 
Join Date: Apr 2004
Location: Des Moines, IA
Posts: 5,342
Received 44 Likes on 43 Posts
Default

I saw that spin and snap comment but in no way wanted to open that can of worms.
Old 02-23-2019, 09:06 PM
  #21  
Pylonracr
 
Pylonracr's Avatar
 
Join Date: Apr 2011
Location: Reno, NV
Posts: 918
Likes: 0
Received 5 Likes on 5 Posts
Default

Originally Posted by Truckracer
I saw that spin and snap comment but in no way wanted to open that can of worms.
No can of worms opened... That comment goes back a couple of years to a discussion Shawn and I had at my lake house during the design of the pattern plane in the photos. The short version of the story is that if the plane doesn't completely stall, it is not technically a snap or a spin. All pattern planes fly through snap - spin maneuvers, therefore they are not true snap or spin maneuvers. Long story, but I was just taking one of my pokes at Shawn.

Scott
Old 02-23-2019, 09:55 PM
  #22  
Truckracer
My Feedback: (19)
 
Join Date: Apr 2004
Location: Des Moines, IA
Posts: 5,342
Received 44 Likes on 43 Posts
Default

I sort of understood what you were getting at even before the explanation. A very old topic that many people have discussed many times over the years. Good discussion over a few beers.
Old 02-24-2019, 02:28 AM
  #23  
CK1
My Feedback: (60)
 
CK1's Avatar
 
Join Date: Apr 2002
Posts: 1,552
Received 24 Likes on 17 Posts
Default

Well OP there you have it . Did you need basic help or super technical manhood measuring ? I hope some of this has assisted you
Old 02-24-2019, 07:29 AM
  #24  
speedracerntrixie
My Feedback: (29)
 
speedracerntrixie's Avatar
 
Join Date: Jun 2010
Location: Happy Valley, Oregon
Posts: 9,515
Received 176 Likes on 151 Posts
Default

Originally Posted by Truckracer
I sort of understood what you were getting at even before the explanation. A very old topic that many people have discussed many times over the years. Good discussion over a few beers.

Ive had that discussion with many people including pattern judges. The fact that while performing either a spin or snap roll, the airplane stops rotation the instant you center the controls tells me it has been in controllable flight the whole maneuver.
Old 02-24-2019, 07:33 AM
  #25  
speedracerntrixie
My Feedback: (29)
 
speedracerntrixie's Avatar
 
Join Date: Jun 2010
Location: Happy Valley, Oregon
Posts: 9,515
Received 176 Likes on 151 Posts
Default

Originally Posted by CK1
Well OP there you have it . Did you need basic help or super technical manhood measuring ? I hope some of this has assisted you

When did information sharing become a bad thing? Yes the OP got a bit more here then he thought he would however the techniques described work. He now has a choice and a bit more knowledge that if not used here could be used in the future.


Contact Us - Archive - Advertising - Cookie Policy - Privacy Statement - Terms of Service -

Copyright © 2024 MH Sub I, LLC dba Internet Brands. All rights reserved. Use of this site indicates your consent to the Terms of Use.