


Spirit Kit - Any building advice?
 10-07-2003, 04:27 AM
#1


I just destroyed my Great Planes Spirit Select, an RTF package, that I have really enjoyed for about 60 great hi-start launches. I was learning how to use the club winch, got a bad launch, panicked, and put the plane into the ground very hard. Anyone need some tooth picks?
So I am going to build a new one from a kit. This is my very first kit, so I would appreciate any advice on building it.
Are there any pieces or places in the build process where I should deviate from the plans to reinforce the structure? I plan to build it stock, so I am not looking for modifications to the plans other than to improve the strength or to reduce the weight of the structure where appropriate.
I will be keeping the wing as a two piece wing. My habit was to tape the wing halves together with clear packing tape. The wings never fluttered on the strongest hi-start launches, even in 15 MPH winds. My NE Sail planes hi-start has 1/2" tubing and easily launches 3 meter+ planes. I get very powerful launches.
While the stab mount had been prone to breakage, it was easily fixed and I believed that this breakage probably saved the stab from damage. Sort of a sacrificial release point. Any thoughts on this?
Since I am still a fairly new pilot, I planned to stay with the rubber band wing mount method, but would be open to any alternate ideas.
Any advice on glues or gluing techniques?
Would I benefit from the addition of carbon fiber rod, tube, sheet, cloth or thread for reinforcement at key stress points?
Most of the time it will be launched using that powerful hi-start, but I am planning to do more and more launches using the club winch, so strength is important to me. I don't expect to zoom it, but since this is a new build, now is the time to consider reinforcement or enhancement to the structure.
I will be building in the spoilers using servos in the wings. I had recently added the spoilers in this fashion to the Spirit Select and really loved the way they helped with landings.
I will be covering the plane with Monokote.
Just for background, in addition to the 60 Spirit launches, I also have about 100 flights on an Aerobird electric parkflyer and about 20 flights on an Electrajet delta wing park flyer ARF foam kit that I built.
Thanks for any tips you may be able to provide as I start building my new sailplane.
 10-08-2003, 10:41 AM
#2
Senior Member

Join Date: Aug 2003
Location: Austin, TX,
Posts: 105
Likes: 0
Received 0 Likes
on
0 Posts
If you're wanting to reduce the weight I would scrap the pushrods that it comes with and go to small/medium sized carbon rods.
Probably the best thing that I can think of to make it fly properly is to get the correct balance for the plane...which probably isn't the recommended CG. Balance is EXTREMELY important to getting the plane to fly right.
A lot of people like to "Set it a little nose heavy so it will be 'stable'." This really isnt' a good idea. The same people also say "A plane that has a rearward cg is twitchy." This isn't the case. A plane that is too nose heavy will not respond to control inputs, possibly leaving you off field or in a tree. It will have to fly faster to stay level because of all the weight in the nose. Landings will be harded because the elevator will lose authority at low speeds causing the nose to come into the ground. A plane that is balanced properly should respond to the slightest control inputs and fly at all speeds level. That means no "ballooning" or stalling. Just straight...beautiful level flight at all speeds A properly balanced plane is NOT "twitchy" it's controllable and the CG is generally back from the manufacturer's suggestion.
Properly balanced planes also come alive in thermals and are more fun to fly Dual rates are nice for high speeds if you have the capability of using them. The balance point can take a while to perfect, but it's definately worth it when you're "on the money."
To give you an idea. Before I dumbthumbed my spirit elite and put her into the ground the CG was a little over 3/4" back from the recommended position. It flew beautifully...but it wasn't quite perfect(yet).
So...the most important thing about building your new model?
CG CG CG CG CG CG CG CG CG CG CG!!!!!
You can make a brick with a wing fly with the proper balance point
Averen
Probably the best thing that I can think of to make it fly properly is to get the correct balance for the plane...which probably isn't the recommended CG. Balance is EXTREMELY important to getting the plane to fly right.
A lot of people like to "Set it a little nose heavy so it will be 'stable'." This really isnt' a good idea. The same people also say "A plane that has a rearward cg is twitchy." This isn't the case. A plane that is too nose heavy will not respond to control inputs, possibly leaving you off field or in a tree. It will have to fly faster to stay level because of all the weight in the nose. Landings will be harded because the elevator will lose authority at low speeds causing the nose to come into the ground. A plane that is balanced properly should respond to the slightest control inputs and fly at all speeds level. That means no "ballooning" or stalling. Just straight...beautiful level flight at all speeds
A properly balanced plane is NOT "twitchy" it's controllable and the CG is generally back from the manufacturer's suggestion. Properly balanced planes also come alive in thermals and are more fun to fly
Dual rates are nice for high speeds if you have the capability of using them. The balance point can take a while to perfect, but it's definately worth it when you're "on the money." To give you an idea. Before I dumbthumbed my spirit elite and put her into the ground the CG was a little over 3/4" back from the recommended position. It flew beautifully...but it wasn't quite perfect(yet).
So...the most important thing about building your new model?
CG CG CG CG CG CG CG CG CG CG CG!!!!!
You can make a brick with a wing fly with the proper balance point
Averen
10-10-2003, 12:37 AM
#4
Senior Member
Join Date: Aug 2003
Location: Austin, TX,
Posts: 105
Likes: 0
Received 0 Likes
on
0 Posts
Hmmmm...that's a tough one...
Was your other Spirit a kit or the ARF? I saw in one of your other posts that you had 4.5oz of lead in the front! EEEEEP!
For starters you probably want to have a "loaded" CG of 40% Root at your leading edge. So with all the electronics in the model it should balance roughly around the 40% chord mark, without any weight. Out of curiosity where was your CG in your last model? And how do you feel that it flew there?
A guy I fly with bought the Spirit Elite ARF and immediately took off the covering on the tail, drilled lightening holes in the stab, recovered both the stab and rudder after lightening both of them, removed the control horns and installed pull-pull cables. With just those changes his ARF weighed quite a bit less than mine (sorry, don't remember actual numbers.)
It's hard to give good "bullet proof" tips for building in the correct CG...actually it's probably impossible to do so. Take some weight out of the back...of the plane...but not too much.
Measure the length of your fuse and find where it should balance with the wing on it at 40% from the LE. Measure the distance from the CG point to the Nose and the CG point to the tail. You'll probably find that it is a ratio of around 1/2.5 (nose/tail) So the tail has about 2.5 times more leverage in it (or whatever your ratio turns out to be) This means that for every ounce you take out of the tail it's like not having to add 2.5 to the nose to make up for it!
Talk about some weight savings!
There are many many many factors that go into making a sailplane fly as well as it can. In all honesty I don't even know where to start...seems like someone with more knowledge than I have should write a book over it
Good luck with the kitting Please post some pics as you go along...I for one enjoy seeing planes in the "nude." I'll post some pics of my Spirit Elite modifications when I finish the fuse...I don't know if it can actually be considered a Spirit Elite anymore!
Good Luck!
Averen
Was your other Spirit a kit or the ARF? I saw in one of your other posts that you had 4.5oz of lead in the front! EEEEEP!
For starters you probably want to have a "loaded" CG of 40% Root at your leading edge. So with all the electronics in the model it should balance roughly around the 40% chord mark, without any weight. Out of curiosity where was your CG in your last model? And how do you feel that it flew there?
A guy I fly with bought the Spirit Elite ARF and immediately took off the covering on the tail, drilled lightening holes in the stab, recovered both the stab and rudder after lightening both of them, removed the control horns and installed pull-pull cables. With just those changes his ARF weighed quite a bit less than mine (sorry, don't remember actual numbers.)
It's hard to give good "bullet proof" tips for building in the correct CG...actually it's probably impossible to do so. Take some weight out of the back...of the plane...but not too much.
Measure the length of your fuse and find where it should balance with the wing on it at 40% from the LE. Measure the distance from the CG point to the Nose and the CG point to the tail. You'll probably find that it is a ratio of around 1/2.5 (nose/tail) So the tail has about 2.5 times more leverage in it (or whatever your ratio turns out to be) This means that for every ounce you take out of the tail it's like not having to add 2.5 to the nose to make up for it!
Talk about some weight savings!
There are many many many factors that go into making a sailplane fly as well as it can. In all honesty I don't even know where to start...seems like someone with more knowledge than I have should write a book over it
Good luck with the kitting
Please post some pics as you go along...I for one enjoy seeing planes in the "nude." I'll post some pics of my Spirit Elite modifications when I finish the fuse...I don't know if it can actually be considered a Spirit Elite anymore!Good Luck!
Averen
10-10-2003, 03:07 AM
#5
My first Spirit was an RTF, not an ARF or a kit. Came prebuilt, all the electroncis installed. They call this the Spirit Select. I really like it. It was the third Spirit Select in our club.
The 4.5 oz is an estimate as the main weight was a pyrmid shapped fishing sinker that said it was 4 oz, but i never weighed it. I added a couple of 1/4 oz weights to finalize it. Depending on the wind I might add another 1/4-1/2 oz under the receiver compartment, or take out 1/4 to 1/2 oz. As I became more familiar with it I was able to trim out some weight. I would guess the actual average ballast was about 4 oz. That was based on two standard servos that were placed under the wing at the factory, just in front of the factory recommended CG.
CG was set based on the factory manual which I think placed it right under the spar.
I may have been a little nose heavy for an accomplished pilot, but for a new flyer like me, it was smooth and stable. I speced it out a few times, though about 50% of my launches did not involve looking for lift as much as looking to sharpen my launch, control and landing skills. I had about 20 launches in 12+ MPH winds.
If lift was abundant, I would ride it, but I had not become a real hunter yet. That was next.
On the new Spirit, a kit, I am looking to see how I can move the servos more forward and perhaps go to smaller, lighter servos. I have two reasons for wanting to do this.
First, to take out as much dead balance weight as possible
Second, I built a power pod for the plane. It will be put on and taken off. I never flew it because I would have had to move the servos in order to put the battery, 13 ozs, over the CG. It was planned, but never done.
If I clear out the area under the wing I can put the power pod and the battery right on the CG and hopefully minimize any rebalancing needed to put the power pod on when I want to.
The kit has arrived. I hope to start building this weekend.
10-13-2003, 12:16 AM
#6
Senior Member
Join Date: Aug 2003
Location: Austin, TX,
Posts: 105
Likes: 0
Received 0 Likes
on
0 Posts
So the rudder and elevator servos were installed directly under the wing in your first one?
If so I would move those forward...even a little bit...like just before the bulkhead that is under the leading edge of the wing. You know the reasons why and you're on the right track for building it.
Once you have it balanced you'll notice a large difference in how it flies. Finding lift becomes much easier with a properly balanced plane. Now that you have the basics of launch, landing and some thermaling behind you it's time to really see what the plane can do. It's amazing that for the price of those Spirit kits how great they fly! The manufacturer's CG is always forward...always...I don't know why they do this...probably for "stability" issues.
After you're done building it be sure to balance it properly...you'll know when you finally hit the "sweet spot!" The plane will nose up and slow down in lift and nose down and speed up in sink...it will almost do the work of hunting thermals for you...you just have to have the thumbs to stay in them and keep the plane happy.
Good luck with your new kit...I'm about to get another myself...
Averen.
PS. Started shaping the fuse for the Spirit Elite-M tonight...I hate sanding but I think I have the first plug the way I want it. I'll post some pics for you to see when I finally get the first fuse done.
10-14-2003, 12:28 AM
#7
Senior Member
My Feedback: (3)

Join Date: Sep 2003
Location: butternut,
WI
Posts: 405
Likes: 0
Received 0 Likes
on
0 Posts
having the arf version on the spirit the biggest problem i have had, is destroying the fuse under the stab. the solve the problem i got rid of the cheesy threaded rods and put the thing together in a more conventional manner. i also glassed the rear 3!QUOT! of the fuse. now the tail feathers are rock solid. i also glassed the wings together. with the recommended 8 rubber bands i have yet to over stress the wings. as testament to this, on my last outing, in hi winds, i pulled off a massive cuban 8. thought for sure i'd loose the wings in the outside loop. but the spirit pulled it off beautifully. i would also suggest installing the spoilers. my first few sessions were with out them and i had to walk a lot to fetch the plane. after setting the spoilers up i am able to literally drop the plane at my feet.
11-13-2003, 04:41 AM
#8
Turns out the original spirit was not as bad as I thought. I have been rebuilding it.
Before I put the covering on, another pilot said that if I sheet the front of the wing outer pannels, same as the inner panel of of the wing, that it helps eliminate tip stall.
I am finally up to the point where I can re-cover the wings. I am going to add the 1/32 sheeting to the outer panel of the wing. Do I just lay it on top of the ribs or do I overlap onto the leading edge? Any thoughts on this?
I thought I would just lay it on the ribs with a little overlap onto the leading edge, then sand it to blend it into the leading edge.
Does that seem reasonable?
02-05-2004, 01:46 PM
#9

Join Date: Sep 2003
Location: Charleston
Posts: 9
Likes: 0
Received 0 Likes
on
0 Posts
When I sheeted the outer tips, I sanded the tp of the ribs a bit until it looked about right to make the balsa flush to the LE and spar. In other words, using 1/32" balsa I took off about 1/32 of the top of the front part of the rib. It wasn't done scientifically, though.
Any news on the Spirit Elite fuse, and the Select rebuild? I have 3 Spirits and a Spectra at the house I am trying to get back together. Basically just need to order about a dozen microservos to do what I want to. Plan is to replace the 3103's with micros, as well as put micros in the wings to activate spoilers. I am considering building one of the wings as a straight full house wing for the fun of it....
Any news on the Spirit Elite fuse, and the Select rebuild? I have 3 Spirits and a Spectra at the house I am trying to get back together. Basically just need to order about a dozen microservos to do what I want to. Plan is to replace the 3103's with micros, as well as put micros in the wings to activate spoilers. I am considering building one of the wings as a straight full house wing for the fun of it....
02-05-2004, 02:46 PM
#10
The Spirit select rebuild is all done. Came out petty well. You can see a write-up and photos here:
http://www.torqueroll.com/forums/sho...&threadid=2473
RC Universe doesn't like this particluar site so it **** s it out.
Fill in t o r q u e r o l l . c o m where the *** appear and it should work fine.
If you have questions, you can ask here or at that site where I document the whole thing. I have a lot more photos
11-20-2010, 04:38 PM
#14
Junior Member
Join Date: Jun 2010
Location: sandia, TX
Posts: 3
Likes: 0
Received 0 Likes
on
0 Posts
is there any other way of operating the spoler's then with tubes and string.starting a build after turkey day,first build in a lot of year's
10-31-2011, 09:35 PM
#16
Member
Join Date: Jul 2009
Location: Martinez, CA
Posts: 38
Likes: 0
Received 0 Likes
on
0 Posts
Aeajr, I have a Spirit kit-built. I just retired from getting worn out. It has much repairing from many light crashes. I'll tell you though, that plane was built like a car that has crumple zones to protect the passengers. It may sound a little weird but I call it a marvel of engineering. First thing to say, make both tail surfaces larger, I have heard somewhere to 150%. I went with 120% and that was perfect. Also, lead, lead and more lead weight in the farthest forward compartment (right behind the nose cone). I could not figure out why it wasn't flying right untill I added weight into the second compartment behind the first one. I ended up at 13.8 oz. of lead, and it flew like a dream. But - to get back to crumple zones, I have had so many crashes and each one was immediately fixed and flew within ten minutes. The wing joiner with many layers of plywood and aluminum would delaminate, and just glue them back together, stick them in and you're flying again. If the fuselage hits the ground hard, the rubberbands (if you don't have too many) will break and allow the wing to break free from the fuselage. Both the wing and the fuselage are more survivable this way. The vertical stabilizer breaks off and also glues back on in a jiffy. I have had many crashes that looked bad and in half an hour flying again.
11-01-2011, 05:01 AM
#17
Senior Member
Join Date: May 2009
Location: steamboat springs,
CO
Posts: 157
Likes: 0
Received 0 Likes
on
0 Posts
Since the nose needed ballast anyway I replaced the soft balsa nose block with doug fir. Harder to shape but I have the carpentry tools. No dents from landing hard. I made a little hatch for the lead compartment that screws into the nose block. This allows adjustment to the amount of lead later. Don't sweat the details or think a perfected model is going to make a lot of difference at this stage. Get lots of flights. Try some slope soaring in gentle conditions if you have a slope nearby. Getting to fly half-an-hour at a time is addictive! best wishes!
 09-09-2014, 06:19 AM
#20
Very nice.
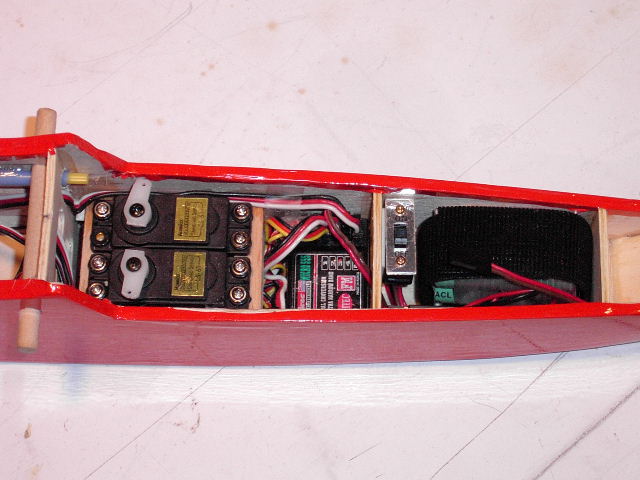
Looks like HS-81s for R/E.
Did you have to put lead in the nose to get it to balance? If you did, and you want to take some weight out you might consider moving those servos forward of the bolt. I did that on mine and saved some weight.
What is your all-up final weight?
Looks like HS-81s for R/E.
Did you have to put lead in the nose to get it to balance? If you did, and you want to take some weight out you might consider moving those servos forward of the bolt. I did that on mine and saved some weight.
What is your all-up final weight?
Last edited by aeajr; 09-09-2014 at 06:32 AM.
09-09-2014, 07:27 AM
#21
Banned
Hello Everyone,
Discovered this thread and enjoyed reading it all.
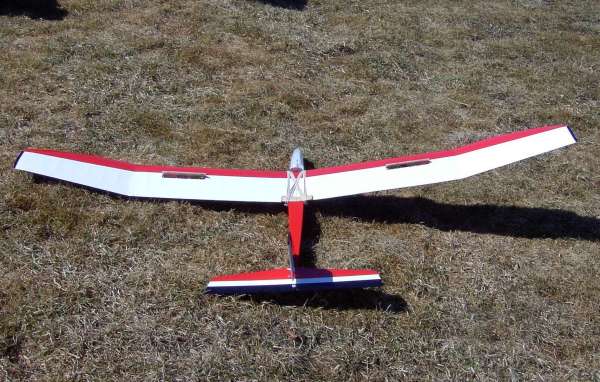
I built a Spectra which is the electric powered version of the Spirit ( info for who may not have known ).
It was highly modified. I added 1 1/4" to the wing chord and made some flaps and ailerons. I also added a removable landing gear.
A couple of pics attached.
I have redesigned drawings and many more pictures.
Zor
Discovered this thread and enjoyed reading it all.
I built a Spectra which is the electric powered version of the Spirit ( info for who may not have known ).
It was highly modified. I added 1 1/4" to the wing chord and made some flaps and ailerons. I also added a removable landing gear.
A couple of pics attached.
I have redesigned drawings and many more pictures.
Zor
09-09-2014, 07:47 AM
#22
Very nice.
Looks like HS-81s for R/E.
Did you have to put lead in the nose to get it to balance? If you did, and you want to take some weight out you might consider moving those servos forward of the bolt. I did that on mine and saved some weight.
What is your all-up final weight?
Looks like HS-81s for R/E.
Did you have to put lead in the nose to get it to balance? If you did, and you want to take some weight out you might consider moving those servos forward of the bolt. I did that on mine and saved some weight.
What is your all-up final weight?
Looks good Zor!!
09-09-2014, 08:26 AM
#23
I moved the servos forward. These were the standard sized servos that came with the RTF Spirit Select. They were a very tight fit to get into the nose. HS-85s or 81s would have been a much better choice but shifting that weight forward helped reduce the lead in the nose.
Drilled into the nose block and inserted lead there to get it as far forward as possible, Think I ultimately had about 1 oz of lead in the nose and that was all that was needed.
Added spoilers with servos in the wings.
When I was done I had taken out about 3 oz of the lead needed to balance the Spirit. Flew much better after that. I think my all up at that point was about 34 or 35 ounces or something like that.
I still have the Spirit but it rarely see the air these days as I have a fleet of molded gliders for the winch now. But every once in a great while I bring it out to play.
Last edited by aeajr; 09-09-2014 at 08:32 AM.
09-10-2014, 04:22 AM
#24
I moved the servos forward. These were the standard sized servos that came with the RTF Spirit Select. They were a very tight fit to get into the nose. HS-85s or 81s would have been a much better choice but shifting that weight forward helped reduce the lead in the nose.
Drilled into the nose block and inserted lead there to get it as far forward as possible, Think I ultimately had about 1 oz of lead in the nose and that was all that was needed.
Added spoilers with servos in the wings.
When I was done I had taken out about 3 oz of the lead needed to balance the Spirit. Flew much better after that. I think my all up at that point was about 34 or 35 ounces or something like that.
I still have the Spirit but it rarely see the air these days as I have a fleet of molded gliders for the winch now. But every once in a great while I bring it out to play.
Drilled into the nose block and inserted lead there to get it as far forward as possible, Think I ultimately had about 1 oz of lead in the nose and that was all that was needed.
Added spoilers with servos in the wings.
When I was done I had taken out about 3 oz of the lead needed to balance the Spirit. Flew much better after that. I think my all up at that point was about 34 or 35 ounces or something like that.
I still have the Spirit but it rarely see the air these days as I have a fleet of molded gliders for the winch now. But every once in a great while I bring it out to play.
Very nice, ya I wish I would of stuck the servos into the nose, and drilling out the nose block for weight was a good idea. But do far the airplane feels light and has no problem staying up in the air for quite some time! Got a 42min flight off tow on its 3rd flight