


Building a Dynaflite Super Decathlon
 03-15-2014, 08:40 PM
#1901

My Feedback: (1)

Join Date: Apr 2003
Location: Houston,
TX
Posts: 144
Likes: 0
Received 0 Likes
on
0 Posts
funnotcrazy....asked ...Did you check incidences on wing & stab ? No, did not. Funny thing happened on first test run. I did not want to get airborne just wanted to do a fast run up on the mains. Just as the plane made the rotation onto the main LG the nose lifted and the plane was in the air....so I just backed off the throttle and did a 3 point landing. Good thing I did as I forgot to change the servo reverse in the ailerons...they were backwards!!
 03-19-2014, 07:43 AM
#1902
Junior Member
Join Date: Mar 2007
Location: Bennington,
VT
Posts: 21
Likes: 0
Received 0 Likes
on
0 Posts
I just started my kit last weekend and so far have the tail feathers and the right wing completed. But... before I get any further I'm debating whether or not I want to change the wing mount to add the skylight. Anyone who has done this, was it worth the time and effort? Anyone who didn't do it, do you wish you had? I know the model is fun-scale at best so that's why I'm hesitant about bothering with this mod in the first place.
I'm about halfway through this thread and have learned a ton already. I'll be putting in a G-38 for power.
And now back to some more reading.
thanks
I'm about halfway through this thread and have learned a ton already. I'll be putting in a G-38 for power.
And now back to some more reading.
thanks
03-19-2014, 07:22 PM
#1903
My Feedback: (1)
Join Date: Apr 2003
Location: Houston,
TX
Posts: 144
Likes: 0
Received 0 Likes
on
0 Posts
Hi vt-flier......if I am remembering right - the scale location (apoxx) of the skylight may be in the area of where the main spar and aluminum tube reside in the C section of the models wing/fuse area. So.....that may need some additional engineering in that area. I built mine per the instruction manual and wish that I had built it with the wings pluging into the fuse. I thought about the skylight but scuddled the idea because of the changes in that area.
Try and remember to keep it light - this plane will be much heavier than say RC Guys model of the Decathlon due to the use of lazer cutting of thier fuse parts. And lastly put yourself a 1 or 1/2 degree of dihedrel in the wings or your plane will look droopy.
Like mine! lol!
Try and remember to keep it light - this plane will be much heavier than say RC Guys model of the Decathlon due to the use of lazer cutting of thier fuse parts. And lastly put yourself a 1 or 1/2 degree of dihedrel in the wings or your plane will look droopy.
Like mine! lol!
04-27-2014, 12:03 PM
#1904
My Feedback: (1)
Join Date: Apr 2003
Location: Houston,
TX
Posts: 144
Likes: 0
Received 0 Likes
on
0 Posts
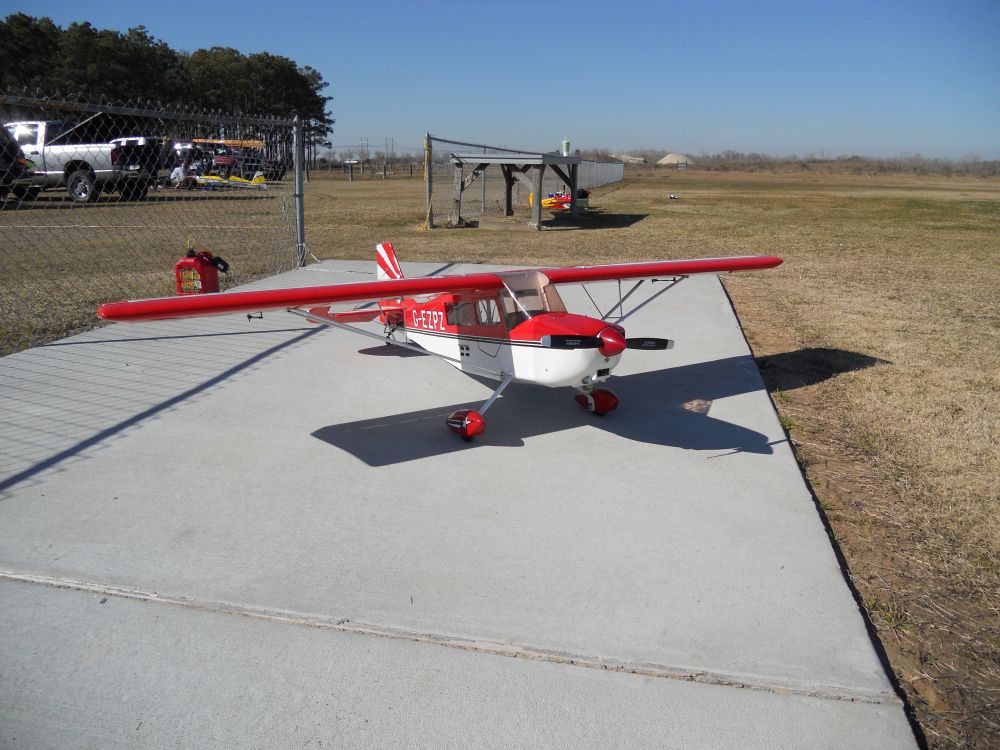
Nice lookin plane Mike, hope you and the plane are well and still flying in 2014! What a nice field too!
Note: This is a response to post#379 of Mike Boyds plane from 2006.
Note: This is a response to post#379 of Mike Boyds plane from 2006.
Last edited by ScaleRCpilot; 04-27-2014 at 12:06 PM.
06-03-2014, 10:13 AM
#1905
Junior Member
Join Date: Mar 2007
Location: Bennington,
VT
Posts: 21
Likes: 0
Received 0 Likes
on
0 Posts
Maiden flight was this past weekend and all I can saw is WOW, this is a keeper! Saturday was not the best day for a maiden with 10-15mph winds but it was coming straight down the runway so I gave it a go. The SD tracked perfectly down the runway and made a beautiful scale takeoff. A couple clicks of right aileron and down elevator had her flying hands-off. The landing looked even better, I just lined her up on the center line, chopped the power and she practically landed herself. The guys in the club were impressed! Sunday was practically windless and it was even more impressive. Loops, rolls, hammerheads and a little inverted all performed like I really knew what I was doing. I'm still feeling her out and I think a little rudder mix and maybe some differential would smooth things out but I think this is going to be a fun airplane.
I built the kit mostly by the book except that I added the door with the intent of scaling out the cockpit but as everyone warned, she came out tail heavy and I was forced to move the batteries all the way forward and the tank back over the CG. not the worst place for the tank but it messed up my cockpit plans. Power is a G-38 with an EI conversion and it fits the plane perfectly, both in size and power. Even with the Zenoah and batteries in the nose I ended up adding 10oz of lead to get her to balance on the recommended cg. Total weight is 18.2 lbs.
I built the kit mostly by the book except that I added the door with the intent of scaling out the cockpit but as everyone warned, she came out tail heavy and I was forced to move the batteries all the way forward and the tank back over the CG. not the worst place for the tank but it messed up my cockpit plans. Power is a G-38 with an EI conversion and it fits the plane perfectly, both in size and power. Even with the Zenoah and batteries in the nose I ended up adding 10oz of lead to get her to balance on the recommended cg. Total weight is 18.2 lbs.
06-03-2014, 10:35 AM
#1906
Senior Member
 06-03-2014, 11:20 AM
#1907
My Feedback: (2)
How do you add dihedral when the wing tube pretty much defines how the two wings join? That seems like quite a bit of modification effort. Personally I don't think my wings droop...
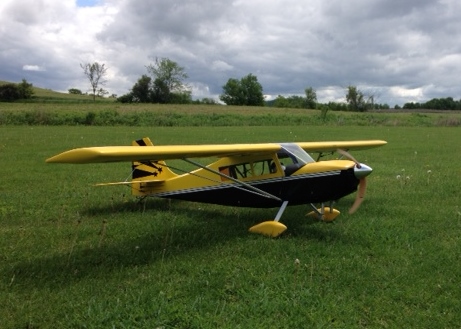
Anyway, here's my dynaflight...
os gt33, weighs just under 12lbs RTF

we maidened last Sunday, was a blast. Its going to be a great plane for a long time to come ( "fingers crossed" )
Anyway, here's my dynaflight...
os gt33, weighs just under 12lbs RTF
we maidened last Sunday, was a blast. Its going to be a great plane for a long time to come ( "fingers crossed" )
06-03-2014, 12:19 PM
#1908
Junior Member
Join Date: Mar 2007
Location: Bennington,
VT
Posts: 21
Likes: 0
Received 0 Likes
on
0 Posts
UNDER 12lbs??? What's your weight saving secret? Mine flies well at 18lbs but I think it would fly a lot better at a lower weight.
Nevermind, I saw your build thread.
Nevermind, I saw your build thread.
Last edited by vt-flier; 06-03-2014 at 12:41 PM.
06-03-2014, 05:13 PM
#1909
My Feedback: (2)
a couple thoughts that aren't necessarily in the build thread.
the os gt 33 vs G38 + 10 ounces of weight is a difference of over 2lbs right there.. so if you were able to find a way to balance yours with a GT33 + no lead, you'd be under 16lbs already...that part though was a pretty big challenge, as the tail on this plane isn't exactly small...
I balanced the plane prior to covering, installing servos, battery etc so that I wouldn't have to add weight later. This put the servos up where a pilot would normally be, and the batteries where the gas tank would be.....because of this I also have no cockpit detailing which is a bit of a bummer... but I'll live with it.
the build thread wasn't very popular, I had a couple followers, so for the rest of the people that want to know how I got down to 12lbs..., I redesigned the tail section and cut out all of the 1/4" x 1" spars that were used aft of the CG and replaced with either 1/4" x 1/2" or 1/4" square. The reasoning here was my Dad's Ace Extra 230 ( 30% ) used 1/4" square stringers for the tail.... if that is good enough for an unlimited aerobatic aircraft... its probably more than adequate for an aerobatic trainer like the decathlon...my other thought was while I've built many planes that have had wing failures.. I've yet to snap a body in half... so I should be able to build it lighter....I made the flying wires functional as well which allowed for lighter/thinner wood.... it mainly made the tail light enough so that again, no extra weight was needed to balance...
the rest of it was just wood selection. I have a box of wood from the kit that I could almost build another decathlon out of that I chose not to use for the main reason it was just very dense and heavy, I ended up going to my local hobby shop and swapping out pieces and trying to really keep the body as light as I could.
I'm by no means an expert here, this whole build was a first for me and entirely a learning experience... just had fun with the whole build and decided to try something new
Last edited by mattnew; 06-03-2014 at 05:16 PM.
06-06-2014, 09:04 PM
#1910
My Feedback: (1)
Join Date: Apr 2003
Location: Houston,
TX
Posts: 144
Likes: 0
Received 0 Likes
on
0 Posts
Mattnew.....You can find the exact center of the tube and (lightly tap) the center with either a screw driver or chisel. The indent will cause the tube to take on a degree of dihedrel when the wings come together. You will have to adjust the wing strutts as the wings with the new dihedrel will pull away slightly from the fuse. I did this to my plane and the strutts just needed a slight amount of adjustment. It looks much better(IMHO)! The full scale does have some dihedrel while it may be also possible some full scale planes (by adjustment) may have none.[ATTACH]2001826[/IMG]
06-12-2014, 06:57 AM
#1911
Senior Member

Well guys
It's been sometime since i worked this plane but i finally had success as far as the engine goes. I rebuilt the carburetor even though it was already brand new. I didnt see anything during tear down so dont have a clue what ifixed. The engine is still hard to start so i have to use my magnatron starter to spin it to start it. However, it will start and runs well. I would like to see a little more rpm but i think that will come up as it breaks in. It's currently about 5900 but pulls like a tank. I may have it a little over propped but im going to try it for a while before i make changes. However, i built a new vannesa balancer to double check the balance. Good thing as im way more tail heavy than i thought. So looks like more lead is in my future on a plane that is already an anchor. I plan to work on it this evening so ill update everyone.
It's been sometime since i worked this plane but i finally had success as far as the engine goes. I rebuilt the carburetor even though it was already brand new. I didnt see anything during tear down so dont have a clue what ifixed. The engine is still hard to start so i have to use my magnatron starter to spin it to start it. However, it will start and runs well. I would like to see a little more rpm but i think that will come up as it breaks in. It's currently about 5900 but pulls like a tank. I may have it a little over propped but im going to try it for a while before i make changes. However, i built a new vannesa balancer to double check the balance. Good thing as im way more tail heavy than i thought. So looks like more lead is in my future on a plane that is already an anchor. I plan to work on it this evening so ill update everyone.
Last edited by WILDCRASHWILLY; 06-12-2014 at 06:59 AM. Reason: change a term
06-12-2014, 09:29 AM
#1912
Junior Member
Join Date: Apr 2007
Location: Vilnius, LITHUANIA
Posts: 28
Likes: 0
Received 0 Likes
on
0 Posts
Here is mine(-: Unexpected huge! On the way to first takeoff....Now just putting the setup stuff and still hope do not exceed 6.5kg weight limit... (-:
Making the tail lighter like mattnew is the good smart idea! For mine SD do that it is too late, as taking dihedral degree for the wings. But if I decide next SD project, I'll do that!:-)
Thanks ScaleRCpilot for the experience advice! Hope your new SD will bring too much joy!
Last edited by Valius; 06-13-2014 at 06:31 AM.
06-13-2014, 03:08 PM
#1913
Senior Member
Looks like my Decath will weigh 20 lbs 3 oz. After I add another lb of weight to the nose. Even then, I will be just inside the balance range. The range is 2 7/8 - 3 7/8. At this weight it will balance at 3 3/4. I will work with it tonight to make sure of the adjusments. Also. I have pictures I will post later tonight or tomorrow.
Last edited by WILDCRASHWILLY; 06-16-2014 at 08:22 PM. Reason: correct a typo
06-14-2014, 08:06 AM
#1914
Junior Member
Join Date: Jun 2014
Posts: 2
Likes: 0
Received 0 Likes
on
0 Posts
I'm new to this form but I have started a my build of a dynaflite super decathlon and have a couple of questions. How do you cover the wing with the star burst, do you cover with a solid color and then use trim pieces to make the star burst same question on covering the rest of the plane. Also I would like to purchases the EME 35cc with electric starter has anybody used this before will it fit under the cowl. Thanks for any advice you can give me. Peter Taylor
06-14-2014, 01:49 PM
#1915
My Feedback: (1)
Join Date: Apr 2003
Location: Houston,
TX
Posts: 144
Likes: 0
Received 0 Likes
on
0 Posts
Peter T......The way you described the covering process is exactly how you do it. Its a bit time consuming but renders a very nice looking SD in the end.
Plus you can take pride at the field (when someone asks about it) that you did it yourself. Just make templets off the plans, I would avoid cutting up your plans and protect them.
Peter make your templets from see thru paper and transfer to poster board and then to the covering OR trimsheet. Once you have your star and burst bar cut out - you can spray down some dish washing soap and water (light soapy solution) and apply the star and bar together or separately. Use a credit card or Drivers Lic to lightly squeegee out the soap and water. This will in effect cause the now star/bar to stick down and become stuck.
After it drys (24 hrs later) you can apply (for covering) some heat carefully and it will activate the adhesive in it. I would lay down some pin strip on the edge and then seal the pin strip with either clear Rustolium paint OR - go raid your wife or GF's finger nail polish bag and steal the clearpolish sealer and paint the edges. Let dry. Done- repeat all other surfaces. I wish you good luck and just take your time and it will very nice!
06-14-2014, 01:54 PM
#1916
My Feedback: (1)
Join Date: Apr 2003
Location: Houston,
TX
Posts: 144
Likes: 0
Received 0 Likes
on
0 Posts
Valius.....Your welcome! Hope get some pics of mine real soon. It starting to get HOT here in SE.Texas and Im starting to migrate to the air conditioned hanger of my living room! Cheers SRCP
06-14-2014, 03:12 PM
#1917
Junior Member
Join Date: Jun 2014
Posts: 2
Likes: 0
Received 0 Likes
on
0 Posts
Thanks very much for taking the time to explain this process to me, covering is way off I just started the build but as I look at some of the post on this form and see the all the planes covered like they came out of a factory I wondered how it was done. Also glad for the tip on making the templets did not know how to get those. Use to live in Houston 15 years ago live in Orlando now. Peter T
06-14-2014, 06:18 PM
#1919

Thanks very much for taking the time to explain this process to me, covering is way off I just started the build but as I look at some of the post on this form and see the all the planes covered like they came out of a factory I wondered how it was done. Also glad for the tip on making the templets did not know how to get those. Use to live in Houston 15 years ago live in Orlando now. Peter T
Applying covering using the WIndex Method
Hope this helps
Ken
06-14-2014, 06:45 PM
#1920
Senior Member
Srtelemaster. Thanks for the suggestion and the numbers. I may be able to trim a little off the tail wheel bracket. Also, i have 2-56 wires for flying wires. I have considered removing them to see how much weight would be saved but i have been concerned about the tail feather strength without the wires. It would be nice if these items add up to the four onces but im not sure. Ill just have to remove them and weigh them on my scale to verify the onces.
Again thanks for the suggestion.
Again thanks for the suggestion.
Last edited by WILDCRASHWILLY; 06-14-2014 at 06:48 PM. Reason: some typos
06-15-2014, 06:13 AM
#1921
Senior Member
Here's a thread on RCU that does a very good job of explaining the Windex method. It has a lot of pictures and is very informative. Just remember that this method only works when you are using Monokote and will not work with any other brand of covering. I have used this method of applying graphics like this many times and it's a great way of applying graphics to a plane and on large surfaces like this it works out a lot better than trying to use heat, as when using heat you'll usually wind up with a lot of bubbles stuck under the graphic.
Applying covering using the WIndex Method
Hope this helps
Ken
Applying covering using the WIndex Method
Hope this helps
Ken
That is exactly what the automotive industry uses to apply graphics. I've used that method Aw/great success.
06-15-2014, 06:23 AM
#1922
Senior Member
Srtelemaster. Thanks for the suggestion and the numbers. I may be able to trim a little off the tail wheel bracket. Also, i have 2-56 wires for flying wires. I have considered removing them to see how much weight would be saved but i have been concerned about the tail feather strength without the wires. It would be nice if these items add up to the four onces but im not sure. Ill just have to remove them and weigh them on my scale to verify the onces.
Again thanks for the suggestion.
Again thanks for the suggestion.
Actually it all depends on the ratio of length forward & aft of the CG. The shorter the nose moment compared to the tail length, the larger the ratio.
Placing the nose weight as far forward as possible also helps. A large prop nut or spinner adaptor will offset tail weight better than a similar weight on the firewall. Measure the distance from the prop nut to the CG, then, from the CG to the tailwheel. Divide the later by the former & you will give you your ratio. Some small diameter cable from a pull/pull set-up would also save weight.
I wouldn't eliminate the flying wires, but if you know an angler that has some of the new high tech braided fishing line. That might work just as well & weigh a lot less.
Build light in the tail & don't be too concerned W/the weight ahead of the CG.
06-15-2014, 08:19 AM
#1923
Senior Member
I knew early on that this model was building tail heavy. I just never really thought about it being an issue with me as i was using a 40 cc gas engine. Boy was i wrong. I have some pull/pull cable so i'm going to start with that.
Thanks,
Thanks,
Last edited by WILDCRASHWILLY; 06-15-2014 at 08:27 AM. Reason: spelling
06-15-2014, 10:12 AM
#1924
Senior Member
If you are using a light weight wood or composite prop switching to a heavier nylon prop will also help more than the equivalent firewall weights.
06-15-2014, 03:37 PM
#1925
My Feedback: (2)
The rule of thumb is at 1oz in the tail equals 5ozs in the nose.
Actually it all depends on the ratio of length forward & aft of the CG. The shorter the nose moment compared to the tail length, the larger the ratio.
Placing the nose weight as far forward as possible also helps. A large prop nut or spinner adaptor will offset tail weight better than a similar weight on the firewall. Measure the distance from the prop nut to the CG, then, from the CG to the tailwheel. Divide the later by the former & you will give you your ratio. Some small diameter cable from a pull/pull set-up would also save weight.
I wouldn't eliminate the flying wires, but if you know an angler that has some of the new high tech braided fishing line. That might work just as well & weigh a lot less.
Build light in the tail & don't be too concerned W/the weight ahead of the CG.
To add to this some Decathlon specifics. the nose is approximately 12 inches ahead of the CG and the tail is about 36 inches behind the CG so for the decathlon, that ratio is about 3:1, or 1 ounce in the tail will require an equivalent 3 oz's in the nose.