


4*120 Build Thread


 07-11-2016, 12:04 PM
#953
A 91 2 stroke may be too much motor for the plane, both in torque and weight. The 4*120 will be yanked around the sky with one. They are some massive motors, a friend gave me one a while back and it is as big as the Saito 125 I have in my P-51.
The 91 4 stroke though, now that I can see pulling that plane out and around nicely. You may be able to counter balance the big motor on the nose by moving the elevator servo to the tail if you can. Did that on my 120, so nice firm elevator, no worry of the pushrod flexing, rudder is a pull-pull.
The 91 4 stroke though, now that I can see pulling that plane out and around nicely. You may be able to counter balance the big motor on the nose by moving the elevator servo to the tail if you can. Did that on my 120, so nice firm elevator, no worry of the pushrod flexing, rudder is a pull-pull.
07-11-2016, 04:59 PM
#954

My Feedback: (1)
thanks for the replies and interest !
I have an OS 61FX in my 62 inch span GP ShoeString, as for weight it's a great combO, the 4-Star 60 span is 9 inches longer at 71 inches, and has more wing area, it's a real floater with a 61, so I don't think a 91 is to big,
Jim
I have an OS 61FX in my 62 inch span GP ShoeString, as for weight it's a great combO, the 4-Star 60 span is 9 inches longer at 71 inches, and has more wing area, it's a real floater with a 61, so I don't think a 91 is to big,
Jim
 07-12-2016, 04:43 PM
#956
Did you say a 91 2 stroke or 91 4 stroke? Makes a huge difference on the 4*60. An OS 91 2 stroke weighs 1 pound 9.75 ounces, and is larger in diameter, where a Saito 91 4 stroke weighs in at 1 pound 3.31 ounces. That's nearly 6 1/2 ounces that you have to compensate for in the tail. Since it is a 2 stroke, is will also suck fuel like mad, and the tank in the 4*60 would give you maybe 5 minutes of flight, maybe. I don't think you would be happy with it, especially if it dead sticks as it will be a lead sled with all that weight on it. That is if the fuse can hold up to it. You have to add bracing, and beef up the fuse for an engine that big. The manual even states not to use a larger than recommended engine in this plane. If you want more speed, I doubt you will get it with a larger engine, you would be better putting a 65-70 on it than the 91, and propping it for speed, though with that fat wing, its not a speed demon, and if you push it too fast you will get flutter in the wings and tail.
It's your plane, so do what you want with it, only telling you this from experience. If you want a fast plane, this is not it. If you want an aerobatic plane that is easy to fly, then this is it, when built with the right equipment installed.

It's your plane, so do what you want with it, only telling you this from experience. If you want a fast plane, this is not it. If you want an aerobatic plane that is easy to fly, then this is it, when built with the right equipment installed.
07-12-2016, 07:12 PM
#957
My Feedback: (1)
2-St,, the OS 95ax (engine only) weighs only 2.5 oz more than their 65ax engine, the 95 muffler may weigh a couple oz more too, but I don't see a real problem with weight there,
yes a 91 or 95 will use more fuel but I have to replace the Bulk Head that holds the Tank so I will use a lager Tank and I will beef-up the Bulk Head a bit to strengthen the Fuse, if I get flutter I will just have to slow down and put my new in the box 1985 HB 61 PDP in it and have neat looking plane,,
you said from experience I will get Flutter, I will have to take your word on that, maybe I will just put the HB in it,
you busted my bubbled with the fluttering thing LOL LOL, I have seen it on planes before, I wouldn't mind putting a modified Main Wing on it but I'm not going to go threw all that
thanks for the interest !!
Jim
Last edited by the Wasp; 07-12-2016 at 08:37 PM. Reason: because
07-13-2016, 06:07 PM
#958
Yeah, I got flutter on my 120 with a DLE 20 on it. I replaced all the aileron hinges with Robarts pin hinges, so now the tail flutters a bit in a high speed dive.  The flutter was so bad that three of the aileron hinges ripped apart. At least it didn't do what my first 120 did, I still have the remnants of the wing and tail, the rest is sawdust and toothpicks. The DLE20 is the correct size engine for the 4*120 too ..
The flutter was so bad that three of the aileron hinges ripped apart. At least it didn't do what my first 120 did, I still have the remnants of the wing and tail, the rest is sawdust and toothpicks. The DLE20 is the correct size engine for the 4*120 too ..
07-13-2016, 06:29 PM
#959

Join Date: Oct 2005
Location: Dublin,
VA
Posts: 1,181
Likes: 0
Received 0 Likes
on
0 Posts
I bet you didn't seal your hinge line did you? A 4Star 1.20 shouldn't have any flutter issues IF the hinge gap is tight/sealed, slop -free linkages, strong/good centering servos were used and no major mods to the control surfaces. Guys have been running 30cc+ on these with no issues.
07-13-2016, 06:49 PM
#960
It had a slight gap, about the thickness of a business card. Too many power dives did the damage. I loved going WOT down the runway, pull up until it can go no more, then hammer head it over while still at WOT, and dive straight down, pulling up just a few feet over the runway and zooming past the other way. I noticed it buzzing loudly on the last pass, heard it over the tail wires, and knew that something came loose. Sure enough, couple hinges busted loose. The ailerons are nice and tight now, but I can see the tail shake doing the same thing. In fact I have to recover my stab, the covering peeled off from going so fast. The tail wires sing loudly.
07-22-2016, 01:44 PM
#961
My Feedback: (1)
now that I have thought about it more, with the speeds I want I don't think I will have a problem with flutter, I don't want a speed demon, I just want it to go faster, the 4-Star 60 is a pretty slow plane, the heavier Tiger 60 is noticeably faster, like I said, if I do get flutter I will drop my HB PDP 61 in it
Jim
Jim
Last edited by the Wasp; 07-22-2016 at 01:48 PM.
08-13-2016, 12:56 PM
#962
Picked up a 4 star 120 ARF this week that has only been assembled. I have a DLE 20 side exhaust I am planning on using. It will not fit between the cheeks with stock muffler. Suggestions on how to put this combination together???
 (That was a horible pun)
08-14-2016, 08:53 AM
(That was a horible pun)
08-14-2016, 08:53 AM
#964
Also before you fly that plane, Take it from someone very familiar with the 4*120 ARF, reinforce the wing!!!!! The upper and lower spars form a box where the aluminum wing joiner slips into and the box is NOT complete! You will need to remove the covering and add some 1/16" plywood to make the box strong or you will lose a wing in flight. If in doubt I will take some pics of what is left of mine.
10-25-2020, 07:34 PM
#965
lookong for a dle20 one.
thanks!
10-26-2020, 08:30 AM
#966
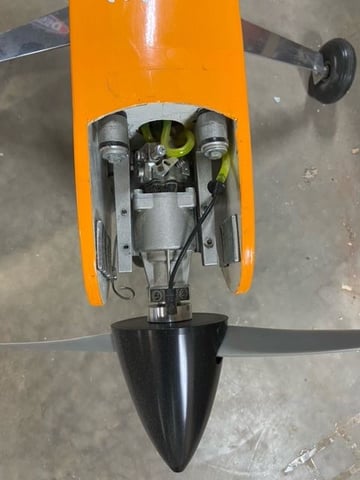

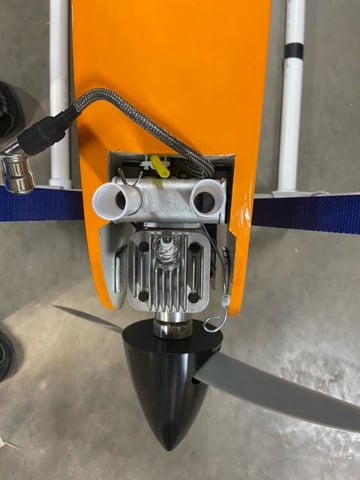
Here are the top, side, and bottom views on my DLE20RA on my 4*120. Really the only modification was to cut out the floor of the engine bay in order to squeeze the DLE20RA in.
The following users liked this post:
[email protected] (10-26-2020)


The following users liked this post:
Flyboywbl (11-11-2020)
11-12-2020, 07:09 PM
#969

looking forward to it!! I've been have engine troubles with my NGH 30cc four stroke. I can't for the life of me get it tuned.

The following 2 users liked this post by Rcpilot:
Flyboywbl (11-19-2020),
flyingagin (11-19-2020)
11-25-2020, 09:37 PM
#973
It's been awhile since my last post, so I figure it's time to get a little update on my progress.
My last post, I was asking about tapering my ailerons. After replies back, I said I would taper. Well that changed once I did my hinge installation. I fitted my ailerons with Robart hinges. I've used them in the past and have been quite pleased with their quality and ease of installing. Once they were installed, I realized that due to the length the hinge extended into the aileron, that tapering would cut into the drilled hole for the hinge. I proceeded to then do the 45 deg bevel on the front and round over the rear per plan instructions, except I don't sand as plans mentions. I have always used a router for the bevel and round over, since it is so much easier, fast and precice. I don't recall using a router being mentioned in build threads before, but I'll post some pictures of my proceedure.
By the way, I think the ailerons still looked fairly good, even without taper. I can still use the provided aileron positioning guide to set the ailerons for final neutral adjustment.
I am now starting the covering, which will be a slow process. I am using Sig Koverall, MinWax polycrylic for attaching and filling weave, then final painting with Rustoleum rattle can spray.
Lamar
11-26-2020, 07:19 AM
#974
Robart hinge size is governed by the size of the airplane, thickness of material and the amount of stress you put on the control surfaces. The 3/16"is the most popular size I think. They also make a pocket you glue in so you can remove the surface by loosing the set screw that hold the hinge in.
11-26-2020, 07:31 AM
#975
It's been awhile since my last post, so I figure it's time to get a little update on my progress.
My last post, I was asking about tapering my ailerons. After replies back, I said I would taper. Well that changed once I did my hinge installation. I fitted my ailerons with Robart hinges. I've used them in the past and have been quite pleased with their quality and ease of installing. Once they were installed, I realized that due to the length the hinge extended into the aileron, that tapering would cut into the drilled hole for the hinge. I proceeded to then do the 45 deg bevel on the front and round over the rear per plan instructions, except I don't sand as plans mentions. I have always used a router for the bevel and round over, since it is so much easier, fast and precice. I don't recall using a router being mentioned in build threads before, but I'll post some pictures of my proceedure.
By the way, I think the ailerons still looked fairly good, even without taper. I can still use the provided aileron positioning guide to set the ailerons for final neutral adjustment.
I am now starting the covering, which will be a slow process. I am using Sig Koverall, MinWax polycrylic for attaching and filling weave, then final painting with Rustoleum rattle can spray.
Lamar
Robart hinge size is governed by the size of the airplane, thickness of material and the amount of stress you put on the control surfaces. The 3/16"is the most popular size I think. They also make a pocket you glue in so you can remove the surface by loosing the set screw that hold the hinge in.
Thanks!