


Piper Arrow 2
 12-27-2005, 09:49 AM
#1
Junior Member
Thread Starter
Join Date: Nov 2005
Location: Naas, IRELAND
Posts: 10
Likes: 0
Received 0 Likes
on
0 Posts
Im building a piper arrow 2 from an aviomodelli kit, i have read some people have fitted it with retracts, the instructions give no mention of retracts so how would i go about installing them? how much re-inforcing will i need? What type of retracts would be best air or mechanical?
any help will be greatly appreciated
any help will be greatly appreciated

 12-28-2005, 11:20 AM
#3
Junior Member
Join Date: Sep 2005
Location: Newcastle, UNITED KINGDOM
Posts: 6
Likes: 0
Received 0 Likes
on
0 Posts
Spiderbaby - I too am building this kit and have also considered retracts.
Maybe I'm missing something but 'doubling-up' two rib fronts isn't really an option as there aren't any ribs in the wing - it's solid foam with a plastic sheet veneer of some type.
The fixed undercarriage is made up by sandwiching five pieces (I think it was five) of laser-cut plywood per wing together before epoxying the assembled article into a slot cut in the wing's foam.
Deviating from the this method would pose other problems as when the wings are attached to the fuselage, the wing mounting tube slots in to a hole running through the centre of the undercarriage mounting blocks. The blocks automatically give the correct amount of dihedral due to the way in which they were cut at the factory.
Slightly deviating from the retract issue - I have a problem of my own relating to the wing. How do you build up the inner-leading edge of the wing using the balsa block and plywood veneer? Do you need to cut the plastic sheeting of the wing or is the balsa attached to the top of this? Is there an idiot-proof way of making sure that this is mounted at the correct place and that both wings match?
Any help would be greatly apprieciated!
Thanks,
Andrew
12-29-2005, 05:42 PM
#4
Junior Member
Thread Starter
Join Date: Nov 2005
Location: Naas, IRELAND
Posts: 10
Likes: 0
Received 0 Likes
on
0 Posts
I was thinkin of keepin those five plywood pieces for the fixed undercarraige in the wings but modifying the ends to accomodate retracts. That way the dihedral stays the same.
I was just thinkin since the wings are 2 seperate pieces it would be a pain in the ring to rig the air tubes/retract pushrods into the fuselage. i might not bother with retracts, they would be cool but its too much money for me
"inner-leading edge of the wing"
are you talking about the part you have to build into the fuselage, where the wing and fuselage blend into each other?
I havnt come that far yet, im probably gonna fit the wings to the fuselage while i build them. im thinking of building them onto the fuselage because it will be easier to glue a balsa to balsa joint,
Sorry if im making no sense, im not in a problem solving state right now
12-30-2005, 10:38 AM
#5
Junior Member
Join Date: Sep 2005
Location: Newcastle, UNITED KINGDOM
Posts: 6
Likes: 0
Received 0 Likes
on
0 Posts
Spiderbaby,
I've enclosed a picture of an Arrow II that shows the wing area that I'm talking about.
From what I can gather and from how it looks in the photo, this part is built onto the wing and not the fuselage.
When you say that you're probably going to fit the wings to the fuselage when you build them, do you mean that you intend to permanently attach the wings?
Separately, I don't know how far on with the build you are, but when planking the upper fuselage it becomes a pain when you reach the tail end. However, rather than worrying (as I did) about keeping everything neat and trimming parts so that they fit perfectly, don't bother. I found that there is enough spare balsa planking to patch up any poorly covered/messy areas, as long as you're prepared for a lot of sanding.
Thanks,
and all the best for 2006!
Andrew
12-30-2005, 11:32 AM
#6
Junior Member
Thread Starter
Join Date: Nov 2005
Location: Naas, IRELAND
Posts: 10
Likes: 0
Received 0 Likes
on
0 Posts
Lego man, is that your model, it looks good? im not going to permenantly attach the wings. but they will be attached when i build the inner leading edge just to keep the gap to a minimum. i know it should be attached to the wings but the instructions are only a guideline in my opinion.
I have half of the planking done, it didnt go too bad so far. i just tapered the ends and its working out grand.
Happy New Year too man
I have half of the planking done, it didnt go too bad so far. i just tapered the ends and its working out grand.
Happy New Year too man
01-05-2006, 07:44 AM
#9
Junior Member
Thread Starter
Join Date: Nov 2005
Location: Naas, IRELAND
Posts: 10
Likes: 0
Received 0 Likes
on
0 Posts
Hey Spud02ie yeah it is who you think it is, the long haired kid!!! i thought it was you when i saw some of your other posts but i was gonna ask you in person.
I got a piper arrow for christmas but i didnt know i was gettin it so now i have 2 planes to finish, noooooooo!!!!
I got a piper arrow for christmas but i didnt know i was gettin it so now i have 2 planes to finish, noooooooo!!!!
01-05-2006, 04:13 PM
#10
Junior Member
Join Date: Jan 2004
Location: kildare, IRELAND
Posts: 23
Likes: 0
Received 0 Likes
on
0 Posts
ah deadly ya im nearly finished mine, just finishing off the covering. i got a tucano for xmas its kinda like the pc9. mite c ya at the weekend!

01-09-2006, 08:00 AM
#12
Junior Member
Join Date: Sep 2005
Location: Newcastle, UNITED KINGDOM
Posts: 6
Likes: 0
Received 0 Likes
on
0 Posts
Spiderbaby,
Sadly, the plane in the photo I posted is not mine - I got the pic from a Google image search. My building has pretty much come to a halt recently, although I hope to get this rectified.
However, I did have a look at what's left to be done on my Arrow and couldn't quite figure out how the tail pieces are supposed to be attached securely. Firstly, the horizontal stabiliser and elevator don't quite fit through the holes in each side of the fuselage. To make this fit would mean either cutting or sanding the fuselage and/or stabiliser - something I'm not keen on as this could change the angle of the flying surfaces.
Secondly, how does the vertical stabiliser attach to the fuselage safely? It looks to me as if you're supposed to remove a piece of the planking from the top of the fuselage and then glue the whole thing in to the gap(?).
Lastly, I can't quite figure out whether I have a faulty nose leg/wheel setup or if I just haven't grasped the whole issue but, it looks like the steering arm is secured via a small grub allen screw, although I can't find this and nor is there a threaded whole to receive this. The brass tube appears to be a very tight fit in the plastic firewall mount and I don't understand how the piano wire leg is secured.
Could you possibly post pictures of your build when and how you get around to tackling these bits, please, and also when you address the wing leading edge extensions?
Thanks a million,
Andrew
01-25-2006, 01:32 PM
#13
Junior Member
Thread Starter
Join Date: Nov 2005
Location: Naas, IRELAND
Posts: 10
Likes: 0
Received 0 Likes
on
0 Posts
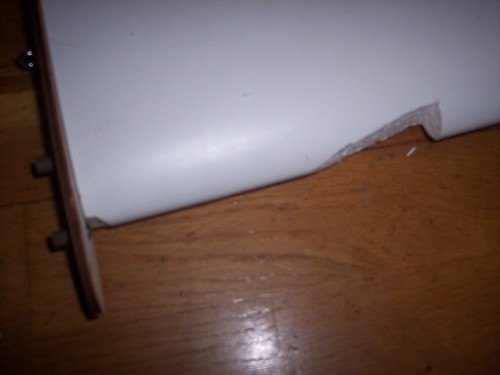
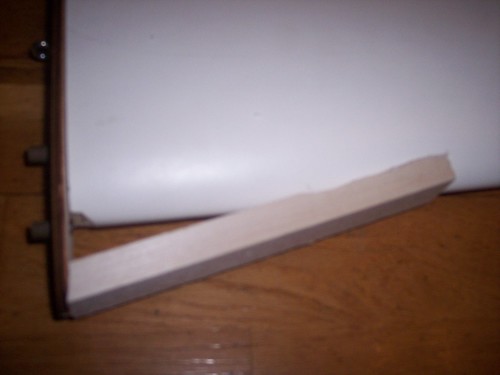
Sorry it took me to reply, i havnt checked this thread in a while. you already probably have it done but il tell you how im doing the inner leading edge.
i measured 18cm out from the edge of the wing. i cut a wedge shaped slot there. i shaped the balsa block to fit in between the wing and extra rib.
I did that just there so il post again when i have it sanded smooth. im probably gonna just glue the veneer straight to the wing.
i measured 18cm out from the edge of the wing. i cut a wedge shaped slot there. i shaped the balsa block to fit in between the wing and extra rib.
I did that just there so il post again when i have it sanded smooth. im probably gonna just glue the veneer straight to the wing.
01-29-2006, 01:22 PM
#14
Member
Join Date: Jan 2006
Location: , GERMANY
Posts: 47
Likes: 0
Received 0 Likes
on
0 Posts
Andrew & Spiderbaby,
I`ve built the Arrow II in 2003. In Germany the model is distributed by Krick. The Piper is a very good flying model but indeed I had the same problems when building it!
First of all, I decided not to use retracts because I thought is was to complicated to make changes to the middle of the fuselage. But the Piper Archer/Warrior looks similar to the Arrow II and has a fixed landing gear!
For the wing section, I did it like Spiderbaby showed in his pic. It was not to complicated. I sanded the surface of the wings and glued the thin plywood with epoxy.
But Andrew, you are totally right, the building-instruction has fatal errors:
1.) Mounting of the vetrical stabilizer:
You cannot glue the stabilizer on the upper belt of the fueselage end! This is horrible. I doubled the upper belt of the fuselage with 5 mm plywood. Then I drilled two 6mm (I think it was 6 mm) wholes in the belt and also in the foam of the stabilizer. Then I glued 6 mm round wood in the stabilizer and in the two wholes of the belt. I put the round wood as deep in the foam as possible. Important: Before you assemble this, you should glue in the horizontal stabilizer. This will ensure you that the round wood that looks into the fuselage does not disturb you when gluing in the horzontal stab.
2.) Horizontal Stabilizer:
You will have to sand it! I had the same problems, the stabilizer did not fit into the fuse. I sanded the section very carefully and tried it many times - at last it worked but to be honest: the left end of the stab. is approx. 1 cm higher than the right end. It has no bad effort on flying charackteristics! When sanding, try to put the stab. in the fuse. from both sides!
3.) Mounting of the nose-wheel:
Just throw the nose wheel, which is provided in the kit into the trash-box! I used an additional part with double-suspension. It is not that hard and it`s not a good solution to fix the nylon hinge of the wheel with a metal srew. I think the nylon material is to weak.
Two additional tipps:
-In Germany the distributer offers a special muffler. When it is the same in your country: Do not buy it. It is to big to fit propperly and my engine (brand new O.S. 91 FX) stopped twice when airborne! But the Piper is a very good handling aircraft - Twice I managed to hit the landing-strip softly - Thanks God (and my flying-skills)! So far I´m trying to solve this problem by using another muffler.
-It is suggested to make the suspension of the landing-flaps metal by metal. I think this could cause problems to the radio. Therefore I just left out the metal coins in the foam of the wing because I think the plywood is strong enough for the metal axles of the flaps. Just think about this.
If you two are interested, I`ve going to take some pics. of my model and put them in the forum.
Hope my English is good enough...
Have fun when building the plane.
Michael
02-12-2006, 11:00 AM
#15
Junior Member
Join Date: Sep 2005
Location: Newcastle, UNITED KINGDOM
Posts: 6
Likes: 0
Received 0 Likes
on
0 Posts
Thanks Spiderbaby and Michael, that is so much help!
Apologies for taking so long to reply.
Why couldn't aviomodelli have provided photos with the instructions? It would make life so much easier.
How is your build coming along, Spiderbaby? I had taken a break with mine but am in the process of digging it back out and will make an effort to get this flying this year. Currently, I am fibreglassing small parts with 0.6oz glass cloth and instead of using epoxy glue I'm using waterbased quick-drying clear interior varnish - mainly because 80% of the weight evaporates when it dries.
I intend to paint my piper arrow in British Airways colours - I just can't decide whether to use the current colour scheme or the 1980's colours. As it happens, the Piper Arrow is used by British Airways Flying Club. You can see lots of high-detail shots of the Piper Arrow at www.airliners.net. This may help you decide on a finishing scheme or, you may just want to finish it as the manufacturer intended.
Michael, your English is very good but I'm not sure I follow what you mean with regard to the flap system: QUOTE "It is suggested to make the suspension of the landing-flaps metal by metal. I think this could cause problems to the radio. Therefore I just left out the metal coins in the foam of the wing because I think the plywood is strong enough for the metal axles of the flaps."
When you fitted the vertical stabiliser by adding 6mm rods/dowels, did these go through the horizontal stabiliser and did the attach to the bottom of the fuselage?
Also, I would be very interested to see any other photos that either you or Spiderbaby have and in particular, a photo of the nose gear assembly, if possible please.
Thank you again to you both for your help so far - it is appreciated!
Cheers,
Andrew
02-19-2006, 11:35 AM
#16
Member
Join Date: Jan 2006
Location: , GERMANY
Posts: 47
Likes: 0
Received 0 Likes
on
0 Posts
Andrew,
hope with my new post it`s easier to understand what I wanted to say concerning to the flap suspension:
If you have a look at the building sheet where the wing section is shown. There is part no. 105 (it`s called PIPE in the part list) and part no. 106 (called FLAP ROD). Part no. 105 is made of brass, part no. 106 is aluminium. This means that the metal rod will move in a suspension made of brass. My first glow aircraft crashed because of misfunction of the radio. Some colleagues with more experience told me after the crash, that`s totally forbidden to make any movable metal-to-metal connections. I had connected the metal hinge of my magnum engine directly with a metal wire...[:@] After this experience I pay attention to this and I avoid movable metal-to-metal connections when possible. So my suggestion is: just leave out parts no. 105. But make your own thought about that issue!
Building of the vertical stabilizer:
I`m trying to attach a draft of the building plan, where I marked the position of the dowels. I did not glue them on the bottom of the fuse and also did not drill a hole in the horizontal stab. I doubled the top of the belt with plywood, only. So far I did not overstrengthen this construction but I´m only flying scale-like with this aircraft: no loops, no turns and things like that! So I think it`s a good idea to glue the dowels at the bottom of the fuse. But then you`ll have to drill a hole in the horizontal stab.
Nose wheel:
I have to clarify that my model has not a retractible gear. I have attached some pictures of my construction. Picture 1 shows you the first nose wheel I used, picture 2 is the newest version (only the changed position of the mount for the nose wheel, the new landing gear isn`t ready so far). I had to change it because I want to use another muffler. Therefore version no. 2 is still under construction. For version no. 1 I used the nylon mount (grey part that is screwed at the fire wall) but I bought an additional nose wheel which has two shanks (I`m not shure if "shanks" has the correct meaning but have a look at picture 1) I solded a metal hinge to the wire and then I covered the hinge with ABS-plastic and a thin coat of epoxy. When I connected the nose wheel with the servo of the steering rudder I realized that the servo had real problems! That`s why I installed a seperate servo for the nose wheel.
If you are still interested in using a retractible gear: visit the homepage of Top Flite (www.top-flite.com) They have released a kit of the Piper Arrow II. You can download the manual as a .pdf-file. The manual shows the mounting of Robart retracts. Maybe you will be inspired by these pictures!
British Airways livery is nice. I firstly decided to paint my model in colours of Lufthansa or LTU but than I`ve chosen the marks of a zebra. Looks like a safari-plane.
Cheers,
Michael
P.S.:
I`ve seen that I could not upload the drawings of the plan and of the nose wheel because they are .tif-documents. I hope you`ll see everything about the nose wheel on the pictures!
09-12-2006, 09:56 AM
#17
Junior Member
Join Date: Sep 2006
Location: haifa, ISRAEL
Posts: 15
Likes: 0
Received 0 Likes
on
0 Posts
Hello
I would like to know how much its difuculte to build kit piper arrow .
until today I was build a piper cub 1/5 skill
In Israel my friends say that its very very hard to build that kit. ( piper arrow )
I will be happy if can you tell me how much its hard to build that kit.
thanks
I would like to know how much its difuculte to build kit piper arrow .
until today I was build a piper cub 1/5 skill
In Israel my friends say that its very very hard to build that kit. ( piper arrow )
I will be happy if can you tell me how much its hard to build that kit.
thanks
10-04-2006, 12:47 PM
#18
Member
Join Date: Jan 2006
Location: , GERMANY
Posts: 47
Likes: 0
Received 0 Likes
on
0 Posts
Hi Dikoz,
I don`t think that it is that hard to build the Aviomodelli Piper. I started my Arrow in October 2003 and finished it in February 2004. I only worked in the evenings 2-3 times a week. So far I`ve already built ARF`s
The wing is made of styro an abachi, you only have to cut out the ailerons and flaps. The fuselage is real work but the wooden parts fit very, very good!
For detail works you will need some experience e.g. mounting the front wheel or fitting the horizontal stabilizer but if you have already built a J-3 Cub in 1:5 I think it could work!
Are you really shure that your friends are talking about the Aviomedelli Piper? Top Flite also offers a Piper Arrow. I`ve seen the kit and I think for that kit you must be an expert.
Just have a look at www.fmv-leingarten.de in "Pictures" you can see my Arrow II in its "safari outfit"
Regards Michael [8D]
