


Carl Goldberg Super Chipmunk build
 12-07-2014, 11:26 PM
#276

My Feedback: (32)
Join Date: Feb 2002
Location: Southern California,
CA
Posts: 152
Likes: 0
Received 0 Likes
on
0 Posts
Rye, Ok, you are familiar with the CG Chipmunks I see. Sorry about the mid air, hope you get the new one flying soon. Using the old parts for the dowel location sounds good. What engine are you running in yours? Rick
 12-08-2014, 06:01 AM
#277

My Feedback: (10)
i was using a os 61 fx but we reinforced the firewall now we are going to use the satio 100 ,ill be using your cowl as a temp the old cowl is for a os 61 , i may make #3 for a dle 20 rear muffler gasser going to beef up the front end any one have any ideas on #3 and ill be looking for another uncut cowl for the dle 20,thanks rye
12-08-2014, 10:05 AM
#278
My Feedback: (32)
Join Date: Feb 2002
Location: Southern California,
CA
Posts: 152
Likes: 0
Received 0 Likes
on
0 Posts
Rye,
I used an OS .61 for awhile then decided to use an OS .91FX and flew it that way for several years. It was a very good match. I did swap the lite ply firewall for 1/4" plywood with the OS 91. I have a World Models S Chipmunk that has a Magnum .91FS and it fly's well with that eng. I have a Saito 100 that I too will be putting in a Chipmunk (not sure when). Are you going to side mount or invert the Saito eng?
Have you seen the review of the guy who did use a DLE 20 in a Chipmunk.? I probably saved it, if I can find it I'll let you know. Maybe you have read it already?
Would you like me to look to see if I have another ABS cowl? Rick
12-09-2014, 06:21 PM
#280
My Feedback: (32)
Join Date: Feb 2002
Location: Southern California,
CA
Posts: 152
Likes: 0
Received 0 Likes
on
0 Posts
Rye,
I'll look for another ABS cowl and let you know. How about some pics of your Saito 100 install when you do it. Also, have you seen the build in this thread of a Chippy with a DLE 20? It starts about post #223 and done by Tony Builder. Rick
I'll look for another ABS cowl and let you know. How about some pics of your Saito 100 install when you do it. Also, have you seen the build in this thread of a Chippy with a DLE 20? It starts about post #223 and done by Tony Builder. Rick
12-12-2014, 07:48 PM
#285
12-15-2014, 09:47 AM
#288
My Feedback: (32)
Join Date: Feb 2002
Location: Southern California,
CA
Posts: 152
Likes: 0
Received 0 Likes
on
0 Posts
Hey Rye, You have a production line going! Are you making different modifications to each build or just upgrading to a larger engine? Looks like wooden vs plastic wing tips?
If I get a little more time I'll take some photos of the mods I have made. I put the elevator servo in the rear of the fuse with an access hatch. I like pull-pull on the rudder. I trimmed the bottom of the rudder to get more up elevator, I've cut back the cowl so it's closer to the firewall (saved over an oz of weight) and I got tired of fighting to get the cowl on/off over the engine.
Let us know what changes you've made and photos of the Saito 100 install or other mods. I'm sure others can benefit or show us their mods that they have done. It's a great all around flying plane in that size/weight range. Rick
12-15-2014, 01:16 PM
#289
My Feedback: (10)
hi rick
i got the box today thanks,
 as for the mods, no just going to pin the fire wall for the gasser with 1/8 dowel rod ,but i like the idea of servos in the rear i going to do that for this one the gasser dle 20 please post pictures and any information you have heres #2 body i will be going out of town for 2 weeks friday so the builds will be on hold for a time merry xmas happy new years, rye ps now i have to change the motor mount
i got the box today thanks,
Last edited by rye; 12-15-2014 at 01:19 PM. Reason: bad
12-15-2014, 01:30 PM
#290
My Feedback: (32)
Join Date: Feb 2002
Location: Southern California,
CA
Posts: 152
Likes: 0
Received 0 Likes
on
0 Posts
Rye, glad you received the cowl ok. Nice on the thicker firewall. I'll try to get some photos on mods I have done. Maybe give you some ideas. Hope you enjoy your 2 weeks out of town. Merry Xmas to you and hope you have the best New Year ever! Enjoying your photos. Rick
12-21-2014, 11:00 PM
#293
My Feedback: (32)
Join Date: Feb 2002
Location: Southern California,
CA
Posts: 152
Likes: 0
Received 0 Likes
on
0 Posts
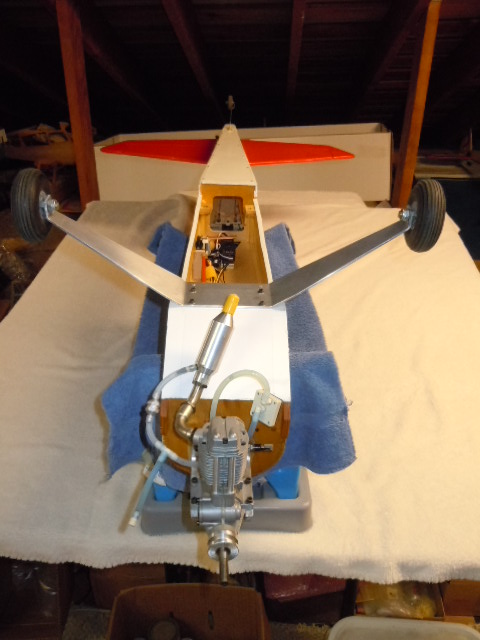
First one is the elevator servo in the rear of the fuse, the linkage in 4-5 works well (push rod attached to a center attachment in fuse) but somewhat difficult to set up. 6&7 is pull-pull for rudder, 8 & 9 is landing gear mounted on fuse and fuel tank moved back into wing saddle (eng has regulator/pump to be able to move tank further back). 4 planes shown here. 


12-28-2014, 11:30 AM
#294
My Feedback: (10)
hi rick
i am back going to start up soon ,i am going to put the pull-pull servo where the stock servos are and going to put the elevtor servo in front of that it will be a little lower so the push rod will pass under the mounting tray of the rudder tray and a long arm for travel ,i dont like the servos on the rear of the body i like the metal landing gear where did u get yours or who makes them ,thaks rye
i am back going to start up soon ,i am going to put the pull-pull servo where the stock servos are and going to put the elevtor servo in front of that it will be a little lower so the push rod will pass under the mounting tray of the rudder tray and a long arm for travel ,i dont like the servos on the rear of the body i like the metal landing gear where did u get yours or who makes them ,thaks rye
12-28-2014, 08:45 PM
#295
My Feedback: (32)
Join Date: Feb 2002
Location: Southern California,
CA
Posts: 152
Likes: 0
Received 0 Likes
on
0 Posts
Hi Rye,
It is certainly easier to set up the servos in the wing saddle. Mine was pretty crowded with with the flap servo in the wing and mostly, when I started moving the CG rearwards I ran out of room in the saddle and had to move servos and battery to the rear of the fuse. I don't think you have flaps on yours? That makes it pretty tight near the wing mounting bolts. Yes, check the wing clearance when you mount your servos. If you don't need to move servos the wing saddle is best. The metal L/G is just something I had in my L/G box and it was just about the right width and gave enough prop clearance. I haven't flown that one yet. I'll let you know how it works. If I could find the right carbon gear I think I would like that. I know I'm bashing the chipmunk but just trying to make it into a 3D and unlimited aerobatic airplane (LOL) NOT. Just having some fun with a great airplane.
Let me know when you make some progress on your current build. Rick
04-02-2015, 08:26 AM
#296
Junior Member
Join Date: Apr 2011
Location: Hudsonville, MI
Posts: 9
Likes: 0
Received 0 Likes
on
0 Posts
Anybody have a set of the decals they are not using? Mine have gotten a little fuel on them as I was building, and are no good. All I have left to do is connect fuel lines, attach canopy, decals?, and final balance. I will post pics soon.
04-02-2015, 09:00 AM
#297
My Feedback: (32)
Join Date: Feb 2002
Location: Southern California,
CA
Posts: 152
Likes: 0
Received 0 Likes
on
0 Posts
I couldn't find decals and looked at an electric chipmunk arf that Tower sells (Great Planes?) and got a "smaller" set for about $6.00 I think it was. Maybe consider if you can't find the normal size ones. If you can wait, they do seem to show up from time to time.
04-09-2015, 06:33 AM
#298
Junior Member
Join Date: Aug 2009
Location: Alliance,
NE
Posts: 15
Likes: 0
Received 0 Likes
on
0 Posts
This is an old thread but I just found it..I have built two CG Super Chipmunks..The first one I lost back in the 80`s due to radio failure..Both look like Art`s color scheme..My complaints were that the landing gear wires are a little soft,as was the plastic on the cowling..Aftermarket cowling from Fiberglass Specialties fixed that..Both planes had/have Super Tigre .61 engines..I wish now I would have went with a .91 four stroke..Goldberg manuals are the best,as are the little tools you build to build the plane..Great stuff..Adjust the center of gravity back a little and there is nothing this plane won`t do..Don`t skimp on the servos,and you can really hammer the sticks...
04-09-2015, 06:39 AM
#299
Junior Member
Join Date: Aug 2009
Location: Alliance,
NE
Posts: 15
Likes: 0
Received 0 Likes
on
0 Posts
Oh and I should add that, I love the Super Chipmunks so much I am just starting on a red,white and blue Slipstream Super Chipmunk! Might as well have a set.. I would love to see some more giant scale Chipmunks on the market..
04-09-2015, 07:50 AM
#300
My Feedback: (32)
Join Date: Feb 2002
Location: Southern California,
CA
Posts: 152
Likes: 0
Received 0 Likes
on
0 Posts
Swede520, The CG Super Chipmunk has been one of my favorite all around planes. It really can do a lot and has no bad habits. I flew one for about 4-5yrs. I still have a couple that I am slowly putting together (doing some mods) and hope to get back in the air. The landing gear and it's blocks in the wing were soft. Better to reinforce the blocks or use better quality ply than soft ply for the blocks. And rake the gear forward under the leading edge. I had an OS .91FX 2 stroke in one for years. I have a Magnum .91FS in a World Models Chipmunk. I hope to put a Saito 100 in one in the future. Yes, adjust the CG to about the farthest rear range (slow increments) and it fly's great!
What engine are you putting in the Slipstream Chippy? I have one that I will probably put a gas 35cc eng in. Be a while before I start putting that one together.
You can still find some older 20-25% scale kits by Ohio RC, Pro Craft and current, Precision Cut Kits out there. The UK had a kit from Apache (under new owner now). There was a company that had a large kit (think Aerotech?) but the kit was very expensive.
Would like to know how your Slipstream build goes. Also, if your currently flying a CG Chippy and what you have in it? Rick