


Sig 1/5 scale piper cub
 04-12-2013, 06:11 PM
#226

Hey SDP,
I know thisgoes a ways back, but I have a question re: the wingstrut attachment points on your 1/5 scale cub (and maybe your 1/4). I believe that you installed the Robart gear which is more narrow front to back than the kit supplied wire gear from Sig. I know that this requires modification of the hardwood gear mounting blocks. Didn't you add a mounting block about an inch in front of the existing rear block? My real question is what did you do with the wing strut mounting point. Did you attach it further up under the rear Robart gear attachment point? I believe that this would actually be much further foward than the position that is indicated on the plans.
Thanks for your time.
Robert
 04-12-2013, 07:04 PM
#227

The strut attachment point did move forwards with the gear. You build the struts on the plane so the change in location is not an issue. Here are a few photos of my 1/5th Cub during the build.
SunDevilPilot
SunDevilPilot
04-12-2013, 07:07 PM
#228
Here is the 1/4 Cub strut attachment. Almost exactly like the 1/5th.
(I have better photos of the 1/4th Cub's struts than the 1/5th)
SunDevilPilot
(I have better photos of the 1/4th Cub's struts than the 1/5th)
SunDevilPilot
04-13-2013, 03:23 AM
#229

Join Date: Dec 2005
Location: Torrington, CT
Posts: 144
Likes: 0
Received 0 Likes
on
0 Posts
For those who are following this thread...
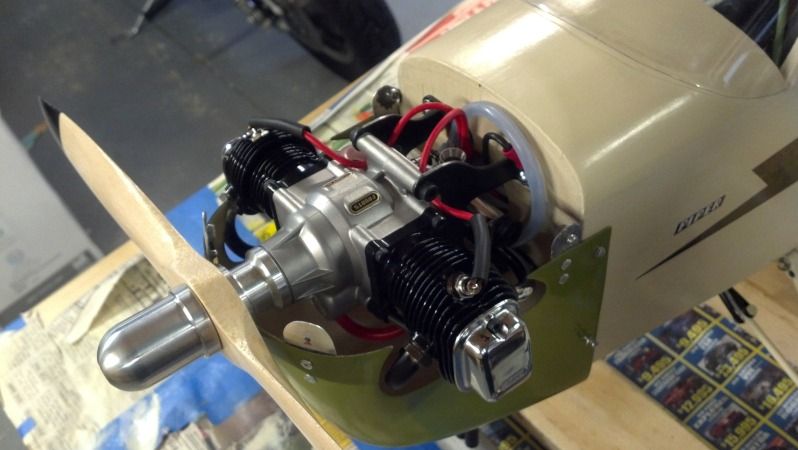
Here's an update to my cub build. I was using a magnum 91 4-stroke, and am moving to gasoline for all my planes. I replaced the magnum with an RGCF 15cc from Graves RC, using a Jtec compact RCGF 15cc muffler. I cut 10mm from the original 15cc engine standoffs and opened up the firewall hole to accomodate the carb peeking into the firewall.
Flys like a dream. started with a 14x7 triple, but switched to a 14x8 Zoar.
Here's some photos...
06-17-2015, 07:09 AM
#231
My Feedback: (2)
I guess I'm resurrecting this old thread for a bit... I'm just collecting parts and info though. I have a Sig Anniversary Cub, 1/5 Scale and see that Robart has a really expensive LG for this plane. I also seem to recall that there were other vendors who supplied some good, scale LG but I cannot remember who they were.
Can anyone help with info or opinions???
Thanks,
Bob
Can anyone help with info or opinions???
Thanks,
Bob
06-17-2015, 09:53 AM
#233
My Feedback: (2)
Thanks RV7.... What did you use for scale tires??? Did you use Robarts or Dubros? What size, if I might ask???
I was also thinking about using a Fiberglass Specialties glass cowl. Any thoughts or comments on that???
Thanks a lot,
Bob
I was also thinking about using a Fiberglass Specialties glass cowl. Any thoughts or comments on that???
Thanks a lot,
Bob
Last edited by N1EDM; 06-17-2015 at 09:57 AM.
06-18-2015, 03:19 AM
#235
My Feedback: (2)
I think I'll use the Dubro 1/5 Scale tires for the Scale look. I'm getting the Robarts LG. I saw an option listed for the J-3 somewhere for some 'fenders'. Any idea what those are???
In case anyone needs it, someone was rebuilding a J-3 at a local airfield and I had the chance to get some really detailed photos of it, if anyone needs any scale detail.
Bob
In case anyone needs it, someone was rebuilding a J-3 at a local airfield and I had the chance to get some really detailed photos of it, if anyone needs any scale detail.
Bob
09-19-2015, 07:58 AM
#236
Junior Member
Join Date: May 2010
Location: Walker,
LA
Posts: 2
Likes: 0
Received 0 Likes
on
0 Posts
I think I'll use the Dubro 1/5 Scale tires for the Scale look. I'm getting the Robarts LG. I saw an option listed for the J-3 somewhere for some 'fenders'. Any idea what those are???
In case anyone needs it, someone was rebuilding a J-3 at a local airfield and I had the chance to get some really detailed photos of it, if anyone needs any scale detail.
Bob
In case anyone needs it, someone was rebuilding a J-3 at a local airfield and I had the chance to get some really detailed photos of it, if anyone needs any scale detail.
Bob
01-12-2016, 08:11 AM
#237
Senior Member
Join Date: Jul 2003
Location: Patriot Nation
Posts: 105
Likes: 0
Received 0 Likes
on
0 Posts
I guess I'm resurrecting this old thread for a bit... I'm just collecting parts and info though. I have a Sig Anniversary Cub, 1/5 Scale and see that Robart has a really expensive LG for this plane. I also seem to recall that there were other vendors who supplied some good, scale LG but I cannot remember who they were.
Can anyone help with info or opinions???
Thanks,
Bob
Can anyone help with info or opinions???
Thanks,
Bob
Omni Models has the Robart unit for $133.
01-21-2016, 05:28 AM
#241
Senior Member
Join Date: Jul 2003
Location: Patriot Nation
Posts: 105
Likes: 0
Received 0 Likes
on
0 Posts
I have a Smith Miniplane as well. I need to put in some right thrust as the one and only time I flew it it took a wicked left turn into a tree with only minimal damage to one of the N struts. Did you add right thrust? I've read about 3 degrees is needed.


01-21-2016, 05:49 AM
#242
My Feedback: (10)
I did indeed, using washers between the motor mount and firewall on the port side, to act as spacers. My Smithy flies great! See my build thread if you're interested; this bird has been flying for 9 years now 
Nice color scheme on yours, haha!
http://www.rcuniverse.com/forum/kit-...ane-build.html
Nice color scheme on yours, haha!
http://www.rcuniverse.com/forum/kit-...ane-build.html
01-24-2016, 08:02 AM
#245

My Feedback: (1)
Join Date: Oct 2005
Location: Spring Hill, TN
Posts: 97
Likes: 0
Received 0 Likes
on
0 Posts
I used the Sig cowl as well like RV7 (also ordered a backup as well), as it's pretty nice, although the Fiberglass Spec stuff is really nice. I have several of their pieces for my TF P47 build and I highly recommend them.
I went with the Robart/Dubro gear and tires as you can't beat it for scale looks and functionality. After your build was done, you'd look back and probably regret not spending the $150(or so) to get them and add them to the build. I also highly recommend the Top Notch 1/5 scale dummy engine kit. It's a super nice add-on for the engine and looks SO much better than the plastic engine included with the kit http://www.topnotchkits.com/index_files/TN_Kit11.htm. It can be a challenge to mount and keep engine clearance, but I squeezed mine in there with room to spare for the Saito .72 I have mounted up front. I also used the Mcdaniels remote glow driver for ease of starting and to keep the engine running smoothly at the lower RPM's http://www.sonictronics.com/xcart/pr...cat=310&page=1.
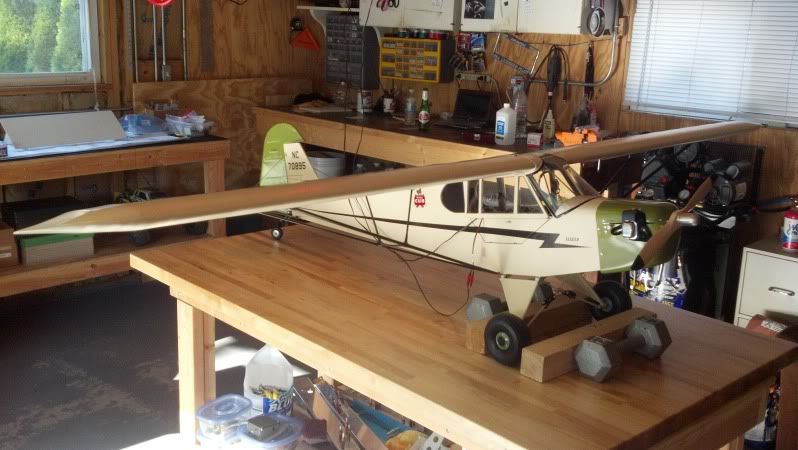
I copied RV's J3 as color inspiration for my build as well as you can see using the Nelson Hobby paint that I brushed on with foam brushes. It turned out very nice, but is somewhat of a pain to use. But this is a cub, and not some high end show plane. It's not supposed to have a super nice finish, but a more robust and used look if that makes sense. It was a really fun build and the quality on the Sig 1/5 Cub kit is excellent!
The plane is easy to fly and looks great low and slow. It doesn't like wind, and I never really fly it much if the winds are above 7-8 mph as it's just to fragile to hold up to rougher landings and higher crosswinds. But all in all it's a wonderful kit and flyer and looks and sounds great putting through the air.
I don't have very many good pics, but here are a few.
-Josh
https://www.youtube.com/watch?v=BOrWfHx2bEU
I went with the Robart/Dubro gear and tires as you can't beat it for scale looks and functionality. After your build was done, you'd look back and probably regret not spending the $150(or so) to get them and add them to the build. I also highly recommend the Top Notch 1/5 scale dummy engine kit. It's a super nice add-on for the engine and looks SO much better than the plastic engine included with the kit http://www.topnotchkits.com/index_files/TN_Kit11.htm. It can be a challenge to mount and keep engine clearance, but I squeezed mine in there with room to spare for the Saito .72 I have mounted up front. I also used the Mcdaniels remote glow driver for ease of starting and to keep the engine running smoothly at the lower RPM's http://www.sonictronics.com/xcart/pr...cat=310&page=1.
I copied RV's J3 as color inspiration for my build as well as you can see using the Nelson Hobby paint that I brushed on with foam brushes. It turned out very nice, but is somewhat of a pain to use. But this is a cub, and not some high end show plane. It's not supposed to have a super nice finish, but a more robust and used look if that makes sense. It was a really fun build and the quality on the Sig 1/5 Cub kit is excellent!
The plane is easy to fly and looks great low and slow. It doesn't like wind, and I never really fly it much if the winds are above 7-8 mph as it's just to fragile to hold up to rougher landings and higher crosswinds. But all in all it's a wonderful kit and flyer and looks and sounds great putting through the air.
I don't have very many good pics, but here are a few.
-Josh
https://www.youtube.com/watch?v=BOrWfHx2bEU
01-24-2016, 12:24 PM
#246
Of all my planes my Sig 1/5th Cub probably has the most flights on it. Mine has been in continuous service since the maiden in March of 2009. A few minor upgrades along the way, motor, wheels, and gear spring struts.
I do so many touch-n-goes per flight I was rapidly wearing out the wheels. The Dubro inflatable rubber tires seem to last a long time but to solve the issue I made some aluminum wheels with bearings. I also made some spring struts to replace the rubber band / o-ring setup inherent to the Robart gear.
SunDevilPilot
Last edited by SunDevilPilot; 01-24-2016 at 12:30 PM.
01-24-2016, 12:42 PM
#247
My Feedback: (10)
SunDevil, I've admired your Cub for years, now. Just excellent attention to detail and scale touches. Some day I want to go back and really detail mine; cockpit, especially. Maybe make the Windows look better, haha 
Just for the sake of posting, here are a couple more pics of mine. I'm proud of the engine compartment
Just for the sake of posting, here are a couple more pics of mine. I'm proud of the engine compartment
01-24-2016, 01:40 PM
#248

Of all my planes my Sig 1/5th Cub probably has the most flights on it. Mine has been in continuous service since the maiden in March of 2009. A few minor upgrades along the way, motor, wheels, and gear spring struts.
I do so many touch-n-goes per flight I was rapidly wearing out the wheels. The Dubro inflatable rubber tires seem to last a long time but to solve the issue I made some aluminum wheels with bearings. I also made some spring struts to replace the rubber band / o-ring setup inherent to the Robart gear.
SunDevilPilot
, I added integral drums for working hydraulic drum brakes.I used 4, 10mm x 5mm miniature ball bearing used in the 1:10 scale car clutch bells, they last a life time as wheel bearings.
John M,
Last edited by John_M_; 01-24-2016 at 01:50 PM.
01-24-2016, 02:39 PM
#250
I will be posting a thread on the entire refurbish; I turned a 1/4 sig cub near close to 95% scale... I'm waiting for some 3D printed parts in wax to do some lost wax castings to complete the tail wheel and interior parts.
The brakes are expanding thin wall silicone tubes with a thin leather jacket over the tubing for the brake linings... uses a master cylinder made out of 1/4" brass tubing... non expanding Clippard brand clear brake line connects the brake drums to the master cylinder... the system is filled with silicone shock oil, very simple and effective... It will almost hold the aircraft with 3/4 throttle run-ups... you don't need anywhere near that for taxiing, and definitely very little if any on landing or you'll flip it on its nose.
John M,