


Top Flite Cessna 182 build
 12-25-2013, 06:58 PM
#1001
Junior Member
Join Date: Jun 2013
Location: auckland, NEW ZEALAND
Posts: 10
Likes: 0
Received 0 Likes
on
0 Posts
Great Vidio what engine and onboard starter are you usingQUOTE=ALPHA-AIR;11490596]Hi all,
a little (test-) vid from the finished Cessna:
http://www.youtube.com/watch?v=MoLbQJJF9Ho
Re-maiden flight is next weekend , if the wind conditions seems right to me..[/QUOTE]
a little (test-) vid from the finished Cessna:
http://www.youtube.com/watch?v=MoLbQJJF9Ho
Re-maiden flight is next weekend , if the wind conditions seems right to me..[/QUOTE]
 12-25-2013, 11:19 PM
#1002
Junior Member
Join Date: Feb 2013
Location: cle elum, WA
Posts: 13
Likes: 0
Received 0 Likes
on
0 Posts
I'm also building the same model. I'm considering the Zenoah ZP 20 or Zp 26. Electronic ignition that will accept a 2 cell lipo. Easy starts so I understand. This is my first build so if u don't mind I would like to follow ur build. Been in RC for 25 yrs but only a few yrs in the plane world.
01-15-2014, 07:03 AM
#1004


That is like asking what is the best sports team, you ask 5 people and get 6 opinions! However if you keep with a good brand like Futaba, JR, or Hitec you should be OK. In my 182 I have all s3004s except for the throttle which has a s3001. The trick is to match the servo to the load. If I had the ailerons or flaps on one servo I would move up to a heavy servo with more torque.
 01-15-2014, 08:16 AM
#1005
Junior Member
Join Date: Jun 2013
Location: auckland, NEW ZEALAND
Posts: 10
Likes: 0
Received 0 Likes
on
0 Posts
Thanks that gives me a starting point.moving from nitro helis where servos are a big part and expense especialy in the 60 and 90 flybarless that i fly typicly im spending $160 per servo.hi speed hi torque digitals with alloy cases for cooling as example rjx swash servo speed 0.4 torque 12.5 kg
01-15-2014, 09:24 AM
#1006
Your servo pick is based on the size of the aircraft and the style of flying you will be doing. The stuff I fly is mostly scale and some high wing trainers like the Kadets, along with the odd Oldtimer. I don't 3D or anything like that and my airplanes are usually 1/5th scale. If I do go to quarter scale the subject has a wingspan of less than 90 inches and a weight less than 25 lbs.
02-21-2014, 10:44 AM
#1009

Unfortunately the plans for the Top Flite Cessna are what are called builder's plans. this means that they do not contain outlines of all the parts on the plans. Also, this is a kit that is currently in production from Top Flite and would be a copyright violation as well. You can purchase this kit directly from Tower Hobbies here:
http://www3.towerhobbies.com/cgi-bin...?&I=LXHU91&P=7
Ken
http://www3.towerhobbies.com/cgi-bin...?&I=LXHU91&P=7
Ken
04-01-2014, 02:35 PM
#1011
Member
Join Date: Jun 2006
Location: Melbourne, AUSTRALIA
Posts: 59
Likes: 0
Received 0 Likes
on
0 Posts
Before I started building I went over the entire plan making adjustments here and there to get the basic outline closer to scale, this included the top rudder fairing and where the lower rudder meets the tailcone. The first photo shows the modified shape of the rudder top fairing. The top fairing also sits very sligtly "proud" of the main rudder (the full size rudder top fairing is fitted over the top of the rudder giving it this look) I achieved this by wrapping two layers of masking tape around the rudder at the bottom of the top fairing block and sanding it down to the masking tape surface. You can just see this change in the surface in the second and third photos. Where the lower rudder meets the tailcone was simply a matter of adding a small piece of 1/8 balsa to get the correct contour. The hardest part I found was fitting the rudder once it was complete as I used the fully faired hinge method which doesn't allow much room for movement when installing, especially with a swept back rudder.
Last edited by crowe04; 04-01-2014 at 02:40 PM.
04-02-2014, 09:54 AM
#1012
Before I started building I went over the entire plan making adjustments here and there to get the basic outline closer to scale, this included the top rudder fairing and where the lower rudder meets the tailcone. The first photo shows the modified shape of the rudder top fairing. The top fairing also sits very sligtly "proud" of the main rudder (the full size rudder top fairing is fitted over the top of the rudder giving it this look) I achieved this by wrapping two layers of masking tape around the rudder at the bottom of the top fairing block and sanding it down to the masking tape surface. You can just see this change in the surface in the second and third photos. Where the lower rudder meets the tailcone was simply a matter of adding a small piece of 1/8 balsa to get the correct contour. The hardest part I found was fitting the rudder once it was complete as I used the fully faired hinge method which doesn't allow much room for movement when installing, especially with a swept back rudder.
05-03-2014, 06:27 PM
#1013
Senior Member
Hi crowe04 earlier in this thread you showed this method for glassing http://www.tompierce.net/190/html/paint/glassing.htm
Since you are in Melb too, can you tell me the brand names of the locally purchased products you used?
Since you are in Melb too, can you tell me the brand names of the locally purchased products you used?
05-03-2014, 08:04 PM
#1015
Senior Member
05-03-2014, 08:21 PM
#1016
Member
Join Date: Jun 2006
Location: Melbourne, AUSTRALIA
Posts: 59
Likes: 0
Received 0 Likes
on
0 Posts
Brilliant day (for ducks)!!!!
I tried sanding sealer on the rudder but found that the weight exceeded the benefits of the sealer so I didn't bother for the rest of the model.
I tried sanding sealer on the rudder but found that the weight exceeded the benefits of the sealer so I didn't bother for the rest of the model.


 07-28-2014, 02:30 PM
#1019
Banned
07-28-2014, 04:56 PM
#1020


Join Date: Apr 2014
Posts: 3
Likes: 0
Received 0 Likes
on
0 Posts
Hi ,My Job is Airline Captain Airbus A 320 and 319 in Chile ,Regional Airline ...Sky Airline.
I have an old single engine Cessna U206 B 1967 in south of Chile (Chiloe island) working in aero taxi with Tourist and charters.
Similar scheme
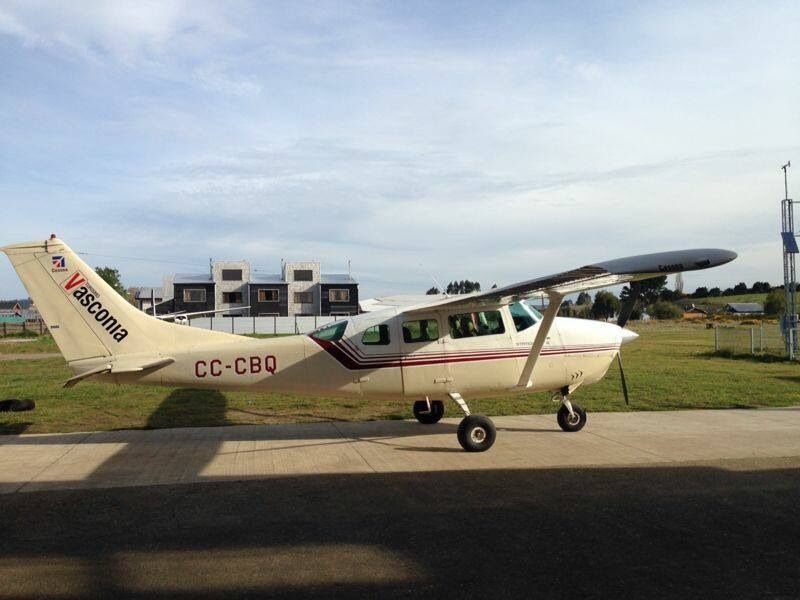
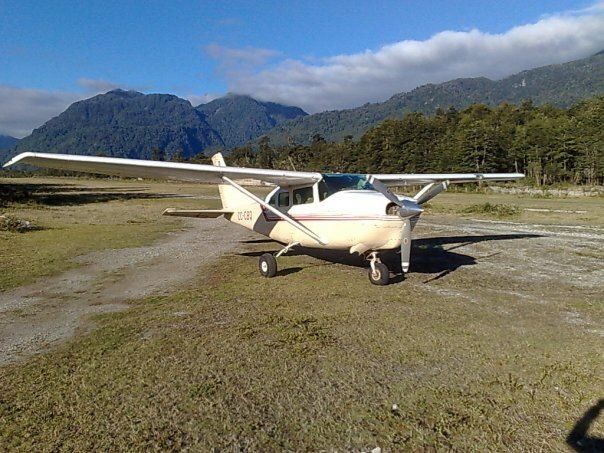
I have an old single engine Cessna U206 B 1967 in south of Chile (Chiloe island) working in aero taxi with Tourist and charters.
Similar scheme

 07-28-2014, 07:43 PM
#1021
Banned
Well _ _ _ I had a good hunch about you.
Your chosen nickname triggered my hunch because I have many hours flying a 206.
Laurentide Aviation in Montreal ( province of Quebec ) were the distributors for Cessna in Canada and I was an instructor with Laurentide.
They imported the first 206 in Canada and I had the privilege of flying the 206 to many airports demonstrating the new 206. That was in the mid 1960s as I remember well.
It is a super flying machine and most pleasurabe to fly. I suspect you will agree with me based on your own experience.
It would be nice to see more of the 182 model. The 206 is a result of the advanced progression of the 182 and of the Cessna 210.
I went to the link www.turismovasconia.cl and surprised myself how much I could read Spanish.
Again, nice to see you here; looking for more postings from you at your convenience.
Best regards from Zor.
07-28-2014, 08:49 PM
#1022
Join Date: Apr 2014
Posts: 3
Likes: 0
Received 0 Likes
on
0 Posts
Talking with you is a proud, we agree on the 206 a real truck.
This kit T.F 182 assemble it long ago, but as the work is increasingly more absorbent not even flying it.
Do you have the same Kit?
Greetings, I hope I have more experiences with the 206.
This kit T.F 182 assemble it long ago, but as the work is increasingly more absorbent not even flying it.
Do you have the same Kit?
Greetings, I hope I have more experiences with the 206.
07-29-2014, 07:34 PM
#1023
Banned
Some day, I think, you will fly that 182. It looks very nice and in the pics the engine is running.
I do not have a 182 but quite a few hours on the Skylane including on amphibious floats. We used to take students from the airport to a base on the river for students taking their seaplane endorsements.
I found Castro on Chiloe Island. Beautiful country to fly the 206. I saw the dual causeway connecting the island to the main land.
I see an airport at the north end of the island but from your pictures I suspect you have a location to fly the 206 closer to home.
I would have lots to talk about with you but I do not wish to take this thread out of topic.
Best 2 U from Zor
Last edited by Zor; 07-29-2014 at 07:42 PM. Reason: Reformatting