


Skybolt hangar and clubhouse
 05-10-2012, 12:05 PM

robc57,
I strongly suggest that you do not use dowel(s) at the leading edge of the bottom wings.
Do I have to explain why ?
Zor
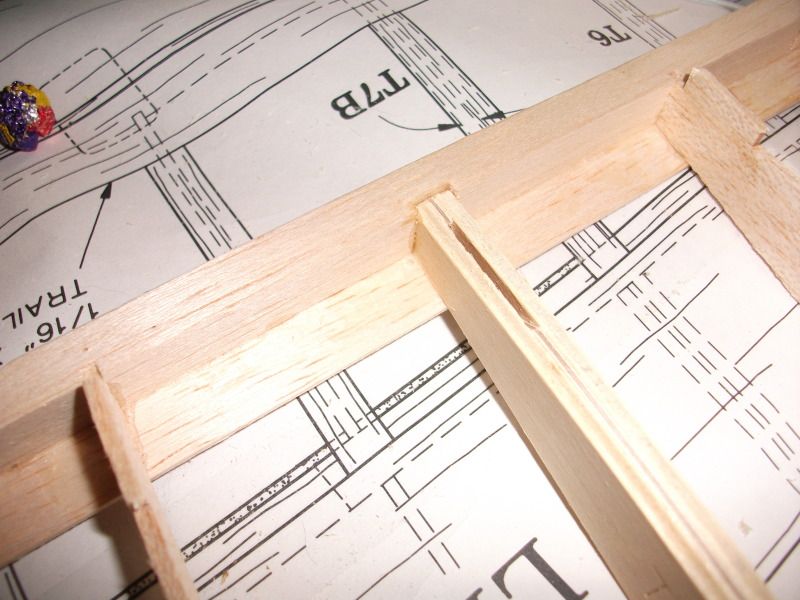
There's a 1/16" ply brace already there, double this up extending it out a bay each side and back it with some medium block tieing the two root ribs, the spars and the leading edge together, whack a 5/16" dowel in - Bob's your uncle!
 05-10-2012, 01:18 PM
u2builder and robc57
I just read your last postings.
Right now 16:20 EDT I have to have my first and only meal of the day then I have to plant some vegy and flowers while it is still daylight.
Please check later this evening and I will explain.
Thanks from Zor
05-10-2012, 06:55 PM
u2builder and robc57,
My reasoning why I suggested "not to use dowel(s) to hold the leading edge of the bottom wings".
I will try to explain as clearly as I can.
The dowels would have to extend at least 1/4" and perhaps preferably 3/8" in front of the leading edge.
That means that the lower wing would have to be back by at least that amount to present the dowels to their holes. It also mean that the trailing edge would be down (lower than final position) by 5/8"; check with drawing.
If the holes in which the dowel(s) go in is (are) a good 1/4" deep then their diameter need to be larger than the dowel(s) because the dowels are going in at an angle. I can see the holes being the same width as the dowel(s) but have a slope upward at their top to accommodate the insertion.
I believe that this low wing must have no play at all at its leading edge.
I also believe that the aerodynamic forces acting on the low wings have to be transferred to the main front spar.
I have no doubt that you can modify the wing structure to install a dowel or two that would have a diameter nearly as much as the leading edge thickness. I hate to think cutting off the wood grain of that leading edge piece. I realize that there is the D section planking that is pretty strong.
Ii suppose that you would provide in the modified structure to bring this (these) dowel(s) all the way into the main spar.
A few words about the fit of the dowel(s) in the hole(s).
When we talk about "fits" (fitting) we have three categuories ___
1 loose __the hole is larger in diamete than the dowel.
2 slipping fit __the hole and dowel are exactly the same size and the dowel slips in easily but without any play (looseness).
3 interference fit __the hole is just a tiny bit smaller diameter than the dowel and the dowel has to be forced in.
I belive that item 2 above is the only proper and suitable fit for the low wing leading edge.
It might be difficult to achieve with the dowel(s) having to insert at an angle.
I alsothink that for this #2 fit the dimensioning of the hole(s) and dowel(s) should be stabilized and thus unaffected by temperature and humidity.
Then there is the matter of the assembly method.___
Top wing first or bottom wing first.
I have no idea if you have already figured that out.
Here I install the bottom wing first on which the "I" beams (interplane struts) are already on with the flying and landing wires.
On disassembly I take off the top wing first and the flying and landing wires stay with the lower wing and the struts. Theni can remove the lower wings.
Note that I do not have to remove the wings for access the the battery.
The battery and the fuel tank are removable by removing a hatch in front of the landing gear.
On re-installation I put on the low wing first and slip on the top wings.
Perhaps I talk too much
 .
. Just my thinking and ideas but just do what your feelings tell you to do.
After 30 years of using dowels I am sure that my suggestion is useless.
Please just forget about it and enjoy your builds.
I said that I would post to explain later so I am holding my promisse.
Zor
05-11-2012, 12:15 AM
First - the dowel hole. My practise with this is to oval the hole vertically by removing material from the top of the hole for a low wing design, or from the bottom for a shoulder wing. This is the non-load bearing side of the hole. You could use a 2" deep slot to locate the dowel in, only the bottom half of the hole which forms the load bearing surface is of any consequence. There will be no problem with fitting the wing in place!
Second, where the wing is set into the fuselage to any degree, the rear face of the wing cut-out should be angled backwards slightly to allow the trailing edge with attached belly-pan to drop down and slightly back as you remove the wing.
Third, the loads are spread by the wing skins, the block infill, the leading edge and it's ply doubler into the root ribs, from there to the spar.
Honestly, it does work fine for our MODEL engineering![8D] Try it sometime, it's one less bolt to drill and tap for, and one less item to loose
Oh yes, one other practise I use is to drill and tap the ply wing mount plate rather than using a captive nut. Harden the threads with a good soaking in thin cyno and it works a treat. These methods hold the wings on my .60 powered Tornado and .90 powered King Altair pattern aerobatic models.
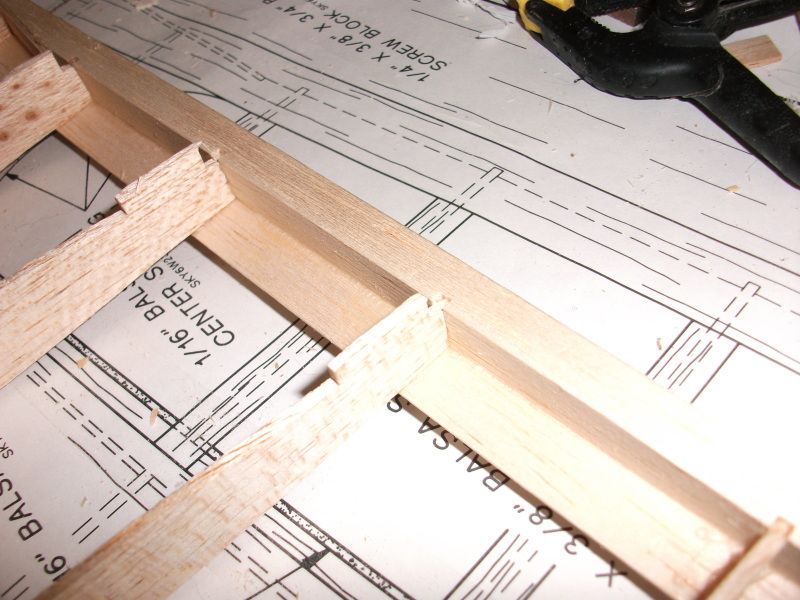
Back to the build - last night I bonded on the spar doublers and popped the lower wing ribs out of their sheets. I really can't believe the quality and accuracy of the die cutting in this kit. It's even good quality rib stock balsa! It a real revelation of what could be acheived pre-laser.
05-11-2012, 02:04 AM
05-11-2012, 03:36 AM
I also sheeted the turtle deck with a contest grade 3/32 rather than the supplied standard grade 1/16 because it bends easier, weighs a little less, and gives a little more thickness for sanding. I used the supplied balsa for the leading edge skins because going too light in the leading edge tends to result in cracked balsa when handling the plane.
05-11-2012, 09:12 AM
robc57,
Thanks for your post and comments.
There certainly is more than one good way of doing things.
Another reason for me to avoid dowel(s) like you are planning to use is that in a crash mishap I prefer to see screws pulling out than dowel(s) tearing up the fuselage structure. I assume the dowels are of hard wood and at least 1/4" dia.
I must say that there has been no crash with my Skybolt. Once running out of fuel and unable to make the field it landed in tall bushes (small trees) without any damage at all so I do not call that a crash _
 _
_ _.
_. I did not remove the wings since 2010 as it fits all assembledjust sitting on the bed of my old Ford RV (1979).
I installed active (working) flying and landing wires of stainless steel in the same pattern of the full size even though it is not really needed. Just a fancy I took while building. This cross bracing of the wings may In a potential crash reduce any damages. Perhpas it helped in the tree landing.
I also have stainless steel wires on the empennage. A single set but provisions in place to add a second set like on the full size Skybolts.
I can remove the top wing without touching the wires.
The landing gear can tear off without affecting the wires at the bottom of the fuselage.
The feathers are totally bolted on which would makes it easier to remove and do repairs if damaged.
We just do things our own way and have fun.
My best friend Tony that lived across the street from me and passed away two years ago was from Birmngham, UK and immigrated to Canada in 1969.
Another best life time friend who retired in Florida was also from Birmingham, UK.
Nice chatting with you about the Skybolt ___a super aerobatic and best flying machine.
Zor
Edited to add a P.S.: It would be nice to see some pictures on your and u2builder progress.
End
05-11-2012, 10:16 AM
05-11-2012, 11:54 AM
Hey Zor, I am all done building, finished and posted pics and info back in the early 50 pages this winter. Just waiting to maiden. I just hang around here because it is one of the few build threads that is active and in a plane I am interested in, and to pass on advice to new builders.
It's a long time that I have looked at the beginning of this thread wih 1400 or so postings.
When I can find enough time, I will start from post one and browse through.
I can barely see the time go by so fast with all the chores that need to be done.
Best 2 U and thanks again.
Zor
05-11-2012, 02:18 PM
robc57,
Thanks for your post and comments.
There certainly is more than one good way of doing things.
....................................
We just do things our own way and have fun.
My best friend Tony that lived across the street from me and passed away two years ago was from Birmngham, UK and immigrated to Canada in 1969.
Another best life time friend who retired in Florida was also from Birmingham, UK.
Nice chatting with you about the Skybolt ___a super aerobatic and best flying machine.
Zor
Edited to add a P.S.: It would be nice to see some pictures on your and u2builder progress.
End
I've started the lower wings, but there's nothing more to see yet that's any different from the photos in the instruction book. Iguess the next thing that may deserve a picture will be assembling the cabane once the wings are complete, and modding the lower wing for a dowel.
My Uncle Ron emigrated to Canada in the mid 60s, Toronto Ithink. Anyway, he gave me an Eros 84" cabin model set up for single channel with a McCoy 29 disc valve engine as he couldn't take it with him. Iguess Iwas about 13 or 14 at the time. That was what drew me into RCand away from control-line.
05-12-2012, 07:41 PM
 05-19-2012, 07:44 AM
The top wing is another matter. The rear of the ribs is about 1/32" shallower than the depth of the TE. The TE matches the aileron stock once the 1/16" sheet is added top and bottom, so I'm sure it's not the problem, the ribs are. I've built the wing with the top of the ribs lining up with the TE stock. On the underside I'll strip some 1/32" sheet to 3/32" wide and cap the ribs from TE to spar, then feather this cap down to the spar.
Its all ribs, which is odd.
 05-19-2012, 09:29 AM

I lined (adjusted) all the ribs at their top using a 1/16" thick little piece of sheet balsa in anticipation of the 1/16" sheeting and then after cementing the trailing edge flush at the top and having cemented the sheeting both top an bottom I sanded the top and bottom faces of the TE spar and the TE piece all flush with the ribs capstrips.
A sanding bar 12" long and 2" wide did a good job using 80 grit and finishing with another sanding bar with 320 grit. I do not have to go with a finer grit since I am using fabric and dope finish.
I have found over times that balsa stringers and sheeting have pretty wide tolerances for dimensions and thickness not to mention drastically wrong hardness for their application.
All turned out well at the end by substituting new purchased and chosen material from the LHS.
You are doing very well with your progress; keep it up.
Zor
05-21-2012, 05:53 AM
I had my first flight of the season with my Skybolt yesterday. We finally had some decent weather and I had a small window of opportunity. I was a little nervous this first flight and with the wind blowing from the left of the runway my first landing attempt was too fast. I did a hard touch and bounce about halfway down the paved runway and it was still flying so I throttled up and went around. There were comments from the peanut gallery behind me trying to figure out if I'd botched the landing or made a "touch and go" so I claimed touch and go and tried again. The next attempt was still on the fast side but I got it settled onto the runway and rolled out into the grass off the far end and taxied back.
I'll have to get reaquainted with the speed envelope again.
Jaybird
05-21-2012, 11:55 AM
The next task is to glass the strut ends then I'll be in a position to join the lower wing and finalise the alignment of the cabane. I guess some epoxy and micro balloons will be needed to fair in the glasscloth. I'm sure I've got a bottle of balloons somewhere, it's just a matter of digging them out.
05-25-2012, 03:38 AM
Not to worry, I have a crafty plan!
First I strapped a straightedge across the lower wing seat square to the fuselage - this gives me datum #1. I glued on the tailplane using this, the fin and the front of the fuselage sides as references to get it square. The tailplane is now my primary horizontal datum.
I assembled the cabane by clamping the cabane holder ply plates around the wires and used tie-wraps to hold the wires roughly together. With the top wing on and propped up level I could check the incidence and squareness to the fuselage (wing tip to fin post measurements) and adjust the cabane holder cutouts to suit.
With everything taped together I flipped the model and attached the struts and lower wing half, remembering to pack the trailing edge from the wing seat by 1/16 to allow for the sheet. Because the cabanes weren't glued I had some leeway to move the top wing back and forwards to get the lower wing lined up in it's seat. This now defined the lower wing dihedral so I glued the two halves together in place and added the large dihedral brace to lock it up.
Now I have a one-piece lower wing so I can complete the sheeting on it, then bolt it on to the fuselage and use it as a reference for fitting the top wing and cabane assembly, which I'll assemble while the glue is still liquid to allow for tweaking the alignment.
Simple!
05-25-2012, 08:01 AM
I used a "jig" method suggested earlier in the thread where I built up part of the center section and by driling through the blocks was able to run a straight rod through both front and rear mounts from the leading edge. I then removed the rod used that assembly to align the cabane struts front to back and set the incidence. You are right, by the manual it's kind of a "hope this works" kind of approach, although they did say not to glue completely so if you had to make adjustments you could break parts free to reposition.
Anyway, continued good luck with your build.
Jaybird
05-25-2012, 05:16 PM
The new gear needs some getting used to. I reduced the size of the wheels and they have less bounce than the tundra tires it sported since I got it. That and the much stiffer composite gear means touch downs need to be even smoother or some bounce is in order. Just another challenge.
I let my friend fly it right from throttle up and his takeoff was interesting to say the least. Did not find out why till I tried his F-22 Raptor and nearly drilled holes in the sky. Seems I like negative expo and he wants lots of positive. Some energetic stick movement was needed on takeoff and those trees got REALLY close!
This weekend looks to be out with bad weather coming over the horizon. Nuts!
05-25-2012, 11:56 PM

Flew mine again yesterday, really starting to appreciate the way this model flys as my skills grow. This is my third year flying and now my models are spending some time inverted and knife edge, this model holds a line well.
Was originally worried I would compromise the model by fitting the 20cc gas engine but with the servos inthe rear and no lead fitted the balance point is perfect and the power is just right with a graupner 158 3 spinning8000 rpm, yes it is over powered but not by much,just enough to pull unlimited vertical from hover (I dont spend my time trying to hover this model, I have other models for that, im just trying to give a idea of the power available) and loops as big as you want, throttle backfor nice scale flight.I understand a good glow willalso be great for this model but for anyone interested in goinggas one of the beam mount20cc gassers out there now does work well on thisairframe. May end up 1/2 pound heavier than a glow bolt but the airframe handles it no problem.
The longer ailerons were also a good idea, no negatives from his mod that I can find. I have a1/4 scale pitts with scale ailerons like the standard skybolt should have and it is very "mushy"in slow speed manouvres, my skybolt is far more nimble and precise at this speed due to the larger control surfaces, rolls are still gracefull at speed.
Need to add a bit flair to my covering though, on a clear or cloudy day it is not the easiest model to see if it is inverted or upright, will have to add a bit colour to the top of the wings.
Glad I have this one in the hanger.
06-05-2012, 01:40 PM
Hi all, hope you don’t mind me posting here as as yet I’m not sure where my plane fits in. I just picked up a never flown great planes Super Skybolt with new OS FS90 surpass. Flew it for the first time last weekend.
Great plane and a pleasure to fly.
My problem was getting the wheels to touch the ground. It just wants to float by.
Where I fly is quite gusty so crawling in at low speed isn’t an option as if the gust drops the planes airspeed can instantly become zero.
To this end faster approaches are needed resulting in the plane floating past.
My other planes have flaps and landing is a breeze soooo.
Any words of advice on fitting flaps to a Skybolt.
Please don’t tell me biplanes have lots of drag and don’t need them. That’s what I thought until flying this plane. Over two days I had four flights with approx. 30 landings so I’ve given it a fair try. It’s just too slippery on days where there is no wind at all to slow it down.
Cheers
Glen
06-05-2012, 02:37 PM
Gusty winds do call for a margin of safety with a little extra airspeed in case the gust suddenly goes away so it just may take more time and experimentation.
Welcome aboard. I'm sure you will be hearing from many others on the thread.
Jaybird
06-05-2012, 02:51 PM
Thinking the smaller pitch will help with loosing air speed a bit due to less pitch and more beaking effect as you alluded to.
Cheers
06-05-2012, 02:58 PM
Jaybird