


Sig Citabria Build
 06-05-2012, 07:02 PM
#151

Join Date: Jul 2006
Location: Rhinelander,
WI
Posts: 147
Likes: 0
Received 0 Likes
on
0 Posts
ORIGINAL: optech
GADZOOOKS!!!!
Check this out;
http://www.ebay.com/itm/NEW-SIG-CITA...item519f92380a
Maybe you should'a auctioned off this kit and built something else with the profits Either that or buy a bunch of kits from Sig and dole 'em out on Ebay to morons that pay those bid prices.
GADZOOOKS!!!!
Check this out;
http://www.ebay.com/itm/NEW-SIG-CITA...item519f92380a
Maybe you should'a auctioned off this kit and built something else with the profits
Either that or buy a bunch of kits from Sig and dole 'em out on Ebay to morons that pay those bid prices.
Sucker born everyday!
 06-15-2012, 06:24 PM
#152

Thread Starter
After probably too much thought, I decided to go with the late model Citabria. So, I spent a bit of time today trying to trim the scoop to prepare it for placement on the cowl. I trimmed the bigger pieces using a dremel mototool with a cut-off wheel. Later, I did a bit of more close-in work with an x-acto knife. I also had to trim the cowl a bit to get the scoop to fit in the right spot. The first three pictures are of the scoop and cowl before I attached them together with medium CA. My next jobs will be to cut out the holes in the front of the cowl and to fill in and smooth out all of the gaps and crevices in on the cowl.
06-20-2012, 06:31 PM
#153
Thread Starter
More work on the cowl...
First, I cut out the hole for the prop using a 7/8 drill bit, then I used an x-acto knife to cut out the air intakes on the sides of the prop. I used sandpaper to try to smooth the edges (figure 1).
Then, I filled in all the gaps around the cowl with filler (figure 2).
Today, I sanded the filler and then cut a notch for the exhaust? at the back of the cowl (figures 3 and 4). I haven't found a good view from the underside of this cutout, so I'm not sure how accurate the cuts are.
I still need to add one more layer of filler and then will need to go over the cowl with a finer grit sandpaper, I'm thinking of 220 grit, but that might not be fine enough....we'll see. AAARGGGG! What a run-on sentence that was!
As a side note, the Saito .56 is on back order. It's supposed to arrive around July 9th according to the LHS.
06-20-2012, 11:24 PM
#154
My Feedback: (9)
Join Date: Jan 2002
Location: Copperas Cove, Tx.
Posts: 552
Likes: 0
Received 0 Likes
on
0 Posts
Looking good.
Just wanted to say that balsa filler is probably not the best to use on that plastic. Especially if its built up a bit. As soon as the cowl flexes, i.e, putting it on, cutting engine holes, engine vibration, etc... it'll fall out. Micro balloons and epoxy or even Bondo body filler would be better to use. For small pin holes or shallow areas you can use red or green glazing putty or that filler stuff they use on plastic static models.
If you want to stick with the balsa filler try some on some scrap. When final sanded, wick with thin CA and see how that works. It might harden and help bond it to the plastic but I've never tried it.
Mike
06-21-2012, 04:50 AM
#155
Thread Starter
Hi Optech!
Thanks for the comments and advice! The filler that I'm using is not for balsa, it says it works on "everything" including fiberglass. I thought it would also work with the plastic cowl.
I'll have to think about this more. Maybe I'll have to replace it with one of the alternatives that you suggested.
06-21-2012, 09:57 AM
#156
My Feedback: (9)
Join Date: Jan 2002
Location: Copperas Cove, Tx.
Posts: 552
Likes: 0
Received 0 Likes
on
0 Posts
Before doing anything, try some on some scrap cowl material. Bend it, flex it, etc... If it stays put then your good to go. The canister in your pic looks like one of those "spackle" type fillers. They weren't really made for smooth non-porous materials. I've got a can of the balsa colored version so I was a little concerned after all the hard work you've put into this.
Mike
Edit; I just went a checked, I have the exact same stuff except its the red "balsa colored" can. The Hobbylite is for balsa primarily though.
Mike
Edit; I just went a checked, I have the exact same stuff except its the red "balsa colored" can. The Hobbylite is for balsa primarily though.
 I had to work on another model...
06-29-2012, 04:09 PM
I had to work on another model...
06-29-2012, 04:09 PM
#160
Thread Starter
Just a tad off subject. However, the cabinet is for organizing my shop/workspace and I wanted to show why I hadn't made progress on the Citabria.
07-31-2012, 05:49 AM
#162
Thread Starter
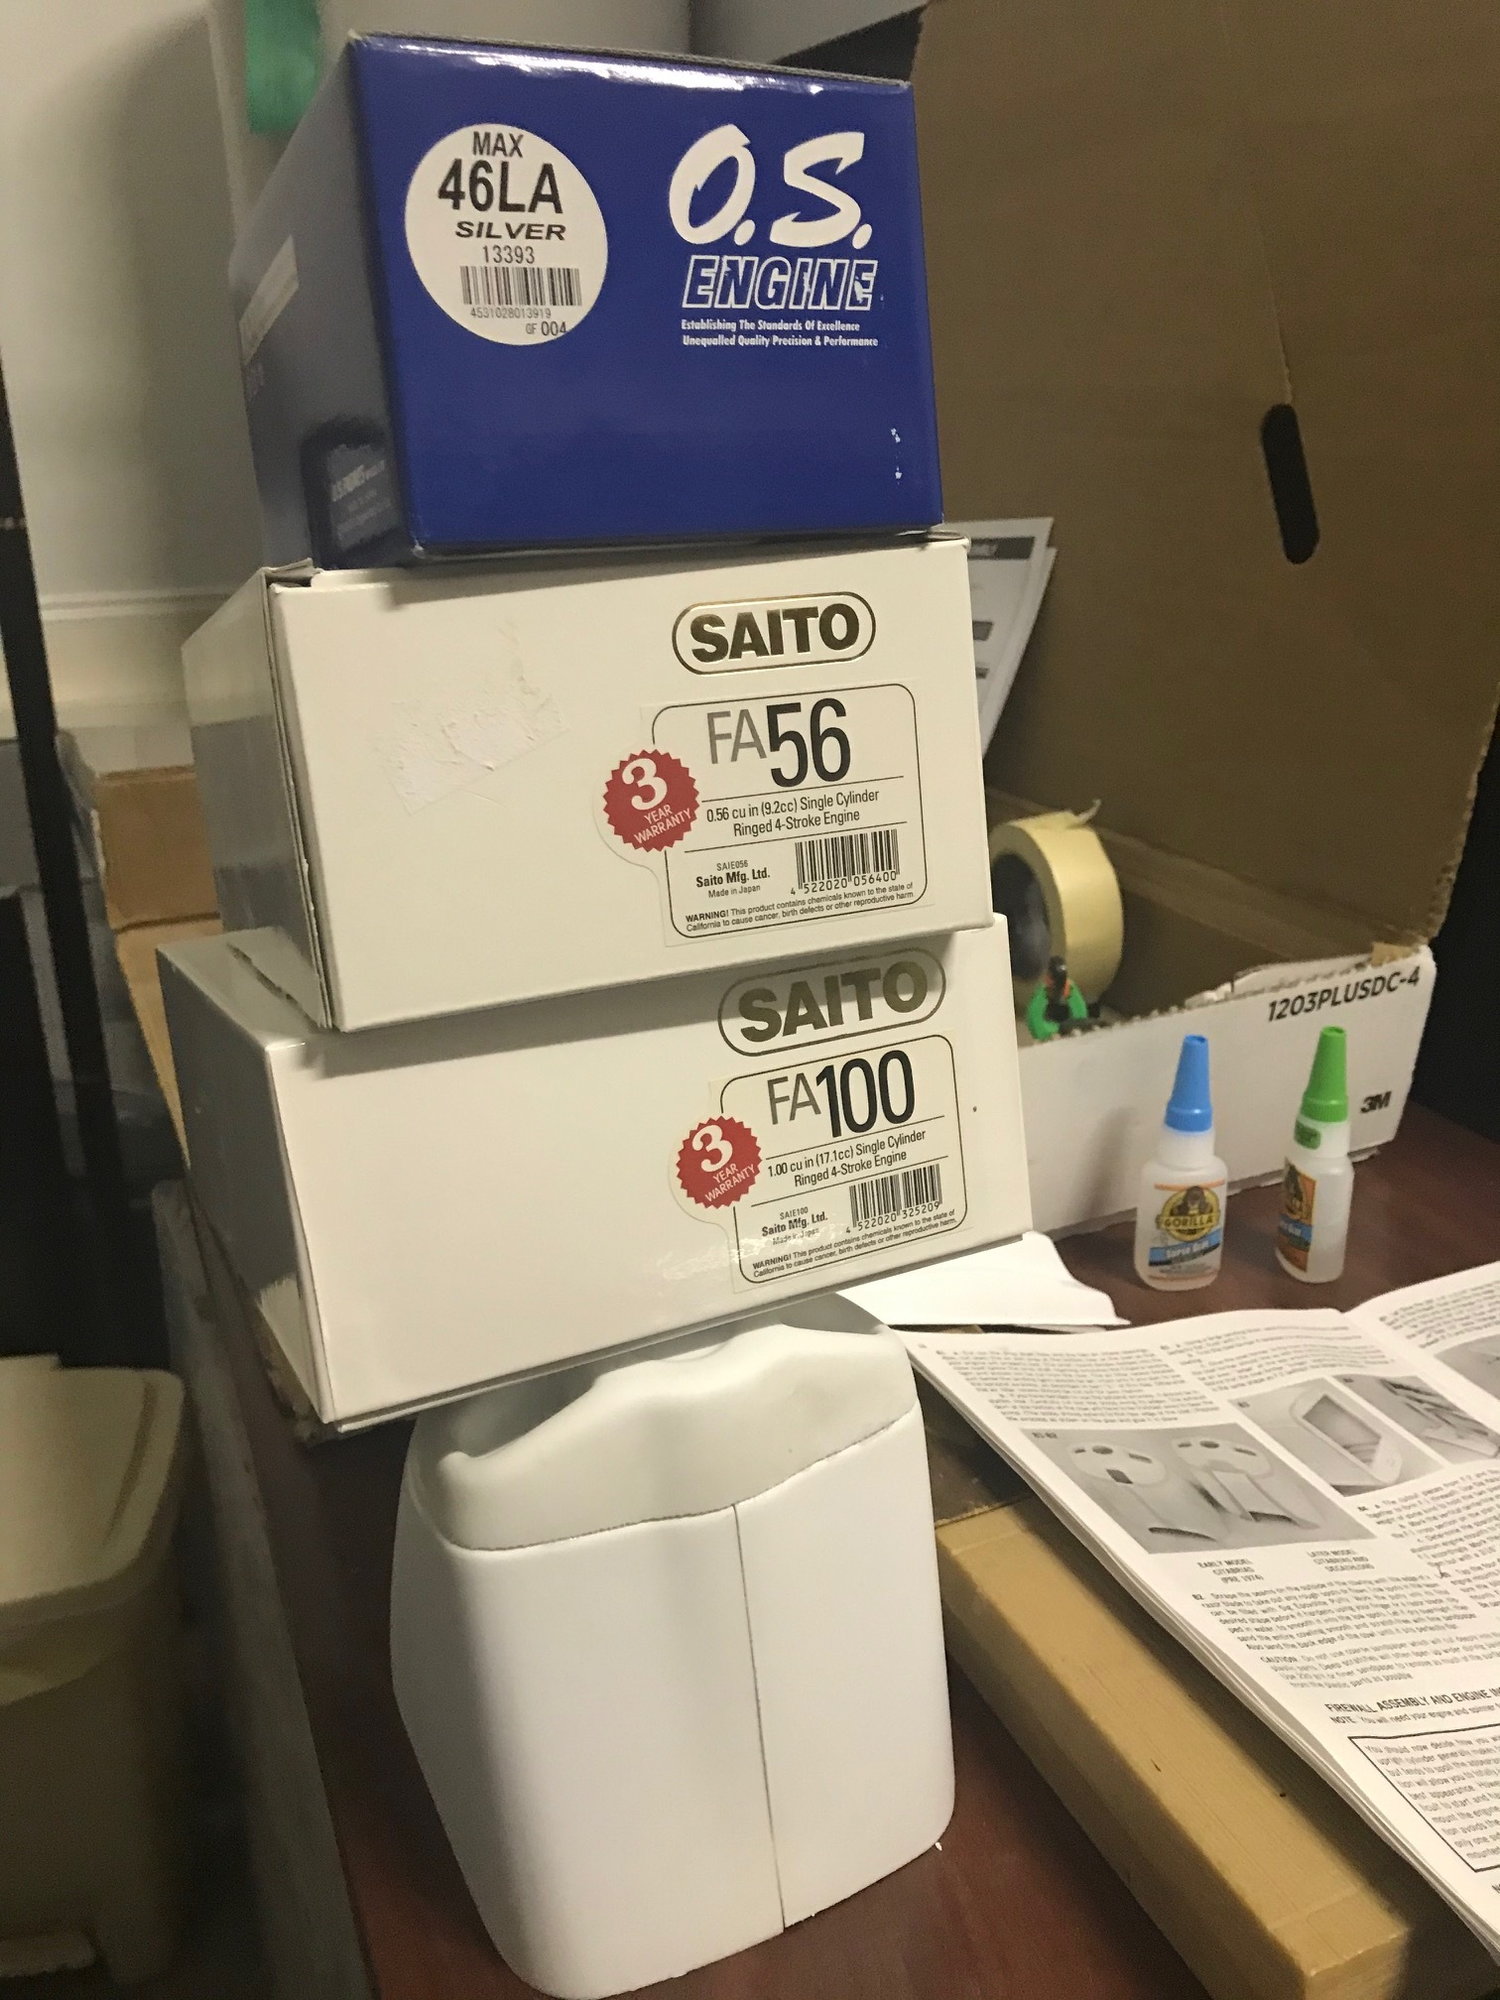
The Engine! The Engine! The Engine is here!
You guessed it, the engine arrived! That happened just as I left on a trip to visit my family back in MN. Now I'm back.
I went with a SAITO FA56. I think that it will be sufficient for this airplane.
For some strange reason, I've always enjoyed opening engine boxes for the first time. Perhaps it's because I have a strong admiration for the design and precise machining that is required to make such excellent pieces of machinery. Hence, I've looked forward to seeing this engine for quite some time. I still remember how excited I was when I opened the box of my last new engine, a SAITO Golden Knight. It was a real joy to open that box and see that gold-crowned engine resting within its cradle.
Here is what greeted me when I opened this new engine.
A box of bubble wrap! What a massive dissappointment!
After unwrapping this mess, I was finally left with a nice looking engine. But I have to say, the magic of opening an engine has been rudely discarded...
 02-08-2013, 08:31 PM
#164
Member
Join Date: Oct 2005
Location: Polson,
MT
Posts: 45
Likes: 0
Received 0 Likes
on
0 Posts
"OK", This may be a bit off topic, [8D]But I am re-building a Lanier 64" Citrabria and have been looking all over for a cowl. Since I can not seem to locate one
I would like to know if the SIG CITABRIA COWL would fit?? May be someone could give me the dementions of the SIG CITRABIA fire wall where the cowl would fit
and i can see it matches up with mine (LAINER CITATRIA 64") I really like this plane and want to restore it with some scale features!! Help if you can.
Sorry if this may be way off topic but I do not know any where's to look!! HAPPY BUILDING!!
[8D]
I would like to know if the SIG CITABRIA COWL would fit?? May be someone could give me the dementions of the SIG CITRABIA fire wall where the cowl would fit
and i can see it matches up with mine (LAINER
CITATRIA 64") I really like this plane and want to restore it with some scale features!! Help if you can.Sorry if this may be way off topic but I do not know any where's to look!! HAPPY BUILDING!!
[8D]
02-08-2013, 08:33 PM
#165
Member
Join Date: Oct 2005
Location: Polson,
MT
Posts: 45
Likes: 0
Received 0 Likes
on
0 Posts
"OK", This may be a bit off topic, [8D]But I am re-building a Lanier 64" Citrabria and have been looking all over for a cowl. Since I can not seem to locate one
I would like to know if the SIG CITABRIA COWL would fit?? May be someone could give me the dementions of the SIG CITRABIA fire wall where the cowl would fit
and i can see it matches up with mine (LAINERCITATRIA 64") I really like this plane and want to restore it with some scale features!! Help if you can.
Sorry if this may be way off topic but I do not know any where's to look!! HAPPY BUILDING!!
[8D]
I would like to know if the SIG CITABRIA COWL would fit?? May be someone could give me the dementions of the SIG CITRABIA fire wall where the cowl would fit
and i can see it matches up with mine (LAINER
CITATRIA 64") I really like this plane and want to restore it with some scale features!! Help if you can.Sorry if this may be way off topic but I do not know any where's to look!! HAPPY BUILDING!!
[8D]
02-08-2013, 10:29 PM
#166
Join Date: Jul 2006
Location: Rhinelander,
WI
Posts: 147
Likes: 0
Received 0 Likes
on
0 Posts
Starwolf. Bubble wrap?!! These engines come packed in a high quality, perfectly molded white foam packing. Who did you buy it from, secound hand Sue?
06-28-2013, 10:37 AM
#167
Thread Starter
Hi Senrak!
It's been quite awhile, sorry about the late reply. I purchased the engine from my LHS. I have always received great service from them. I thought that the bubble wrap reflected a change in packaging by Saito.
I've done a bit of work. The pictures below show the firewall extensions being mounted to the fire wall. It was a bit tricky trying to glue them at a 90 degree angle. You can see how I braced the engine up while the epoxy set.
06-28-2013, 10:45 AM
#168
Thread Starter
The next job was to glue the firewall extensions to the fuselage. The first picture shows a close-up of the assembly while the second one shows the entire fuselage. At this time, the entire thing is very nose-heavy. I had to add some weight to the tail to keep the model from flipping on it's nose. The counterweights are visible in the second picture.
There are a couple of other items that are visible here. First, the throttle linkage will be on the top of the model. Second, this means that the needle valve is at the bottom. I would have preferred to have the needle valve at the top as it would be safer to adjust it there. However, I felt that the engine had to be mounted in this configuration in order for the exhaust to be pointed down. Does anyone have any thoughts of this?
There are a couple of other items that are visible here. First, the throttle linkage will be on the top of the model. Second, this means that the needle valve is at the bottom. I would have preferred to have the needle valve at the top as it would be safer to adjust it there. However, I felt that the engine had to be mounted in this configuration in order for the exhaust to be pointed down. Does anyone have any thoughts of this?
06-28-2013, 10:54 AM
#169
Thread Starter
It took several days of making one or two pieces, gluing them on with eopxy, and then making another couple pieces and gluing them, but I finally finished making the structures surrounding the firewall extensions and the cowl mounting blocks. I just realized that I didn't take any pictures. I will have to do that tonight.
I have attached a picture of the cowl mounted to the fuselage. Now, I have to figure out how I will mount the muffler. The muffler that came with the engine does not look like it will work without cutting more ugly holes in the cowl. I want to avoid that. The plans suggest mounting a curved pipe to the engine; however, the owner of my LHS suggests that these systems are somewhat fragile and short lived. I'll have to look for alternative ideas. I know that I have seen some before. Does anyone have any ideas?
I have attached a picture of the cowl mounted to the fuselage. Now, I have to figure out how I will mount the muffler. The muffler that came with the engine does not look like it will work without cutting more ugly holes in the cowl. I want to avoid that. The plans suggest mounting a curved pipe to the engine; however, the owner of my LHS suggests that these systems are somewhat fragile and short lived. I'll have to look for alternative ideas. I know that I have seen some before. Does anyone have any ideas?
04-11-2016, 03:53 PM
#170
Well damn, read through 7 pages and it isn't finished. Been working on mine and found that the radio gear isn't shown on the plans, nor in the manual other than suggestions on how to mount it. Was hoping to see how others did it.
05-12-2016, 09:23 AM
#172
Junior Member
Join Date: Dec 2010
Location: North Canton,
OH
Posts: 7
Likes: 0
Received 0 Likes
on
0 Posts
Wow! Thanks for the update to this thread. I have been working on mine for over 3 years, (actually Not working...) I need the movitvation to set the table back up and startup again.
05-15-2016, 04:36 PM
#173
I know what you mean. I have projects galore to get finished. Today I took the day to work on my Biper Cub, and an Ultimate Bipe I just acquired. Almost finished with the Biper Cub. Just one wing left to paint, one strut left to paint, open the cowl and finish it, then I can balance and secure the battery and RX, and go fly it. I got all the controls setup, the windows in, the left wings is all complete and tight, just have to figure out the best way to transport and assemble. Best part, if I want to fly as a regular cub I can just remove the bottom wings.
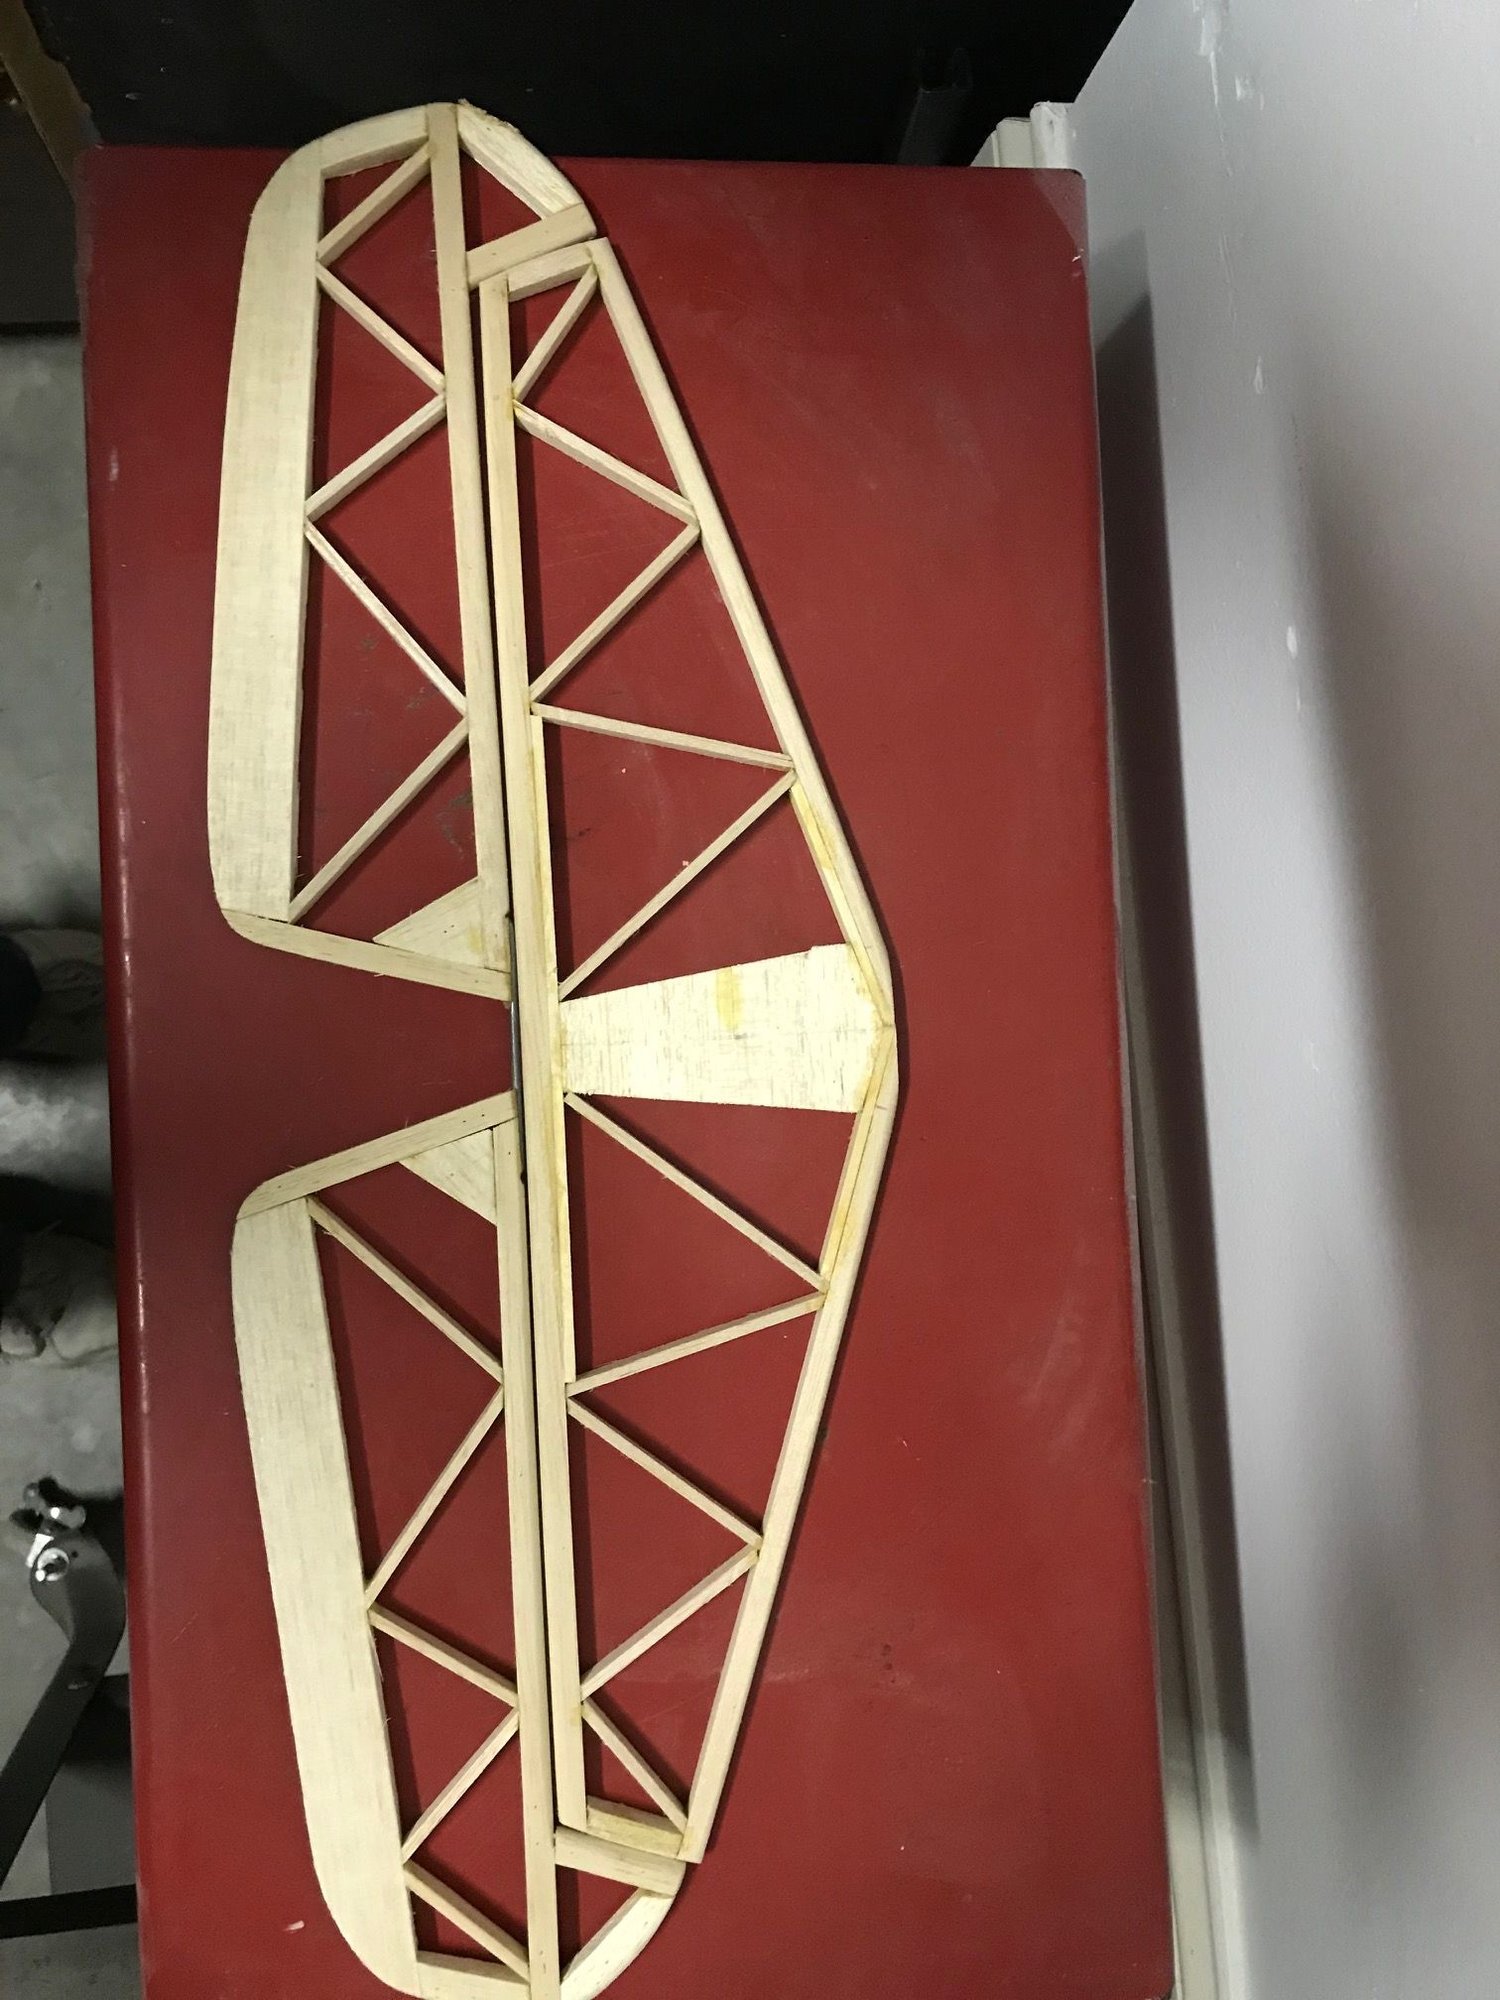
My Citabria is being built exactly as the original, except the radio of course, it has the same engine, the Saito 45 that is on the plans, the only thing missing is the original aluminum mount for the Saito. The one thing I have yet to figure out is how to hook up the controls. The plans aren't very detailed in that regards. In fact the only servo shown is the one in the wing. There isn't even a tank floor. I think I will see about finishing the wing this week and try to balance it before covering just to see what goes where.
My Citabria is being built exactly as the original, except the radio of course, it has the same engine, the Saito 45 that is on the plans, the only thing missing is the original aluminum mount for the Saito. The one thing I have yet to figure out is how to hook up the controls. The plans aren't very detailed in that regards. In fact the only servo shown is the one in the wing. There isn't even a tank floor. I think I will see about finishing the wing this week and try to balance it before covering just to see what goes where.
10-19-2019, 07:01 PM
#174
Thread Starter
I finally think that I may have some time to work on the Citabria again! I�ve moved 4 times in the 5 years that have passed since I last worked on the model. In the meantime, I�ve been rethinking my plans for the Citabria. I am still very uncomfortable having the needle valve at bottom of the cowl. It will require the use of a lot of caution whenever it needs to be adjusted. I could rotate 180 to fix this, but then throttle linkage would be at bottom and the exhaust would be in an inconvenient location.Therefore, I have been considering converting this to an electric version. This would have several advantages for me in addition to removing the needle valve. First, I am not sure how often I will be able to fly any airplane. I don�t want to have a lot of glow fuel sitting around in the garage gradually going bad. I think it would be easier to handle batteries than glow fuel. Second, I won�t have to mess with tuning the engine every time I make one of those infrequent flights. Third, the cowl will look better without so many hole cut into it for the engine. Finally, I won�t have any exhaust residue to clean off the airplane after every trip to the airfield.There are two major cons to converting. First, I know very little about electric powered airplanes. Second, I will really miss the sound of a real engine!I have spent a bit of time looking for a motor, ESC, battery, and prop combo that would work for the Citabria.I saw a YouTube video where someone used this combo (Motor NTM 42-58 500kv, ESC Turnigy 85 A). The system seemed to work well, but the motor is no longer made. I found a report of someone using a Hacker A50 12L, on a 7S 4000 pack. Another person uses an Eflight Power 46 motor, CC Talon 90 esc, APC E 12x6 prop and runs on a 5S 4000mah battery. I found several other posts where people said that they recommended, or planned on using, a large variety of setups. Unfortunately, I was not able to learn if these were actually used or how well they worked.I would certainly appreciate any advice that would be offered!I need to spend some time thinking about the conversion and learning about the world of electric RC.Today, I put some filets (not sure if I got the term right) along the bottom of the fuselage. In addition, I looked at the stabilizer and elevator. They don�t match as well as I would like. In addition, there is not a gap between them that is large enough to allow the covering. I did a bit of sanding and they fit together better when clamped in position. However, I think that they may not line up when the hinges are installed. I need to think about this problem some more. Last, I was able to start putting the new cowling together. I will need a new cowl if I convert it to electric. 
Filets
Stab and elevator before sanding

Stab and elevator clamped together after some sanding
Starting on the new cowling
Filets
Stab and elevator before sanding
Stab and elevator clamped together after some sanding
Starting on the new cowling
10-20-2019, 06:17 PM
#175
The one I am building will have the engine as per plans, the Saito 45. The needle is through the top of the cowl, head to the right as per plans. I will get some pics if I remember to, it is at my friend shop where we have a build night every Saturday.

