


SIG Ryan STA special kit by Maxy Hester
 10-20-2011, 07:35 AM
#51
Junior Member
Join Date: Oct 2011
Location: East London, SOUTH AFRICA
Posts: 2
Likes: 0
Received 0 Likes
on
0 Posts
Hi John..
Iregistered on this site just to congratulate you on this build. You seem to be showing great patience with even greater attention to detail. And like a member mentioned above, it is certainly a quality we should all aspire to..!!
My stepfather had this kit. I was about 15 years old at the time and wanted to build it so badly!Only today can I truly appreciate him not wanting me to do it, asI would have no doubt made a real hash of it! Sadly though he later sold the kit. But the memories I have as a kid wanting to build this kit so badly still live with me, and I WILL one day get hold of one and build it. So I too am looking forward to following the rest of this build!! I did manage to get some stuff from him though such as a Tom Cook F4. AndI know that he still has a BV P51 that hasn't been built yet.. =))
I havent built a model in years. I put the few kits I had in storage a few years back and I will be getting them back shortly.I cannot wait to get flying, but more importantly, get building.
Looking forward to the rest of this build!! And good luck!
PS.. I noticed your mention of strengthening the wings etc for the increase in power. Would be nice if you could ellaborate a bit on how you did that. Thanks in advance..
 10-21-2011, 05:02 AM
#53
Junior Member
Join Date: Oct 2011
Location: East London, SOUTH AFRICA
Posts: 2
Likes: 0
Received 0 Likes
on
0 Posts
Hi John,I had a look but couldn't find anything. But I am on my mobile so browsing a bit difficult. Will have a decent look when I get home. Thanks for the info..
10-21-2011, 05:37 AM
#54

Thread Starter

Join Date: Nov 2006
Location: Santa Teresa, N.M.
Posts: 168
Likes: 0
Received 0 Likes
on
0 Posts
Thanks for the interest in this thread.
I too had attempted to build this kit years ago after falling in love with this particular airplane. After attempting to take on this project I realized it was
way too much for my skill level! For years I yearned to have another try.
After discovering this kit was obtainable on eBay I new what I needed to do...
Welcome to RC Universe
John
10-23-2011, 03:56 PM
#55


Join Date: Feb 2007
Location: Adelaide, AUSTRALIA
Posts: 320
Likes: 0
Received 0 Likes
on
0 Posts
I am too watching this build with great interest
I bought it at my local Swap meet/Auction for $50.00
The fuse has been started and some small hardware items are missing.
Johnkpap
I bought it at my local Swap meet/Auction for $50.00
The fuse has been started and some small hardware items are missing.
Johnkpap
12-30-2011, 07:53 AM
#56
Thread Starter
Join Date: Nov 2006
Location: Santa Teresa, N.M.
Posts: 168
Likes: 0
Received 0 Likes
on
0 Posts
And so I survived Christmas and Family....
I first need to apologize for leaving so many of you abandoned from this build, I it still in progress and I have since decided that
I am going to squeeze this into my schedule and complete this one!
I have some more pictures of some work on the tail section. There will be a pull pull rudder and separate control for the tail wheel.
I'm looking into the logistics of how to do the cockpit, I have never done one before and I am looking forward to the challenge of this
one...
Thanks for your patience.
12-30-2011, 07:57 AM
#57
Thread Starter
Join Date: Nov 2006
Location: Santa Teresa, N.M.
Posts: 168
Likes: 0
Received 0 Likes
on
0 Posts
Here are a few photos of the wing fairing area and my attempt to make it look descent...
I first used micro balloons on the fill area, and then sanded it rough to apply the wood filler.
I can now shape to a desired shape, and fill as needed to attain the best appearance.
I first used micro balloons on the fill area, and then sanded it rough to apply the wood filler.
I can now shape to a desired shape, and fill as needed to attain the best appearance.
12-30-2011, 08:10 AM
#58
Thread Starter
Join Date: Nov 2006
Location: Santa Teresa, N.M.
Posts: 168
Likes: 0
Received 0 Likes
on
0 Posts
This is the installation of the firewall and forward area of this plane.
If all goes as planned I will have a custom exhaust that will fit in here as well, I am still deliberating on the issue of
a cowl that has opening panels, although this would look so cool at the field I want to make sure it doesn't become
a shredded POS. I will figure it out and do what I can to make it happen...
12-30-2011, 08:48 AM
#59

The quality of this build is very much worth the wait. I'm savoring this build like a good bottle of wine! Thanks for sharing the build.
12-30-2011, 09:46 AM
#60
Junior Member

Join Date: Sep 2011
Location: Oregon, OH
Posts: 16
Likes: 0
Received 0 Likes
on
0 Posts
Thanks for the great information. I'll be starting my Ryan in a couple of weeks. Just finishing up and covering a Somethin Extra.
When you use micro bolloons in an application like the fairings do you prefer 5 min or 30 min epoxy? Do you get asmany bollons in as you can or do you follow the mixinstructions?
My concern is the epoxy sagging and running out of position before it sets.
When you use micro bolloons in an application like the fairings do you prefer 5 min or 30 min epoxy? Do you get asmany bollons in as you can or do you follow the mixinstructions?
My concern is the epoxy sagging and running out of position before it sets.
12-30-2011, 10:05 AM
#61
Thread Starter
Join Date: Nov 2006
Location: Santa Teresa, N.M.
Posts: 168
Likes: 0
Received 0 Likes
on
0 Posts
I use 30 min epoxy to get as much unrushed time as possible, an I put as many balloons in as I can get
before the mixture starts to become stiff. It also keeps the weight to a minimum. I mix the epoxy thoroughly
and get a working time of around 20 min or so. The applied mixture needed to be worked by holding the fuse
at different angles to keep it somewhat consistent in the fairing.
Hope it helps...
John
01-22-2012, 09:39 AM
#62
Junior Member
Join Date: Sep 2011
Location: Oregon, OH
Posts: 16
Likes: 0
Received 0 Likes
on
0 Posts
Today I finished up the Somethin Extra project andand got out the Ryan project.
Here's my thread http://www.rcuniverse.com/forum/m_10921373/tm.htm. I don't want to hijack John's great build.
Here's my thread http://www.rcuniverse.com/forum/m_10921373/tm.htm. I don't want to hijack John's great build.
08-15-2012, 11:56 AM
#63
Join Date: Aug 2006
Posts: 149
Likes: 0
Received 0 Likes
on
0 Posts
This build looks great. Hopefully we will get to see it completed soon.
Hello. Like many I remember admiring this kit years ago. Back then I didn't have the money or skills to do it justice. The good news is that I just bought one at a swap meet and it looks to be complete and in good shape. The bad news is that it will be a little while before I can start building it. Now I'm looking forward to winter so that I can get started.
Hello. Like many I remember admiring this kit years ago. Back then I didn't have the money or skills to do it justice. The good news is that I just bought one at a swap meet and it looks to be complete and in good shape. The bad news is that it will be a little while before I can start building it. Now I'm looking forward to winter so that I can get started.
08-31-2012, 05:38 PM
#64

Great job John, I am really impressed by your neat building work. I just came across this thread and will now watch with interest. I have been restoring an old Sig Ryan that I picked up off eBay a few years ago. Have not done much on it for a long while, but hopefully this thread will give me some inspiration to get back into it. I also have a NIB kit sitting in stock, waiting for the right time.
James.
James.
09-01-2012, 02:58 PM
#65
My Feedback: (37)
Join Date: Mar 2002
Location: Fleetwood,
PA
Posts: 191
Likes: 0
Received 0 Likes
on
0 Posts
Your build looks great John, and for anyone looking for a contest quality scale 1/5 scale Ryan STA Special in the John Gosney scheme, I have one for sale. This was my practice plane for the Ryan that I built for Top Gun a few years back. I still have that one and have this listed currently in the Classified Scale section of RCU. The model is very scale, flies very well and was flown in World Scale Competition.
Rick Boyer
Top Gun 2004 - 2012
Pitts Special S-1S (#1)
Ryan STA
Pitts Special S-1S (#2)
Rick Boyer
Top Gun 2004 - 2012
Pitts Special S-1S (#1)
Ryan STA
Pitts Special S-1S (#2)
03-29-2013, 11:38 AM
#66
Thread Starter
Join Date: Nov 2006
Location: Santa Teresa, N.M.
Posts: 168
Likes: 0
Received 0 Likes
on
0 Posts
Hi People,
I have been taking care of other things and hope to return to this build soon. I have not abandoned this project, just stored it away for a while.
My intentions are to get back to working on this this spring/summer. I am going to finish this for sure....
I have been taking care of other things and hope to return to this build soon. I have not abandoned this project, just stored it away for a while.
My intentions are to get back to working on this this spring/summer. I am going to finish this for sure....
09-27-2014, 05:43 AM
#67
Thread Starter
Join Date: Nov 2006
Location: Santa Teresa, N.M.
Posts: 168
Likes: 0
Received 0 Likes
on
0 Posts
Wow
I thought this thing was doomed as vaporware...
Im finally back from the grave and in full build mode once again.
For those who subscribed only to have my thread peter out and fade, I apologize.
Here are some photos to show the real up to date progress...


I thought this thing was doomed as vaporware...
Im finally back from the grave and in full build mode once again.
For those who subscribed only to have my thread peter out and fade, I apologize.
Here are some photos to show the real up to date progress...
10-06-2014, 05:50 PM
#68
Thread Starter
Join Date: Nov 2006
Location: Santa Teresa, N.M.
Posts: 168
Likes: 0
Received 0 Likes
on
0 Posts
I want to make left and right panels that are hinged at the top and are held up with prop rods. My original idea is to use a piano wire hinge, only the side has a subtle compound curve and something else will need to be done.
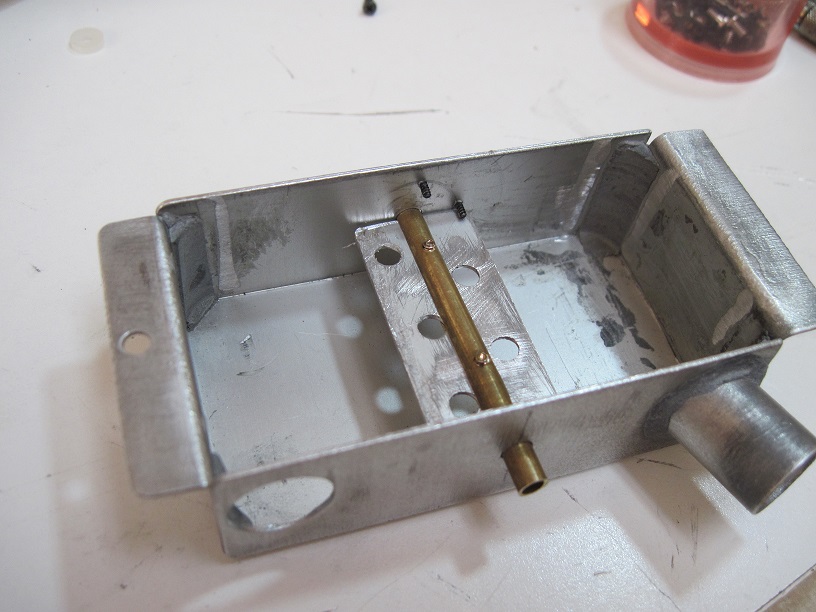
Anyways, I haven't reached that yet. Right now I'm concentrating on the exhaust system. After hours of surfing and reading other builders threads I have settled on braised copper and silver solder(non-electrical) for the exhaust header manifold. I would like to use some heat resistant JBWeld type putty over the outside to finish. Here are some photos of the progress.
Thanks for showing interest.
Last edited by jwharkinz; 10-06-2014 at 05:57 PM.
10-07-2014, 07:31 AM
#69
Wow- thought this thread was long abandoned...welcome back! During your absence, I located a kit, built and finished it. You can check out how it came out if interested .
http://www.rcuniverse.com/forum/kit-...-ryan-sta.html
http://www.rcuniverse.com/forum/kit-...-ryan-sta.html
10-11-2014, 07:02 AM
#70
Thread Starter
Join Date: Nov 2006
Location: Santa Teresa, N.M.
Posts: 168
Likes: 0
Received 0 Likes
on
0 Posts
VincentJ, I am going to use the rivet idea i saw you use for your plane. I'm planning to try to attach the rivets to the outside of my chrome monokote that will be used for the fuse. Method for attachment is still being considered, easiest to try will be heat. I'm going to test some ideas first and then I'll decide more from there, heat is my first choice...
I'm also considering flat rivets just for looks, I would rather have domed rivets. I really don't want to cover over the rivets with monokote as I might like to show some ageing and wear, weathering too. Since this is to represent raw metal, rivets on the outer surface of the covering would give the best illusion from what I can determine.
On the other front I'm preparing to school myself on applying Flitemetal to all the plastic parts. I tried with some sample material I have, and let me tell you this stuff is gonna be challenging to get around all those curves! There has to be a method to apply this stuff in pieces, maybe sand the seams and blend them out before polishing. Right now Im ordering more Flitemetal.
While I shift gears to the part in the front... I'm mocking up my exhaust, here are some pics of this process...
Last edited by jwharkinz; 10-11-2014 at 07:04 AM.
10-18-2014, 07:13 AM
#71
Thread Starter
Join Date: Nov 2006
Location: Santa Teresa, N.M.
Posts: 168
Likes: 0
Received 0 Likes
on
0 Posts
I have been working on some of the details at the tail end with all the plastic. I have had some success with the chrome monokote and the stabilizer, vertical fin, and headrest. My monokote skills still have a lot of room for improvement!
On another subject, I'm looking for some small chrome lettering that can be used on the side of the cowl as a 1940's style of emblem depicting " SUPERCHARGED" on the cowl. I want a specific style, Like the old chrome auto emblems like "HUDSON", the old '50's "Chevrolet" that was on the '55 Bel Air.
Something that will tie in with the theme I'm following. My theme has evolved into something of a modern hotrod. Technology wise it ultra modern, under the looks of an old school airframe from the 1940's. This is going to have a classic look but with the performance of a more modern aircraft.
Thanks for not totally giving up on me...
10-21-2014, 06:20 PM
#73
Thread Starter
Join Date: Nov 2006
Location: Santa Teresa, N.M.
Posts: 168
Likes: 0
Received 0 Likes
on
0 Posts
I have been spending some time trying to figure out some of the thought processes I had going when this build was interrupted. So far nothing to unconventional...
Anyhow here are some pics of the progress.


Anyhow here are some pics of the progress.
