


Carl Goldberg Ultimate 10-300 Brotherhood.
 11-24-2016, 05:12 PM
#1901
Member
Join Date: Jul 2016
Posts: 52
Likes: 0
Received 0 Likes
on
0 Posts
through bolt horn on top and bottom. servo for left is on right and visa versa. Mock it up uncovered. to get straight lines. Elevator is one side and on top. Use 3' steel rule to plot. Really isn't that hard if you lay out the lines outside over plans (oops, just remembered yours is a rebuild.) leave lins slak at servos, clamp elevators straight and rudder as well. I really would give some consideration to flying braces (I used aluminum welding rod which I think is lighter than air.). Cut threads real slow with sharp die so no gall. You can put finished rods in your hand and can't feel them. Honestly I used to run long bike spokes through composite tubes but attached to bottom of elevators. I was hesitant to use braided line at first but after it was in and no chafing contacts I was amazed at how tight it was and stayed. The stiffer these little guys are, the better My second one I used carbon fiber tape in opposing spirals over ply sides starting at canopy rear. The fuselage really gets rigid. What kind of gear set up did you plan. That was always my bane and I never solved it.
 11-24-2016, 06:22 PM
#1902
This one has tail braces, but they were poorly done and have to be redone, and the pull/pull on the rudder was not crossed, but direct, so that has to be changed, and the cables are kinked so they will be changed. I have a carbon fiber gear that I will see if it will work, if not, then will probably use cross bracing on the original one.
12-01-2016, 06:57 AM
#1903
Oh man, what a mess. I went to start covering the fuse now that I have all the joints glued back together and found it to be fuel soaked. I got the oil out with baby powder and then brushed some clear dope on the wood. That worked, now the covering sticks, but I didn't think it through and screwed up the first piece. The open bays are a bugger when you are doing three colors. I dont know how the original covering was done, the red and white met in the open bay, and my blue covering is all wrinkled and loose so meeting it with the white will be ugly. Looks like I will need to strip the bottom covering off again and try something different. Not liking the results so far.
When I do have it covered though, it will be solid again. I am not looking forward to stripping the wings, but after seeing how the fuse was fuel soaked, I am betting the bottom wing will be too. Looks like there was a tank failure at some point.
When I do have it covered though, it will be solid again. I am not looking forward to stripping the wings, but after seeing how the fuse was fuel soaked, I am betting the bottom wing will be too. Looks like there was a tank failure at some point.
12-01-2016, 08:50 AM
#1904

My Feedback: (2)
Oh man, what a mess. I went to start covering the fuse now that I have all the joints glued back together and found it to be fuel soaked. I got the oil out with baby powder and then brushed some clear dope on the wood. That worked, now the covering sticks, but I didn't think it through and screwed up the first piece. The open bays are a bugger when you are doing three colors. I dont know how the original covering was done, the red and white met in the open bay, and my blue covering is all wrinkled and loose so meeting it with the white will be ugly. Looks like I will need to strip the bottom covering off again and try something different. Not liking the results so far.
When I do have it covered though, it will be solid again. I am not looking forward to stripping the wings, but after seeing how the fuse was fuel soaked, I am betting the bottom wing will be too. Looks like there was a tank failure at some point.
When I do have it covered though, it will be solid again. I am not looking forward to stripping the wings, but after seeing how the fuse was fuel soaked, I am betting the bottom wing will be too. Looks like there was a tank failure at some point.
12-01-2016, 09:14 AM
#1905
The problem I ran into is putting the panels on wrong. I should have done the bottom, and then the sides instead of doing the bottom and sides as one piece. Going to do it differently. I also used LITE covering on the bottom, which is not covering as well as the normal stuff. I just happened to have a few rolls in a color I like.
12-04-2016, 07:17 PM
#1907
Member
Join Date: Jul 2016
Posts: 52
Likes: 0
Received 0 Likes
on
0 Posts
You are doing well. Sometimes I have to step away for a day or so when striving for perfection. Every airplane is important to us when we build. Sometimes the most difficult thing is they usually look nicer to others than through our own eyes seeking perfection. Try not to complicate what you don't have to. Clean, strong, on the CG., no friction in controls. Fly it and enjoy your labors and personal imagination. Nothing like clear sky with a pretty model airplane flying through it. Always time to make changes and improve if you want. You are now the builder. Cheers.
12-04-2016, 08:02 PM
#1908
Going to load it back into the truck and work on it at my friends house where the rest of the plane is at. I made some thin strips of yellow and will put three stripes on the tail 3/4", 1/2" and 1/4" small to large top down, and then three on each stab and elevator parallel to the fuse, and this it. The bottom will stay the way it is. Wing bottoms will be the same blue with white stripes near the tips, and the top will stay red, with yellow stripes to match the tail. I think it will look good.
Worked on my B-25 today, got the left wing panel done, and started dry fitting the fuse.
Worked on my B-25 today, got the left wing panel done, and started dry fitting the fuse.
12-28-2016, 04:37 PM
#1909
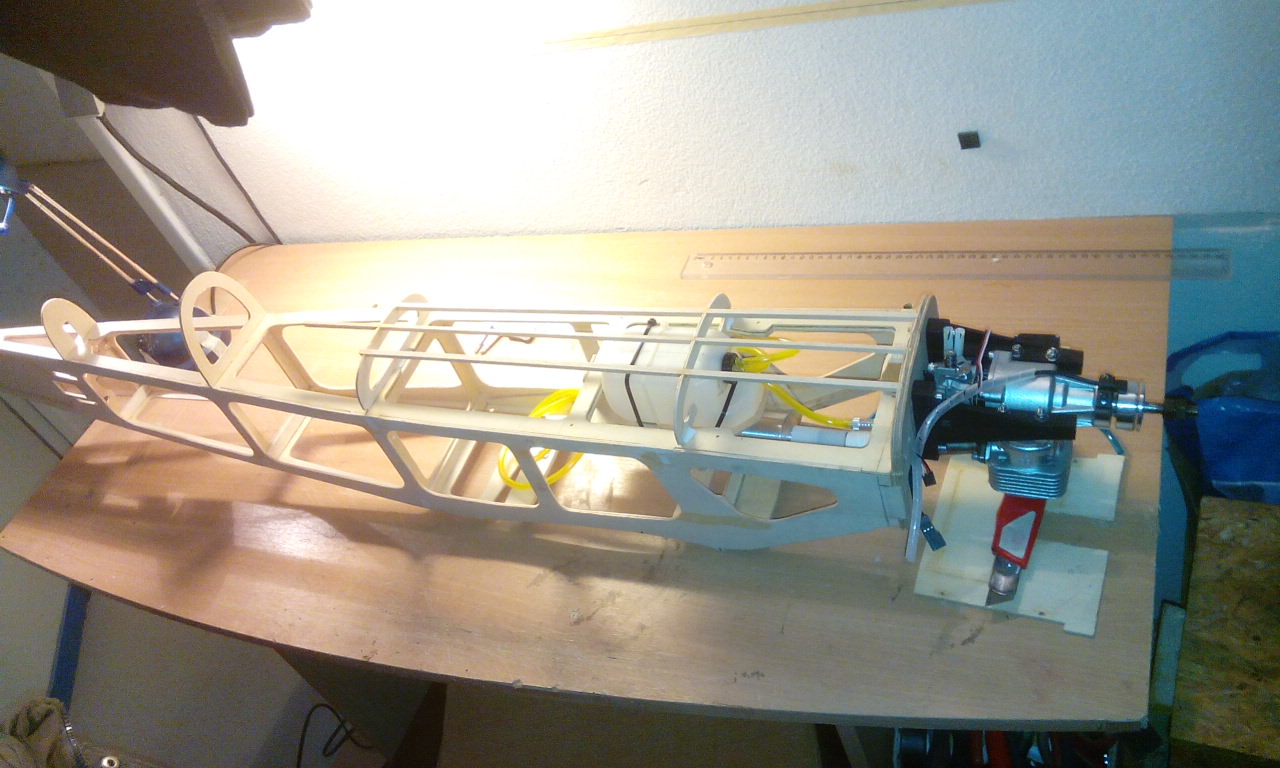
OK I need help. Check the tank on this, what can I do to lower it?


The needle is almost at the bottom of the tank, and the tank floor is right about where the bottom of the tank is in the pics. The engine runs with the tank here, but spits fuel out and leaks when not running.
The needle is almost at the bottom of the tank, and the tank floor is right about where the bottom of the tank is in the pics. The engine runs with the tank here, but spits fuel out and leaks when not running.
12-29-2016, 01:33 AM
#1910

My Feedback: (1)
Join Date: Sep 2003
Location: Talamanca de JaramaMadrid, SPAIN
Posts: 583
Received 4 Likes
on
4 Posts
I enter today just to wish a very Happy New Year 2017 to all friends on this dedicated thread.
"acdii" if the engine runs well with fuel tank there I will, instead of trying a new position, device a way of shutting off the fuel line. Bear in mind that whats is important is the fuel tank center line and that it is not so high related to the carburator.
If you are firm on changing the fuel tank position I would go with a little one and mounting it on middle of the tank bay, in lien with carburator and corner on the nose. It will need, of course, making modifications and reinforcements in the nose area.
Best Regards.
12-29-2016, 06:39 AM
#1911
Acdii,
I’m going to assume (there’s that word) you don’t wish to rotate the engine 180 degrees for obvious reasons. It would solve the issues, but would no doubt be ugly with the carb out the top of the cowl. I’ve had similar issues with other planes (GB Chipmunk as an example). I haven’t built my Ultimate, but I look over the plans for some ideas. A couple that came to mind, smaller tank, move it rearward to be able to lower it…
Another unconventional solution would be to locate the tank at the CG in the area normally used for the servos and such. There you can raise and lower it as required, but now you need to find homes for servos and such. With muffler pressurized fuel systems, fuel delivery isn’t an issue like it was in the good old days. Most precision pattern fliers have the tank there as it provides no balance change as the fuel is consumed.
I’ll look over the plans and see if anything pops out at me and share it.
Got2retire (finally did)
12-29-2016, 09:12 AM
#1912
Acdii,
Checked the plans, took some measurements and here’s a couple of conclusions and suggestions…
I’m assuming you’re using a recommended 12oz tank…
If the engine is mounted with its CL on the recommended CL, which it appears to be and the recommended tank was used, the CL of the tank is +/- 3/8 inch below the recommended CL and the engine CL… So no problems there…
Conclusions…. The fuel dripping is a result of the siphoning effect due to the drop of the fuel line coming thru the firewall above the CL and dropping to +/- 1/2 inch below the CL to the carb…
If the plane and engine perform well, don’t fix something that’s not broken….
Jesus Carden’ s response was spot on with finding a way to close off the fuel flow after a flight..
I see the easiest way would be, after shut down following a flight, open the throttle, hold the plane’s nose up for a couple of seconds allowing the fuel in the line between the carb and the tank to run back into the tank…. Problem solved…
Hope this helps, and I put the kit on the bench in queue to be started…something long over due...
Got2retire
12-29-2016, 09:34 AM
#1913
Thanks, I will double check the tank size. This plane was built by someone else and I am restoring it. The carb spits fuel at idle which is why I question the tank CL, and I did look at inverting the engine, once, but thought the same thing, don't want to mess up a perfectly good cowl. I do have room at CG without servo interference, and am considering putting it there with some sort of pump/regulator instead of hacking the nose to lower the tray 3/4". That is how much lower the tank needs to be in order to match the tank CL with the needle. The Gemini doesn't have pressure fittings, it is straight piped, so would need a pump/regulator instead.
When I tune I use a half tank of fuel, and even at that it was still pouring out the carb.
When I tune I use a half tank of fuel, and even at that it was still pouring out the carb.
01-03-2017, 03:17 AM
#1914
My Feedback: (1)
Join Date: Sep 2003
Location: Talamanca de JaramaMadrid, SPAIN
Posts: 583
Received 4 Likes
on
4 Posts
"acdii" that pouring out of the carb you explain is not from the fuel tank position but due to the design of glow carburators.
If you make a search here in RC Universe, you will easily find that glow carbs are designed to run rich on low and mainly mid throttle so they may rev up when required. This is even worse with engines lacking exhaust pressure aid like your Gemini, as the manufacturer has to secure there is fuel available if you quickly open the throttle (air income is immediate but fuel due to viscosity need more time to flow).
So I doubt that changing the fuel tank position will cure that glow pouring from the carb intake. Anyway you may check by temporarily mounting the fuel tank to the side of the fuselage and trying different positions, testing if fuel continue splitting out of the carb.
Best Regards.
Last edited by jescardin; 01-03-2017 at 03:19 AM.
01-03-2017, 05:34 AM
#1915
My Feedback: (4)
Join Date: Jan 2002
Location: Westhampton Beach,
NY
Posts: 860
Likes: 0
Received 0 Likes
on
0 Posts
Unless you get that tank lower fuel will always siphon out the carb,.
Try putting the tank back by the CG and use a smaller header tank at the firewall so you can movie it down. plumb them in series and that may solve your problem. But that will only work if there is muffler pressure to the larger tank so it fills the smaller thank and i can tell from the pics if that's available.
While I love twin engines in this case that one may not be the right choice for the job though...
Bill S.
01-03-2017, 11:51 AM
#1916
I was able to resolve this. The tank floor was soaked and rubbery so I had to make a new one anyways. What I did was notch out the nose floor a bit, and dropped the tank floor down to the bottom of F2, and braced it, then slid the tank on. It put the tanks center line dead center to the spray bar. This may not prevent the carb from leaking when not running, but it should at least cure the spitting while running and make it easier to tune. I used hot glue to secure the tank floor, comes in real handy and holds tight, but can be easily removed if needed. There are notches in the floor to lock it to F2, so not concerned with it coming apart either. I was also able to correct the throttle linkage so that it works correctly now, the original setup was a mess, the servo was in backwards so half a throw was a full turn of the throttle. Flipped the servo around and now open and close matches the stick. Just have a couple things left to do and the fuse is done, then I can decide on if I want to strip the wings or just repair and patch them.
02-02-2017, 03:28 PM
#1917
My Feedback: (3)
Join Date: Aug 2008
Location: mt vernon, OH
Posts: 20
Likes: 0
Received 0 Likes
on
0 Posts
I would like to join the brotherhood if I could. I have recently purchased an original kit version of The Ultimate to go along with my Extra 300. Also have a Dave Patrick 40 size that needs some TLC. The upper wing mounting aluminum cabanes are missing along with some fuse damage. I would welcome any input of repairing this and would document it here if that would be O.K. along with pics. Anyways I need to find an engine for the Goldberg Ultimate and was wondering what would be the best ? Leaning towards a 1.2 Four Stroke but wanted to know if anyone has put a .91 four stroke on one and if so how did it perform.
Thanks Ron Moss
Thanks Ron Moss
02-02-2017, 04:36 PM
#1919
Member
Join Date: Jul 2016
Posts: 52
Likes: 0
Received 0 Likes
on
0 Posts
Ron, I would go with 1.20 but bodybuildr is right about performance on .91FS. I have seen them operate very well on an O.S. 71FS. What I noted was that a strong engine and tail bracing makes for a crisp reaction that seems to taper off on less power. It is a well designed airplane that will fly on the wing. I had a YS 1.40pumped in one of mine and it was my best flyer for my liking. The plans note engine degree offset of 2 degrees for a 1.20 and 3 for the 1.40. I wish I hadn't sold my YS but i'm prone to doing bone head things my wife tells me.
02-04-2017, 11:04 AM
#1921
Member
Join Date: Jul 2016
Posts: 52
Likes: 0
Received 0 Likes
on
0 Posts
Moss, I think you will like the l.20 FS. Have you read any of the old Harry Higgley help books like "all about bipes?" Lots of good tips on building the structure. If I may suggest, used a level building surface. Level the datum and incidents of wings and empennage.. I have built a couple and each one better and more crisp. I used carbon fiber on wing spars and used the ribbon from the fuselage wrapped before ailerons and crossed in X back to end of the fuselage to reduce torsional flex. run bracing from bottom or fuse up through horizontal stab and through vert stab and back down. Use spruce on front firewall and a real 5 or 6 ply firewall rather than the light ply. stringers and set engine offset according to plan (I thing 2 degree for 1.20FS.) The fun comes from how crisp the plane responds aided by making it as rigid and light. I only have one large Ziroli plane in the stable. I have gone back to 60" span planes and strong .46 2 stroke; 60 2 stroke and enjoy flying in close alternating patterns. If you work out the landing gear weakness you will enjoy the 10-300!
02-06-2017, 03:31 AM
#1922
My Feedback: (1)
Join Date: Sep 2003
Location: Talamanca de JaramaMadrid, SPAIN
Posts: 583
Received 4 Likes
on
4 Posts
Mr. Moss you are more than wellcome to this -fron now on- your Carl Goldberg Ultimate fraternity.
Your brotherhood number is # 119 and you may include it within your RC Universe firm so it will be shown on every post you write.
maukaonyx # 01
JohnMcGowan # 02
Cub Man # 03
DanS # 04
u2builder # 05
CRJDriver # 06
alfredbmor # 07
captinjohn # 08
yekots # 09
everwood # 10
JNorton # 11
Tailskid # 12
Crash Campbell # 13
frequent flyer # 14
daveopam # 15
VCScott # 16
PropWash # 17
eaticus # 18
mistermnkim # 19
Zebra One # 20
JimboGreek # 21
tony 0707 # 22
pushinoldrc # 23
bigal126 # 24
Steve Campbell # 25
raubold # 26
Revy # 27
twn # 28
vt-flier # 29
rk2648 # 30
Francisco Ortiz # 31
JohnB 96041 # 32
David Agar # 33
IMaflyer # 34
Reefrus # 35
Jduran157 # 36
Bipeguy03 # 37
SRQFlyer # 38
Charlie111 # 39
Flygilmore # 40
Falling leaf # 41
ericzombie # 42
Pacomb # 43
Atlanta 60 # 44
Gunneredwards # 45
braddock VC # 46
Cyberfyn # 47
Mrshea # 48
Peternj # 49
WarbirdAirRacer # 50
Abbott915 # 51
ArcticCatRider # 52
THEJADEGROUP # 53
Jjoos99 # 54
MajorTomski # 55
Twin Flyer # 56
72 #57
George Waldrop #58
TripleDeucer # 59
Johnny Zero # 60
Garthwood # 61
Moeandicy # 62
stefanP # 63
Helichong # 64
Jsarsonj # 65
andizzle # 66
Killionaire # 67
OntAeronut # 68
drbenz # 69
Eddie James # 70
CanDo # 71
Thunderbolt P47 # 72
KC10Chief # 73
TheGreatBoo # 74
Noginblue # 75
boisebiker # 76
J. Paul Saure # 77
Acrostar # 78
sirzepp # 79
Kconn3 # 80
suburban95 # 81
BigTom802l # 82
Gary Binnie # 83
dmarusa # 84
westernstar # 85
scale only 4 me # 86
thisstrangeengine # 87
smkrcflyer # 88
mikmerl # 89
kwg # 90
pt19 flyer # 91
thnilsen # 92
nick1881 # 93
jescardin # 94
Vince Wickline # 95
bodybuildr # 96
mnmopar # 97
trippergreenfeet # 98
Knight_74 # 99
toolmaker7341 # 100
skyracer068 # 101
maekju # 102
mattnew # 103
ktmfrank # 104
jglemba # 105
Gray Beard # 106
FSXBA3P-MAN # 107
Dinkster75 # 108
ThunderBoat42 # 109
mRqS #110
got2retire # 111
Jim Oliver # 112
twistman # 113
MFIGHT43 # 114
Garbiray # 115
drac1 # 116
srecker # 117
hakesm # 118
rmoss94 # 119
02-06-2017, 06:08 AM
#1923
Junior Member
Join Date: Dec 2016
Location: Austria Bgld
Posts: 4
Likes: 0
Received 0 Likes
on
0 Posts
Hello.
I have just finished building my CG ultimate which was sold to me by a elderly gent at our flying club.
The kit has been sitting in his attic since 1993.The invoice was still in the box.
setup is with a dle 20 ra. I had the first flight this weekend and overall very happy with the plane..,as for the motor??


 ,I will have to give it time to run in.
Here are some pics
I have just finished building my CG ultimate which was sold to me by a elderly gent at our flying club.
The kit has been sitting in his attic since 1993.The invoice was still in the box.
setup is with a dle 20 ra. I had the first flight this weekend and overall very happy with the plane..,as for the motor??
Here are some pics

