


1/6 F4U Corsair
 06-28-2011, 09:53 AM
#1
Member
Thread Starter

Join Date: Dec 2009
Location: Varazdin, CROATIA (HRVATSKA)
Posts: 36
Likes: 0
Received 0 Likes
on
0 Posts
Hi all...
Since I'm new to forum it would be nice to present my build...
It's a Brian Taylor 1/6 F4U Corsair... I will try to make it as scale as possible for my abilities...
It is classic balsa + plywood build and it will be covered with 2 mm balsa sheets and finished in lightweight glass cloth + epoxy (or vinylester)...
Here are some pictures of my build along with YouTube video of working flaps...
[youtube]http://www.youtube.com/watch?v=heYTeDxE2Ko&feature=player_embedded[/youtube]
The video has a crapy quality because it was taken with mobile phone camera, but it shows flaps movement...

 06-29-2011, 05:13 AM
#3
Member
Thread Starter
Join Date: Dec 2009
Location: Varazdin, CROATIA (HRVATSKA)
Posts: 36
Likes: 0
Received 0 Likes
on
0 Posts
Thanks, I try very hard to have everything as scale as possible... 
Yes, I love and hate them at the same time because it took me nearly 4 hours to make everything work as it should...
Wingspan: 84", length: 67"...
As for engine, I'll use something in 35 - 40 ccm (2 - 2,5 cu. in.) range (probably chainsaw or weedwacker conversion) with custom made (self, probably) 1,95 : 1 reduction belt drive to drive 23 or 24 in, 3 or 4 blade propeller, to make it as scale as possible... I think I will use one of those variable pitch propellers from varioPROP...
I will post some more pictures in some 2 weeks, when I finish with my exams at college...
06-29-2011, 11:12 AM
#5
Member
Thread Starter
Join Date: Dec 2009
Location: Varazdin, CROATIA (HRVATSKA)
Posts: 36
Likes: 0
Received 0 Likes
on
0 Posts
So, it is not to much time? 
Good thing was that my father was at home and he helped me a lot by telling me to try to put middle flap on same axle (read same screw) with inner flap and same screw with outer flap... It really speed up the process and needed just few minor hole adjustments...
Retracts are home made per Brian Taylor's drawings... I had to make CAD drawings for my uncle so he could turn and mill parts for me... Here are some parts already turned and milled...
By now Ilearned how to turn, just have to learn how to mill...
Cheers,
Robert

 07-10-2011, 01:40 PM
#7
Member
Thread Starter
Join Date: Dec 2009
Location: Varazdin, CROATIA (HRVATSKA)
Posts: 36
Likes: 0
Received 0 Likes
on
0 Posts
hi, thanks for nice comments...
I managed to catch some spare time today and to do a bit on elevators...
One half is complete... As balsa is a bit expensive around here, I mainly use XPS for aestethic purposes (leading edges of elevators, rudder, etc.) with balsa on hinge points... Idrilled holes in elevator and tailplane and glued in pieces of brass tube with epoxy, for hinges... This elevator half and tailplane are sanded and ready for covering in glass cloth + epoxy...
here are some pictures...
08-21-2011, 10:32 AM
#8
Member
Thread Starter
Join Date: Dec 2009
Location: Varazdin, CROATIA (HRVATSKA)
Posts: 36
Likes: 0
Received 0 Likes
on
0 Posts
hi all, here Iam, returned from holidays and continuing with the build...
For last few days Iwas working on flap and aileron pushrods... I'm using Sullivan semiflexible for linking servos with bellcranks and 2 mm steel rod for connecting belcranks with ailerons and flaps... port side flaps and ailerons are connected with bellcranks but bellcranks are not conected with servos, so flaps are opereted by hand in video... it took me nearly 10 hours to get everything working as it works, but it stil needs some tweaking...
so, here is video and some pictures...
[youtube]http://www.youtube.com/watch?v=KuA1d5jrdOI[/youtube]
08-21-2011, 08:47 PM
#11
Looks like great progress. I've been doing a lot of research on the Corsair and the BT appears to be one of the most acurate designs.
A little over a week ago I was working in the cockpit area and just forward of the cockpit where the fuel tank sits.
If you notice, the center wing section (without flaps) is in the background of the first photo.
Scott
A little over a week ago I was working in the cockpit area and just forward of the cockpit where the fuel tank sits.
If you notice, the center wing section (without flaps) is in the background of the first photo.
Scott
08-22-2011, 03:08 PM
#13
It was a rare and wonderful opportunity to spend a week helping out on a full size restoration.
Here's a link to more photos:
http://www.rcuniverse.com/forum/fb.asp?m=10673595
They should be helpful if you plan on adding cockpit and wheel well details.
Scott
Here's a link to more photos:
http://www.rcuniverse.com/forum/fb.asp?m=10673595
They should be helpful if you plan on adding cockpit and wheel well details.
Scott
09-09-2011, 08:01 AM
#15
Member
Thread Starter
Join Date: Dec 2009
Location: Varazdin, CROATIA (HRVATSKA)
Posts: 36
Likes: 0
Received 0 Likes
on
0 Posts
a few more pictures, just to show how my father cuts the channel in main spar for carbon fiber reinforcements...
he took the he initiative in cutting so I was just standing beside...
he took the he initiative in cutting so I was just standing beside...
09-09-2011, 03:09 PM
#17
Member
Thread Starter
Join Date: Dec 2009
Location: Varazdin, CROATIA (HRVATSKA)
Posts: 36
Likes: 0
Received 0 Likes
on
0 Posts
yep, he finished cutting in less than 5 minutes...
now, it was not all about cutting, I'm working on right wing half on flaps and aileron... I cut and drilled all the holes for pushrods and now I have to install belcranks and connect everything with servos... I will post some more pictures tomorrow...
09-20-2011, 03:00 PM
#18
Member
Thread Starter
Join Date: Dec 2009
Location: Varazdin, CROATIA (HRVATSKA)
Posts: 36
Likes: 0
Received 0 Likes
on
0 Posts
hi all...
I didn't post much of the progress on my Corsair because there were many drawbacks... I had to remove all the bellcranks and Sullivan pushrods to place servos in the wing right behind flaps and ailerons... I had major drawbacks with system used and I couldn't get servo to move flaps completely to up position... Flaps stopped a few millimeters below desired position and servo was just pushing and pulling, but nothing happened... There was no binding in linkages and I was careful with geometry, copied all from plans... So I cut everything off and started to make servo holders to place servos behind flaps and ailerons...
I believe that those things come from my inexperience with big birds like 1/6 Corsair (bent wings don't help, either...)... I only built free flight gliders in primary school (along with kit built FW 190A, which was destroyed by my teacher), so this is my first big project...
The bottom line is that I won't give up...
more (+ pictures) tomorrow...
cheers,
Robert
I didn't post much of the progress on my Corsair because there were many drawbacks... I had to remove all the bellcranks and Sullivan pushrods to place servos in the wing right behind flaps and ailerons... I had major drawbacks with system used and I couldn't get servo to move flaps completely to up position... Flaps stopped a few millimeters below desired position and servo was just pushing and pulling, but nothing happened... There was no binding in linkages and I was careful with geometry, copied all from plans... So I cut everything off and started to make servo holders to place servos behind flaps and ailerons...
I believe that those things come from my inexperience with big birds like 1/6 Corsair (bent wings don't help, either...
)... I only built free flight gliders in primary school (along with kit built FW 190A, which was destroyed by my teacher), so this is my first big project...The bottom line is that I won't give up...
more (+ pictures) tomorrow...
cheers,
Robert
 10-01-2011, 02:33 AM
#21
Member
Thread Starter
Join Date: Dec 2009
Location: Varazdin, CROATIA (HRVATSKA)
Posts: 36
Likes: 0
Received 0 Likes
on
0 Posts
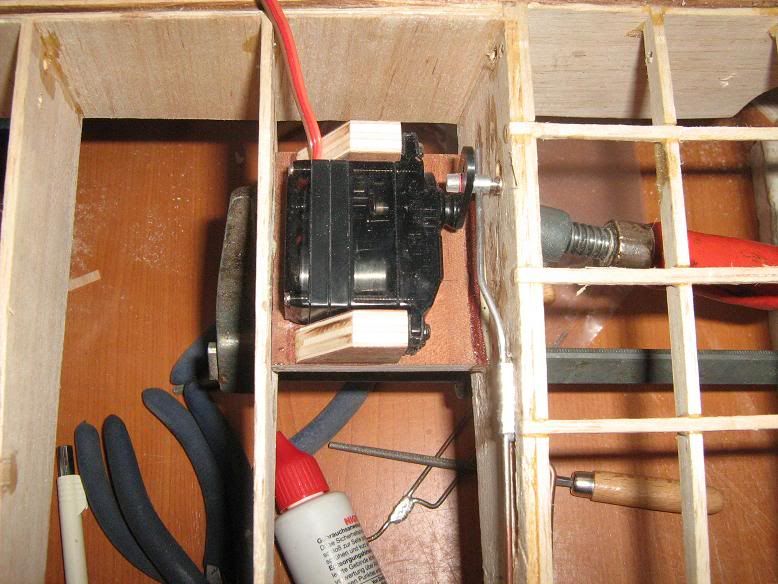
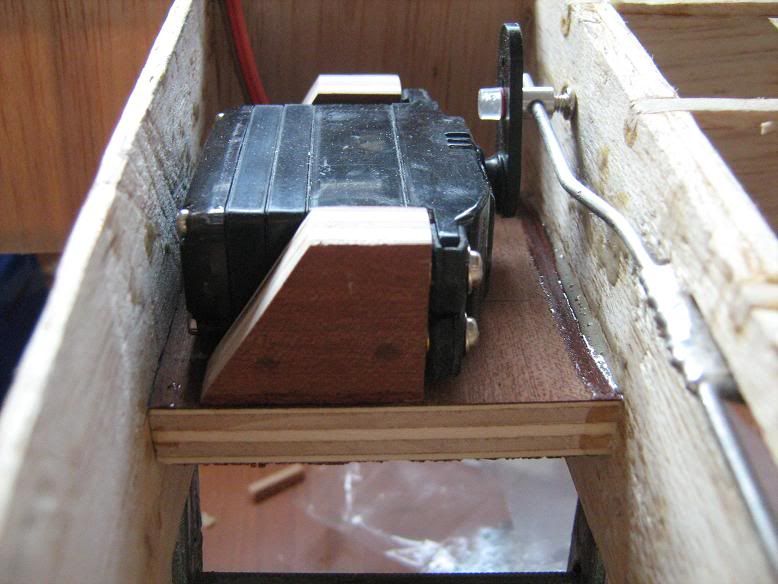
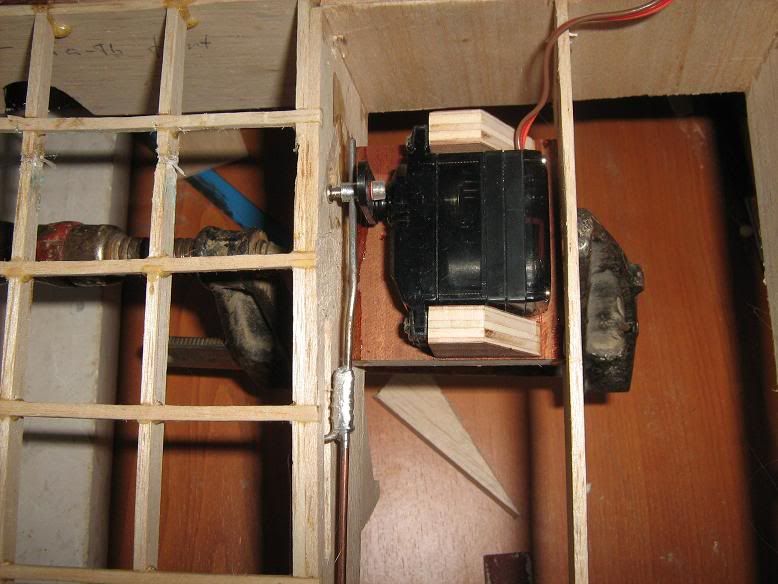
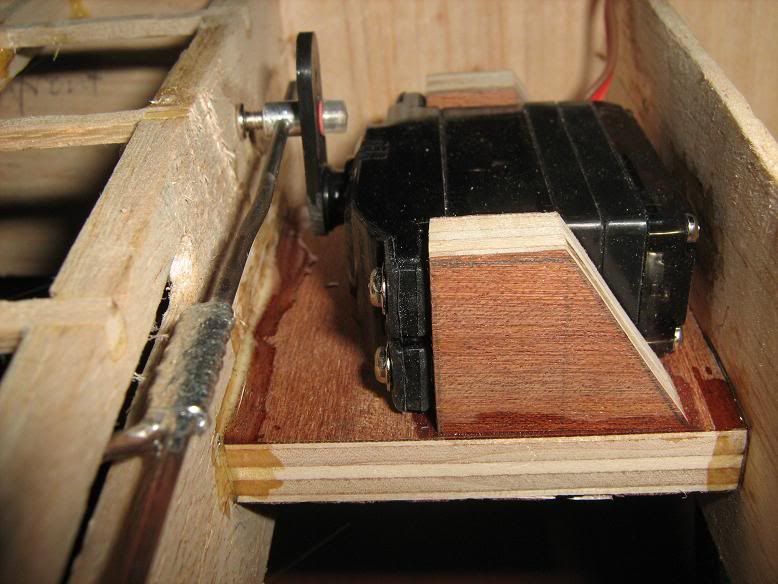
I can't set my mind, so I would need your help.
As you can see on pictures, flap servos have been installed. I have to reinforce the ribs between which I have glued the servo holder. Is it enough to reinforce the ribs with glass cloth (80 or 100 g) and epoxy, or should I use carbon cloth, kevlar cloth, or maybe carbon-kevlar hybrid cloth?
I'm not smart enough.
