Hobby Lobby Telesport build
 09-21-2011, 11:49 PM
#1

Thread Starter

Join Date: Apr 2005
Location: U.S.
Posts: 480
Likes: 0
Received 0 Likes
on
0 Posts
This was the second plan i never owned. Almost 20 years ago i would stare at the add in the hold hobby-lobby catalog and admire it. I was a young teenager and after my first plane a GP pt-60 all my money went to maintaining/repairing and flying it. i have owned many ARF's through the years but besides a few scratch builds that already had wings built up this is my first kit sense the pt-60 18 years ago. From what i can remember the pt-60 was fairly easy for me to build considering my age and inexperience, but this old kit from hobby lobby will test my building skills for sure. With patients and planning it will come together.
About the plane. I have read very little about it and a google search only brings up old adds. Few ever heard of the kit. i read a few threads over on rccananda about it and a guy there was nice enough to mail me an old rc review article on it. From what i have learned it was hobby lobby's attempt to make a 40-60 size low wing sport aerobatic trainer. it was only sold from about late 80's to 1993. Do to the growing popularity of arf and hobby lobbies shift towards electric, is probably what lead to it being discontinued. It highly resembles the GP super sportster, Iv even heard it was kited my GP for hobby lobby. It is suppose to be a great flying airplane. it is nostalgic for me and i loved its vintage look with elliptical wings and turtle deck. And i plan on covering it just like HL's scheme on the box. I have not decided on a power plant but im highly considering a JBA 56 or larger SK 70 to 90. If anyone has any knowledge of this plane or advise for a power plant then please share. "good power for strong sport flying not 3D".
This will be a slow build but my goal is keeping it under 3 months. the only thing i plan on deviating from so far is using 2 aileron servos in the wings instead of 1 in the center. I have started on it tonight and so far i have glued the lower spar to the dihedral braces with 30min expy. Be for i build the wing up any further i will get some ceiling tile or drywall for a building surface. Meanwhile i have glued the stabs together with med CA. For glue i will be using CA, titebond and epoxy. Hopefully by this weekend i can have a good building surface and get he wing framed up. I will be posting my progress here with pics. RCU is not letting me upload pics right now, i will try later. Thank you

 09-23-2011, 02:09 AM
#3
Thread Starter
Join Date: Apr 2005
Location: U.S.
Posts: 480
Likes: 0
Received 0 Likes
on
0 Posts
Starting to look like an airplane.  Framing the wing up is what i dreaded most and so far nothing has tested my patients, it has been a joy. Only a few slots in the ribs needed to be re sized for the spars to fit in. The tabs on the bottom trailing edge of the ribs for support were cut accurately for the wing to sit level. I do not trust the two 1/16" ply pieces for the dihedral braces, i will be adding more braces or glassing the root. I have to remind myself to make holes in the ribs for the aileron harnesses as i will be installing two servos one for each aileron. All the ribs and spars are strait and square and i cant see any warp at this point. Maybe this weekend i will have enough time to at least have the left wing complete, maybe both.
Framing the wing up is what i dreaded most and so far nothing has tested my patients, it has been a joy. Only a few slots in the ribs needed to be re sized for the spars to fit in. The tabs on the bottom trailing edge of the ribs for support were cut accurately for the wing to sit level. I do not trust the two 1/16" ply pieces for the dihedral braces, i will be adding more braces or glassing the root. I have to remind myself to make holes in the ribs for the aileron harnesses as i will be installing two servos one for each aileron. All the ribs and spars are strait and square and i cant see any warp at this point. Maybe this weekend i will have enough time to at least have the left wing complete, maybe both.
09-23-2011, 04:35 AM
#4
Join Date: Jan 2008
Location: Yuma, AZ
Posts: 101
Likes: 0
Received 0 Likes
on
0 Posts
I found a few pics from my own project.....here is how it came together. I would say to feel free to add a bit of strength in the wing joint...cannot hurt. I may still dig the project out, cover it and put it into the air.
OOPS....pics will not load. Send me your email and Ill get pics to you.
Russ V.
OOPS....pics will not load. Send me your email and Ill get pics to you.
Russ V.
09-23-2011, 01:00 PM
#5
Join Date: Sep 2003
Location: Ottawa,
ON, CANADA
Posts: 23
Likes: 0
Received 0 Likes
on
0 Posts
About lightening it up. Tony W.
<<And one guy in this thread suggested building it lighter; I plan on cutting some holes in it, what else can be done to lighten it up?>>
Is the wood in the kit heavy? e.g. more than 10#/ sq.ft.? Cutting holes in the stab may help if the wood is heavy. Better to change the wood altogether.
I have cut round holes in fuse sides, and when weighed the amount was very little weight saved but easy to weaken the structure.
If you are going tp use a heavy 4 stroke in the nose, you may have no balance problems.
In the RC Reports review, the plane, with a 60 engine, came out at 5 lbs. 3 oz. and a WL of 22. That is pretty good and it will fly better in the wind too.
Dan
09-23-2011, 03:53 PM
#6
Thread Starter
Join Date: Apr 2005
Location: U.S.
Posts: 480
Likes: 0
Received 0 Likes
on
0 Posts
ORIGINAL: mcledan
About lightening it up. Tony W.
>
Is the wood in the kit heavy? e.g. more than 10#/ sq.ft.? Cutting holes in the stab may help if the wood is heavy. Better to change the wood altogether.
I have cut round holes in fuse sides, and when weighed the amount was very little weight saved but easy to weaken the structure.
If you are going tp use a heavy 4 stroke in the nose, you may have no balance problems.
In the RC Reports review, the plane, with a 60 engine, came out at 5 lbs. 3 oz. and a WL of 22. That is pretty good and it will fly better in the wind too.
Dan
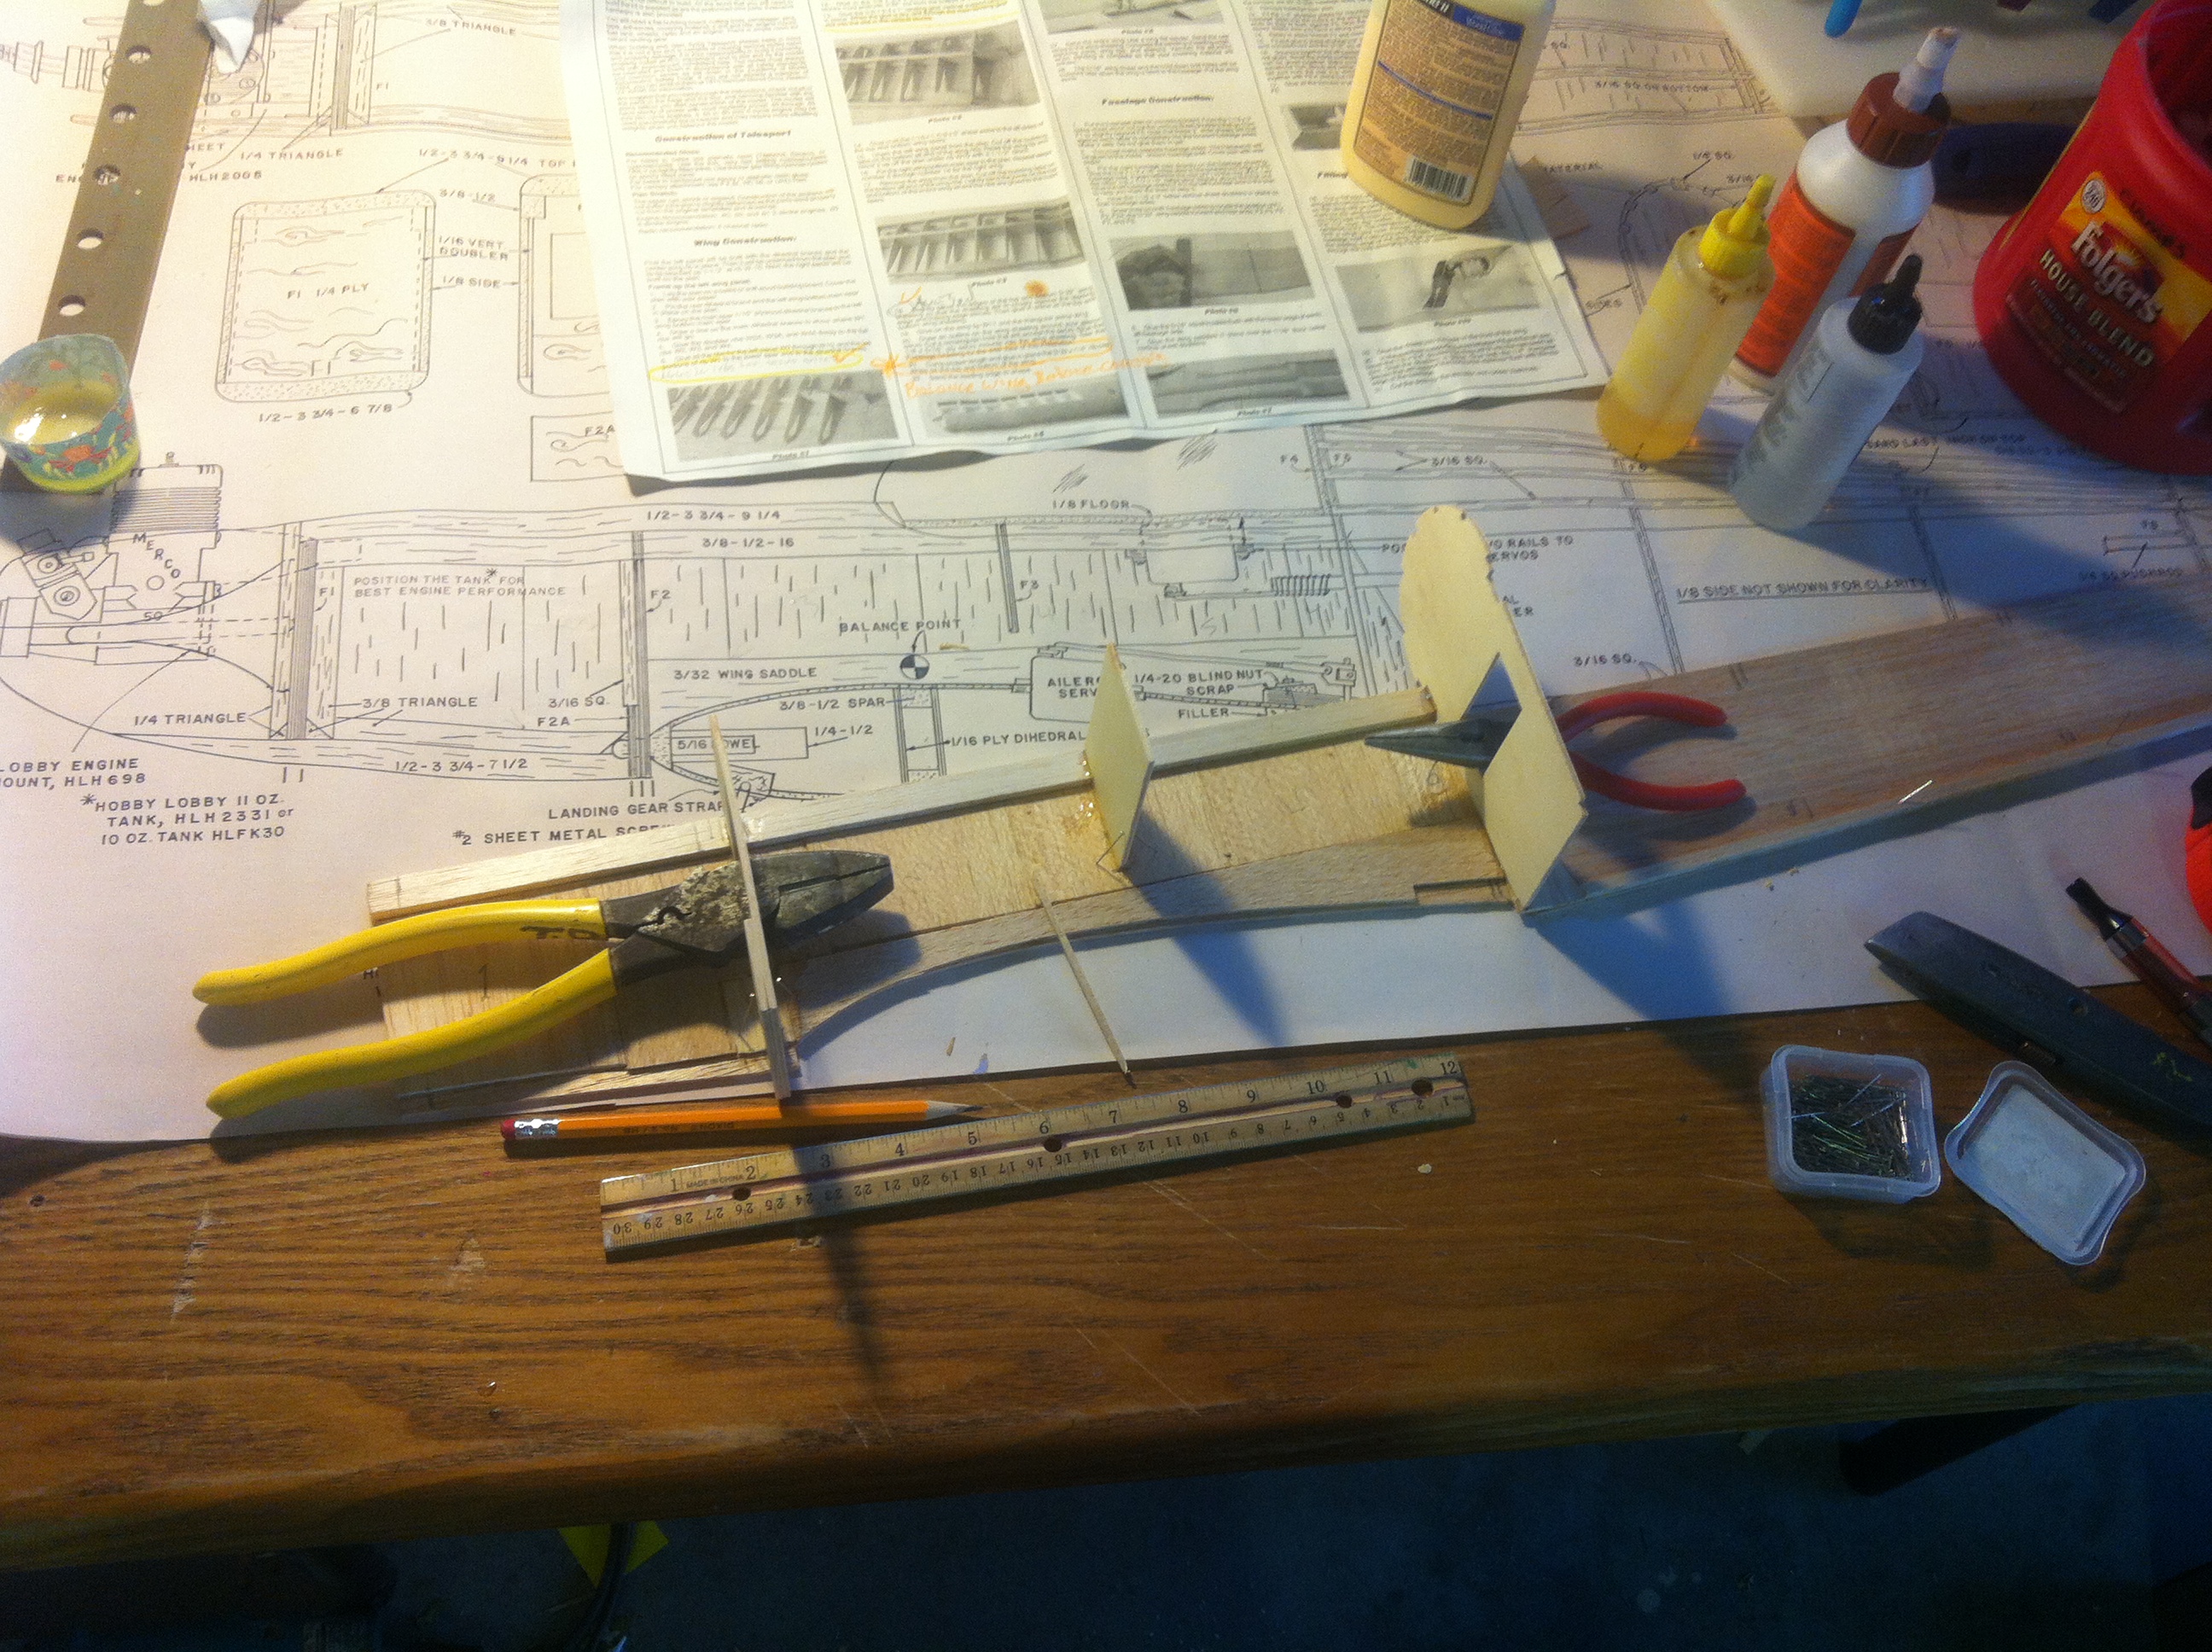
I mentioned in my first post that I would buy ceiling tile or dry wall for building but I could not wait and just had to improvise. I robbed a laminated shelf off a cabinet that’s about 2X3’ just big enough for one wing half and it was perfectly flat according to my strait edge. Once everything pre fit I used weights to hold everything in place while the glue set. Then glued the top spar in and made sure the wing was perfectly strait before it set. I am very pleased with how it turned out and was easy enough. May not get any progress up tonight do to a late work shift but will try and get as much done this weekend around family time. Full time job, wife, and 2 kids that need help in school that’s why my goal is 3 months. I will try my best to stay faithful to the project and build thread. Thanks for dropping in.
09-25-2011, 11:21 PM
#7
Thread Starter
Join Date: Apr 2005
Location: U.S.
Posts: 480
Likes: 0
Received 0 Likes
on
0 Posts
Well life happened this weekend so i didnt get much done. The left wing is built up and the right spar is glued in place ready for the right ribs. Ill take pics later.
09-28-2011, 12:38 AM
#8
Thread Starter
Join Date: Apr 2005
Location: U.S.
Posts: 480
Likes: 0
Received 0 Likes
on
0 Posts
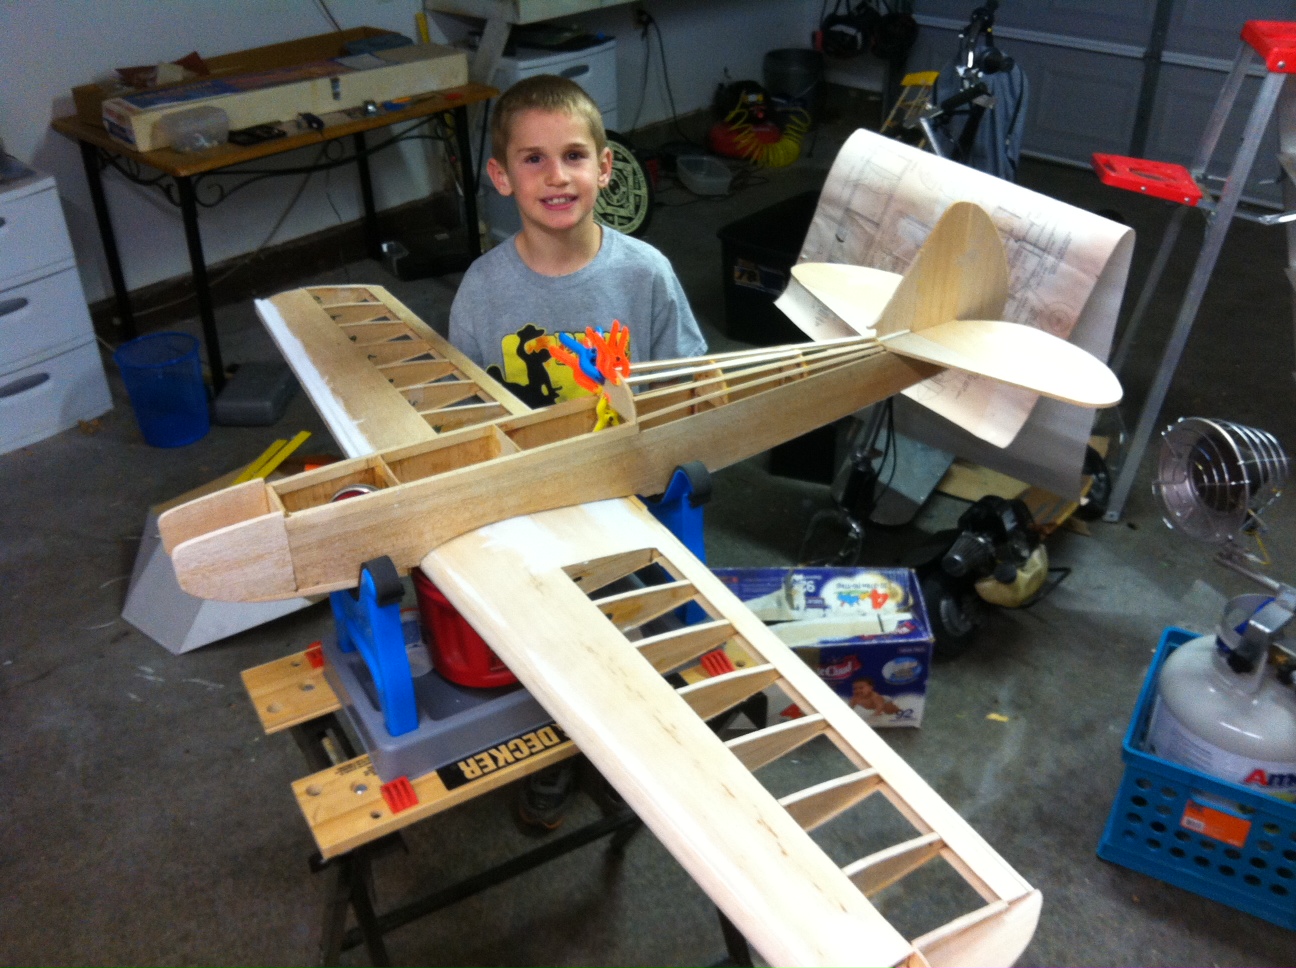
The wing is built up and ready for the wing tips to be glued on and then sheeted. be for i sheet the wing i will apply epoxy to high stress areas inside the wing like the root and landing gear blocks.
A few mods was i added an extra 1/4" dihedral brace in between the 2 stock braces. I also added some small 1/4" ply blocks to the leading edge of the ribs that are supporting the landing gear blocks, you can see that in the pics.
A flaw that is in the instructions which i didn't catch be for it was to late is it doesn't mention to glue the trailing edge dihedral brace in be for you glue the trailing edge balsa strip on, the plans show the brace in between the leading edge balsa strip and wing bolt support blocks. So i had to glue the dihedral brace on outside of the trailing edge. See pic. I will just have to work around this with the ailerons.
Next will be sheeting.
10-10-2011, 08:54 PM
#9
Thread Starter
Join Date: Apr 2005
Location: U.S.
Posts: 480
Likes: 0
Received 0 Likes
on
0 Posts
Do to some unfortunate personal issues this and all other of my hobbies have been put on hold. Hopefully when things get back to normal i can continue the build. Thanks you
08-08-2013, 04:57 PM
#11
Thread Starter
Join Date: Apr 2005
Location: U.S.
Posts: 480
Likes: 0
Received 0 Likes
on
0 Posts
Ok so where was I? Wing is covered and ready for the leading edge to be sanded to shape, rib caps still need to be glued on. The fuslage has the sides glued together along with the firewall and formers. Recieved two rolls of monokote cub yellow and royal blue to mach the covering scheme on the box. Will be excited to get it ready to cover.
Sorry for the two year delay in the build thread. Went through some major life changes.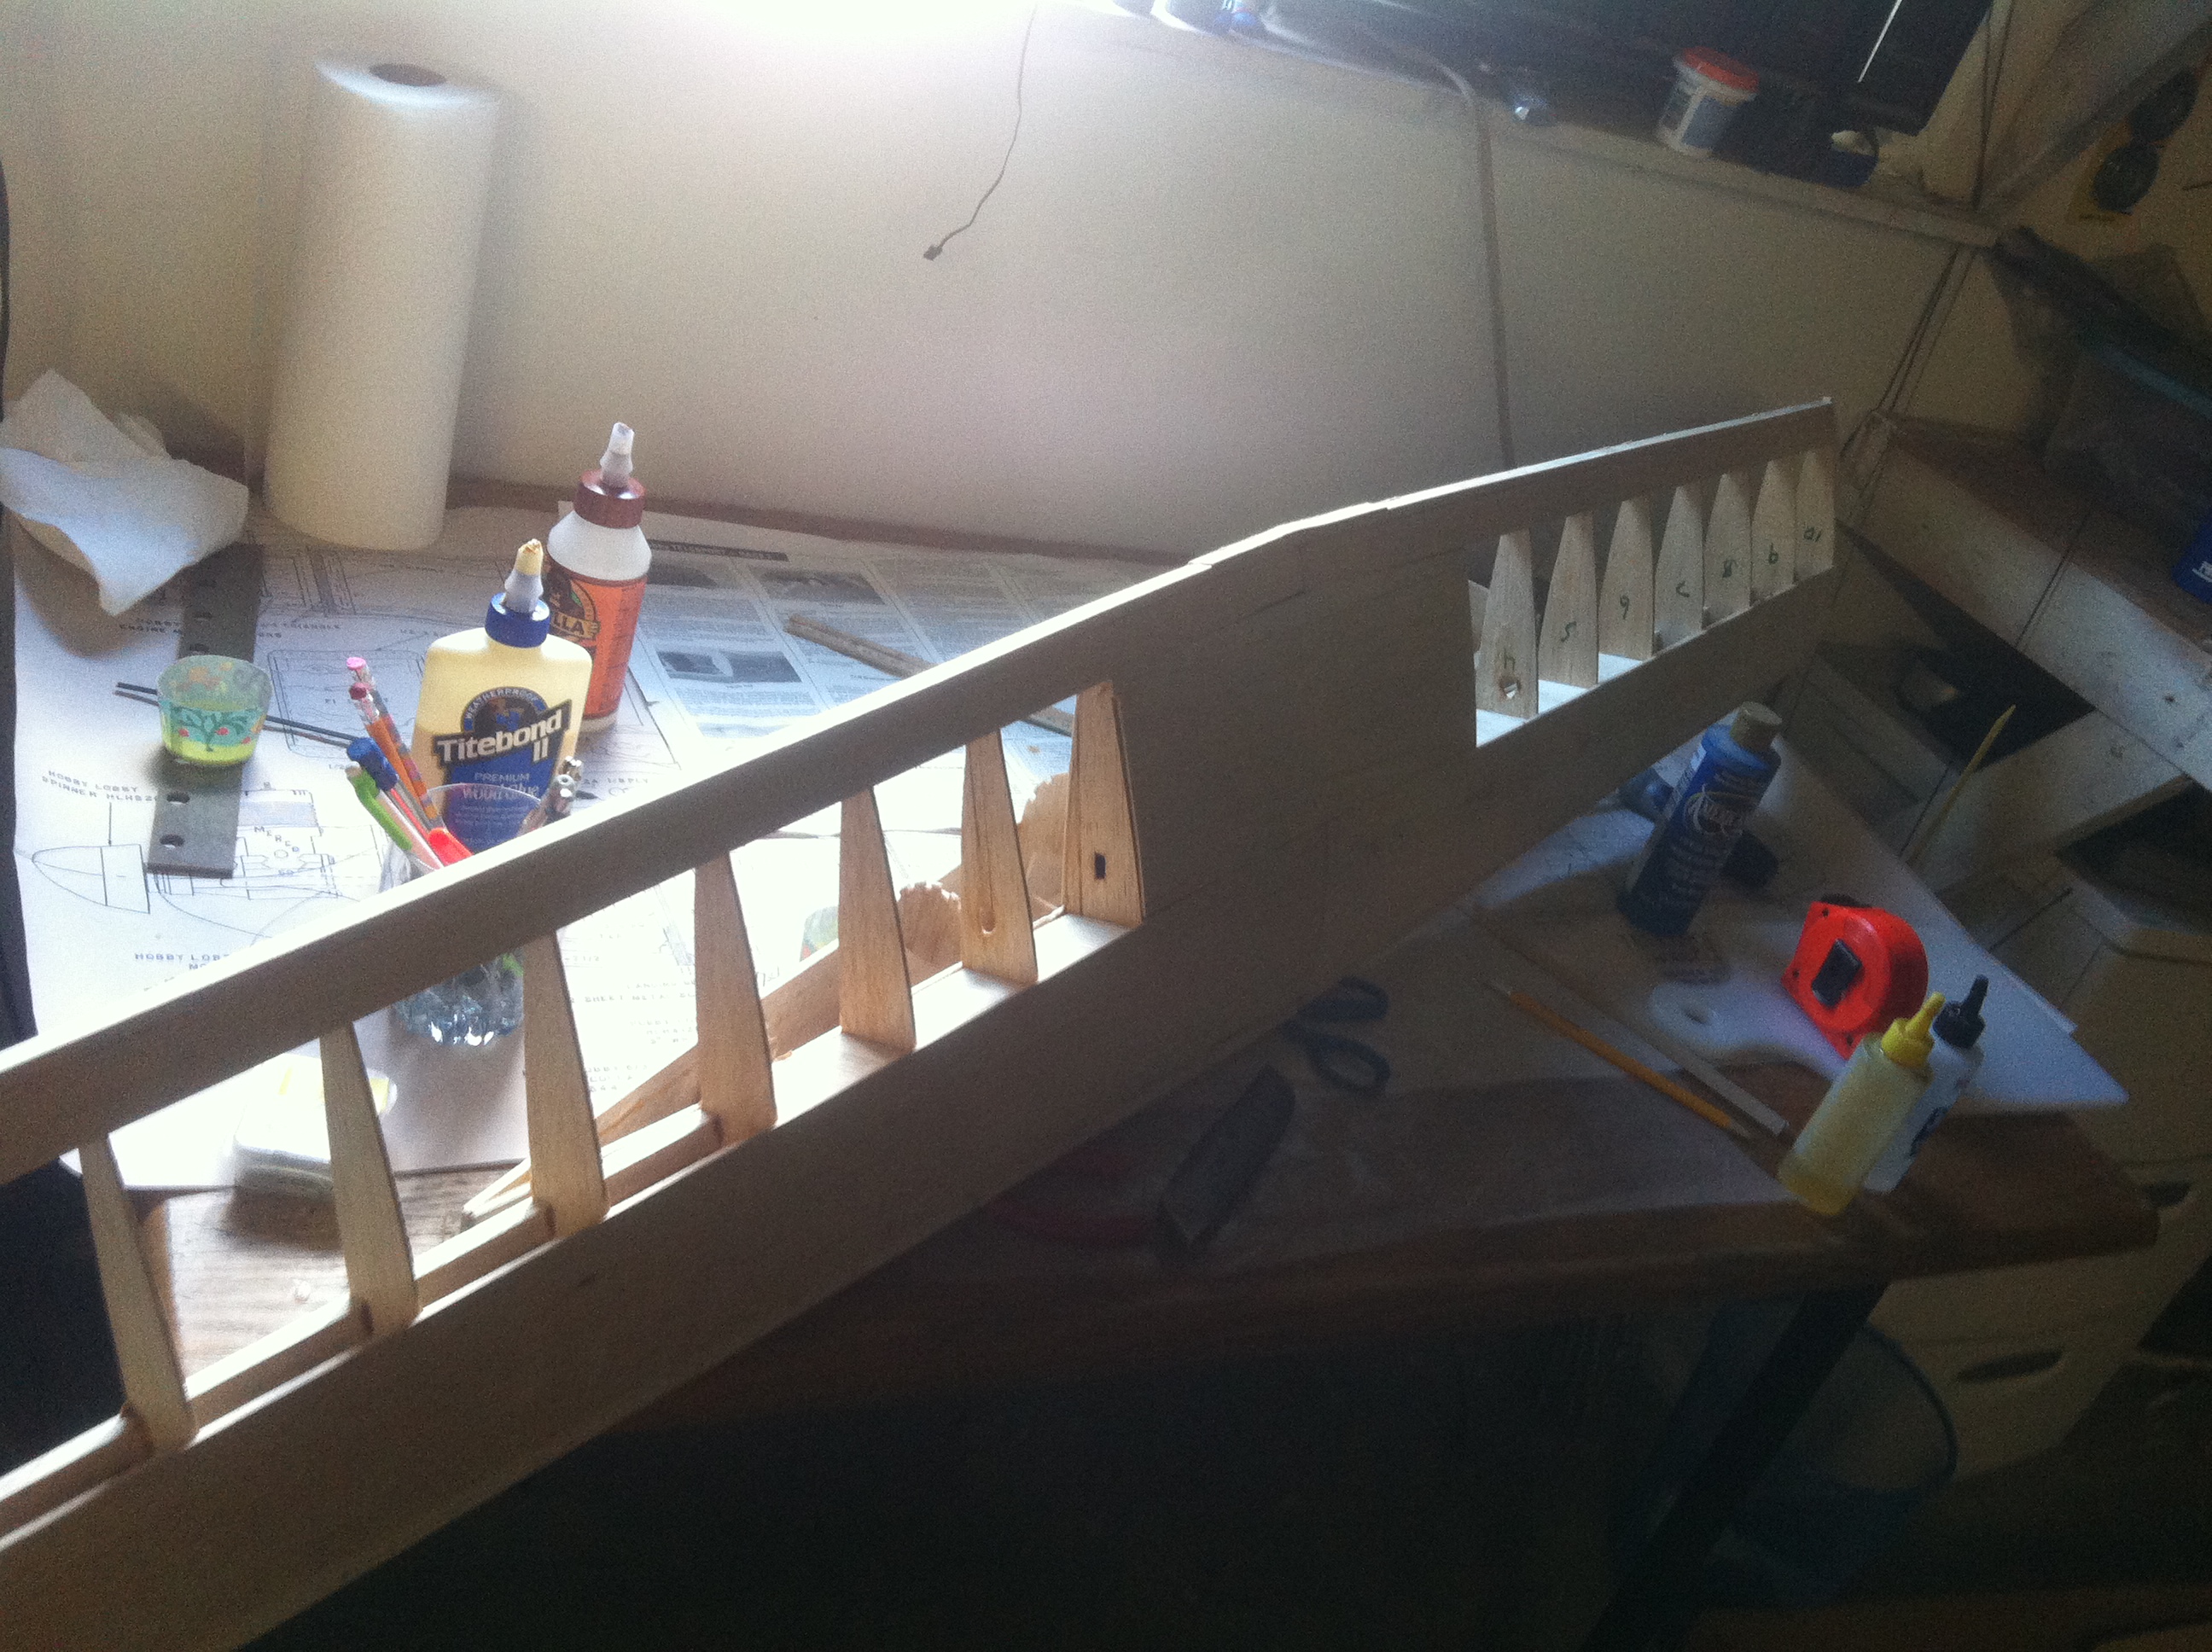

Sorry for the two year delay in the build thread. Went through some major life changes.
01-01-2014, 02:30 PM
#12
Thread Starter
Join Date: Apr 2005
Location: U.S.
Posts: 480
Likes: 0
Received 0 Likes
on
0 Posts
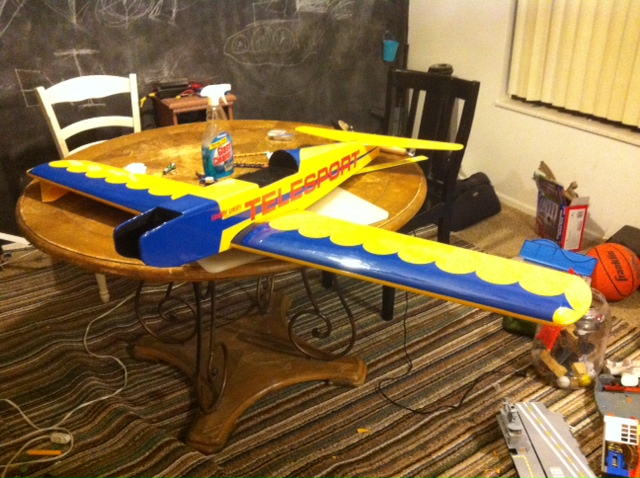
Had some time to get alot done over the holiday. The wing and stabs are only setting on the fuse for now just for the pic. Alot of work has to be done around the wing saddle to allow the wing to seat flush. Also doing a lot of sand shaping filling sand shaping again to the wing. The bulk of the kit is built up and from this point on i should not need much of the instructions. Alot of sanding and more shaping and it will be ready to cover. Im going to cover the stabs befor there installed like an ARF build.
Last edited by tonywayne; 01-01-2014 at 02:34 PM.
01-20-2014, 11:11 AM
#13
Thread Starter
Join Date: Apr 2005
Location: U.S.
Posts: 480
Likes: 0
Received 0 Likes
on
0 Posts
Got the wing ready to cover. Applying the blue graphics to the LE was easier than i thought once i developed a method. I spaced the scalops according to the ribs and used an aproprate sized cup to trace around. Slowly with a razor cutting it out then useing the windex method to apply it to the wing with a squeegy. I will go over it lightly with an iron to make sure it seals good after the windex is dry.
 02-02-2014, 08:04 PM
#15
Thread Starter
Join Date: Apr 2005
Location: U.S.
Posts: 480
Likes: 0
Received 0 Likes
on
0 Posts
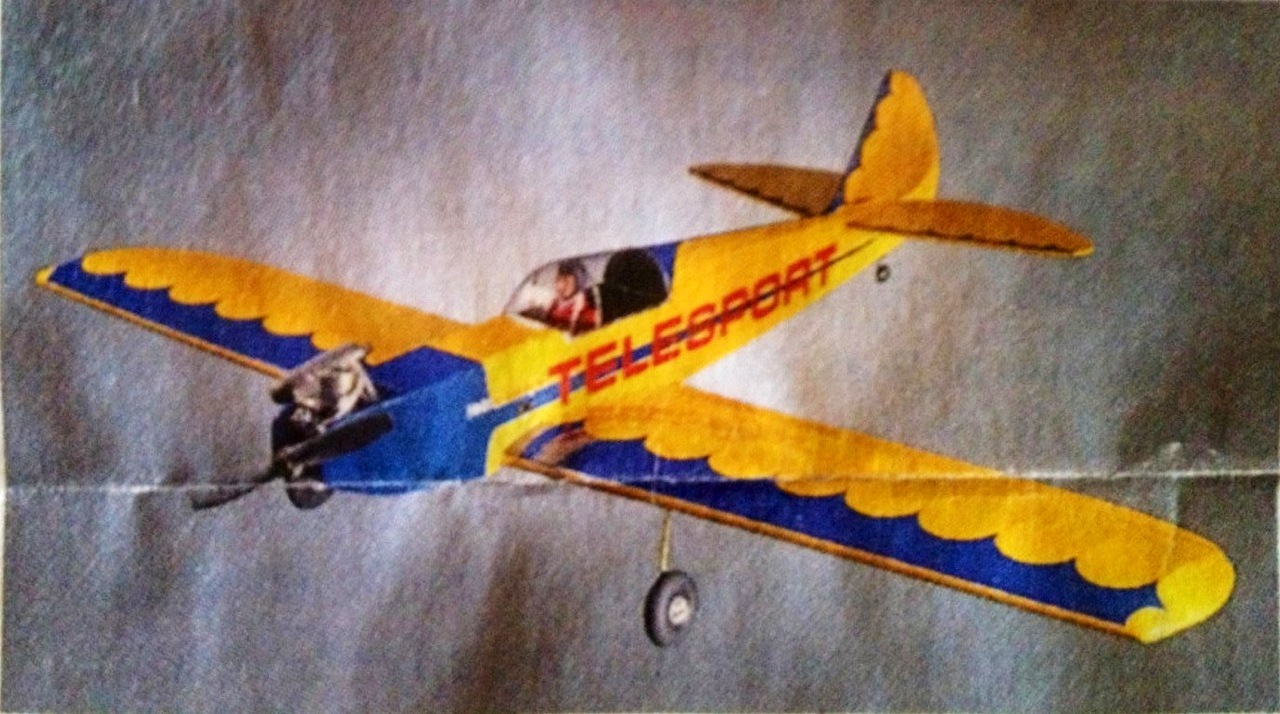
Its pretty much at an ARF state right now. All that's left for covering is the scallops on the stabs and control surfaces then hinging them. Next thing i will do is apply one more coat of epoxy to the engine area then drill the wing mounting bolts and seat the wing with wing seat tape and fuel proof inside the wing saddle for any fuel that may work its way through, i am a fuel proof stiffler. Then radio gear and push rods ect. Last will be landing gear, canopy and engine. I will be using CA hinges then sealing the hinge gaps with monokote. I originally bought a SK 50 for the nose but have decided to go with a TT pro 46. The first pic here is the original hobby lobby telesport from the 1990's catalog. My yellow is not as bright as is looks in the pic, its just the lighting.
Last edited by tonywayne; 02-02-2014 at 08:07 PM.
02-09-2014, 01:53 AM
#16
Thread Starter
Join Date: Apr 2005
Location: U.S.
Posts: 480
Likes: 0
Received 0 Likes
on
0 Posts
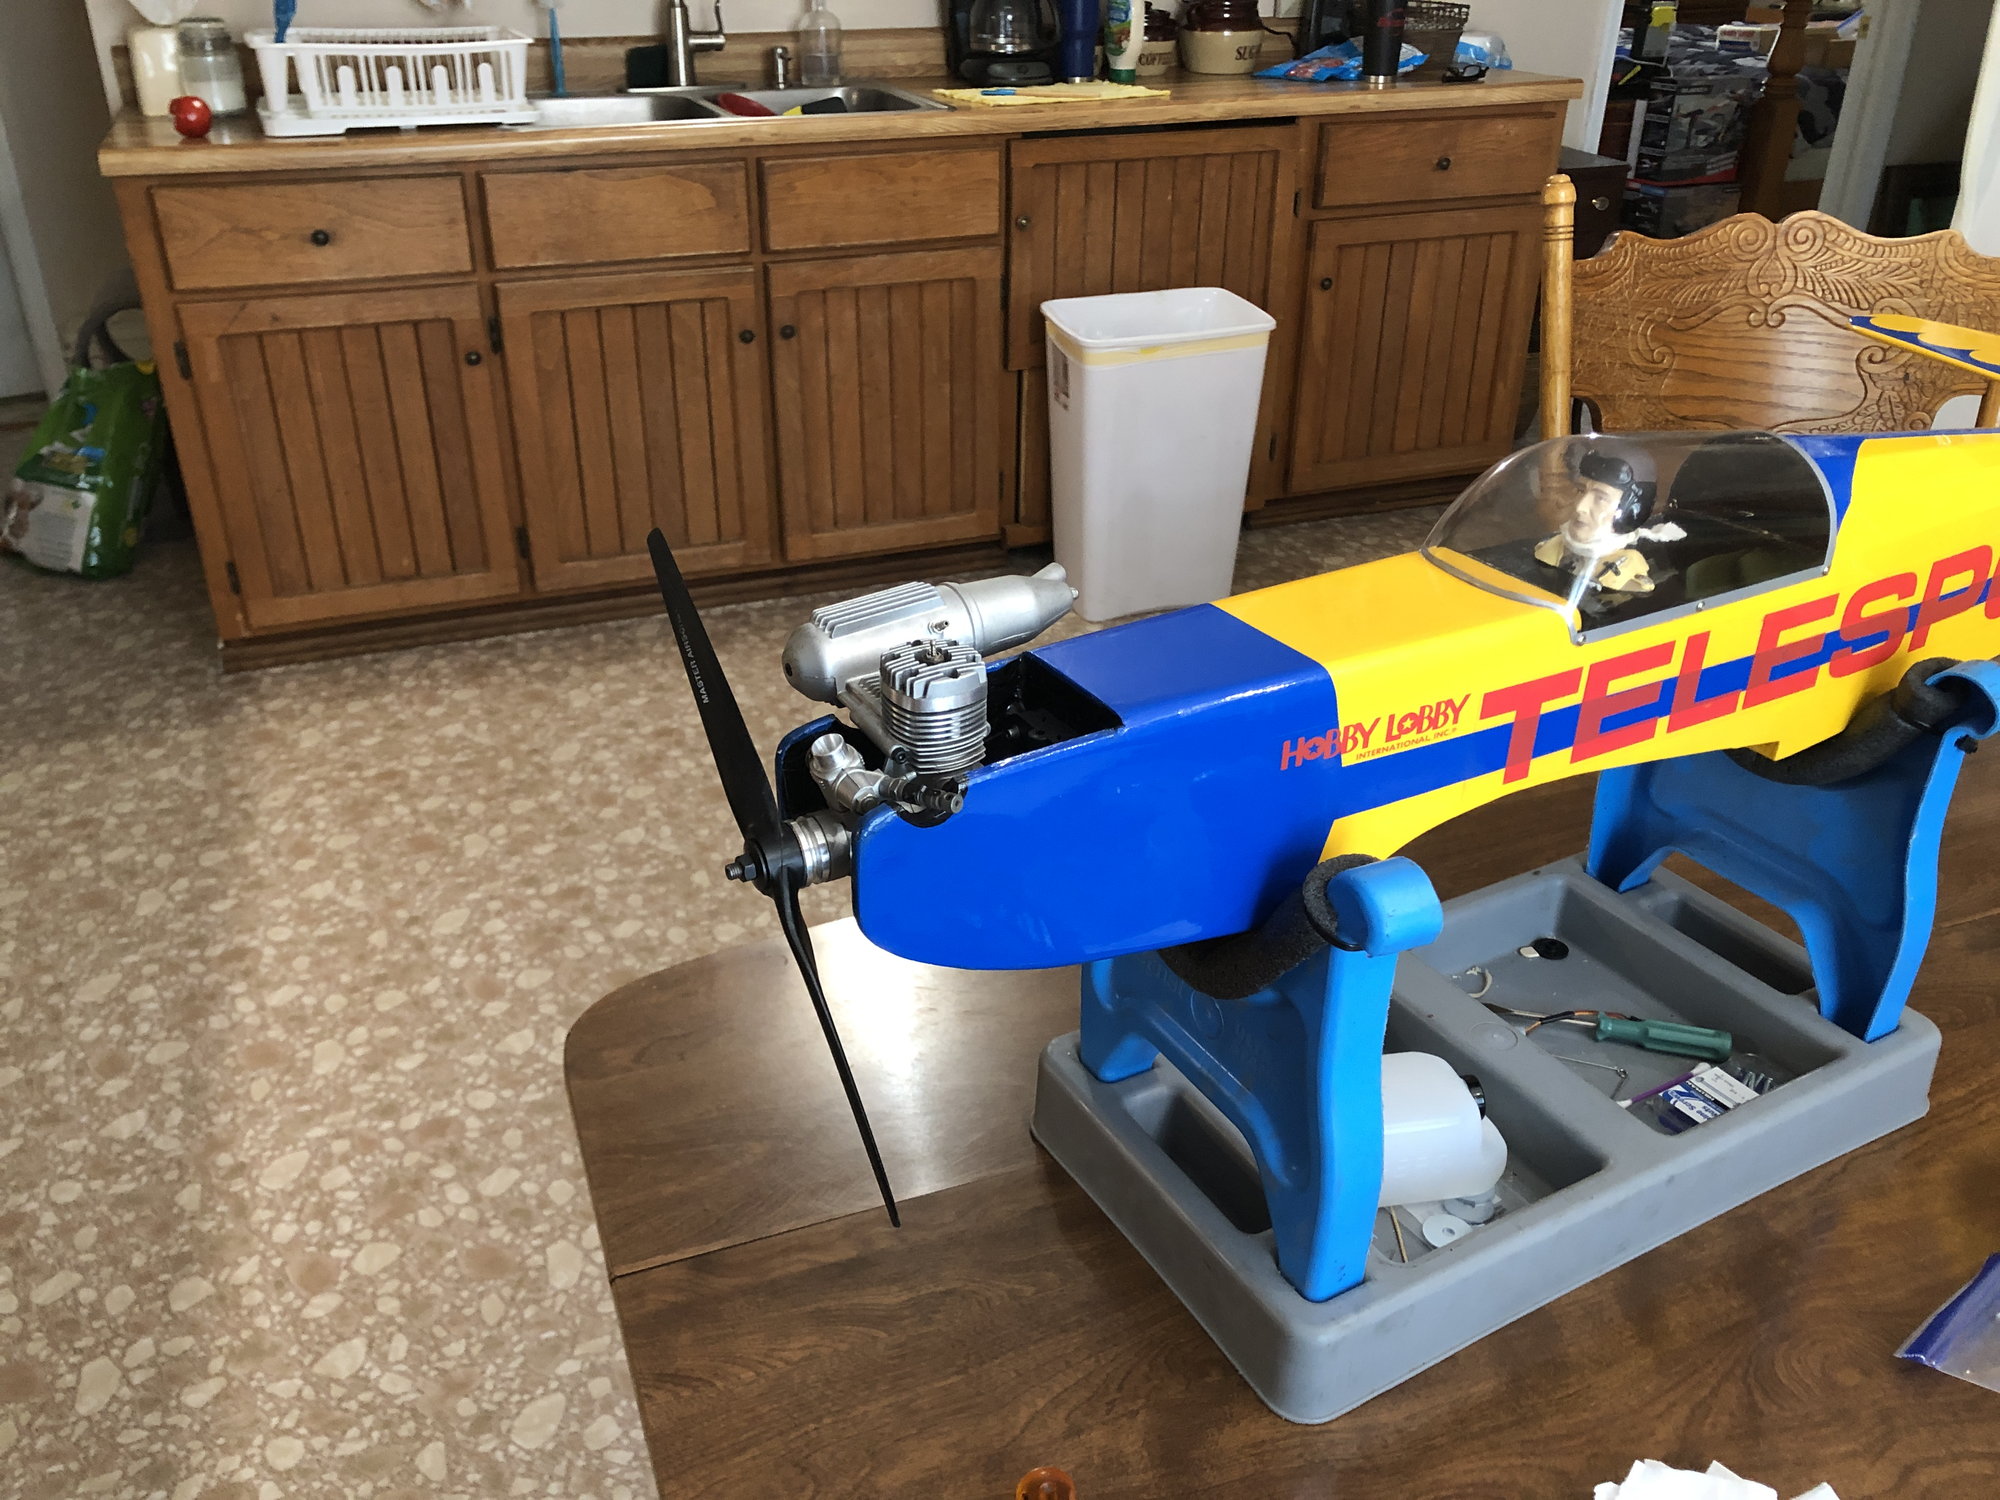
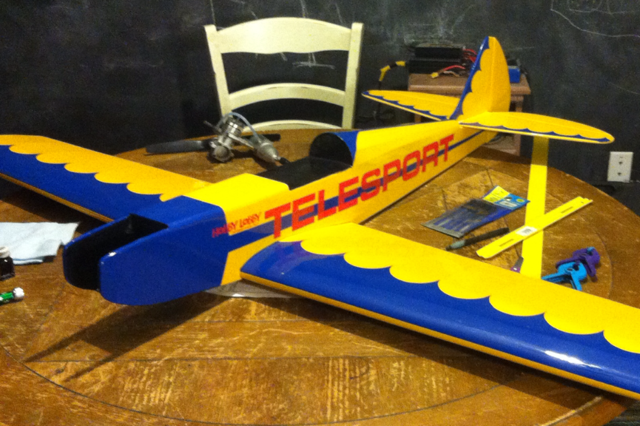
Just when i think im getting close to finishing i spend 7 hours on one portion. So here it is completely covered with the stabs epoxied in place. Next will be shaping and applying balsa stock to where the stabs join together to the fuselage. After that i will be installing the engine and landing gear. Behind the plane you will see my new TT 46 pro going in the nose. I ordered it just a few weeks ago from Tower. I noticed a few days ago they are discontinued now. Guss i got one of the last of TT's old model 46 pro since they now have the new model. Glad i got one before they were gone. Anyway. I have ran about 3 tanks through it on the bench for break in and shes swinging a MS 11x6 prop at 13,500 just under peek with a smooth transition and idle. Oh! i still have the ailerons to shape cover and install.
Last edited by tonywayne; 02-09-2014 at 10:35 AM.