


Albatros D.III Build along
 01-26-2004, 09:47 PM
#1

Thread Starter
My Feedback: (2)

Join Date: Jun 2002
Location: Holliston, MA
Posts: 368
Likes: 0
Received 0 Likes
on
0 Posts
I've always liked the build along threads in here, so I thought I'd post one of my own.
This is my winter project, a [link=http://www.funaero.com/albatrosd3.htm]FunAero Albatros D.III[/link]
Its about 1/6 scale, 65" span, Saito .91 power. Its my first scale effort and I am hoping to enter
it in Fun Scale at our local Scale Masters qualifier.
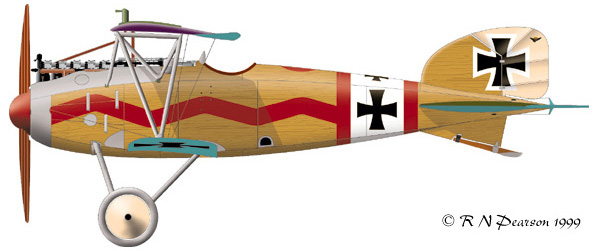
Im thinking of doing the finish in this scheme from an unknown pilot in Richthofen's Jasta 11:
First image, the kit contents. Very nice laser cutting and good wood selection. Two BIG full size plan sheets.
*** Update Jan-30-04 ***
I'm running this build along on my website also. Same photos, but with more comments.
[link=http://sky.prohosting.com/jharkin/albatros.html]Albatros D.III Construction Site[/link]
******
This is my winter project, a [link=http://www.funaero.com/albatrosd3.htm]FunAero Albatros D.III[/link]
Its about 1/6 scale, 65" span, Saito .91 power. Its my first scale effort and I am hoping to enter
it in Fun Scale at our local Scale Masters qualifier.
Im thinking of doing the finish in this scheme from an unknown pilot in Richthofen's Jasta 11:
First image, the kit contents. Very nice laser cutting and good wood selection. Two BIG full size plan sheets.
*** Update Jan-30-04 ***
I'm running this build along on my website also. Same photos, but with more comments.
[link=http://sky.prohosting.com/jharkin/albatros.html]Albatros D.III Construction Site[/link]
******
 01-26-2004, 09:50 PM
#2
Thread Starter
My Feedback: (2)
Join Date: Jun 2002
Location: Holliston, MA
Posts: 368
Likes: 0
Received 0 Likes
on
0 Posts
This next bunch is the tail group. The stab is a sheeted frame of laser cut parts. I opted to scratch build the fin and rudder as the docs I have are for the early version of this bird wich has a different rudder shape than this kit.
01-27-2004, 04:18 AM
#5
Senior Member
Join Date: Dec 2003
Location: minot,
ND
Posts: 225
Likes: 0
Received 0 Likes
on
0 Posts
Thats a very nicely done kit of a very cool airplane. It's one that I've dreamt of building for awhile myself. I have a few questions about it. First, does it come with a scale dummy engine or plans for building one? Second, the cooling issue, what provisions are there for getting some airflow to the engine? Thats one thing that has always put me off building one of these myself. Also, what's the fuselage and tail group sheeted with? At one time I sorta toyed with the idea of scaling up some 3 views of this plane to quarter scale, and sheeting it with 1/64 plywood over balsa, but yikes, all those compound curves.[ ] Thanks for posting it. Looks great so far.
] Thanks for posting it. Looks great so far.
01-27-2004, 08:48 AM
#6
Thread Starter
My Feedback: (2)
Join Date: Jun 2002
Location: Holliston, MA
Posts: 368
Likes: 0
Received 0 Likes
on
0 Posts
Hi Pete-
Thanks for the compliment...
Dummy Engine- Yes, the kit includes parts for one. Its all balsa and dowel pieces though and some pieces you supply yourself (coat hanger wire, brass tube, springs from a pen to make the valve springs).
Cooling - The engine is mounted upright , all you do is cut away part of the dummy engine to expose the head. I plan to cut a bunch of holes in the bottom of the cowl for exit air. I'm also thinking of running the exhaust out the bottom with a flexible header pipe. Its not totally concealed, but then again this is only a sport scale kit. BTW, if you click the link in my first post you can see some images of how it is supposed to come out.
Sheeting- The fuselage is sheeted with 1/16 balsa. I'm going to be experimenting with different finishes to try to duplicate the varnished wood look on the balsa without leaving the surface too soft. My fall back plan will be to sheet it with 1/64 ply. (This is how proctor does their D.Va)

 01-27-2004, 10:28 PM
#10

James,
Looking very good! The DIII is also on my list of too builds some day. Like pete13, I'd have a hankering for 1/4 scale too.... maybe. But, the Fun Aero kits sure is nice looking. I was drooling on one a the Dayton DPR last September.
What's the diameter of the spinner? It might be an option for builders of the Balsa USA Bristol M1C.
I'm looking forward to watching your progress.
Thanks,
01-28-2004, 09:44 AM
#11
Thread Starter
My Feedback: (2)
Join Date: Jun 2002
Location: Holliston, MA
Posts: 368
Likes: 0
Received 0 Likes
on
0 Posts
Mike-
The spinner is 4.75 inch in diameter and is made by [link=http://www.genebarton.com/]Gene Barton.[/link]
BTW, nice site. I'll have to send some picks in when I get this bird completed.
-Jeremy
The spinner is 4.75 inch in diameter and is made by [link=http://www.genebarton.com/]Gene Barton.[/link]
BTW, nice site. I'll have to send some picks in when I get this bird completed.
-Jeremy
01-28-2004, 12:51 PM
#12
Member
My Feedback: (2)
Join Date: May 2003
Location: Orange,
CA
Posts: 85
Likes: 0
Received 0 Likes
on
0 Posts
Hallo Jharken;
The Albatross Werke D series aircraft are very interesting to model. I have build a 62" wingspan, .65 (2-stroke engine) Mike Bishop plans D-Va version. Building the spinner and running the control cables were the best part before flying. It is a good flyer.
Your stabilizer is sheet covered ? This is not scale ! The rudder fin is sheeted but not the stab. Check the NASM restoration research.
You have over 82 basic Jasta's colors to choose from. Mine is a green tailed with red trim (j5), grey fuselage with a red dragon playfully running the lenght of the fuselage.
Clear the skies of the those inferior Newports, DeHavallins, etc. !
01-28-2004, 01:12 PM
#13
Thread Starter
My Feedback: (2)
Join Date: Jun 2002
Location: Holliston, MA
Posts: 368
Likes: 0
Received 0 Likes
on
0 Posts
Good catch balsa, you are of course correct.
This kit is only semi-scale. The outline is about right, but some dimensions are stretched and many details are altered. One of which is that they sheeted the stab and framed the fin (reverse on the original). I scratched my own sheeted fin, but did not want to go to all that trouble on the stab. Instead, I'm thinking of gluing some thin balsa strips over the sheeting to simulate the ribs.
Eventually I'd like to do one exact scale, like the Proctor and Torrance kits; but I want to get some building and competition experience under my belt first.
ORIGINAL: balsa4cat
Your stabilizer is sheet covered ? This is not scale ! The rudder fin is sheeted but not the stab. Check the NASM restoration research.
Your stabilizer is sheet covered ? This is not scale ! The rudder fin is sheeted but not the stab. Check the NASM restoration research.
01-28-2004, 01:17 PM
#14
Senior Member
My Feedback: (5)

Join Date: Mar 2002
Location: Goodyear, AZ
Posts: 247
Likes: 0
Received 0 Likes
on
0 Posts
Neat airplane! I also have this kit, but the parts have never left the box. I hope to get around to building it someday, the Albatross is a great looking airplane. What are you using for wheels?
01-29-2004, 09:07 PM
#15
Thread Starter
My Feedback: (2)
Join Date: Jun 2002
Location: Holliston, MA
Posts: 368
Likes: 0
Received 0 Likes
on
0 Posts
I'm probably going to use williams wheels. I'm thinking of making real fabric wheel covers to dress them up though.
ORIGINAL: Wulfman
Neat airplane! I also have this kit, but the parts have never left the box. I hope to get around to building it someday, the Albatross is a great looking airplane. What are you using for wheels?
Neat airplane! I also have this kit, but the parts have never left the box. I hope to get around to building it someday, the Albatross is a great looking airplane. What are you using for wheels?
01-30-2004, 09:53 AM
#16
Thread Starter
My Feedback: (2)
Join Date: Jun 2002
Location: Holliston, MA
Posts: 368
Likes: 0
Received 0 Likes
on
0 Posts
Latest update. I just recieved the pilot Im going to use from perfectpilots.com
[link=http://www.perfectpilots.com/pilots/ww1/spike.html]Spike[/link]
Not necessarirly scale for 1917, but he looks a lot better than the bland williams pilots.
[link=http://www.perfectpilots.com/pilots/ww1/spike.html]Spike[/link]
Not necessarirly scale for 1917, but he looks a lot better than the bland williams pilots.
01-30-2004, 11:46 AM
#17
Member
My Feedback: (2)
Join Date: May 2003
Location: Orange,
CA
Posts: 85
Likes: 0
Received 0 Likes
on
0 Posts
Hallo Jharken;
Just a thought about your exhaust plan; The full scale exhaust was routed out and above teh top wing. Your four stroke pointed up would be scale. Engine cooling would be aided by moving the spinner forward more from the fuselage creating a air gap, ala full scale.
Have you selected the wing covering color yet ? Early production purple, dark green & blue colours are easy to paint on. The 4 or 5 colour lozenge of late production versions require a lot of preperation: diangonal or perpendicular cloth lay, painting /staining the lozence colors (unless you buy pre dyed cloth from arizona Model Werks), pink or blue 'pinking strips', top pattern is differnt colours from bottom pattern, etc. Then we must not forget the shiny grey or green colored structs (steel on full scale while the allies used wood).
The pilot I assigned in my Albatross came from a Pease Officer (with helment) on motorcycle toy of my son. A little latex paint and voila!
01-31-2004, 02:43 PM
#18
Member
Join Date: Dec 2002
Location: co.londonderry, UNITED KINGDOM
Posts: 74
Likes: 0
Received 1 Like
on
1 Post
Hello...just noticed your build...I"ve just recieved one of these kits, and am very impressed.....going to be an avid follower of your build.....you mentioned the ply covering...what about sheeting with 1/32 balsa....instead of the suggested 1/16...then apply 1/64 ply.....cut into panels to represent thr full-size?......maybe be easier as well!! I"m not going to build mine for a few weeks...but am delighted at getting the chance to follow you.....brilliant.....
Clifford
Clifford
02-02-2004, 08:26 PM
#19
Thread Starter
My Feedback: (2)
Join Date: Jun 2002
Location: Holliston, MA
Posts: 368
Likes: 0
Received 0 Likes
on
0 Posts
Balsa-
Actually the exhaust on the D.III is routed in between the planes. It was only on the D.I prototypes I believe that the over the top wing exhaust was used. The dummy engine on this model has the scale exhaust pipe, For the real exhaust Im just drying to hide it and direct the mess away from as much detail as possible. Hense the bottom of the cowl idea.
Clifford-
Interesting idea, I may have to try that. Another thought I had was to use finishing resin straight on the balsa without glass. It should harden the surface quite a bit. In any case I'm going to do a bunch of experiments on scrap first before selecting a finish.
 ....keep it coming...I"m saving your pics for reference, when I start my own.....any problems so far?....
02-06-2004, 11:31 AM
....keep it coming...I"m saving your pics for reference, when I start my own.....any problems so far?....
02-06-2004, 11:31 AM
#22
Thread Starter
My Feedback: (2)
Join Date: Jun 2002
Location: Holliston, MA
Posts: 368
Likes: 0
Received 0 Likes
on
0 Posts
Cliff-
So far things are going well. In addition to what I've posted I have the wings complete and am now working on the ailerons. I hope to have more photos in a week or so.
A few comments/suggestions on the build:
* Study the plans carefully! They are well drawn but could benefit from more details view IMO. Especially some cross sections of the wings.
*Dry fit everything before glue. 95% of the parts fit perfectly so I got lazy about this. Then I ran into some aileron ribs that were too short. Its any easy fix but dry fitting would have saved me some frustration
* The instructions have some gaps. For instance the top wing instructions just end without finishing the top of the center section and there are no instructions on control installation. I've built enough kits that I can figure all of it out on my own using the plan but it could leave a first time builder in trouble.
* There is nothing in the plan about routing the aileron servo leads to the fuse. The ribs have cutouts thought so I installed some paper tube conduits and I think I will cut access holes and strap the leads to the cabanes.
* The building sequence calls for making the cabanes during fuselage construction. I skipped over this and built the wings first. I want to be able to attach the wings and check the alignment before I finish solder the struts.
* Like many kits, the plan calls for drilling holes in the lower wing for the alignment dowels after the wing is complete. I don't like the imprecision of this so I marked the leading edges and made a jig to drill them on the drill press before installation. I left of the top sheeting until after Ive test fit the wing to the fuse and glued them in.
02-07-2004, 11:49 AM
#23
Member
Join Date: Dec 2002
Location: co.londonderry, UNITED KINGDOM
Posts: 74
Likes: 0
Received 1 Like
on
1 Post
Jeremy...thanks, I"ll bear those points in mind....do you thinkd that you are going to have any cooling problems?.....ie...only the top-part of the engine is showing in the slipstream....any ideas?
Clifford
Clifford
02-11-2004, 10:46 AM
#24
Thread Starter
My Feedback: (2)
Join Date: Jun 2002
Location: Holliston, MA
Posts: 368
Likes: 0
Received 0 Likes
on
0 Posts
Cliff-
Wont know for sure until I try it, but I doubt it. The head is the hottest part of the engine and is well exposed. What I plan to do is measure the area of the opening, double it and then cut that much area of vent holes in the bottom of the cowl for exhaust.
Wont know for sure until I try it, but I doubt it. The head is the hottest part of the engine and is well exposed. What I plan to do is measure the area of the opening, double it and then cut that much area of vent holes in the bottom of the cowl for exhaust.
ORIGINAL: clifford
Jeremy...thanks, I"ll bear those points in mind....do you thinkd that you are going to have any cooling problems?.....ie...only the top-part of the engine is showing in the slipstream....any ideas?
Clifford
Jeremy...thanks, I"ll bear those points in mind....do you thinkd that you are going to have any cooling problems?.....ie...only the top-part of the engine is showing in the slipstream....any ideas?
Clifford
02-16-2004, 09:17 AM
#25
Thread Starter
My Feedback: (2)
Join Date: Jun 2002
Location: Holliston, MA
Posts: 368
Likes: 0
Received 0 Likes
on
0 Posts
More progress to report...
The wings are nearly complete. All the framing is complete and the lower wing has been fit to the fuse. All that remains is to build the cabanes, struts and hinge the ailerons. I did some more modifications here - the model has a sheeted center section on the upper wing but the full scale does not. So I cap stripped the upper wing instead. I am not too worried about strength as I have added full shear webbing to both wings and will be using semi-functional flying wires.
I also prepared some test samples for the fuse sheeting technique. I tried 4 methods:
1 clearcoat on bare balsa
2 3/4oz glassing
3 resin on balsa without glass
4 1/64 ply laminated onto balsa
As you might guess #4 looks the best. Clearcoat on balsa soaks into the grain too much and the glassing looks like it will need a lot of clear to fill in the weave. Tonight I will sand down the bare resin and shoot some clear... However its looking like the ply is the way to go.
I also had the pleasure of an up close look at a Duncan Hudson Tiger Moth that is being prepped for Top Gun this weekend. The builder is a member of my club and was showing me how the scale s*t*i*t*s covering works. That stuff really looks amazing, I'm just not ready to invest in spraying gear and the $20/pint !! paint it uses. I think koverall, krylon and Sig dope will give me 80% of the look at a budget I can afford.