


Nitro Guide and FAQs
 03-05-2007, 10:43 PM
#1
Senior Member
Thread Starter

First of all, this Nitro Guide and FAQs has been worked on by I (Sean Coots) and rccardude (Eric Brown) for the past 2 months. It is not complete and will be constantly updated and altered. If someone feels that our information is incorrect, please PM Eric or I about the problem and we can come to a resolution. The FAQ guide will be changed fairly frequently with new questions sent in by anyone to I (apollo) or Eric (rccardude). More guides should be available soon too. We hope that this guide is beneficial to many, and we urge you to post a link to this guide whenever necessary. Thank you.
Nitro Engine Break In Guide:
Okay, so you just got your brand new nitro R/C, you are psyched and ready to tear up the streets, but first you must perform a proper break in procedure for your engine unless you want to be buying a new one very soon.
So to start off, you will need to correctly adjust your linkages to work properly (see Linkage Setup below) and make sure your fuel tubing is routed properly (tank pickup to carburetor nipple, pipe pressure nipple to tank pressure fitting.
First, you will need to preheat the engine by taking a hairdryer or heat gun and heating the top of the engines cooling head for about a minute or a little more. Heating the engine up relieves cylinder pinch; therefore the engine will be much easier to crank over.
Side note: Pinch will make your engine hard to turn over. This is why your engine always seems to get stuck, the reason it happens is the cylinder is smaller at the top than it is at the bottom; therefore it’s harder to push the piston through at the top. The reason for pinch is compression, since nitro’s don’t have piston rings, we have to use pinch.
Now you just need to fill the fuel tank up with proper fuel and prime the engine.
Priming Techniques:
-Tank primer: Some fuel tanks are equipped with a built in tank primer; in this case, all you have to do is press down on the priming rod and watch the fuel go to the carburetor.
-Stinger priming: If your fuel tank is not equipped with a built in primer, then just put your finger over the pipe’s stinger (most people just call it the opening in the pipe) and then turn the engine over by means of pull start or whatever. This will push the fuel to the carburetor.
-Mouth priming: While it does sound discouraging, all you have to do is remove the fuel tubing from the exhaust pipe pressure fitting and blow into it (remember not to suck in or you will be drinking hazardous fuel), this will cause the fuel to be forced through the tubing and to the carburetor.
When priming an engine, there is no need to shove excess fuel into it in hopes of it starting easier (actually the opposite of what you think), all that is required is to bring the fuel to the carburetor, no more, once you see it just barely go in then stop and that is enough. If you get good enough at priming, then your engine can start easily on the 1st pull.
Once you have these steps completed, turn on the radio transmitter (TX) and the receiver (RX) and do a quick run through, testing brakes, linkages, carburetor opening, and steering. Now place your fully charged glow igniter on the glow plug and crank the engine by pull start, roto-start, or whatever is used.
Once the engine starts, leave the glow plug igniter in place and begin to slowly drive the car around while varying the engines rpm. Now remove the igniter, if the engine immediately dies then it is running too rich. (Now is the perfect time to read the tuning article below) It is critical at this point to get your engine to a minimal operating temperature, I recommend this to be anywhere from 200*-240* for break in. At this point, it is okay to do 1 second WOT (wide open throttle, aka 100% throttle) bursts. After driving the vehicle around for 2-3 minutes, shut the engine down (read “Engine Stopping Methods” below”) Now you will need to set the engine at BDC (Bottom Dead Center, when the piston is all the way down in the cylinder), to do this, turn the flywheel (or pull starter) until you feel the least amount of resistance and then stop there. This ensures that the piston will not be stuck in the top of the cylinder while it cools. Note: during engine break in, small metal fragments can melt themselves to the glow plug therefore fouling it, so it is wise to have at least 1 spare glow plug for break in.
Let the engine sit and cool down to room temperature, you can lessen the cooling time by blowing compressed air over the head or a hairdryer set to cool. DO NOT SHOCK IT COOL WITH ANY LIQUID AT ALL. Now, repeat the process, adding about 1 minute of run time to each cycle completed. Do this until the engine has run about 15-20 minutes total. Now you are ready to finish properly tuning the engine and then rip it up wherever you want.
Nitro Engine Tuning Basics:
NOTE: ALL TUNING MUST BE DONE AT OPERATING TEMPERATURE
Rich: An excessive amount of fuel entering the engine, more fuel means more oil, which
typically lowers the operating temperature. Rich=counterclockwise
Lean: An insufficient amount of fuel entering the engine, less fuel means less oil, this
causes more friction, higher temperatures, and engine damage. Lean=clockwise
High Speed Needle:
The High Speed Needle (HSN) valve is the tall valve that sticks out from the top of your carburetor. Its job is to control the main flow of fuel to the carburetor. If you lean out the HSN, the LSN (Low Speed Needle) will be automatically leaned too (think of it this way, the HSN is the garden hose faucet which controls all of what goes in, the LSN is the nozzle which controls the exact amount that comes out). The HSN mainly effects the top speed of the car. If your HSN is set too rich, the engine will typically not reach its full RPM potential. If the HSN is too lean, you can experience hesitation, overheating and flameouts (engine instantly shutting off at random or at higher RPM’s). WARNING!!!! The HSN IS NOT to be used as a thermostat. Yes tuning effects running temperature, but only half of it. In the cold, you will typically have to set your needles richer because cold air carries more oxygen, therefore with the previous settings you will be running too lean.
Low Speed Needle:
The Low Speed Needle (LSN) is used for fine adjusting the rate of fuel flowing into the engine from the HSN. If your LSN is too lean then you will have erratic idling, it might want to drive off without you, and it can suddenly shut off (flame out). A characteristic of an overly lean LSN will be a random surging and sound “angry” so to speak. It also will have sporadic RPM increases. Too rich of a LSN will make the idle sound deep and rough, at idle the RPM will slowly decrease and then shut off due to the excess fuel building up, it will also cause consistent sluggish acceleration all the way up the RPM range, and this is what makes it different from a lean bog.
The best way to test your LSN is to get your engine running at normal operating temperature, drive it around, and then let it sit and idle for 30 seconds. Once 30 seconds is over, apply a lot of throttle, if it is rich you will notice slow, gurgly acceleration, if this happens, lean the LSN out by 1/8th of a turn and then test it again, if it is lean, chances are it will flame out or have random surges. In this case you would richen the LSN up by 1/8th of a turn at a time. Your LSN will be set near optimum position when you have little to no hesitation after 30 seconds of idling.
Keep in mind that an engines tune changes day by day, every time you get our your engine and run it, you should tweak the needles a little bit (typically). One day your engine can run fine, the next day it can be running extremely lean.
NOTE: Tune the HSN first because it controls the full amount of fuel entering the carburetor, and then tune the LSN because it is a fine adjustment screw.
As a side note, if you do a lot of wide open running at WOT (Wide Open Throttle, a.k.a. full throttle) your engine will need extra lubrication and it could need to be set 1/4th turn rich to ensure proper lubrication to your engine at high RPM’s.
Here is a good little graphic that for the record I did not make, I simply found it very helpful.

Vapor Lock:
If you have ever shut off your engine or had it flame out while you are using it, and you find that it’s nearly impossible to restart, you are most likely experiencing something called “vapor lock”. Vapor lock is caused by the heat from the engine transferring to the carburetor. In turn it makes the carburetor so hot that whatever fuel that enters it boils off instantly into vapor. Hence the name “vapor lock”. A common giveaway to vapor lock is when you prime your engine; you’ll see that the fuel in your fuel line is pushed away from the carburetor. The only way to run the engine again is to cool the carburetor off enough so that it does not boil the fuel. The most common way is to let your engine sit for five minutes and then try again. Another way is to use cans of compressed CO2 or compressed air cans used for airbrushing and spray the carburetor. Or you can pull off your air filter and dump a little bit of fuel over the carburetor which will rapidly cool it. Just be careful not to get fuel on your brakes or electronics.
Air Leaks:
An air leak is when your engine has unregulated air being sucked in. By unregulated I mean it doesn’t come in through the carburetor. This causes a problem because it can suck in air causing your engine which could be tuned perfectly, to run extremely lean and cause engine damage. It could also cause your extremely rich engine to run lean and well over 300 degrees. If you have an air leak you can look forward to inconsistent tuning and idling, it will seem impossible to find a good tune. Keep in mind that even brand new engines can have air leaks. Here is a good link on How To Seal Your Engine. For the record I did not write that, I am simply posting a link to a helpful guide so moderators, please don’t delete this. Oh and a good place to get RTV silicone sealant and your local auto parts store. You can also use the stuff to seal side exhaust headers and make a gasket so you will never rip another paper gasket again.
Glow Plug Guide:
Without a glow plug, your engine won’t run, simple enough. Now without the right glow plug, your engine just won’t run properly, simple concept. But you are saying to yourself, “Well, how do I know what the proper glow plug is for me?” Well this is a fairly simple question to answer. Glow plugs work by adding compression, heat, and a catalytic reaction between the methanol in the fuel and the platinum in the coil.
Companies rate and sell their glow plugs by their “heat range”. The different general heat ranges are cold, medium, and hot. The heat range of the glow plug is what determines the exact time that the fuel/air mixture being compressed in the cylinder ignites and pushes the piston down. While this sounds like a simple thing, it is absolutely vital to your engines performance. So let’s go on to the function of each type of glow plug and their proper applications.
Hot Glow Plugs:
When you run an engine with a hot glow plug, the compressed fuel/air mixture in the cylinder ignites earlier (more advanced ignition) than a medium or a cold plug would. Hot glow plugs are normally used with low-nitro content (5-20%) fuels to advance the timing and igniter the fuel earlier. Lower nitro fuels burn slower, therefore the mixture must be ignited sooner for the engine to run properly. To hot of a glow plug for your certain nitro percentage can cause pre-detonation and permanent engine damage. An example of a hot glow plug would be the O.S. A3.
Medium Glow Plugs:
Medium glow plugs work the same way that hot glow plugs do, but the do not ignite the fuel as early (more retarded or delayed ignition). Medium glow plugs are often used in medium-nitro fuels (20-30%). An example of a medium glow plug would be the HPI R3.
Cold Glow Plugs:
Cold glow plugs are just like the other glow plugs, but instead, they are meant to be used in engines running high-nitro fuels (30%+). An example of a cold glow plug would be the HPI R5. Cold glow plugs typically have a thicker element in them than a medium or hot glow plug.
Turbo vs. Non-Turbo glow plugs:
Glow plugs come in 2 different styles, Turbo and Non-Turbo. Now before you start thinking “Oh turbo must mean fast, I need that” lets discuss the difference in them.
Turbo Glow Plugs:
Turbo glow plugs differ from standard, non-turbo plugs because they use a tapered edge to make a tight seal between the head button and the cylinder. This lets them to run without a copper washer for a gasket, and also allows them to have a smoother head button which adds a tiny bit of power. An example of a turbo glow plug would be the O.S. P3. Note that you can clearly see the tapered edge.
Non-turbo glow plugs do not have a tapered edge to form a seal between the cylinder and the head button, Instead the use a copper washer. Non-turbo glow plugs (commonly called standard glow plugs) use a different head button than a turbo plug would. The head button is not as smooth; this in turn takes away a tiny bit of power. A good example of a standard plug would be the O.S. 8
How To Read Glow Plugs:
If you know much about 1:1 scale car racing, you will know that teams examine the spark plugs that have been used in the engine while racing, then they use a method called “spark plug reading” to determine how the engine is tuned. Well for scale model cars running 2-stroke nitro engines, there is a method of doing this. It is called “glow plug reading”. Here is a general how-to guide on reading glow plugs. (Note: this is meant for new glow plugs, it cannot be accurately done on glow plugs that have been run for a while)
1. Wire and surrounding bottom of plug wet, with like new shiny wire = rich side of optimum power
2. Wire and surrounding bottom of plug starting to dry and wire starting to gray = very close to optimum power
3. Wire and surrounding bottom of plug dry, wire totally gray but not distorted optimum power
4. Wire and surrounding bottom of pug dry, wire distorted = slightly lean "DANGER!"
5. Wire and surrounding bottom of plug dry, wire broken and distorted or burnt up = extremely lean possible engine damage!
Note: For the record I did not write this “How To Read Glow Plugs” guide and I am using it merely as a helpful guide.
Complete Nitro Fuel Guide:
Most 2-stroke glow fuel engines (with the exception of a few) run on what is commonly called “glow fuel” or “nitro fuel”. Basic glow fuel is comprised of 3 main ingredients: nitromethane, methanol, and oil. Sometimes fuel manufacturers will add friction modifiers (a.k.a. additives) to help improve the overall performance of the fuel. But I will not be going into details on additives.
Fuel Can Go Bad:
You might be asking yourself right now, “What makes my fuel go bad?” Well there are a few things that can cause this. Most of the glow fuel that you use is comprised mainly of methanol (alcohol). One of the characteristics of methanol is that it is ”hygroscopic” , this means that it will freely pull moisture from the air and absorb it since water is soluble in methanol.
Contamination with water is the main reason that fuel goes bad. Contaminated fuel often makes an engine hard to start, tune, or keep running consistently. Another enemy of glow fuel is the sun’s UV rays. These UV rays in sunlight can slowly break down the nitromethane in the fuel, especially if it is stored in sunlight for extended periods of time.
Proper Fuel Storage:
Yes, there is a proper way to do everything, even storing your own glow fuel. Ever noticed when you are almost finished off with a jug of fuel, that there is a lot of empty space in the jug? This is the perfect opportunity for condensation to form in your fuel jug and contaminate it. Below is a picture of how to store your fuel. All fuel should be kept in a cool, dark, dry area if possible.
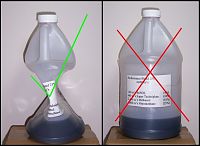
Try to squeeze as much air out of the jug as possible, but be careful, squeezing the jug too hard can puncture an edge (like I have done) and therefore ruin the jug.
Remember these little things?
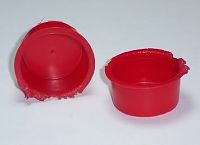
Whenever you open up a fresh gallon of fuel, make sure to put this back in the top to provide a moisture barrier.
Oil Content:
All internal combustion engines require oil to operate, if there were no oil in the fuel, our engines would just seize up and never work again. Although this is true for 2-strokes and 4-strokes alike, different methods are employed to accomplish this.
Our 2-stroke glow fuel already has it oil mixed into it. This is what makes it simple; one of the not so simple parts is the actual oil content in the fuel. Though there is not much to say about this, anywhere from 8-18% are acceptable for glow engines used in land vehicles. Fuels ranging from 8-10% in oil content are considered low-oil fuels, and are primarily intended for the experienced tuners who are trying to get the most power out of their engines while racing. For normal bashing, anywhere from 11-16% oil content is acceptable; any more than 16% oil content does little to provide extra protection.
Oil Types:
In our glow fuels, there are 2 main types of lubricants (a.k.a. oils) primarily used in them; these are castor oils and synthetic oils. The general rule of thumb is to buy a castor/synthetic blend fuel, so you get the best of both worlds.
Castor Oils:
Castor oil is derived from the bean of a castor plant (originally used as a natural laxative) and is the best lubricant you can have in a fuel. It provides the best over-lean protection that you can get, and it only keeps breaking down into a better and better lubricant as it is heated (combusted) in an engine. Finally at around 800*F if memory serves me correct, it burns, which is much higher than synthetic oils. After running fuels with high castor oil content you might notice a brown “varnish” on the engine’s internals, this “varnish” is an anti-scuff layer left behind from the castor oil, most people believe this is bad and remove it, however, this helps protect the engine (to a certain extent) in the case of an over-lean run.
Castor oil is mainly used as an EP (Extreme Pressure) additive in nitro engines because they create an excess amount of friction due to the RPM’s that they crank out. If you have ever tried to purchase pure castor oil, especially AA grade, then you have learned that it isn’t a cheap product, this is why companies use less castor oil (if any at all) in their fuel blends. It is highly encouraged that when choosing a fuel, that there be at least some castor oil content in it. I myself have run on fuel that used nothing but castor oil in it, and I can say from experience that it drastically lowers the temperatures and allows you to run leaner (which helps efficiency) without any detrimental effects. This is how some fuel brands like White Lightning are able to run such low oil content in their fuels.
Synthetic oils are typically derived from refined petroleum extracts, and are often chemically altered to be a custom friction modifier. Synthetic oils are cheaper to manufacture, therefore most fuel companies make this a majority of their oil content in a gallon of fuel. Synthetic oils are just as “slippery” as castor oil, but the main difference is that castor oil does not typically burn in the combustion process, while the synthetic oil is often completely consumed. Synthetic oils provide very little over-lean protection when being used.
Some fuel blends from Blue Thunder run full-synthetic oils in them. I have had personal experience with these and do not like them because they are not very forgiving if you run lean. However, many have had success with them; with the right needle setting you will get great protection from them as well. Just as an example, here is a picture of an O.S. 12TZ that was ran a little too lean on Blue Thunder.
Nitromethane Content:
Although our fuels are mainly methanol, we love to call them “nitro” fuels because it simply sounds better. But what is this “nitro” referring to? Well if you read this whole article, you will know that nitro is short for “nitromethane”. But why do our fuels use nitromethane?
Well for starters, nitromethane allows our engines to gain more power because it is basically liquid oxygen, so to speak. It is an oxidizer, which means that during a chemical reaction, it releases oxygen. Oxygen is what reacts with the fuel, therefore more oxygen = more fuel able to be burned. The more fuel that is able to be burned, the more power that can be made. So in a nutshell, more nitro = more power, less nitro = less power, simple enough.
The second reason that nitromethane is used in our glow fuels is that is makes tuning A LOT easier (and starting for that matter). If you have ever tried to tune an engine on zero-nitro fuel, you will realize that makes less power for starters, and that the tuning needles are a lot more sensitive to input.
Higher Nitro Content:
Raising the nitro content is a simple way to add more power, but there are also other things you must do. When you raise the nitro content in your fuel, you are capable of burning more fuel. This creates a larger “bang” in the cylinder, therefore raising the pressure. If your pressure gets too high, you will encounter pre-detonation which can cause serious damage to your engine.
When changing to high-nitro fuels, it is usually advised to add a head shim which lowers compression, and to run a slightly cooler glow plug which also helps prevent pre-detonation.
Lower Nitro Content:
Lowering the nitro content in your fuel can reduce the power output of your engine. When you lower the nitro content in your fuel, usually you should just run a hotter plug. Whenever this is not sufficient, you must also raise the compression in the engine by removing a head shim if possible.
The FAQ section should be up shortly. Both Eric and I ask that you please only link to this post and not just copy and paste our work that has taken us months to compile. Thank you
Nitro Engine Break In Guide:
Okay, so you just got your brand new nitro R/C, you are psyched and ready to tear up the streets, but first you must perform a proper break in procedure for your engine unless you want to be buying a new one very soon.
So to start off, you will need to correctly adjust your linkages to work properly (see Linkage Setup below) and make sure your fuel tubing is routed properly (tank pickup to carburetor nipple, pipe pressure nipple to tank pressure fitting.
First, you will need to preheat the engine by taking a hairdryer or heat gun and heating the top of the engines cooling head for about a minute or a little more. Heating the engine up relieves cylinder pinch; therefore the engine will be much easier to crank over.
Side note: Pinch will make your engine hard to turn over. This is why your engine always seems to get stuck, the reason it happens is the cylinder is smaller at the top than it is at the bottom; therefore it’s harder to push the piston through at the top. The reason for pinch is compression, since nitro’s don’t have piston rings, we have to use pinch.
Now you just need to fill the fuel tank up with proper fuel and prime the engine.
Priming Techniques:
-Tank primer: Some fuel tanks are equipped with a built in tank primer; in this case, all you have to do is press down on the priming rod and watch the fuel go to the carburetor.
-Stinger priming: If your fuel tank is not equipped with a built in primer, then just put your finger over the pipe’s stinger (most people just call it the opening in the pipe) and then turn the engine over by means of pull start or whatever. This will push the fuel to the carburetor.
-Mouth priming: While it does sound discouraging, all you have to do is remove the fuel tubing from the exhaust pipe pressure fitting and blow into it (remember not to suck in or you will be drinking hazardous fuel), this will cause the fuel to be forced through the tubing and to the carburetor.
When priming an engine, there is no need to shove excess fuel into it in hopes of it starting easier (actually the opposite of what you think), all that is required is to bring the fuel to the carburetor, no more, once you see it just barely go in then stop and that is enough. If you get good enough at priming, then your engine can start easily on the 1st pull.
Once you have these steps completed, turn on the radio transmitter (TX) and the receiver (RX) and do a quick run through, testing brakes, linkages, carburetor opening, and steering. Now place your fully charged glow igniter on the glow plug and crank the engine by pull start, roto-start, or whatever is used.
Once the engine starts, leave the glow plug igniter in place and begin to slowly drive the car around while varying the engines rpm. Now remove the igniter, if the engine immediately dies then it is running too rich. (Now is the perfect time to read the tuning article below) It is critical at this point to get your engine to a minimal operating temperature, I recommend this to be anywhere from 200*-240* for break in. At this point, it is okay to do 1 second WOT (wide open throttle, aka 100% throttle) bursts. After driving the vehicle around for 2-3 minutes, shut the engine down (read “Engine Stopping Methods” below”) Now you will need to set the engine at BDC (Bottom Dead Center, when the piston is all the way down in the cylinder), to do this, turn the flywheel (or pull starter) until you feel the least amount of resistance and then stop there. This ensures that the piston will not be stuck in the top of the cylinder while it cools. Note: during engine break in, small metal fragments can melt themselves to the glow plug therefore fouling it, so it is wise to have at least 1 spare glow plug for break in.
Let the engine sit and cool down to room temperature, you can lessen the cooling time by blowing compressed air over the head or a hairdryer set to cool. DO NOT SHOCK IT COOL WITH ANY LIQUID AT ALL. Now, repeat the process, adding about 1 minute of run time to each cycle completed. Do this until the engine has run about 15-20 minutes total. Now you are ready to finish properly tuning the engine and then rip it up wherever you want.
Nitro Engine Tuning Basics:
NOTE: ALL TUNING MUST BE DONE AT OPERATING TEMPERATURE
Rich: An excessive amount of fuel entering the engine, more fuel means more oil, which
typically lowers the operating temperature. Rich=counterclockwise
Lean: An insufficient amount of fuel entering the engine, less fuel means less oil, this
causes more friction, higher temperatures, and engine damage. Lean=clockwise
High Speed Needle:
The High Speed Needle (HSN) valve is the tall valve that sticks out from the top of your carburetor. Its job is to control the main flow of fuel to the carburetor. If you lean out the HSN, the LSN (Low Speed Needle) will be automatically leaned too (think of it this way, the HSN is the garden hose faucet which controls all of what goes in, the LSN is the nozzle which controls the exact amount that comes out). The HSN mainly effects the top speed of the car. If your HSN is set too rich, the engine will typically not reach its full RPM potential. If the HSN is too lean, you can experience hesitation, overheating and flameouts (engine instantly shutting off at random or at higher RPM’s). WARNING!!!! The HSN IS NOT to be used as a thermostat. Yes tuning effects running temperature, but only half of it. In the cold, you will typically have to set your needles richer because cold air carries more oxygen, therefore with the previous settings you will be running too lean.
Low Speed Needle:
The Low Speed Needle (LSN) is used for fine adjusting the rate of fuel flowing into the engine from the HSN. If your LSN is too lean then you will have erratic idling, it might want to drive off without you, and it can suddenly shut off (flame out). A characteristic of an overly lean LSN will be a random surging and sound “angry” so to speak. It also will have sporadic RPM increases. Too rich of a LSN will make the idle sound deep and rough, at idle the RPM will slowly decrease and then shut off due to the excess fuel building up, it will also cause consistent sluggish acceleration all the way up the RPM range, and this is what makes it different from a lean bog.
The best way to test your LSN is to get your engine running at normal operating temperature, drive it around, and then let it sit and idle for 30 seconds. Once 30 seconds is over, apply a lot of throttle, if it is rich you will notice slow, gurgly acceleration, if this happens, lean the LSN out by 1/8th of a turn and then test it again, if it is lean, chances are it will flame out or have random surges. In this case you would richen the LSN up by 1/8th of a turn at a time. Your LSN will be set near optimum position when you have little to no hesitation after 30 seconds of idling.
Keep in mind that an engines tune changes day by day, every time you get our your engine and run it, you should tweak the needles a little bit (typically). One day your engine can run fine, the next day it can be running extremely lean.
NOTE: Tune the HSN first because it controls the full amount of fuel entering the carburetor, and then tune the LSN because it is a fine adjustment screw.
As a side note, if you do a lot of wide open running at WOT (Wide Open Throttle, a.k.a. full throttle) your engine will need extra lubrication and it could need to be set 1/4th turn rich to ensure proper lubrication to your engine at high RPM’s.
Here is a good little graphic that for the record I did not make, I simply found it very helpful.
Vapor Lock:
If you have ever shut off your engine or had it flame out while you are using it, and you find that it’s nearly impossible to restart, you are most likely experiencing something called “vapor lock”. Vapor lock is caused by the heat from the engine transferring to the carburetor. In turn it makes the carburetor so hot that whatever fuel that enters it boils off instantly into vapor. Hence the name “vapor lock”. A common giveaway to vapor lock is when you prime your engine; you’ll see that the fuel in your fuel line is pushed away from the carburetor. The only way to run the engine again is to cool the carburetor off enough so that it does not boil the fuel. The most common way is to let your engine sit for five minutes and then try again. Another way is to use cans of compressed CO2 or compressed air cans used for airbrushing and spray the carburetor. Or you can pull off your air filter and dump a little bit of fuel over the carburetor which will rapidly cool it. Just be careful not to get fuel on your brakes or electronics.
Air Leaks:
An air leak is when your engine has unregulated air being sucked in. By unregulated I mean it doesn’t come in through the carburetor. This causes a problem because it can suck in air causing your engine which could be tuned perfectly, to run extremely lean and cause engine damage. It could also cause your extremely rich engine to run lean and well over 300 degrees. If you have an air leak you can look forward to inconsistent tuning and idling, it will seem impossible to find a good tune. Keep in mind that even brand new engines can have air leaks. Here is a good link on How To Seal Your Engine. For the record I did not write that, I am simply posting a link to a helpful guide so moderators, please don’t delete this. Oh and a good place to get RTV silicone sealant and your local auto parts store. You can also use the stuff to seal side exhaust headers and make a gasket so you will never rip another paper gasket again.
Glow Plug Guide:
Without a glow plug, your engine won’t run, simple enough. Now without the right glow plug, your engine just won’t run properly, simple concept. But you are saying to yourself, “Well, how do I know what the proper glow plug is for me?” Well this is a fairly simple question to answer. Glow plugs work by adding compression, heat, and a catalytic reaction between the methanol in the fuel and the platinum in the coil.
Companies rate and sell their glow plugs by their “heat range”. The different general heat ranges are cold, medium, and hot. The heat range of the glow plug is what determines the exact time that the fuel/air mixture being compressed in the cylinder ignites and pushes the piston down. While this sounds like a simple thing, it is absolutely vital to your engines performance. So let’s go on to the function of each type of glow plug and their proper applications.
Hot Glow Plugs:
When you run an engine with a hot glow plug, the compressed fuel/air mixture in the cylinder ignites earlier (more advanced ignition) than a medium or a cold plug would. Hot glow plugs are normally used with low-nitro content (5-20%) fuels to advance the timing and igniter the fuel earlier. Lower nitro fuels burn slower, therefore the mixture must be ignited sooner for the engine to run properly. To hot of a glow plug for your certain nitro percentage can cause pre-detonation and permanent engine damage. An example of a hot glow plug would be the O.S. A3.
Medium Glow Plugs:
Medium glow plugs work the same way that hot glow plugs do, but the do not ignite the fuel as early (more retarded or delayed ignition). Medium glow plugs are often used in medium-nitro fuels (20-30%). An example of a medium glow plug would be the HPI R3.
Cold Glow Plugs:
Cold glow plugs are just like the other glow plugs, but instead, they are meant to be used in engines running high-nitro fuels (30%+). An example of a cold glow plug would be the HPI R5. Cold glow plugs typically have a thicker element in them than a medium or hot glow plug.
Turbo vs. Non-Turbo glow plugs:
Glow plugs come in 2 different styles, Turbo and Non-Turbo. Now before you start thinking “Oh turbo must mean fast, I need that” lets discuss the difference in them.
Turbo Glow Plugs:
Turbo glow plugs differ from standard, non-turbo plugs because they use a tapered edge to make a tight seal between the head button and the cylinder. This lets them to run without a copper washer for a gasket, and also allows them to have a smoother head button which adds a tiny bit of power. An example of a turbo glow plug would be the O.S. P3. Note that you can clearly see the tapered edge.
Non-turbo glow plugs do not have a tapered edge to form a seal between the cylinder and the head button, Instead the use a copper washer. Non-turbo glow plugs (commonly called standard glow plugs) use a different head button than a turbo plug would. The head button is not as smooth; this in turn takes away a tiny bit of power. A good example of a standard plug would be the O.S. 8
How To Read Glow Plugs:
If you know much about 1:1 scale car racing, you will know that teams examine the spark plugs that have been used in the engine while racing, then they use a method called “spark plug reading” to determine how the engine is tuned. Well for scale model cars running 2-stroke nitro engines, there is a method of doing this. It is called “glow plug reading”. Here is a general how-to guide on reading glow plugs. (Note: this is meant for new glow plugs, it cannot be accurately done on glow plugs that have been run for a while)
1. Wire and surrounding bottom of plug wet, with like new shiny wire = rich side of optimum power
2. Wire and surrounding bottom of plug starting to dry and wire starting to gray = very close to optimum power
3. Wire and surrounding bottom of plug dry, wire totally gray but not distorted optimum power
4. Wire and surrounding bottom of pug dry, wire distorted = slightly lean "DANGER!"
5. Wire and surrounding bottom of plug dry, wire broken and distorted or burnt up = extremely lean possible engine damage!
Note: For the record I did not write this “How To Read Glow Plugs” guide and I am using it merely as a helpful guide.
Complete Nitro Fuel Guide:
Most 2-stroke glow fuel engines (with the exception of a few) run on what is commonly called “glow fuel” or “nitro fuel”. Basic glow fuel is comprised of 3 main ingredients: nitromethane, methanol, and oil. Sometimes fuel manufacturers will add friction modifiers (a.k.a. additives) to help improve the overall performance of the fuel. But I will not be going into details on additives.
Fuel Can Go Bad:
You might be asking yourself right now, “What makes my fuel go bad?” Well there are a few things that can cause this. Most of the glow fuel that you use is comprised mainly of methanol (alcohol). One of the characteristics of methanol is that it is ”hygroscopic” , this means that it will freely pull moisture from the air and absorb it since water is soluble in methanol.
Contamination with water is the main reason that fuel goes bad. Contaminated fuel often makes an engine hard to start, tune, or keep running consistently. Another enemy of glow fuel is the sun’s UV rays. These UV rays in sunlight can slowly break down the nitromethane in the fuel, especially if it is stored in sunlight for extended periods of time.
Proper Fuel Storage:
Yes, there is a proper way to do everything, even storing your own glow fuel. Ever noticed when you are almost finished off with a jug of fuel, that there is a lot of empty space in the jug? This is the perfect opportunity for condensation to form in your fuel jug and contaminate it. Below is a picture of how to store your fuel. All fuel should be kept in a cool, dark, dry area if possible.
Try to squeeze as much air out of the jug as possible, but be careful, squeezing the jug too hard can puncture an edge (like I have done) and therefore ruin the jug.
Remember these little things?
Whenever you open up a fresh gallon of fuel, make sure to put this back in the top to provide a moisture barrier.
Oil Content:
All internal combustion engines require oil to operate, if there were no oil in the fuel, our engines would just seize up and never work again. Although this is true for 2-strokes and 4-strokes alike, different methods are employed to accomplish this.
Our 2-stroke glow fuel already has it oil mixed into it. This is what makes it simple; one of the not so simple parts is the actual oil content in the fuel. Though there is not much to say about this, anywhere from 8-18% are acceptable for glow engines used in land vehicles. Fuels ranging from 8-10% in oil content are considered low-oil fuels, and are primarily intended for the experienced tuners who are trying to get the most power out of their engines while racing. For normal bashing, anywhere from 11-16% oil content is acceptable; any more than 16% oil content does little to provide extra protection.
Oil Types:
In our glow fuels, there are 2 main types of lubricants (a.k.a. oils) primarily used in them; these are castor oils and synthetic oils. The general rule of thumb is to buy a castor/synthetic blend fuel, so you get the best of both worlds.
Castor Oils:
Castor oil is derived from the bean of a castor plant (originally used as a natural laxative) and is the best lubricant you can have in a fuel. It provides the best over-lean protection that you can get, and it only keeps breaking down into a better and better lubricant as it is heated (combusted) in an engine. Finally at around 800*F if memory serves me correct, it burns, which is much higher than synthetic oils. After running fuels with high castor oil content you might notice a brown “varnish” on the engine’s internals, this “varnish” is an anti-scuff layer left behind from the castor oil, most people believe this is bad and remove it, however, this helps protect the engine (to a certain extent) in the case of an over-lean run.
Castor oil is mainly used as an EP (Extreme Pressure) additive in nitro engines because they create an excess amount of friction due to the RPM’s that they crank out. If you have ever tried to purchase pure castor oil, especially AA grade, then you have learned that it isn’t a cheap product, this is why companies use less castor oil (if any at all) in their fuel blends. It is highly encouraged that when choosing a fuel, that there be at least some castor oil content in it. I myself have run on fuel that used nothing but castor oil in it, and I can say from experience that it drastically lowers the temperatures and allows you to run leaner (which helps efficiency) without any detrimental effects. This is how some fuel brands like White Lightning are able to run such low oil content in their fuels.
Synthetic oils are typically derived from refined petroleum extracts, and are often chemically altered to be a custom friction modifier. Synthetic oils are cheaper to manufacture, therefore most fuel companies make this a majority of their oil content in a gallon of fuel. Synthetic oils are just as “slippery” as castor oil, but the main difference is that castor oil does not typically burn in the combustion process, while the synthetic oil is often completely consumed. Synthetic oils provide very little over-lean protection when being used.
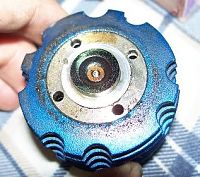
Some fuel blends from Blue Thunder run full-synthetic oils in them. I have had personal experience with these and do not like them because they are not very forgiving if you run lean. However, many have had success with them; with the right needle setting you will get great protection from them as well. Just as an example, here is a picture of an O.S. 12TZ that was ran a little too lean on Blue Thunder.
Nitromethane Content:
Although our fuels are mainly methanol, we love to call them “nitro” fuels because it simply sounds better. But what is this “nitro” referring to? Well if you read this whole article, you will know that nitro is short for “nitromethane”. But why do our fuels use nitromethane?
Well for starters, nitromethane allows our engines to gain more power because it is basically liquid oxygen, so to speak. It is an oxidizer, which means that during a chemical reaction, it releases oxygen. Oxygen is what reacts with the fuel, therefore more oxygen = more fuel able to be burned. The more fuel that is able to be burned, the more power that can be made. So in a nutshell, more nitro = more power, less nitro = less power, simple enough.
The second reason that nitromethane is used in our glow fuels is that is makes tuning A LOT easier (and starting for that matter). If you have ever tried to tune an engine on zero-nitro fuel, you will realize that makes less power for starters, and that the tuning needles are a lot more sensitive to input.
Higher Nitro Content:
Raising the nitro content is a simple way to add more power, but there are also other things you must do. When you raise the nitro content in your fuel, you are capable of burning more fuel. This creates a larger “bang” in the cylinder, therefore raising the pressure. If your pressure gets too high, you will encounter pre-detonation which can cause serious damage to your engine.
When changing to high-nitro fuels, it is usually advised to add a head shim which lowers compression, and to run a slightly cooler glow plug which also helps prevent pre-detonation.
Lower Nitro Content:
Lowering the nitro content in your fuel can reduce the power output of your engine. When you lower the nitro content in your fuel, usually you should just run a hotter plug. Whenever this is not sufficient, you must also raise the compression in the engine by removing a head shim if possible.
The FAQ section should be up shortly. Both Eric and I ask that you please only link to this post and not just copy and paste our work that has taken us months to compile. Thank you

The following users liked this post:
OraTab (06-14-2022)

The following users liked this post:
OraTab (06-14-2022)
03-06-2007, 05:26 AM
#3
Senior Member
My Feedback: (3)

Join Date: Feb 2005
Location: Westmont, NJ
Posts: 1,180
Likes: 0
Received 0 Likes
on
0 Posts
Very nice job guys.... Well done.....
I do not mean to knit pick at you guys but I noticed something that needs to be corrected about how to tell if your fuel is bad.
Those little droplets are not water. They are actually Alcohol droplets from the fuel.
Alcohol has a very Rapid evaporation rate. Which given time in warm conditions accelerates that evaporation. If you look at your fuel bottle on any given day, you will see tons of tiny droplets on the inside of the bottle. These tiny droplets are the alcohol (methanol) that is evaporating out of the fuel. Most believe these droplets to be condensation bit it is not.
Like I said.... not to knit pick but thought I would share that info with ya
03-06-2007, 07:56 AM
#4
Senior Member
Thread Starter
i have read in many places that it is water condensation, and some say it is alcohol, if ill leave it for nwo, there are are any more people suggesting that, i will probably change it
03-06-2007, 02:08 PM
#5
Senior Member
Join Date: Nov 2002
Location: The Great Midwest
Posts: 162
Likes: 0
Received 0 Likes
on
0 Posts
Sean,
Pick up the phone and call Fuelman, there is a few things that need some attention so misconceptions do not get further validated....
Pick up the phone and call Fuelman, there is a few things that need some attention so misconceptions do not get further validated....
03-06-2007, 07:47 PM
#6
Senior Member
Thread Starter
Just gave him a call and removed the condensation part. I also need to revise some minor things in the glow plug section, with the help of Fuelman of course.
03-06-2007, 09:26 PM
#7
Senior Member

Join Date: Jul 2005
Location: Torchy the Fiery Fast RC Turtl
Posts: 10,544
Likes: 0
Received 0 Likes
on
0 Posts
Thank you guys for this great thread!!!!! This is what I am talking about! A comprehensive instructional and informational thread that ANYONE, noob and experienced, can pick up at any time anr read with all information in one place! Keep up the good work and continue to modify and update this post as you guys find out more and as the RC world evolves! As a matter of fact, I am going to put this page in my favorites so I can refer to it in an instant.
03-06-2007, 09:59 PM
#8
Senior Member
My Feedback: (3)
Join Date: Feb 2005
Location: Westmont, NJ
Posts: 1,180
Likes: 0
Received 0 Likes
on
0 Posts
ORIGINAL: hpi apollo
Just gave him a call and removed the condensation part. I also need to revise some minor things in the glow plug section, with the help of Fuelman of course.
Just gave him a call and removed the condensation part. I also need to revise some minor things in the glow plug section, with the help of Fuelman of course.
From me to you......... Thanks and congrats on a job well done.......
 03-06-2007, 11:14 PM
#9
Senior Member
Thread Starter
I promise you guys that if you PM me about a problem you see with it, that we can come to a resolution, downunder has pm'd me already with some helpful stuff, and I know my guide isnt perfect. Thanks for the input.
EDIT: I highly encourage all of you to link people to this article for help. Thanks
EDIT: I highly encourage all of you to link people to this article for help. Thanks
03-08-2007, 04:49 AM
#13
Senior Member
Join Date: Feb 2007
Location: hellJP, ANTARCTICA
Posts: 719
Likes: 0
Received 0 Likes
on
0 Posts
Since this is a great guide, let me add up into this list about tuning:
Make sure you listen to your 2speed shift while tuning, if its not shifting theres a chance your engine is stuck at first gear running high rpm's making the engine heat up quicker and making it look like its running lean
Make sure you listen to your 2speed shift while tuning, if its not shifting theres a chance your engine is stuck at first gear running high rpm's making the engine heat up quicker and making it look like its running lean
03-08-2007, 03:53 PM
#14
Senior Member

Join Date: Jun 2005
Location: Eugene, OR
Posts: 3,647
Likes: 0
Received 0 Likes
on
0 Posts
Mine has less info, but may be good for someone new to the hobby to keep in their wallet, pit box etc. A quick reference tuning guide if you will.
Why do we ‘tune’ our engines? How is it done? This guide assumes that you are familiar with all of the parts of your R/C's engine. If you are unsure what a Low Speed Needle (LSN), High Speed Needle (HSN), idle screw etc are, please refer to the manual (RTFM).
Tuning a nitro/methane 2 stroke engine literally means adjusting the air/fuel mixture inside the chamber. This is done by means of adjusting the amount of fuel that is allowed to flow into the carburetor via needles which can be opened and closed. Most of us know that there are a wide variety of factors that affect that air/fuel mixture in the chamber other than just adjusting the needles. Because of this an engine may have to be tuned several times in the same day for optimum performance. Not maintaining an optimum air/fuel ratio can result in poor performance, or even engine failure!
There is a point, in every engine, at which air/fuel mixture will allow the engine to obtain its maximum HP and RPM’s. Tuning your engine to that point can be dangerous, as the mixture is somewhat lacking in the lubricants necessary to give maximum protection to the engine. Therefore, most people will want to run slightly rich (more fuel in the mixture) of that point. This is referred to as the ‘Sweet Spot.’ Some racers will run at pure max potential, but they also don’t usually care if the engine only lasts a gallon… Running at those settings can be very dangerous because being too lean is just a very slight adjustment away.
And running lean is the real engine killer, not temperature. With proper lubrication, the internal components of an R/C engine can easily withstand temperatures of 300F, maybe even more. The thing is, these engines are designed to operate at temperatures around 210 – 270 F. While there is the possibility you will encounter an engine and conditions that dictate the temperature at proper tune is over 300, it will be a rare occurrence. What that boils down to is that there is a good possibility that there is a problem if your engine reaches too high of a temperature. That is why it’s a good idea to monitor the engine temperature, but not use it as a guide for adjusting the air/fuel mixture in the engine.
So, how do you get to that ‘Sweet Spot?’
1) Start out with rich settings. If you are unsure how to go about this, an easy way is to start with stock needle settings. This includes the idle screw - make sure it is set at factory settings, usually a 1 or 2 mm opening for the idle stop. The factories always set engines rich for break ins.
2) next, warm up the engine. Try not to hammer the throttle too much while its still bone cold, but slowly work your way up to a couple WOT runs.
3) Now that the engine is warmed up (1/2 tank is good), do a couple WOT runs of about 50-100ft in front of you and pay attention to the pitch of your engine. The higher the pitch, the more RPM's its doing.
4) Now lean out the HSN by 1 hour increments (30 degrees, 1/12 of a full circle etc) and continue to do some WOT runs in front of you. The engine's max RPM's should continue to go up each and every time you lean out the HSN by those 1 hour changes. If it doesn't, you have reached the top end and need to richen by an hour. Make sure that you do not continue to lean out the HSN after max RPM's have been reached. You will damage the engine.
Congratulations, you just found the sweet spot. Now, if you notice that the car/truck bogs a bit at take off, lean out the LSN (again 1 hr increments) until it will take off at the touch of the trigger.
And you're done. At this point I like to temp the engine to get a baseline reading for the day.
This is a simple and fool proof method of tuning that everyone can do. Regardless of your experience.
03-08-2007, 05:49 PM
#15
Junior Member
Join Date: Mar 2007
Location: QUINCY, MA
Posts: 1
Likes: 0
Received 0 Likes
on
0 Posts
I just joined this forum and i'm new to the rc scene but I do know this methanol will only condense into droplet at extremely low tempratures.
Methanols evaporation point is around 75 degrees f and it freezes at -126 degrees f. You can pretty much bet that condensation build up on the inside of a bottle is from the air content inside the bottle from infrared heating.
I use methanol extensively in my occupation and at temprature down to -75 degrees f and I have only scene it condense to droplet at temps below 0 degrees f.
Nick
03-08-2007, 08:53 PM
#16
Senior Member
Thread Starter
in an enclosed container, methanol will condense on the sides, i know my guide isnt perfect but i know that part is right
03-08-2007, 10:34 PM
#17
Senior Member

Join Date: Feb 2006
Location: Arlington,
TX
Posts: 3,344
Likes: 0
Received 0 Likes
on
0 Posts
Hmm, this is funny, but hopefully I'm wrong and won't harm my engine; when ever I run on a cold day, I find I have to run it a little LEANER to get the engine to warm up and drive around with power. On the next warm day, I actually end up running rich, in order to keep the engine from heating up above 250-260'F, keeping in mind the smoke density and all that in both scenarios.
I understand the physical/theoretical reasons for running lean in warm weather and rich in denser cold weather air, but my experience with my Pro.15 has been... unique.. in that sense.
I understand the physical/theoretical reasons for running lean in warm weather and rich in denser cold weather air, but my experience with my Pro.15 has been... unique.. in that sense.
03-08-2007, 10:44 PM
#18
Senior Member
Thread Starter
you DO NOT use your hsn for a temp adjuster, when you are in cold weather you need to run richer because cold air is more dense, and more air per voulme of fuel makes it run lean, you need to run richer, but you also might have to cover up some windows to keep the temp up, or if that doesnt work, you need to wrap a paper towell around the head or maybe some foil
03-08-2007, 11:04 PM
#19
Senior Member
Join Date: Feb 2006
Location: Arlington,
TX
Posts: 3,344
Likes: 0
Received 0 Likes
on
0 Posts
hpi apollo,
If you read my post you'll see that I understand how cold air is denser and all and warm air is thinner. What I was trying to say is that if I run in cold(er) weather say 45-50'F, the engine may warm up, but it will simply not run at optimum rpms, meaning it will run like it's too rich and just not have acceleration and speed. It's after a turn it a 1/8 - 1/4 turn leaner that it really starts to work right (smoke trail is just right, sound is just about crisp). In fact I seem to have better luck in cooler weather with respect to the engine running consistantly, while in warmer weather (65+) I'll usually have to go in and richen it as the tank gets low and it gets above 270'F if I don't. So I'm not disputing the "rules of r/c nitro tuning," but simply pointing out an interesting observation. BTW my truck body does not have open windows/windshield, but simply relies on the cooling hole I cut above the engine to shed the heat out, so at least that much is not keeping the engine from heating up in cold weather.
However, next time out in cold weather (whatever of it we have left here in Texas ) I'll try to cover some of the heat sink and see which way I end up tuning the needle, and the effects on performance. Again I don't try to use the HSN as a thermostat, but usually try to strike a balance between power and heat. Maybe I'm still wrong but hey can you blame a nitro novice for trying? I mean the Pro .15 manual says to keep it at 225, which I can agree is is kinda low, and here you guys are saying that engines *can* be run as high as 270'F range. Who do you suggest I trust with my $110? I think I'll strike a balance of both (if possible).
If you read my post you'll see that I understand how cold air is denser and all and warm air is thinner. What I was trying to say is that if I run in cold(er) weather say 45-50'F, the engine may warm up, but it will simply not run at optimum rpms, meaning it will run like it's too rich and just not have acceleration and speed. It's after a turn it a 1/8 - 1/4 turn leaner that it really starts to work right (smoke trail is just right, sound is just about crisp). In fact I seem to have better luck in cooler weather with respect to the engine running consistantly, while in warmer weather (65+) I'll usually have to go in and richen it as the tank gets low and it gets above 270'F if I don't. So I'm not disputing the "rules of r/c nitro tuning," but simply pointing out an interesting observation. BTW my truck body does not have open windows/windshield, but simply relies on the cooling hole I cut above the engine to shed the heat out, so at least that much is not keeping the engine from heating up in cold weather.
However, next time out in cold weather (whatever of it we have left here in Texas
) I'll try to cover some of the heat sink and see which way I end up tuning the needle, and the effects on performance. Again I don't try to use the HSN as a thermostat, but usually try to strike a balance between power and heat. Maybe I'm still wrong but hey can you blame a nitro novice for trying? I mean the Pro .15 manual says to keep it at 225, which I can agree is is kinda low, and here you guys are saying that engines *can* be run as high as 270'F range. Who do you suggest I trust with my $110? I think I'll strike a balance of both (if possible).
03-08-2007, 11:14 PM
#20
Senior Member
Thread Starter
only in cold weather do you need to cover your cooling head, if you do it at 45 degrees then you will overheat your engine, what im trying to say is that if you have enough coolign holes in your body for your engine to run at maybe 240 at an optimum tune, whenever it gets to like 30 degrees you iwll need to block some holes
03-08-2007, 11:42 PM
#21
Senior Member
Join Date: Feb 2006
Location: Arlington,
TX
Posts: 3,344
Likes: 0
Received 0 Likes
on
0 Posts
I understand you're saying. I guess "cold" is a relative term, since I usually don't find it enjoyable to drive my cars if it's colder than 40-45'F and windy (the wind usually kills the fun). I don't see myself need an "r/c" fix in 30'F weather but I'll keep in mind about covering the heatsink if that ever happens. Yet another "interesting" aspect of nitro. ...Hmm... I wonder if my IB4200 is charged....
03-09-2007, 05:30 AM
#22
Senior Member
My Feedback: (3)
Join Date: Feb 2005
Location: Westmont, NJ
Posts: 1,180
Likes: 0
Received 0 Likes
on
0 Posts
OK......... we are not in a battle I HOPE... Eric has done something that MOST will not take the time to do. His friend also took the time to help the man and that man's name is, rccardude........
So before we try to take what is written, take time to read it.
People do have different opinions but some people like to to voice what they know. I personally like what HPI Apollo has wrote with the help of his friend rccardude......
These are people that know RC, and even though I have 20 years in the hobby, I can still learn.
03-09-2007, 05:39 AM
#23
Senior Member
My Feedback: (3)
Join Date: Feb 2005
Location: Westmont, NJ
Posts: 1,180
Likes: 0
Received 0 Likes
on
0 Posts
ORIGINAL: nickh
I just joined this forum and i'm new to the rc scene but I do know this methanol will only condense into droplet at extremely low tempratures.
Methanols evaporation point is around 75 degrees f and it freezes at -126 degrees f. You can pretty much bet that condensation build up on the inside of a bottle is from the air content inside the bottle from infrared heating.
I use methanol extensively in my occupation and at temprature down to -75 degrees f and I have only scene it condense to droplet at temps below 0 degrees f.
Nick
03-09-2007, 08:13 AM
#24
Senior Member
Thread Starter
ORIGINAL: JayC1968
DO NOT get it wrong........ I don't care..... NITRO Fuel will evaporate at a faster rate than METHANOL... We are not talking just one composite... we are talking two ............Methanol will and DOES evaporate at room temps and up to 120 degrees....I do NOT give a rats ass who you are and what you do.......... I see it and so do all the nitro car owners that store fuel,,,,,,,,,,,,,, so blow me
ORIGINAL: nickh
I just joined this forum and i'm new to the rc scene but I do know this methanol will only condense into droplet at extremely low tempratures.
Methanols evaporation point is around 75 degrees f and it freezes at -126 degrees f. You can pretty much bet that condensation build up on the inside of a bottle is from the air content inside the bottle from infrared heating.
I use methanol extensively in my occupation and at temprature down to -75 degrees f and I have only scene it condense to droplet at temps below 0 degrees f.
Nick
I just joined this forum and i'm new to the rc scene but I do know this methanol will only condense into droplet at extremely low tempratures.
Methanols evaporation point is around 75 degrees f and it freezes at -126 degrees f. You can pretty much bet that condensation build up on the inside of a bottle is from the air content inside the bottle from infrared heating.
I use methanol extensively in my occupation and at temprature down to -75 degrees f and I have only scene it condense to droplet at temps below 0 degrees f.
Nick