


Progress on my M4A1E8 Sherman Build
 11-09-2007, 12:45 PM
#1

Thread Starter
Thought I'd show where I'm at and what I've done so far. After my first Sherman build I noticed that pieces B15 and B14 (that are supposed to look like track tension housings) are mounted way too low and when the idler assemblies are mounted at the right height, they do not line up at all. So, I filled, grinded and epoxied them to the correct height.
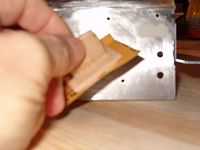
While I was at it, I also made some towing eyes that were completely overlooked by Tamiya.
Also, I went ahead and added the tow pintle.
I'm also going to add the screen that hangs from the upper hull and locks onto the engine access doors. I need to run down to Camp Atterbury to re-measure. My goal is to have it swing down like the real thing.
And, to add to my list of corrections for the Sherman kit, I will be adding bearings to the rear idlers. Especially since metal tracks are to be added, this is a must modification!

Just need to drill and measure for some nice ball bearings!

That's all for now! I work very slow so don't expect it to be done this year!
Jeff
While I was at it, I also made some towing eyes that were completely overlooked by Tamiya.
Also, I went ahead and added the tow pintle.
I'm also going to add the screen that hangs from the upper hull and locks onto the engine access doors. I need to run down to Camp Atterbury to re-measure. My goal is to have it swing down like the real thing.
And, to add to my list of corrections for the Sherman kit, I will be adding bearings to the rear idlers. Especially since metal tracks are to be added, this is a must modification!
Just need to drill and measure for some nice ball bearings!
That's all for now! I work very slow so don't expect it to be done this year!
Jeff
 11-09-2007, 02:35 PM
#3
Thread Starter
Contact firenick (he's a member here: http://www.rcuniverse.com/community/...m?memid=229958 ) about the A1 hull that he makes.
Jeff
Jeff
 11-09-2007, 02:49 PM
#5
Thread Starter
 11-09-2007, 04:02 PM
#6
Senior Member

Join Date: Jan 2007
Location: Santa Rosa,
CA
Posts: 1,332
Likes: 0
Received 0 Likes
on
0 Posts
Nice work, I need to make some towing eyes for the back of mine, front ones are finished [sm=thumbup.gif][sm=thumbup.gif]
11-22-2007, 06:42 AM
#7
Thread Starter
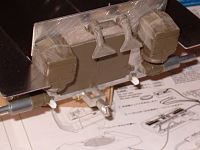
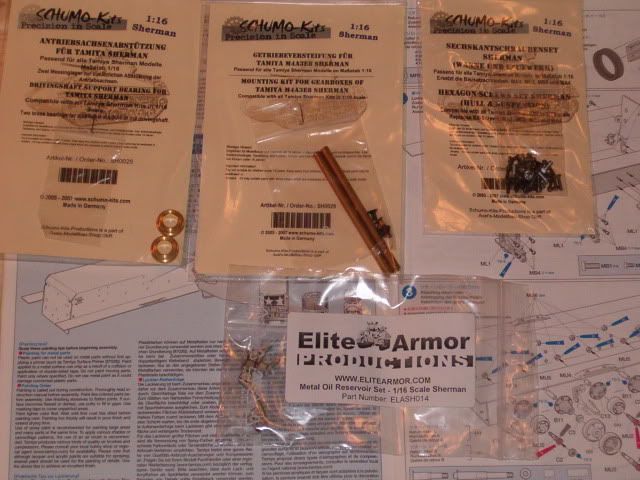
Have a few more pics on what's going on with this build. I decided to go with as much metal as I could so I went with the shaft supports (SH0025), gearbox braces (SH0029) and the Hexagon screw set (SH0020) that replaces those nasty looking kit phillips head screws in the suspension. Plus I sprang for the metal oil reservoir set too.
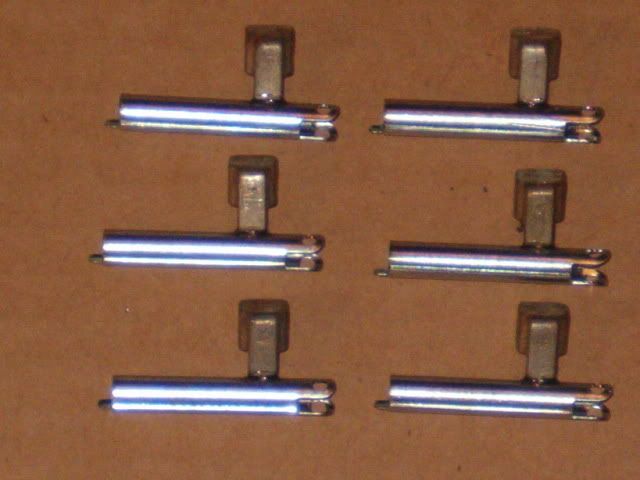
It's been long discussed to solder the metal reservoirs but discussing it and it playing out are completely different. You better make sure it is straight before the solder flows or they'll end up crooked.

I used my trusty 5 minute epoxy which allows you to reposition as it sets so that the piece is nice and straight!
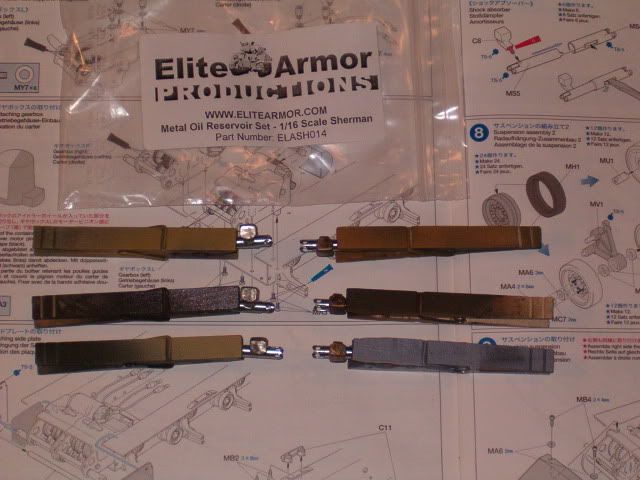
Plus, you can add more epoxy on the inside to add more strength to the bond. I have the stock plastic pieces installed this way on my first Sherman and after 3 years they haven't come off!
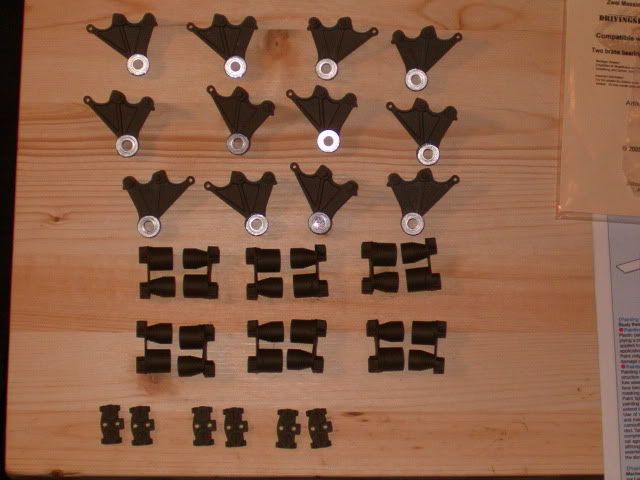
Plus I added the metal conical springs and the metal end plates with the nickel silver metal suspension set (SH011) which replaces those plastic pieces C5, C9 and MS1. Plus, metal bearings where added and everything's been painted.
Here's a few finished shots of the tow pieces I made.
I borrowed the tow hooks from my BYA Easy Eight kit that I never used to finish out what Tamiya left off.

Still much more to do, lots of metal detail left to prep and glue in. I'll work on assembling the suspension this weekend and make my way to the upper hull where I must add the fender extensions and scratch the tubular supports, glue in all the lifting hooks and much more.
Happy Thanksgiving!
Jeff
It's been long discussed to solder the metal reservoirs but discussing it and it playing out are completely different. You better make sure it is straight before the solder flows or they'll end up crooked.
I used my trusty 5 minute epoxy which allows you to reposition as it sets so that the piece is nice and straight!
Plus, you can add more epoxy on the inside to add more strength to the bond. I have the stock plastic pieces installed this way on my first Sherman and after 3 years they haven't come off!
Plus I added the metal conical springs and the metal end plates with the nickel silver metal suspension set (SH011) which replaces those plastic pieces C5, C9 and MS1. Plus, metal bearings where added and everything's been painted.
Here's a few finished shots of the tow pieces I made.
I borrowed the tow hooks from my BYA Easy Eight kit that I never used to finish out what Tamiya left off.
Still much more to do, lots of metal detail left to prep and glue in. I'll work on assembling the suspension this weekend and make my way to the upper hull where I must add the fender extensions and scratch the tubular supports, glue in all the lifting hooks and much more.
Happy Thanksgiving!
Jeff
11-23-2007, 02:02 PM
#8
Senior Member

Join Date: Jul 2007
Location: Enterprise, AL
Posts: 253
Likes: 0
Received 0 Likes
on
0 Posts
Looking good, Panther F! [sm=thumbs_up.gif] I think I will be following in your footsteps, soon, with my own Sherman build. I've already been looking at some of the upgrades that you are adding, so I will be following your post to see just how you did it all. 
11-23-2007, 03:27 PM
#9
Thread Starter
Thanks StoneColdFreak! If you have any question regarding any of the products or how they work feel free to ask away!
BTW, this is what it should look like when finished, only fresher paint!
Jeff
BTW, this is what it should look like when finished, only fresher paint!
Jeff
01-03-2008, 04:18 PM
#10
Thread Starter
Wow ... hard to believe it's been 2 months since I last posted any pics of my build. I told ya I wasn't in any hurry!! After recoverying from being sick around Thanksgiving, figure in the Holidays, losing the drive to want to get out and get materials while shopping for Christmas, I just let everything sit for awhile.
It's funny, it took a 1/77nd scale airplane kit I kicked out in a couple of hours this Sunday to get back in the mood again. This isn't just going to be a battler, but I want to spend some time with detailing and things that have been neglected in the past.
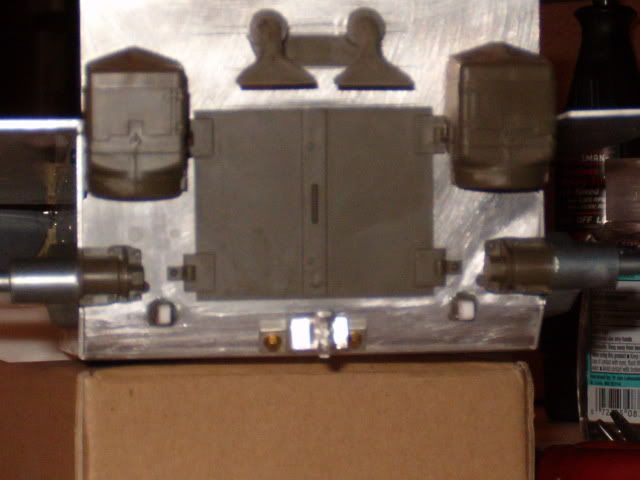
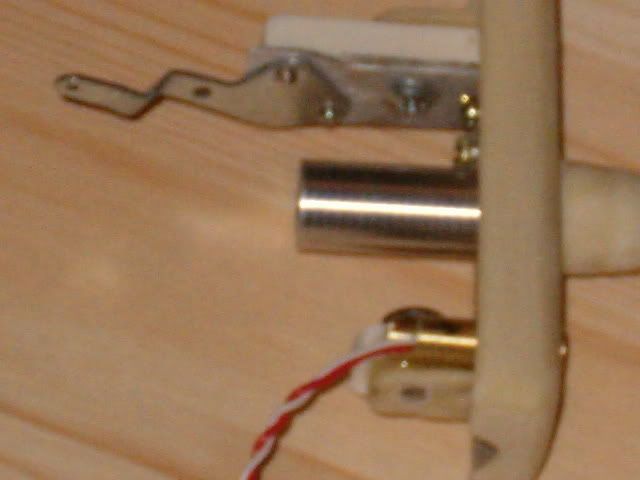
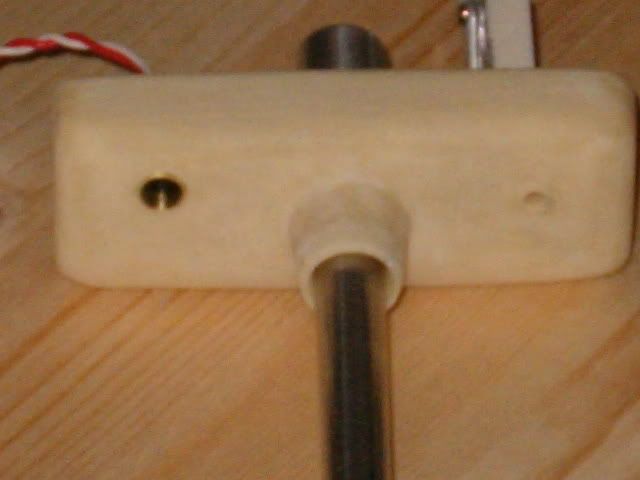
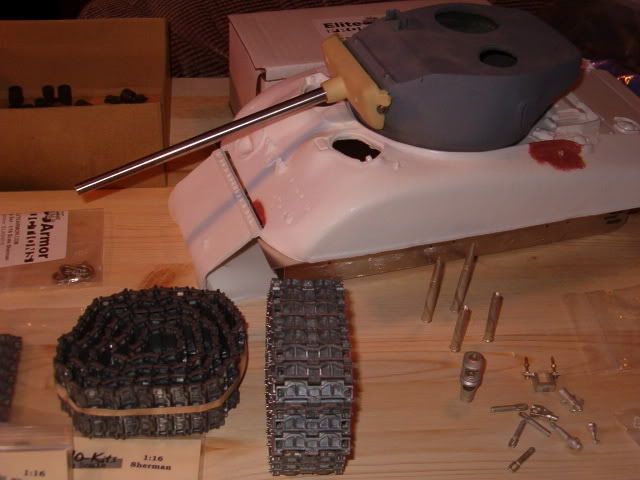
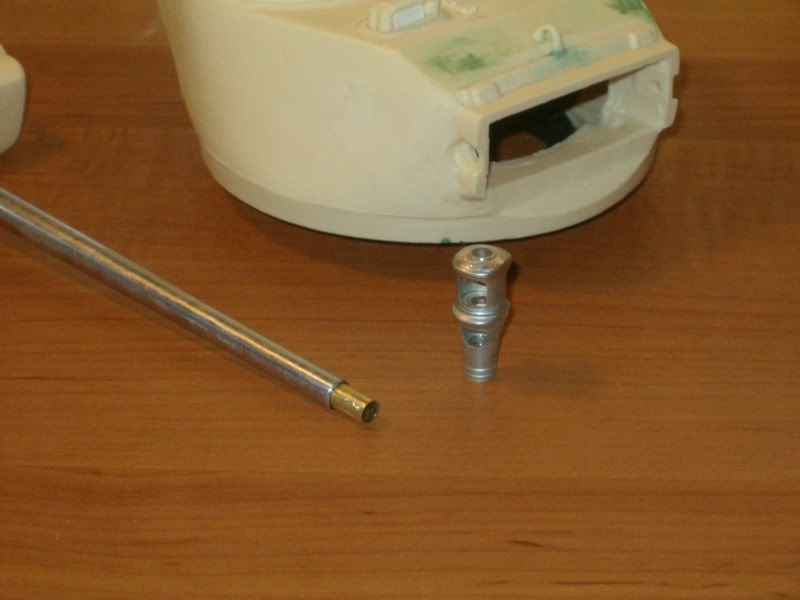
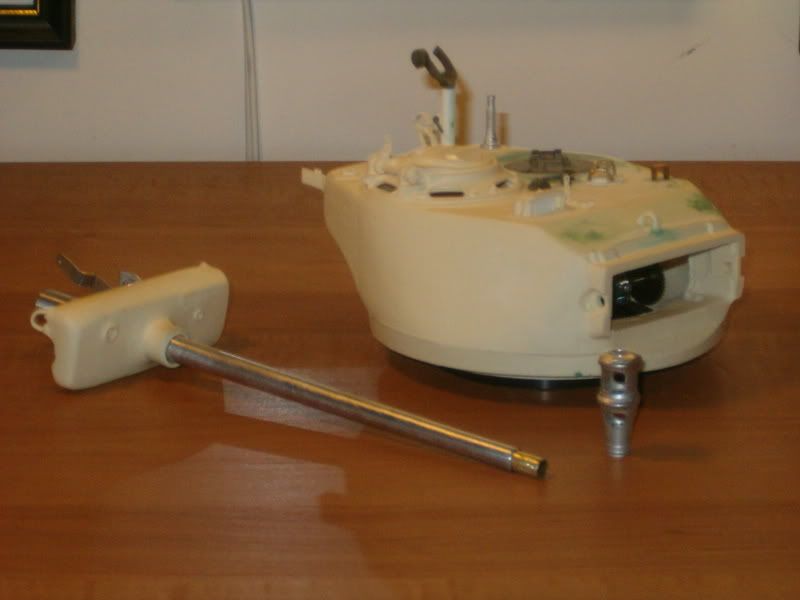
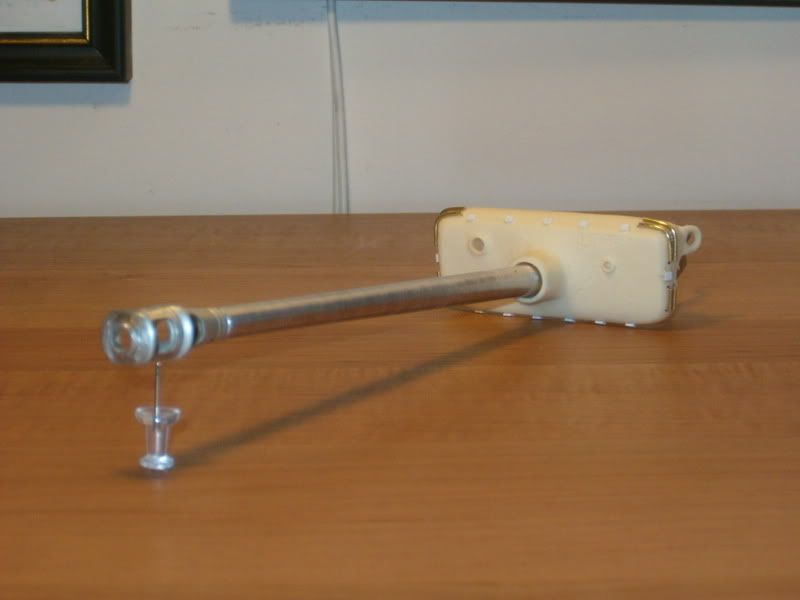
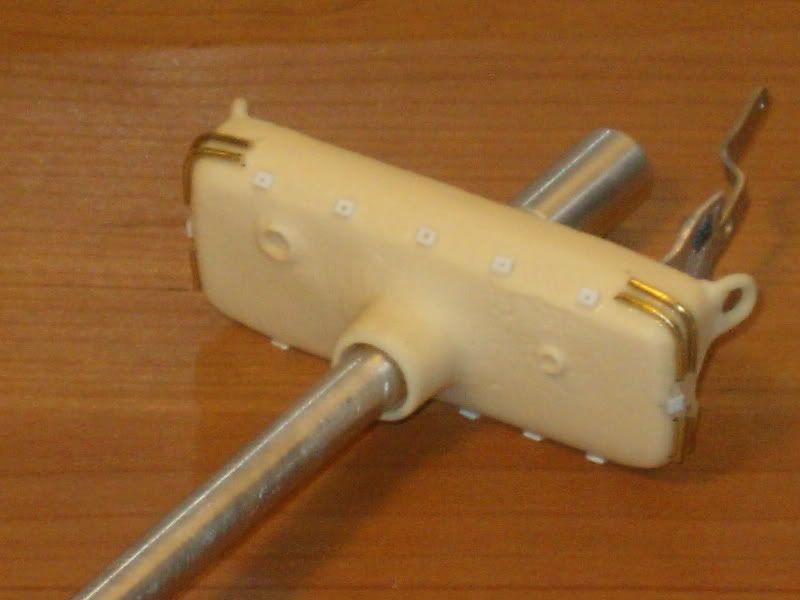
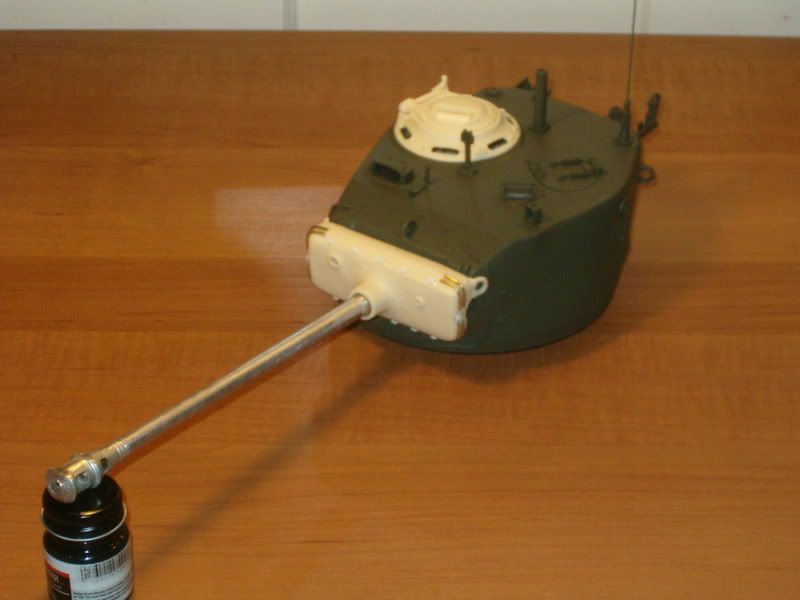
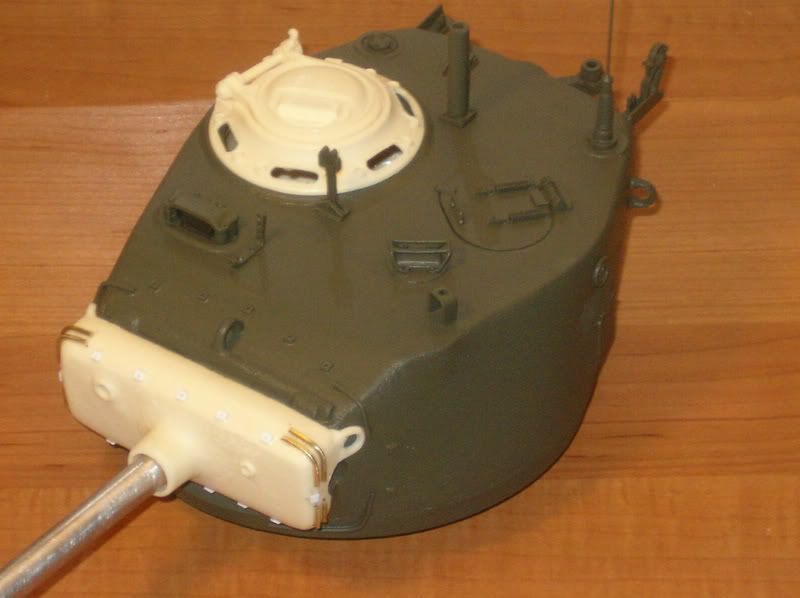
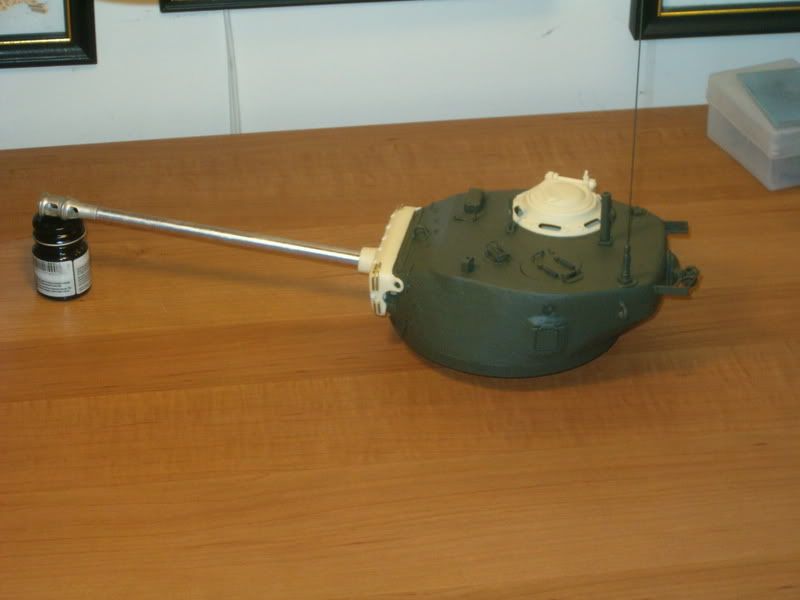
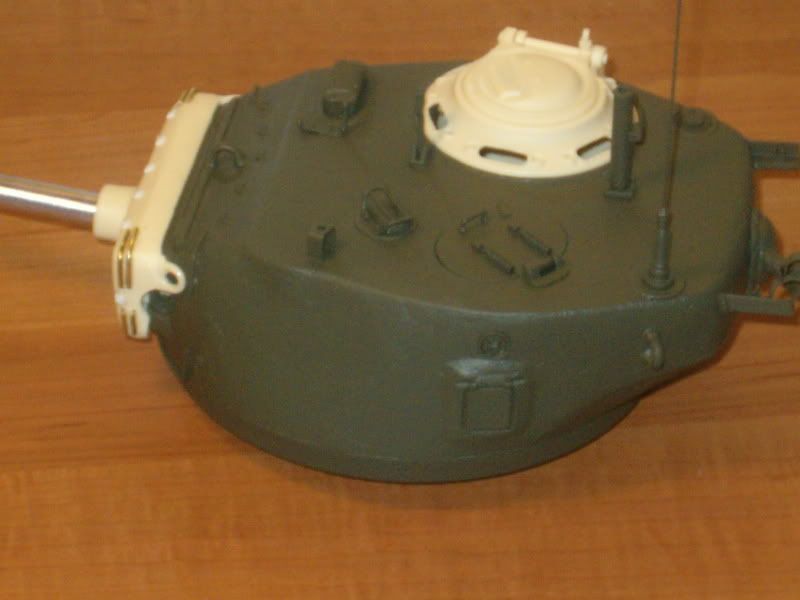
The following pics are pretty self explanatory. A little bit of modifying the resin turret kit, grafting the Tamiya turret ring to fit it, measuring the elevation arm out, reinforcing the mantlet pivot arms and installing the emitter tube correctly. I still need to test the balance of the barrel with the muzzle brake installed to see if I need more weight at the other end.
It ain't pretty, but beauty is only skin deep!
It's funny, it took a 1/77nd scale airplane kit I kicked out in a couple of hours this Sunday to get back in the mood again. This isn't just going to be a battler, but I want to spend some time with detailing and things that have been neglected in the past.
The following pics are pretty self explanatory. A little bit of modifying the resin turret kit, grafting the Tamiya turret ring to fit it, measuring the elevation arm out, reinforcing the mantlet pivot arms and installing the emitter tube correctly. I still need to test the balance of the barrel with the muzzle brake installed to see if I need more weight at the other end.
It ain't pretty, but beauty is only skin deep!
01-03-2008, 04:35 PM
#12
Senior Member
Join Date: Dec 2007
Location: HuddersfieldWest Yorkshire, UNITED KINGDOM
Posts: 405
Likes: 0
Received 0 Likes
on
0 Posts
PantherF Hi. It's all looking great. The rear of the Sherman is really coming to life.
How difficult is it to seperate the rear idler assembly. I was thinking of seperating mine with a view to converting them to ballraces when they get a bit worn.
How difficult is it to seperate the rear idler assembly. I was thinking of seperating mine with a view to converting them to ballraces when they get a bit worn.
01-03-2008, 05:29 PM
#13
Thread Starter
They're not that bad. The 'hub cap' is just pressed on. I rigged up a puller, but I bet with equal prying on both sides it'll come off real easy!
01-03-2008, 05:57 PM
#14
Senior Member
Join Date: Dec 2007
Location: HuddersfieldWest Yorkshire, UNITED KINGDOM
Posts: 405
Likes: 0
Received 0 Likes
on
0 Posts
Panther F thanks for the info. I'll give it a go when I eventually finish my Sherman.
Thanks again,
Gigantohawk.
Thanks again,
Gigantohawk.
01-03-2008, 07:19 PM
#15
Thread Starter
No problem and you're welcome!
 01-03-2008, 08:19 PM
#17
Thread Starter
Yes. The M4A1E8 had the radial engine. At least the ones at Camp Atterbury do.
01-03-2008, 08:39 PM
#18
Ignore my previous post, I thought you were building an M4A3E8. Time to get the glasses checked, cocktails that is. By the way, I will race you to the finish! I have to rework my rear hull after our last battle day. We'll have to get 'em done for AMPS in April.
01-03-2008, 08:43 PM
#19
Thread Starter
That's the plan! 
01-04-2008, 06:10 PM
#20
Senior Member

Jeff, you going to put on T-66 or T-80 track, or stay with the T-84? The earlier track looks cool, but very heavy.
I have one of Nicks' turrets but don't like the early style with split loader's hatch. All the E-8s I ever had to deal with had the oval hatch like the Pershing. No one liked the split hatches and they were known as finger choppers. Had to be VERY carefull closing them, one at a time, and watch your fingers. [:@]Not good when you're open and somebody starts shoting. [:'(]At the time, Nick didn't have the muzzle brake for the gun, so I have it mounted on a static Sherman as an early 76 VVSS tank. [ ] I think he now makes the muzzle brake and rear deck parts.
Looks like your Sherman is going to be very nice (and accurate) when you get it done.[sm=thumbs_up.gif]
Bill
I have one of Nicks' turrets but don't like the early style with split loader's hatch. All the E-8s I ever had to deal with had the oval hatch like the Pershing. No one liked the split hatches and they were known as finger choppers. Had to be VERY carefull closing them, one at a time, and watch your fingers. [:@]Not good when you're open and somebody starts shoting. [:'(]At the time, Nick didn't have the muzzle brake for the gun, so I have it mounted on a static Sherman as an early 76 VVSS tank. [
] I think he now makes the muzzle brake and rear deck parts.Looks like your Sherman is going to be very nice (and accurate) when you get it done.[sm=thumbs_up.gif]
Bill
01-04-2008, 11:52 PM
#21
Thread Starter
Hey Bill, thanks for the compliments. I'm gonna go with the T-66 tracks from Kenny Kong.
These are alot lighter than the T-84's that I did get when I bought the T-66 tracks but then sold them because of the weight issue.
The Tamiya Sherman comes stock with the T-80 tracks.
I'm gonna go with the T-66 tracks from Kenny Kong.These are alot lighter than the T-84's that I did get when I bought the T-66 tracks but then sold them because of the weight issue.
The Tamiya Sherman comes stock with the T-80 tracks.
10-02-2008, 10:04 AM
#22
Thread Starter
Thought I'd show what I've been doing with this tank since I have a Tamiya Panther waiting (and itching) to get started on. I went with Nick's turret and did a few mod's to it to duplicate the tank I'm building it after. Once this is finished I need to finish the upper hull and she's done.
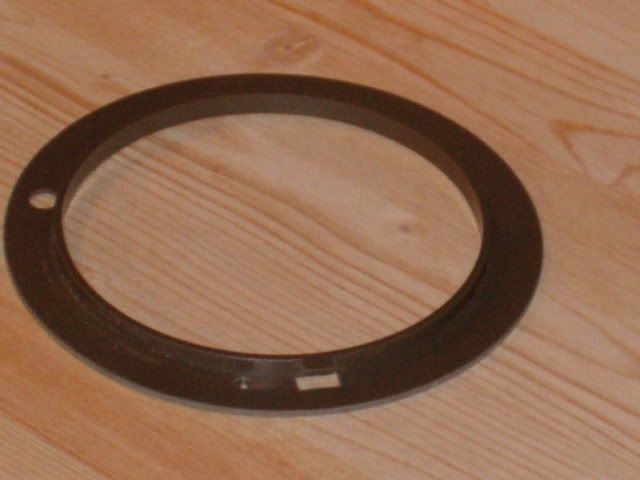
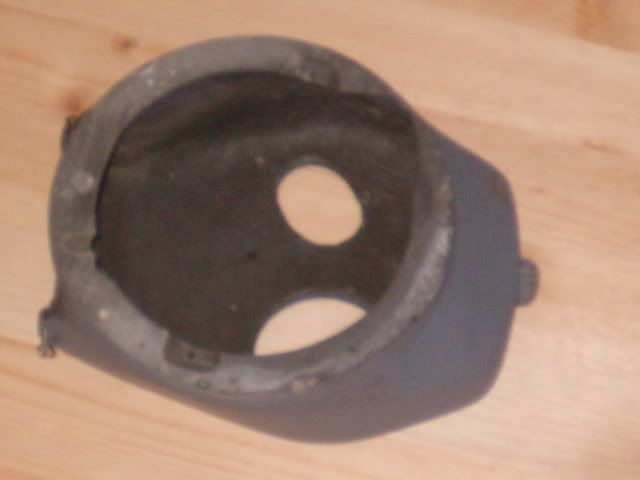
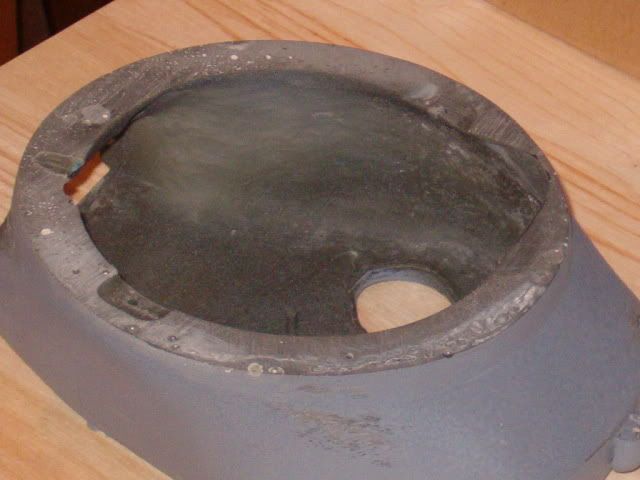
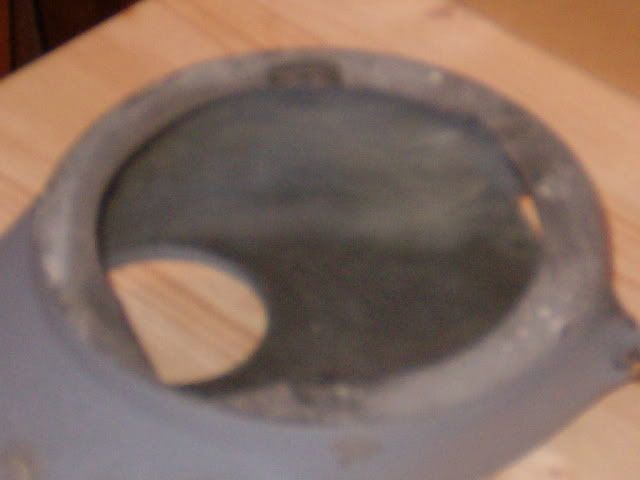
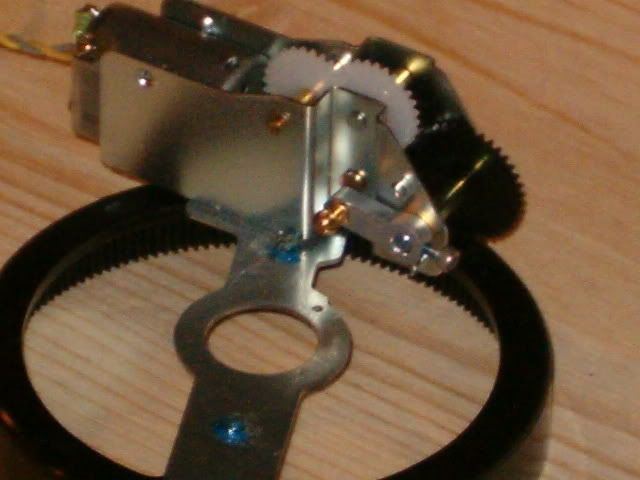
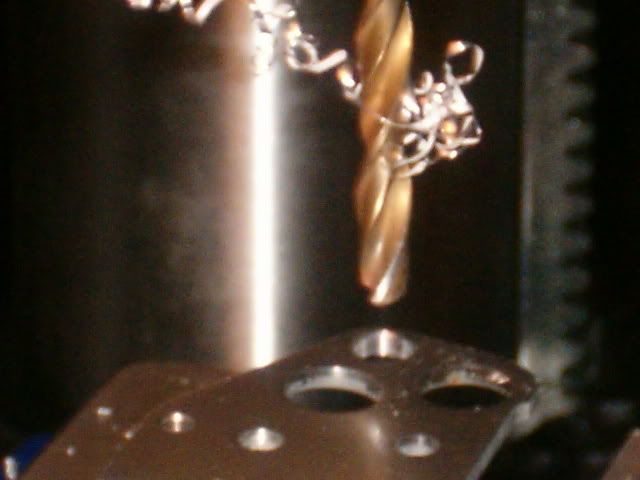
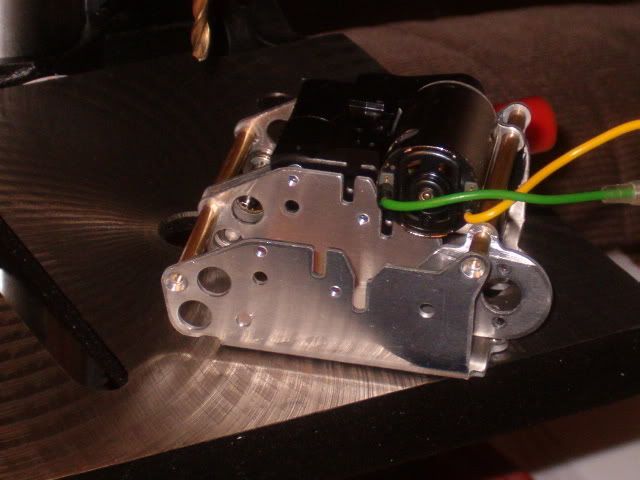
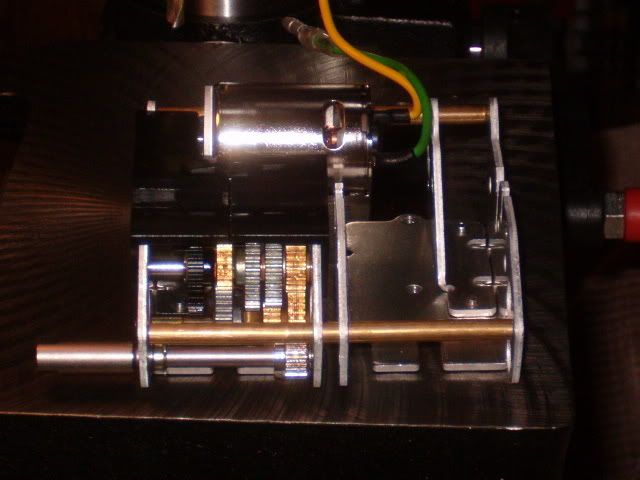
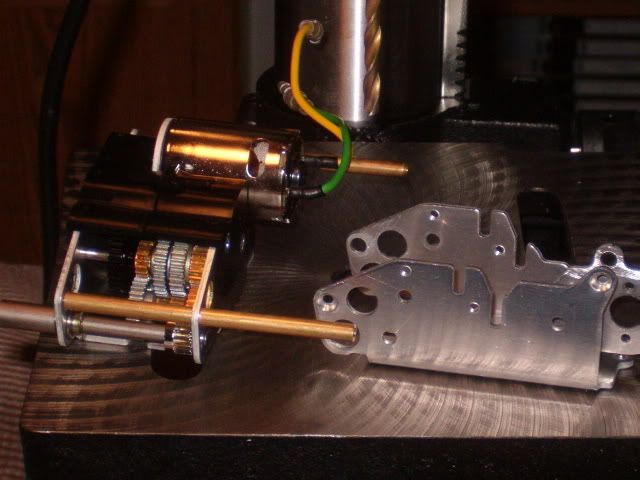
I thought I'd post a few pics of drilling out the aluminum housing of the Tamiya gearbox for my M4A1E8 build and install the SH0029 Mounting Kit.
First, all the gears, shafts and the 2 bearings must be removed. Then just line up the holes to be drilled with a 5mm bit.
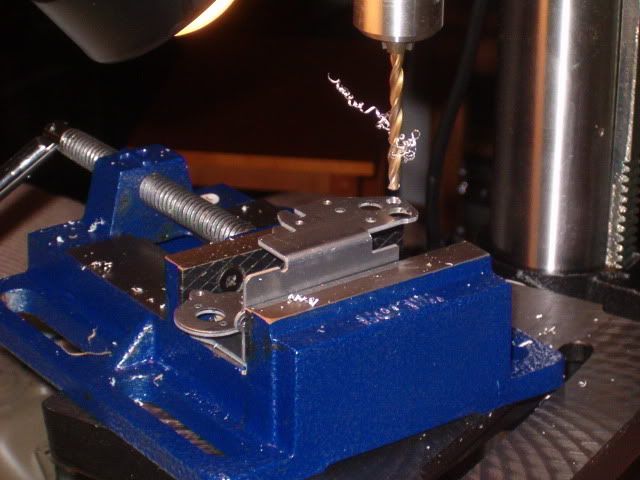
Here you can see I already finnished the right gearbox and re-assembled it. These three photos show how the mounting kit ties the two boxes together to support and reduce any flexing in the upper half, while down below I'll use Daryl Turners gearbox mounting plate to reinforce the hull area.
I'll be using metal tracks with this tank and thought I'd experiment with the stock gearbox and later before I install them in the tank, I'll replace the stock motors with some Graupner Speed 400 6V motors.
Gee ... where does it all go?

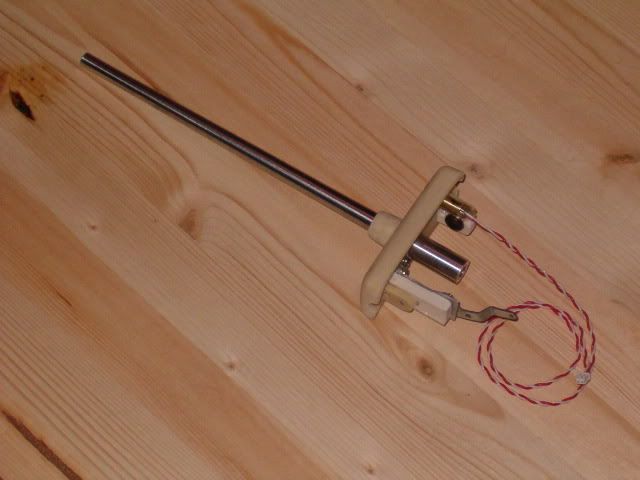
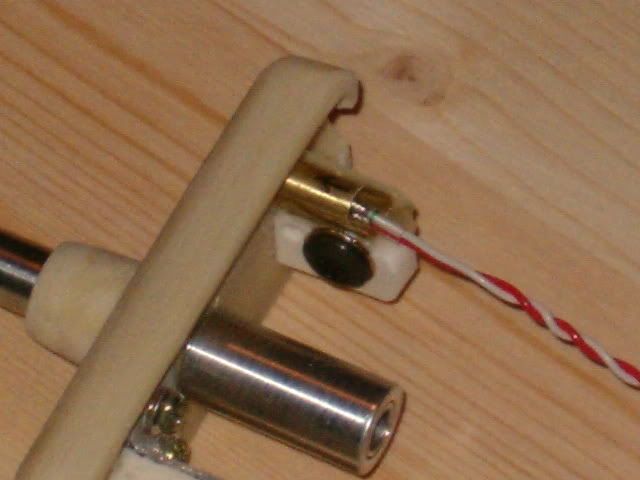
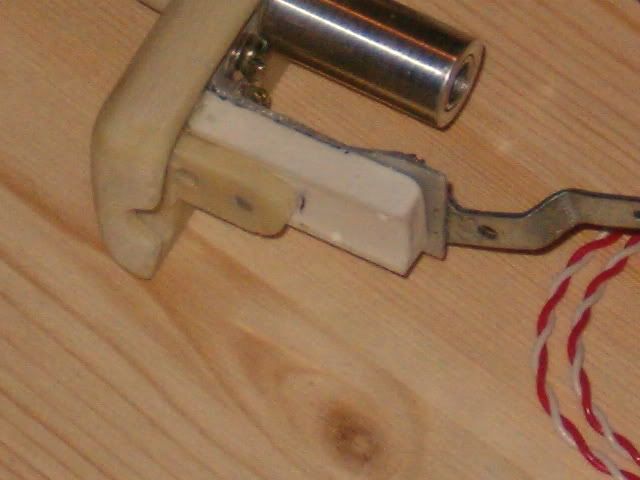
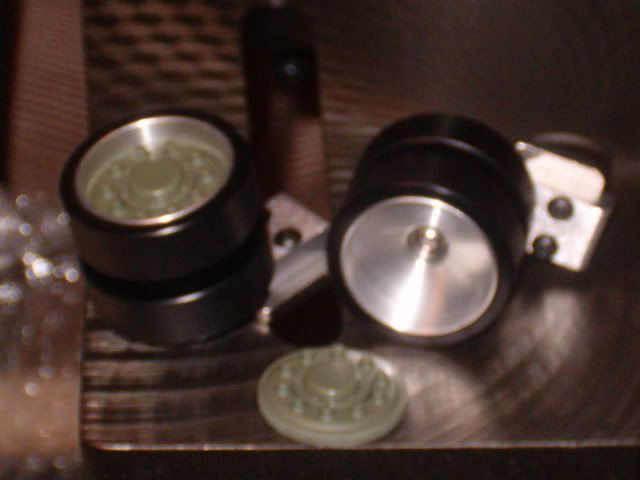
I finally got around to drilling out the stock idler wheels for my 3rd Tamiya Sherman project I have planned and pressing the ball bearings from the IMPACT set in. I found that on my set I'll have to turn the metal axle down a little more near the hubcap, for it wouldn't set down into the bearing race. These turned out alot nicer than I expected!
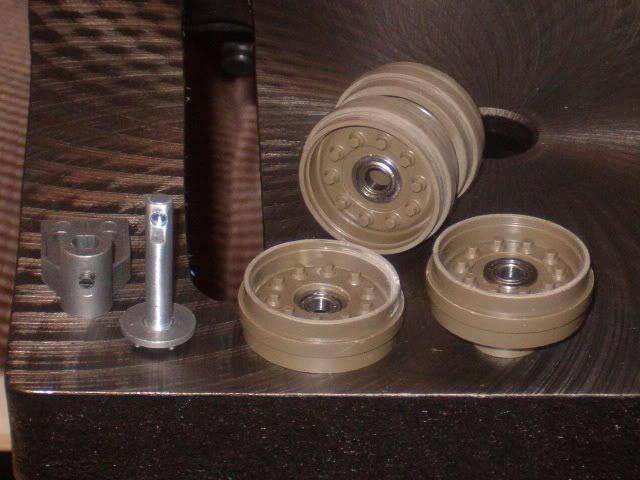
These are the Daryl Turner idler wheel set for the Tamiya Sherman. I wanted the extra insurance for the 2nd Sherman project will have metal tracks, and I don't want any problems.

STILL, a long way to go but the hard part is over. I debated over this area for what seems forever but I feel I'm over the hump and can't wait to fire it up.
I thought I'd post a few pics of drilling out the aluminum housing of the Tamiya gearbox for my M4A1E8 build and install the SH0029 Mounting Kit.
First, all the gears, shafts and the 2 bearings must be removed. Then just line up the holes to be drilled with a 5mm bit.
Here you can see I already finnished the right gearbox and re-assembled it. These three photos show how the mounting kit ties the two boxes together to support and reduce any flexing in the upper half, while down below I'll use Daryl Turners gearbox mounting plate to reinforce the hull area.
I'll be using metal tracks with this tank and thought I'd experiment with the stock gearbox and later before I install them in the tank, I'll replace the stock motors with some Graupner Speed 400 6V motors.
Gee ... where does it all go?
I finally got around to drilling out the stock idler wheels for my 3rd Tamiya Sherman project I have planned and pressing the ball bearings from the IMPACT set in. I found that on my set I'll have to turn the metal axle down a little more near the hubcap, for it wouldn't set down into the bearing race. These turned out alot nicer than I expected!
These are the Daryl Turner idler wheel set for the Tamiya Sherman. I wanted the extra insurance for the 2nd Sherman project will have metal tracks, and I don't want any problems.
STILL, a long way to go but the hard part is over. I debated over this area for what seems forever but I feel I'm over the hump and can't wait to fire it up.
10-03-2008, 07:01 AM
#24
Senior Member
Join Date: Dec 2007
Location: nelson, UNITED KINGDOM
Posts: 679
Likes: 0
Received 0 Likes
on
0 Posts
In One word WOW have been trying to get my hands on a Sherman for ages would love this one brilliant work keep up the posts will watch with interest and wish it was mine
regards pete
regards pete
10-03-2008, 07:34 AM
#25
Thread Starter
ORIGINAL: WhiteWolf McBride
Who makes that metal brake for the barrel? (and which barrel is it?)
details, details!
Who makes that metal brake for the barrel? (and which barrel is it?)
details, details!