


Pilatus PC9 1/3 scale
 01-23-2010, 04:14 PM
#1

Thread Starter

Join Date: Aug 2009
Location: Paris, FRANCE
Posts: 143
Likes: 0
Received 0 Likes
on
0 Posts
Hi everybody,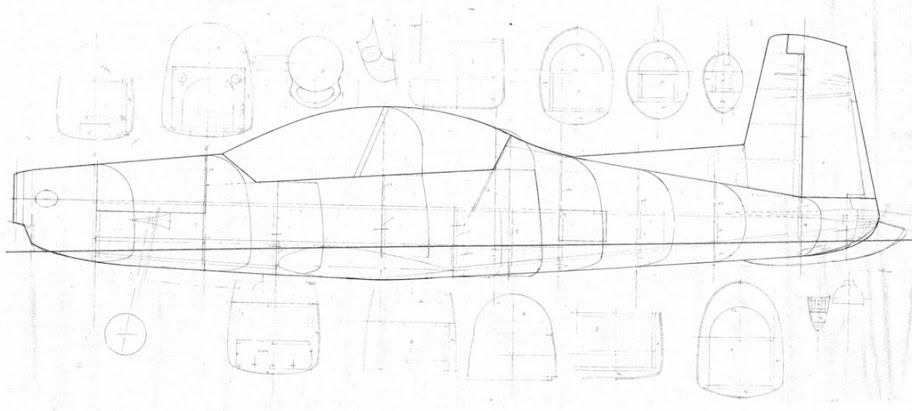
Once scanned and scaled up, I draw every formers.

I would like to present you a project that I am doing with two friends of mine, which is a Pilatus PC9 1/3 scale. As we wants 3 planes, we decided to make a mold.
I'll tell you more about the construction that has already begun one and a half year ago. Today we begin gently to see the end of master of the fuselage ... and still is not finished yet.
Initially we took the plan of a guy that won french F4C competition years ago and we simply scaled up the plan by 2 ...
First step the plan :
We scanned it and here it is :
Once scanned and scaled up, I draw every formers.
 01-28-2010, 07:08 AM
#4
I have seen some construction photos of the plane... it is a very interesting build. Will you be making it in full fiberglass construction or just the fuselage will be in fiberglass and the wings in foam? Will it be available for sale too?  Makes an interesting subject!
Reuben
Makes an interesting subject!Reuben
01-28-2010, 07:17 AM
#5
Thread Starter
Join Date: Aug 2009
Location: Paris, FRANCE
Posts: 143
Likes: 0
Received 0 Likes
on
0 Posts
Only the fuselage will be fiberglass, the wings will be in foam.
The deal between the builders is that we will not sell it. Sorry for that.
The fuselage will be in two parts. The rear part will stop just behind the cockpit.
The deal between the builders is that we will not sell it. Sorry for that.
The fuselage will be in two parts. The rear part will stop just behind the cockpit.
01-31-2010, 11:00 AM
#7
Thread Starter
Join Date: Aug 2009
Location: Paris, FRANCE
Posts: 143
Likes: 0
Received 0 Likes
on
0 Posts
Obviously, the size we wanted, we needed more formers to build the master.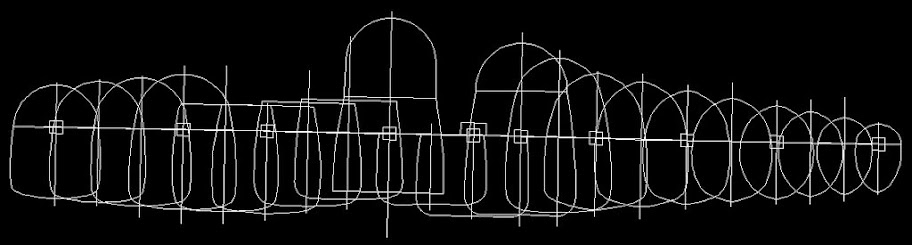
Then I caculated the intermediate formers to have less then 8 inches between each former.
The calculation was an average between to formers but unfortunately we found that this calculation was not correct because the average put the former too low compare to reality because it does not take in account the curve of the plane. So we had to make them all again. That was more work in perspective, but it is an other story.
I am not used to 3D drawing which would have given me the correct shape for the intermediates formers.
01-31-2010, 03:10 PM
#9
Thread Starter
Join Date: Aug 2009
Location: Paris, FRANCE
Posts: 143
Likes: 0
Received 0 Likes
on
0 Posts
ORIGINAL: F86_SABRE
21 formers? What are the dimensions of the model PC-9?
21 formers? What are the dimensions of the model PC-9?
The real one is 35 feet and one inch long which is 10,5 meter, the model will be 11 feet and 6 inches (3,5 meter) long.
The 8 inches between formers is a maximum but most of them are less then that.
02-01-2010, 01:22 AM
#11
Thread Starter
Join Date: Aug 2009
Location: Paris, FRANCE
Posts: 143
Likes: 0
Received 0 Likes
on
0 Posts
ORIGINAL: F86_SABRE
What c.c. will you be using to power the plane? In-line engine?
Reuben
What c.c. will you be using to power the plane? In-line engine?
Reuben
 02-14-2010, 08:30 AM
#14
Thread Starter
Join Date: Aug 2009
Location: Paris, FRANCE
Posts: 143
Likes: 0
Received 0 Likes
on
0 Posts
Following this, more for fun than to get a concrete result, I went to 3D.


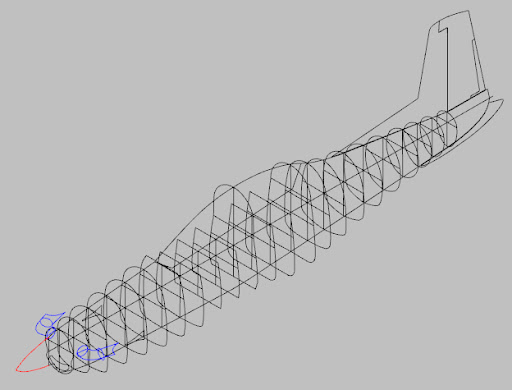
Here is the result.
Formers lined up on the same axis and with the proper spacing.
The same thing with a little lag axis.
Front view.
3/4 view
02-20-2010, 04:02 PM
#15
Thread Starter
Join Date: Aug 2009
Location: Paris, FRANCE
Posts: 143
Likes: 0
Received 0 Likes
on
0 Posts
The next phase was to cut every half-formers on the CNC machine because we will build the master in two parts.
In the first time the bottom part of the fuselage will be build up side down. the top of the fuselage will be build when the bottom part will be done.
This will allow us to check at any moment the wing angle with the stab.
First cut the upper halves.
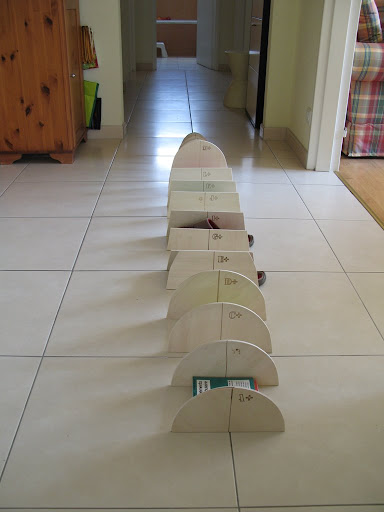
All formers are made by the CNC.
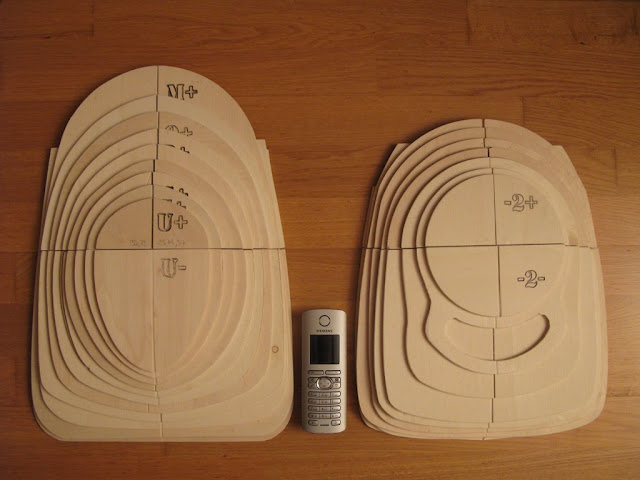
The phone give the size of the formers.
All formers are made by the CNC.
The phone give the size of the formers.
03-07-2010, 01:15 PM
#16
Thread Starter
Join Date: Aug 2009
Location: Paris, FRANCE
Posts: 143
Likes: 0
Received 0 Likes
on
0 Posts
For the construction of the wings, the stab and rudder, I used Profili software.
After generated the profiles in Profili and importing them in good dimension in autocad, I separated the upper profile from the bottom while keeping the same basis reference.
To cut at the correct speed on both sides with the hot wire, I draw vertical lines, I will avoid doing so in the future because it is easier to draw directly them on the Formica and the problem with the vertical lines is that I should not go till the end because the risk of hanging with the hot wire is high. So I restarted everything.
You need to make a perfect surface so the wire does not catch anything, a light sanding with very fine paper achieves the goodsurface.
The value of computing is that I could directly integrate negative twisting wing tip easily.
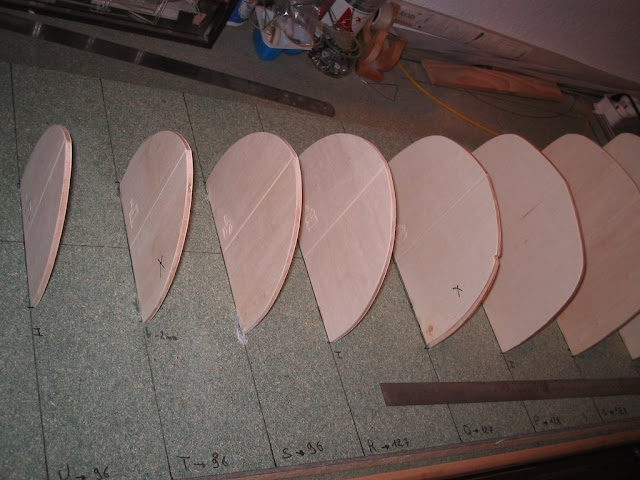
Then the CNC has cut into the formica templates of the wings, stab and rudder.
Here are some examples:
Stab + rudder 1st version

Second version of the rudder thickened.

Second version of the rudder thickened.
03-17-2010, 05:16 AM
#17
Thread Starter
Join Date: Aug 2009
Location: Paris, FRANCE
Posts: 143
Likes: 0
Received 0 Likes
on
0 Posts
The next step was to cut the 3 stabs and tail with the made jigs.


The top surface is horizontal, the bottom surface of a dihedral

The top surface is horizontal, the bottom surface of a dihedral
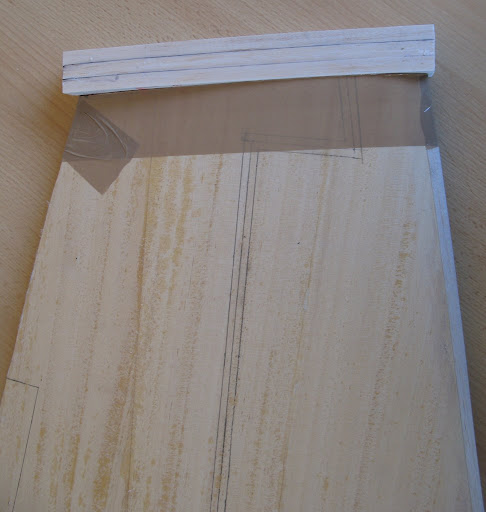
The tail was cut and we put fiber + Obachi
Note that the tape is to limit the dripping resin during drying, especially if you have cracks in the wood simple inexpensive and effective
03-28-2010, 07:53 AM
#18
Thread Starter
Join Date: Aug 2009
Location: Paris, FRANCE
Posts: 143
Likes: 0
Received 0 Likes
on
0 Posts
Work on the tail.


First thing: deburring everything that is too much then we remove the tape.
Then we have set the edge and we cut the top out replaced by 3 planks of balsa
Then protecting the Obachi using tape
Sanding to find the shape of the profile again, we stop when the tape starts to go away
Then we draw the desired shape
After sanding we obtain the desired shape
04-04-2010, 06:37 AM
#19
Thread Starter
Join Date: Aug 2009
Location: Paris, FRANCE
Posts: 143
Likes: 0
Received 0 Likes
on
0 Posts
Once the rudder is done, this is how we plank one or rather two elevators in the bag ....

Inside the bag the elevators with their reinforcements, including the location of centering pins on the front, then setting the brackets for the servos.
Around a layer of fiber with epoxy resin + Obachi, finally tape to prevent the resin through the necessary places (cracks in the wood) all placed in the body so that the shape is properly applied throughout the drying time.
All in a as possible waterproof bag, with an aspiration to a vacuum compressor that operates at the desired value.

Wait overnight and you will get planked elevators.
There is also the technique of beer case but I will explain it another time, for the planking of the wings may be.
Next step alignment of formers on the work bench for the realization of the fuselage master.
04-04-2010, 10:21 AM
#20
My Feedback: (4)
Join Date: Feb 2003
Location: Jackson,
MS
Posts: 844
Likes: 0
Received 0 Likes
on
0 Posts
ORIGINAL: BigP38Lightning
There is also the technique of beer case but I will explain it another time, for the planking of the wings may be.
There is also the technique of beer case but I will explain it another time, for the planking of the wings may be.
You don't have to explain the technique of the beer case, though. I've been using that technique for years.
 04-04-2010, 01:52 PM
#21
Senior Member
Join Date: Nov 2004
Location: almeria, SPAIN
Posts: 302
Likes: 0
Received 0 Likes
on
0 Posts
ORIGINAL: Highflight
Nice build thread.
You don't have to explain the technique of the beer case, though. I've been using that technique for years.
ORIGINAL: BigP38Lightning
There is also the technique of beer case but I will explain it another time, for the planking of the wings may be.
There is also the technique of beer case but I will explain it another time, for the planking of the wings may be.
You don't have to explain the technique of the beer case, though. I've been using that technique for years.
ps: nice build thread
 04-10-2010, 01:22 PM
#22
Thread Starter
Join Date: Aug 2009
Location: Paris, FRANCE
Posts: 143
Likes: 0
Received 0 Likes
on
0 Posts
Thanx guys.
Next step is the biginning of the master.
This is a big part of it.The first thing to realize isworkbench that must be perfectly straight and notsquirm with pleasure over time.
For this, a Novopanboard3m long has been chosen, and twobrackets of the total length have been fixed from below.
Then we plotted the fuselage along andthe location of each former to their proper spacing.
Finally, we glued the halves-pairs below their position tocheck the alignment of the whole.

My friend Christian checking alignement of the half formers... There is a lot of work to realign it all

Nothing is straight... it will take a long time to understand why and to redo everything correctly.
A lot of work ahead. We decided to change tactics. We will work in successive sections rather to try to do everything in one step.
Next step is the biginning of the master.
This is a big part of it.The first thing to realize isworkbench that must be perfectly straight and notsquirm with pleasure over time.
For this, a Novopanboard3m long has been chosen, and twobrackets of the total length have been fixed from below.
Then we plotted the fuselage along andthe location of each former to their proper spacing.
Finally, we glued the halves-pairs below their position tocheck the alignment of the whole.
My friend Christian checking alignement of the half formers... There is a lot of work to realign it all
Nothing is straight... it will take a long time to understand why and to redo everything correctly.
A lot of work ahead. We decided to change tactics. We will work in successive sections rather to try to do everything in one step.
04-18-2010, 05:46 AM
#23
Thread Starter
Join Date: Aug 2009
Location: Paris, FRANCE
Posts: 143
Likes: 0
Received 0 Likes
on
0 Posts
Today I present the wings keys. They are in aluminium AU4G.


Henri (the guy that build the F86 Sabre in my avatar and one of the three fellows that build the PC9 with me) drew me a template on cardboard, I re-designed the shape at the goodscale in Autocad, then integrated the DXF in the Ninos soft to cut the key.
I did some testing before starting in order to know thegood cutting speed.
And here is the result.
I did some testing before starting in order to know thegood cutting speed.
And here is the result.
Henri's plan was even more at scale.
That it, we will make it 6 times ... Finally, a seventh has been cut because I had problems with one of Christian's key.
04-25-2010, 08:16 AM
#24
Thread Starter
Join Date: Aug 2009
Location: Paris, FRANCE
Posts: 143
Likes: 0
Received 0 Likes
on
0 Posts
First filling phase using expanded or extruded polystyrene afterrealigned all formers, but also after re-cutcertain formers you know the famous average calculation... completely wrong.

Small top view

At this point impossible to say what shape it will be.
Small top view
At this point impossible to say what shape it will be.
05-02-2010, 06:34 AM
#25
Thread Starter
Join Date: Aug 2009
Location: Paris, FRANCE
Posts: 143
Likes: 0
Received 0 Likes
on
0 Posts
After a little sanding the result is not bad at all:

It already looks like a more correct shape.

But it makes a lot of polystyrene dust...

The problem with this size of plane is that it is hard to see everything with enough distance... Here the space is severely limited, but it is warm.
It already looks like a more correct shape.
But it makes a lot of polystyrene dust...
The problem with this size of plane is that it is hard to see everything with enough distance... Here the space is severely limited, but it is warm.