


Soldering woes
 10-19-2011, 07:52 PM
#1
Senior Member
Thread Starter

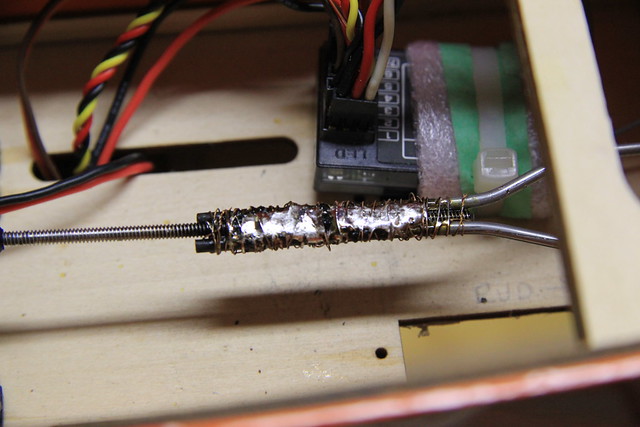
I am trying to create a mechanical solder joint - two elevator pushrods with a threaded rod between them. It's well wrapped in thin copper wire but I'm not getting the results I'm after. Solder pools on the wire but does not wick into the joint. I'm using a 60W pencil iron with a flat tip, and it doesn't seem to matter how long I apply heat the joint... the result is the same.
I'm wondering if I need more flux - is there such a thing as too much?
Cheers.
I'm wondering if I need more flux - is there such a thing as too much?
Cheers.


 10-19-2011, 08:02 PM
#4

My Feedback: (13)
Join Date: Jan 2002
Location: Chesterfield, MO
Posts: 1,857
Likes: 0
Received 0 Likes
on
0 Posts
I think you may need more heat. I use a propane torch when soldering up large diameter (e.g. 1/8) music wire. Also sand the wires clean before you start. And as far as flux, use plenty. I don't think you can use too much, because the excess will just run out anyway.
10-19-2011, 08:02 PM
#5

My Feedback: (2)
For steel wire you will need an appropriate flux. The flux core in electronic solder is not the right thing. I use a liquid zinc chloride flux called "Stay Clean". There are lots of others on the market that are suitable.
Of course, you must remove all corrosion, dirt and oil before you solder. I clean the parts with Skotch Brite then wipe everything off with alcohol.
I think it is easiest to use a soldering iron. A small torch will work but it requires more skill. Once you get everything right the solder will flow into the work very easily.

 10-20-2011, 04:02 AM
#10
The torch will work best, clean wires to be joined with emery cloth and ""do not touch the wirewith your fingers after you cleanit"" the last thing to touch the wire before you solder it should be the emery cloth. Put your three pieces together the way you want them joined and wrap them well with the thin copper wire. Hold work in the vise and heat a little bit with the torch, apply the Acid core flux and it should sizzle a little bit. you are now ready to apply heat to the work NOT the solder. Use silver solder not rosin core solder, apply heat to the work until the solder melts on it when you touch it about a 1/2 inch away from the heat source. do this down the length of your joint moving the torch and solder accordingly, hope this helped you out.
10-20-2011, 04:58 AM
#11
Senior Member
Thread Starter
The threaded rod is Du-Bro #379 4-40; their website notes that it's made of stainless steel. The two push rods are Du-Bro #145 4-40 but the metal is not specified. The copper wire is from 14GA speaker cable, but I stripped it a couple of weeks ago and it's probably well oxidized by now.
I've alternated between two types of solder and two types of flux with similar results.
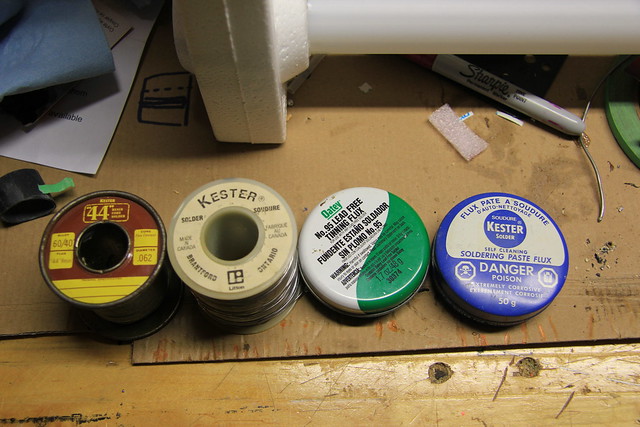
One type of solder is Kester 60/40 Rosin core - the solder is fairly thick and the spool is probably at least 20 years old (leftmost in picture). The other spool is also Kester; the solder is much finer but the content is not specified (one from left).
The flux I used is for Lead-Free solder, which in retrospect seems like a bad idea - 60/40 solder is part lead, right (one from right)? I did try a bit of another type of flux as an experiment and it seemed a little better (rightmost).
The end result is very strong, but it looks like $#!+.
After reading a lot of replies on various forums I've identified some possible trouble spots:
I've alternated between two types of solder and two types of flux with similar results.
One type of solder is Kester 60/40 Rosin core - the solder is fairly thick and the spool is probably at least 20 years old (leftmost in picture). The other spool is also Kester; the solder is much finer but the content is not specified (one from left).
The flux I used is for Lead-Free solder, which in retrospect seems like a bad idea - 60/40 solder is part lead, right (one from right)? I did try a bit of another type of flux as an experiment and it seemed a little better (rightmost).
The end result is very strong, but it looks like $#!+.
After reading a lot of replies on various forums I've identified some possible trouble spots:
- Rods not clean enough
- Copper wire not cleaned
- Wrong solder type
- Wrong flux type
- Too little flux
- Too much flux
10-20-2011, 06:11 AM
#12
Banned
May be strong, but it does not look like the threaded rod is soldered, just captivated in solder.
Stainless stell will NOT solder with normal solder of any kind. It takes a special flux; as I recall I used a stuff called Alpha 90. The last time I went to get some, all I could find was in gallon containers.
Les
Stainless stell will NOT solder with normal solder of any kind. It takes a special flux; as I recall I used a stuff called Alpha 90. The last time I went to get some, all I could find was in gallon containers.
Les
10-20-2011, 07:56 AM
#15
My Feedback: (2)
The solders and fluxes shown in the photo are not the right thing. You need to get some flux that is proper for stainless steel. Plumber's tin-silver alloy solder is stronger than the electronic tin-lead alloy solders shown in the photo, although they will probably work OK with the right flux. Also, cleaning the threaded rod may be a problem because the inner diameter is inaccessible. Maybe a wire brush would work. And I agree with the previous posts, 4-40 rod is probably too large for a 40W iron.
I think we have now all thoroughly beat this subject to death.
I think we have now all thoroughly beat this subject to death.
10-20-2011, 09:05 AM
#16

ORIGINAL: grosbeak
The threaded rod is Du-Bro #379 4-40; their website notes that it's made of stainless steel. The two push rods are Du-Bro #145 4-40 but the metal is not specified. The copper wire is from 14GA speaker cable, but I stripped it a couple of weeks ago and it's probably well oxidized by now.
I've alternated between two types of solder and two types of flux with similar results.
One type of solder is Kester 60/40 Rosin core - the solder is fairly thick and the spool is probably at least 20 years old (leftmost in picture). The other spool is also Kester; the solder is much finer but the content is not specified (one from left).
The flux I used is for Lead-Free solder, which in retrospect seems like a bad idea - 60/40 solder is part lead, right (one from right)? I did try a bit of another type of flux as an experiment and it seemed a little better (rightmost).
The end result is very strong, but it looks like $#!+.
After reading a lot of replies on various forums I've identified some possible trouble spots:
- Rods not clean enough
- Copper wire not cleaned
- Wrong solder type
- Wrong flux type
- Too little flux
- Too much flux
Dennis
10-20-2011, 09:47 AM
#17
Senior Member
My Feedback: (10)

Join Date: Sep 2008
Location: pearce, AZ
Posts: 277
Likes: 0
Received 0 Likes
on
0 Posts
Great tips guys. Although this topic isnt close to beaten to death lol .I know a site where there is 2,309 replies to using a water bottle for a fuel tank. Now thats beaten to death.
10-20-2011, 10:12 AM
#18
Senior Member
Thread Starter
Since I posted this problem on multiple threads late last night there's been a great response. I couldn't possibly do what everyone suggested, so I had to look through the replies to come to my own conclusions. I'm very pleased with the results.
So what did I do differently?
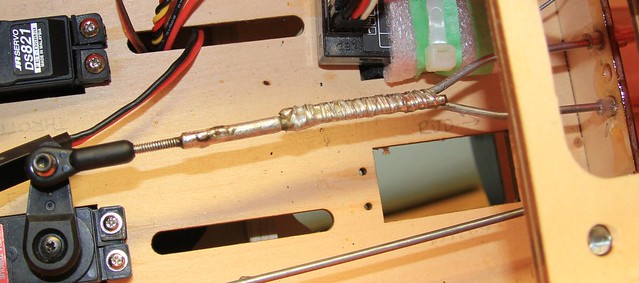
- Coupled the threaded rod to a push rod and soldered to the pushrod
- Configured the three push rods in a triangular stack instead of a "flat pack"
- Sanded and tinned all three push rods before assembly
- Sanded the copper wire and wound with pliers instead of fingers
- Assembled, wound and soldered in a vise instead of in the airplane
I used the 60-40 Kester solder with a little of the Kester flux. This time it flowed into the gaps perfectly; I (a) heated a spot with the iron for a few seconds, (b) applied solder to the joint about 1/4" away, (c) moved the iron over 1/4" inch, and repeated.
Thanks for your replies - I learned a lot!
So what did I do differently?
- Coupled the threaded rod to a push rod and soldered to the pushrod
- Configured the three push rods in a triangular stack instead of a "flat pack"
- Sanded and tinned all three push rods before assembly
- Sanded the copper wire and wound with pliers instead of fingers
- Assembled, wound and soldered in a vise instead of in the airplane
I used the 60-40 Kester solder with a little of the Kester flux. This time it flowed into the gaps perfectly; I (a) heated a spot with the iron for a few seconds, (b) applied solder to the joint about 1/4" away, (c) moved the iron over 1/4" inch, and repeated.
Thanks for your replies - I learned a lot!
10-20-2011, 02:57 PM
#20
Just another point of interest.. At full travel you will be inducing uneven elevator travel with the servo mounted as it is. As the servo arm moves through it's arc of motion it will put more travel into one pushrod than the other.. If you lay the servo arm on it's side then it will be on the same axis as the elevator and will retain even travel through it's arc..
Rick
Rick
10-20-2011, 03:44 PM
#21
Senior Member
Thread Starter
ORIGINAL: TheRickster
Just another point of interest.. At full travel you will be inducing uneven elevator travel with the servo mounted as it is. As the servo arm moves through it's arc of motion it will put more travel into one pushrod than the other.. If you lay the servo arm on it's side then it will be on the same axis as the elevator and will retain even travel through it's arc..
Rick
Do you mean that the whole servo should be mounted on its side?
10-20-2011, 06:23 PM
#22
Member
My Feedback: (4)
Join Date: Dec 2007
Location: athens,
GA
Posts: 37
Likes: 0
Received 0 Likes
on
0 Posts
Try some Staybrite Silver solder next time. It melts at 430 degrees and is stronger than regular solder. Kit comes with some special flux, but rods should still be cleaned. The correct way to use solder is to get the metal hot enough to melt the sloder as its applied, not to use the iron to melt the solder onto the metal.
10-20-2011, 07:22 PM
#23
Senior Member

Join Date: May 2008
Location: Northern Occupied Mexico,
CA
Posts: 998
Likes: 0
Received 0 Likes
on
0 Posts
Heres one I put together.
For flaps on my Avistar. I hit the push rods with sanding drum on my dremel and used a Weller gun to heat it up.
For the very limited throw I need it works well.
For flaps on my Avistar. I hit the push rods with sanding drum on my dremel and used a Weller gun to heat it up.
For the very limited throw I need it works well.
10-21-2011, 03:24 AM
#25
Member
Join Date: Mar 2010
Location: Budd Lake,
NJ
Posts: 39
Likes: 0
Received 0 Likes
on
0 Posts
Also if you are going to solder anything with that much mass you need more heat. I suggest that you buy a Weller (good common brand found in home supply stores) soldering gun. I use it anytime I am soldering push rods or other non-electrical connections that are relatively large. The size you want is one that has a trigger that gives you a 100w and a 140w setting. It will provide more than adequate heat and does not have the issue of an open flame. It's a great investment and will last you a lifetime. The tips are cheap. I also agree with the Stay-Brite - great stuff.