


DLE 20 won't stay running
 06-20-2012, 09:05 AM
#1
Senior Member
Thread Starter

My DLE 20 will start with the choke closed but won't stay running regardless of choke or throttle setting.
It is installed in a Pulse 125 XT and swings a 16 x 8 prop. The fuel is Shell V-Power gas at a 32:1 ratio with Stihl premium 2-stroke dino oil. There is a filter in my 5L gas can, one on the fill line for the tank and another on the carburetor draw line (the latter two are part of the clunks).
The engine has run fine for the gallon and a half that has gone through it up to now.
BACKGROUND
2012-06-06 - At the field
Several flights with engine running well
2012-06-09 - At the field
At the field - Right at first start, engine running extremely rich. CFI help me tune it (~3/32 turns leaner on the high end, ~1/32 turn leaner on the low end). Ran better than ever.
2012-06-13 - At the field
At the field - Good takeoff, one circuit, setting up for aerobatic practice. 50 ft into a vertical upline engine cuts out and nearly quits. Brought it down for a landing, engine still idling. I shut the engine off. On the table, could not get it to run with the choke open at any throttle setting. I checked the choke and throttle linkages and both were fine. I swapped in a known working spark plug - no difference.
2012-06-17 - At home
Looking over the airplane I see that the gas tank has a split in the neck:
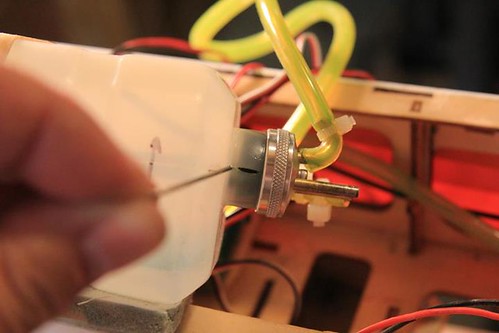
I got a new tank and plumbed it. I needed to install a new fuel line between the engine and the tank because of the neck location of the new tank. I took the plane outside and started the engine, but there was no real difference. Not surprising after I learned that the Walbro carb draws up the gas from the engine instead of relying on pressure or gravity.
2012-06-19 - At home
I removed the carburetor cover and gasket to inspect the carb fuel filter and didn't see any debris. To be sure, I gently brushed it off with a trimmed acid brush. I took the plane outside, closed the Low and High needles all the way and opened them to the factory settings of 1.1 and 1.5 turns respectively. I started the engine, but no difference. I opened L needle 1/10 of a turn through 1.2, 1.3, 1.4 and 1.5 turns successively. No difference, but then I freely admit that I know next to nothing about tuning engines. I also checked the ignition battery, a 4.8V 4200 mAH NiMH. Under a 1.0A load it produced just under 5V.
2012-06-20 - At home
Ignition battery fully charged. Now shows 5.53V @ 1.0A
Ignition test complete and successful - sparks with every rotation of the prop
2012-06-22 - At home
Opti-kill disconnected.
Both needles opened 2.5 turns. Engine started and ran; acceleration tests usually cause it to bog or quit. Gradually closed L in ¼ turns to 1.75 turns. Running and idle and up to half throttle improved but would not run past half throttle. Each time the engine died it was more difficult to start.
Removed the plug to check for flooding but it was dry.
Opti-kill does not appear to be part of the problem but I will leave it disconnected until the problem is solved.
This definitely appears to be a fuel flow issue. The cause (vacuum loss, debris, ?) is still unknown.
2012-06-23 - At home
Front bearing tested for leaks with soapy water - no bubbles
Carb removed from engine
Debris in reed valve assembly spotted.
Debris (determined to be epoxy broken loose from firewall ballast) removed (carefully) and reed valve assembly inspected - appears good
Small amount of debris flushed from crankcase with carb cleaner and acid swab
Crankcase, crankshaft and lower cylinder inspected - appears good
Low and High needles reset to factory specs of 1.1 and 1.5 turns respectively
Engine started - runs perfectly!
The ballast attachment has been cleaned up and reglued, much more securely.
To all the contributors who shared their time and advice, thank you. I am sincerely grateful.
It is installed in a Pulse 125 XT and swings a 16 x 8 prop. The fuel is Shell V-Power gas at a 32:1 ratio with Stihl premium 2-stroke dino oil. There is a filter in my 5L gas can, one on the fill line for the tank and another on the carburetor draw line (the latter two are part of the clunks).
The engine has run fine for the gallon and a half that has gone through it up to now.
BACKGROUND
2012-06-06 - At the field
Several flights with engine running well
2012-06-09 - At the field
At the field - Right at first start, engine running extremely rich. CFI help me tune it (~3/32 turns leaner on the high end, ~1/32 turn leaner on the low end). Ran better than ever.
2012-06-13 - At the field
At the field - Good takeoff, one circuit, setting up for aerobatic practice. 50 ft into a vertical upline engine cuts out and nearly quits. Brought it down for a landing, engine still idling. I shut the engine off. On the table, could not get it to run with the choke open at any throttle setting. I checked the choke and throttle linkages and both were fine. I swapped in a known working spark plug - no difference.
2012-06-17 - At home
Looking over the airplane I see that the gas tank has a split in the neck:
I got a new tank and plumbed it. I needed to install a new fuel line between the engine and the tank because of the neck location of the new tank. I took the plane outside and started the engine, but there was no real difference. Not surprising after I learned that the Walbro carb draws up the gas from the engine instead of relying on pressure or gravity.
2012-06-19 - At home
I removed the carburetor cover and gasket to inspect the carb fuel filter and didn't see any debris. To be sure, I gently brushed it off with a trimmed acid brush. I took the plane outside, closed the Low and High needles all the way and opened them to the factory settings of 1.1 and 1.5 turns respectively. I started the engine, but no difference. I opened L needle 1/10 of a turn through 1.2, 1.3, 1.4 and 1.5 turns successively. No difference, but then I freely admit that I know next to nothing about tuning engines. I also checked the ignition battery, a 4.8V 4200 mAH NiMH. Under a 1.0A load it produced just under 5V.
2012-06-20 - At home
Ignition battery fully charged. Now shows 5.53V @ 1.0A
Ignition test complete and successful - sparks with every rotation of the prop
2012-06-22 - At home
Opti-kill disconnected.
Both needles opened 2.5 turns. Engine started and ran; acceleration tests usually cause it to bog or quit. Gradually closed L in ¼ turns to 1.75 turns. Running and idle and up to half throttle improved but would not run past half throttle. Each time the engine died it was more difficult to start.
Removed the plug to check for flooding but it was dry.
Opti-kill does not appear to be part of the problem but I will leave it disconnected until the problem is solved.
This definitely appears to be a fuel flow issue. The cause (vacuum loss, debris, ?) is still unknown.
2012-06-23 - At home
Front bearing tested for leaks with soapy water - no bubbles
Carb removed from engine
Debris in reed valve assembly spotted.
Debris (determined to be epoxy broken loose from firewall ballast) removed (carefully) and reed valve assembly inspected - appears good
Small amount of debris flushed from crankcase with carb cleaner and acid swab
Crankcase, crankshaft and lower cylinder inspected - appears good
Low and High needles reset to factory specs of 1.1 and 1.5 turns respectively
Engine started - runs perfectly!
The ballast attachment has been cleaned up and reglued, much more securely.
To all the contributors who shared their time and advice, thank you. I am sincerely grateful.
 06-20-2012, 10:33 AM
#2
Senior Member
Join Date: Oct 2005
Location: Deland,
FL
Posts: 1,993
Likes: 0
Received 0 Likes
on
0 Posts
Are you sure your getting spark at the plug ?
Try a fully charged battery,check ground wire.
Opti kill ?? hand flipping ? or starter ?
Bob
06-20-2012, 03:40 PM
#3
Senior Member
Thread Starter
ORIGINAL: dignlivn
Are you sure your getting spark at the plug ?
Are you sure your getting spark at the plug ?
Try a fully charged battery,check ground wire.
Opti kill ??
hand flipping ? or starter ?
Bob
Bob
06-20-2012, 04:39 PM
#4
Senior Member
Thread Starter
2012-06-20 - At home
Ignition battery fully charged. Now shows 5.53V @ 1.0A
Ignition test complete and successful - sparks with every rotation of the prop
Ignition battery fully charged. Now shows 5.53V @ 1.0A
Ignition test complete and successful - sparks with every rotation of the prop


 06-21-2012, 04:18 AM
#7
Senior Member
Thread Starter
ORIGINAL: BarracudaHockey
What spark plug?
What spark plug?
06-21-2012, 05:24 AM
#8

Join Date: Feb 2006
Location: polson, MT
Posts: 228
Likes: 0
Received 0 Likes
on
0 Posts
http://www.rcuniverse.com/forum/m_9863953/tm.htm
For diagosing unplug optikill and hookup directly.
For diagosing unplug optikill and hookup directly.
06-22-2012, 03:43 AM
#9
Senior Member
Thread Starter
ORIGINAL: darrolair
http://www.rcuniverse.com/forum/m_9863953/tm.htm
For diagosing unplug optikill and hookup directly.
http://www.rcuniverse.com/forum/m_9863953/tm.htm
For diagosing unplug optikill and hookup directly.
06-22-2012, 05:21 AM
#10
Join Date: Feb 2006
Location: polson, MT
Posts: 228
Likes: 0
Received 0 Likes
on
0 Posts
This has been posted here before by JediJodi, but here it is again. This time pay attention:
Troubleshooting guide for RcExl ignitions
If you have no spark or think you are having an ignition problem, carefully following this guide will test the ignition module, hall sensor, and spark plug cap components. This guide can be used for single or twin cylinder ignitions; it does not test the manual or any optical ignition switches that may be in the system. You will need a good fully charged 4 cell NiCd or NiMH battery, an old servo extension, and your trusty volt meter.
Take an old expendable servo extension and cut off the male plug end, separate the wires, strip a bit of insulation from each of the 3 leads and plug the other end into the sensor lead on the ignition module.
Put a good spark plug in the cap, doesn't need to be all the way seated but far enough for the hex of the plug to make good contact with the metal shell of the plug cap, plug a fully charged 4 cell battery directly into the ignition.
Test for battery voltage at the red and black wires of the test extension you made and plugged into the sensor lead of the module, if there is no voltage replace the module, if there is battery voltage:
Short the white and black wires together, every time you break this connection there should be a spark, if there is no spark or intermittent spark you have a bad module. If you get a good spark:
Remove the test lead and plug the sensor on the engine into the module and turn the engine over, if no spark, replace the sensor. If you have a good spark:
Remove the spark plug, look down into the plug cap and turn the engine over, if you see spark arcing through the silicone boot to the metal shell, replace the spark plug cap. If there is no visible spark but you hear a snap:
Put a small screw driver into the bottom of the cap, turn the engine over and you should observe spark jumping from the screw driver to the plug cap shell outside of the silicone boot, an arc of about 1/4"-3/8". If it does this there is nothing wrong with the ignition. If you hear an arc but it's not in the cap with the screw driver, it could be a problem with the resistor in the cap or the high tension lead where it goes into the cap, replace the plug cap.
All of this can be done on a bench; the plug does not need to be grounded to the engine.
As Jodi would say: Now go outside and play!
06-22-2012, 04:41 PM
#11
Senior Member
Thread Starter
2012-06-22 - At home
Opti-kill disconnected.
Both needles opened 2.5 turns. Engine started and ran; acceleration tests usually cause it to bog or quit. Gradually closed L in ¼ turns to 1.75 turns. Running and idle and up to half throttle improved but would not run past half throttle. Each time the engine died it was more difficult to start.
Removed the plug to check for flooding but it was dry.
Opti-kill does not appear to be part of the problem but I will leave it disconnected until the problem is solved.
This definitely appears to be a fuel flow issue. The cause (vacuum loss, debris, ?) is still unknown.
Next steps[*]Check front bearing for vacuum leak (apply soapy water while turning over engine)[*]Remove carburetor from engine[*]Remove reed valve assembly from engine[*]Inspect reed valve for debris[*]Disassemble carburetor //document with photos[*]Clean carburetor with carburetor cleaner and assemble parts in foil dish //in order[*]Reassemble carburetor[*]Reinstall carburetor on engine[*]test engine
 06-22-2012, 04:59 PM
#13
Senior Member
Thread Starter
ORIGINAL: darrolair
This has been posted here before by JediJodi, but here it is again. This time pay attention:
This has been posted here before by JediJodi, but here it is again. This time pay attention:
Troubleshooting guide for RcExl ignitions
If you have no spark or think you are having an ignition problem, carefully following this guide will test the ignition module, hall sensor, and spark plug cap components. This guide can be used for single or twin cylinder ignitions; it does not test the manual or any optical ignition switches that may be in the system. You will need a good fully charged 4 cell NiCd or NiMH battery, an old servo extension, and your trusty volt meter.
Take an old expendable servo extension and cut off the male plug end, separate the wires, strip a bit of insulation from each of the 3 leads and plug the other end into the sensor lead on the ignition module.
Put a good spark plug in the cap, doesn't need to be all the way seated but far enough for the hex of the plug to make good contact with the metal shell of the plug cap, plug a fully charged 4 cell battery directly into the ignition.
Test for battery voltage at the red and black wires of the test extension you made and plugged into the sensor lead of the module, if there is no voltage replace the module, if there is battery voltage:
Short the white and black wires together, every time you break this connection there should be a spark, if there is no spark or intermittent spark you have a bad module. If you get a good spark:
Remove the test lead and plug the sensor on the engine into the module and turn the engine over, if no spark, replace the sensor. If you have a good spark:
Remove the spark plug, look down into the plug cap and turn the engine over, if you see spark arcing through the silicone boot to the metal shell, replace the spark plug cap. If there is no visible spark but you hear a snap:
Put a small screw driver into the bottom of the cap, turn the engine over and you should observe spark jumping from the screw driver to the plug cap shell outside of the silicone boot, an arc of about 1/4''-3/8''. If it does this there is nothing wrong with the ignition. If you hear an arc but it's not in the cap with the screw driver, it could be a problem with the resistor in the cap or the high tension lead where it goes into the cap, replace the plug cap.
All of this can be done on a bench; the plug does not need to be grounded to the engine.
As Jodi would say: Now go outside and play!
06-23-2012, 05:33 AM
#14
Join Date: Feb 2006
Location: polson, MT
Posts: 228
Likes: 0
Received 0 Likes
on
0 Posts
quote:
ORIGINAL: darrolair
This has been posted here before by JediJodi, but here it is again. This time pay attention:
Excuse me?
It was cut and paste that rode along. No hurt feelings intended.
ORIGINAL: darrolair
This has been posted here before by JediJodi, but here it is again. This time pay attention:
Excuse me?
It was cut and paste that rode along. No hurt feelings intended.
06-23-2012, 10:44 AM
#16
Senior Member
Thread Starter
ORIGINAL: darrolair
quote:
ORIGINAL: darrolair
This has been posted here before by JediJodi, but here it is again. This time pay attention:
Excuse me?
It was cut and paste that rode along. No hurt feelings intended.
quote:
ORIGINAL: darrolair
This has been posted here before by JediJodi, but here it is again. This time pay attention:
Excuse me?
It was cut and paste that rode along. No hurt feelings intended.
 06-23-2012, 11:06 AM
#17
Senior Member
Thread Starter
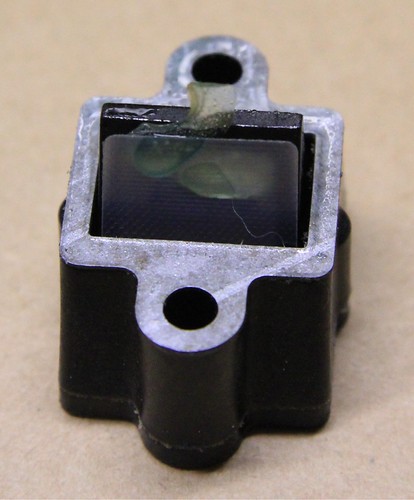
SUCCESS!
I did the air leak test at the front bearing - no dice. The problem was in the reed valve... as soon as I got the carburetor off it was pretty obvious!
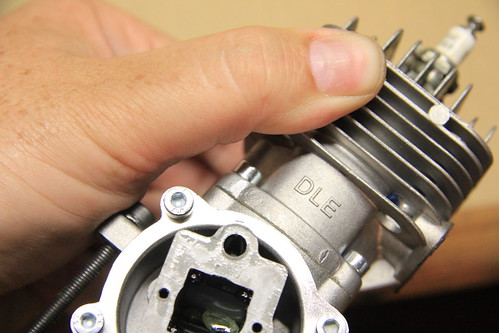

Those are pieces of epoxy from where the ballast was glued onto the back side of the firewall. That area has since been totally redone (properly this time) and cleaned.
Once the pieces were removed, both reeds closed properly. Unfortunately some had gotten into the crankcase...
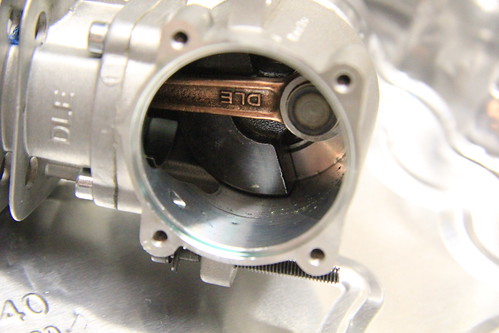
I cleaned it thoroughly with carb cleaner and an acid brush. Here's what was removed:

There was no damage visible to the eye. Once it was all carefully cleaned and reassembled I took it outside, reset the low and high needles to 1.1 and 1.5 turns respectively and started the engine. It ran perfectly. Hopefully the life of the engine will not be reduced. In any case I will chalk this up to experience.
There's a lesson to learned here: Anything loose in behind the firewall can get sucked into the engine. Therefore, make sure there is nothing loose behind the firewall!
Thank you for your help and advice, everyone. Much appreciated!
I did the air leak test at the front bearing - no dice. The problem was in the reed valve... as soon as I got the carburetor off it was pretty obvious!
Those are pieces of epoxy from where the ballast was glued onto the back side of the firewall. That area has since been totally redone (properly this time) and cleaned.
Once the pieces were removed, both reeds closed properly. Unfortunately some had gotten into the crankcase...
I cleaned it thoroughly with carb cleaner and an acid brush. Here's what was removed:
There was no damage visible to the eye. Once it was all carefully cleaned and reassembled I took it outside, reset the low and high needles to 1.1 and 1.5 turns respectively and started the engine. It ran perfectly. Hopefully the life of the engine will not be reduced. In any case I will chalk this up to experience.
There's a lesson to learned here: Anything loose in behind the firewall can get sucked into the engine. Therefore, make sure there is nothing loose behind the firewall!
Thank you for your help and advice, everyone. Much appreciated!
