


Associated RC8.2e
 04-24-2016, 11:51 AM
#26

Thread Starter

Little booty  got messed up a bit. I was wondering how long these pin retainer boots would last. The first one I tore during the build. As I was pulling the boot out around the pin on the center CVA bone...tore. I don't know if it's worth replacing them, or just deal with more dust getting in CVA joint.
got messed up a bit. I was wondering how long these pin retainer boots would last. The first one I tore during the build. As I was pulling the boot out around the pin on the center CVA bone...tore. I don't know if it's worth replacing them, or just deal with more dust getting in CVA joint.
Last edited by RustyUs; 05-26-2017 at 06:05 PM.
 06-12-2016, 11:01 AM
#27
Thread Starter
I had some great runs with 2e, but today sealed the fate for my ESC of choice. The buggy was flying like it always had. Took a violent tumble, and continued onward...for about 5 minutes. I lost power to the receiver on the straightaway; at full speed, and headed for a tree. Luckily the grass slowed down the buggy and saved her. I walked over to the buggy, and I knew what had happened just by the smell of burnt electronics  .
.
I'm guessing the ESC's BEC took a dump, 'cause there is no power to the receiver. The fan on the ESC was still running though...bonus!
On the search for a SkyRC ESC now, unless someone turns me off from them.
Rusty bummed.
.I'm guessing the ESC's BEC took a dump, 'cause there is no power to the receiver. The fan on the ESC was still running though...bonus!
On the search for a SkyRC ESC now, unless someone turns me off from them.
Rusty bummed.
Last edited by RustyUs; 06-12-2016 at 11:24 AM.
06-12-2016, 11:20 AM
#28
Thread Starter
Good news...ESC works fine! It's just that there is no BEC anymore  . I jerry rigged a 3 AAA flashlight battery and a receiver plug. Plugged that into channel 3 and I now have a working receiver/servo/ESC once again.
So now the question is: Do I run the buggy with a receiver battery pack, like the good ol' days, or use a external BEC, or just chuck the ESC? If I just chuck the ESC I'm out of $15 or so. Last option is to use the last remaining T. Rex 120A ESC.
I can tell you two things: I'm not buying a external BEC, and I'm not buying a rechargeable receiver pack.
Rusty's RC nirvana is turning out to Smells Like Burnt Spirit.
. I jerry rigged a 3 AAA flashlight battery and a receiver plug. Plugged that into channel 3 and I now have a working receiver/servo/ESC once again.So now the question is: Do I run the buggy with a receiver battery pack, like the good ol' days, or use a external BEC, or just chuck the ESC? If I just chuck the ESC I'm out of $15 or so. Last option is to use the last remaining T. Rex 120A ESC.
I can tell you two things: I'm not buying a external BEC, and I'm not buying a rechargeable receiver pack.
Rusty's RC nirvana is turning out to Smells Like Burnt Spirit.
Last edited by RustyUs; 06-12-2016 at 11:24 AM.
07-02-2016, 02:29 PM
#29
Thread Starter
Okay, I didn't want to go out and spend $$ on a new ESC, so I broke down and ordered a Castle Creations BEC. I was tired of not being able to run my buggy these past couple of weeks. I was so looking forward to kicking up a dust storm for the neighbors viewing pleasure during this long weekend, but the BEC will not arrive at doorstep until Tuesday.
07-07-2016, 02:44 PM
#30
Thread Starter
Sweet mother of peal!
I thought the XP DS1015 servo that's in the 8.2e was awesome on 5 volts. Now that I'm having 6 volts pumping through the receiver and servo, thanks to Castle's BEC, I can see the steering's full potential. I may have to reevaluate next round of ESCs I buy.
I thought the XP DS1015 servo that's in the 8.2e was awesome on 5 volts. Now that I'm having 6 volts pumping through the receiver and servo, thanks to Castle's BEC, I can see the steering's full potential. I may have to reevaluate next round of ESCs I buy.
07-12-2016, 06:41 PM
#31
Senior Member

Join Date: Dec 2014
Location: Tennessee
Posts: 105
Likes: 0
Received 0 Likes
on
0 Posts
savox 1256 was the best servo I ever had in mine, and there not that expensive compared to some other high end brands. it was a beast. damn I miss that buggy it was bullet proof.
07-13-2016, 03:07 PM
#32
Thread Starter
I would love to try Sav�x, but after all these years of hearing about "brown outs", I always pass them by when I look for servos. "Coreless Motor provides high speed, incredible efficiency, and low power consumption"..."*NOTE: Certain combinations of receiver and ESC have been found to cause "Brown Out" issues when combined with Savox servos. An external BEC, or BEC stabilizing receiver capacitor may be needed for efficient, glitch free operation in low voltage electric applications."  After I read this on a hobby shop's site, it turned me off from the brand. I'm sure their great servos. I'm just not the type of person that wants to jump through hoops.
My growing so found of Ace/Associated/XP servos started with a dirt cheap metal gear servo on eBay about two years ago. It came from a RTR truck and has outlasted my expectations immensely (still going strong, just a little slower than my liking). So I splurged on my next couple of servos from XP.
Thanks for the reassurance of the buggy being tuff. I'm not a hard core basher, but do have moments of "Holy cow. Something had to brake". After many ill looking crashes...nothing broken yet.
After I read this on a hobby shop's site, it turned me off from the brand. I'm sure their great servos. I'm just not the type of person that wants to jump through hoops. My growing so found of Ace/Associated/XP servos started with a dirt cheap metal gear servo on eBay about two years ago. It came from a RTR truck and has outlasted my expectations immensely (still going strong, just a little slower than my liking
). So I splurged on my next couple of servos from XP. Thanks for the reassurance of the buggy being tuff. I'm not a hard core basher, but do have moments of "Holy cow. Something had to brake". After many ill looking crashes...nothing broken yet.
07-13-2016, 03:35 PM
#33
Senior Member
Join Date: Dec 2014
Location: Tennessee
Posts: 105
Likes: 0
Received 0 Likes
on
0 Posts
never had a probelm as long as you got a good bec. I ran mine forever of just an associated XP2g and it did fine, then I got castle bec and it went from around 240oz and .13 to 318oz and.09. best servo i ever had. Ive been running some sollar d722's and d771 and they are awsome servos for the price/\. oh yeah rustus, git some new gear in for my hyper 9e hehe, clockdit at 63 mph today on just 4s with my trusty tacon 4074 2000kv and the new quicun 150a i got today.somebday ima have a leopard 4092 in that bad boy, or a 4274
09-05-2016, 09:21 AM
#34
Thread Starter
I must say I've gone against every piece of advice I've ever given out about doing maintenance on RCs. With this RC8.2e, it has just been making sure the wheel nuts, and gearbox input cup's set screws are tight every so often. I know I'm gonna end up with blown bearings soon. If I can make it until the end of Fall, then I'll tear the whole thing down for complete inspection/cleaning/rebuild.
05-27-2017, 08:54 AM
#35
Thread Starter
Trying out Mugen's gaskets on my diffs. All the different threads on the www, and a lot of times no one will say what part number to use. You gotta do some reading to locate the item. Mugen Seiki Part #C0257 are a perfect fit. The gasket material of the Mugen brand is almost twice (0.52mm) as thick as Associated's gasket (0.20mm). Opening up the front diff, and found approximately � of diff fluid still in there. With the front diff all cleaned up, I thought there might be a shimming issue. So far so good.
On to the center diff...
On to the center diff...
05-27-2017, 03:29 PM
#36
Thread Starter
Center diff was half full since last rebuild. I got no answers to what may have lead to the small leak. The thrown gunk to the underside of body is not a heck of a lot, but enough to let me know something is up.
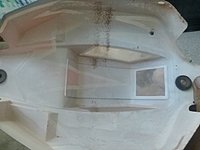
- The paper gaskets can only hold back so much diff fluid?
- After awhile, do they loose their effectiveness?
05-28-2017, 08:23 AM
#37
Thread Starter
Opening up the rear diff was a delightful seen...fluid still in there  .
.
I didn't recall at the time of the kit build, or during other diff rebuilds, but there are two different thicknesses of Associated #89166 gaskets that were supplied in the kit. I only noticed this as I was heading to the trashcan to throw out the Associated ones. I just so happen to be bending/flicking the gaskets in my fingers; noticing a different feel between some of them. Weird, 'cause I don't recall ever reading about others with the same findings.
The Mugen gaskets, that I'm installing now, and the one thicker Associated gasket from kit are about the same thickness.
Additional Note: I'm sooo jealous of you guys with newer platforms that incorporate easily accessible front and rear differentials. That's the one and only feature that I must have on my next eBuggy, truggy, or 4wd SCT.
.I didn't recall at the time of the kit build, or during other diff rebuilds, but there are two different thicknesses of Associated #89166 gaskets that were supplied in the kit. I only noticed this as I was heading to the trashcan to throw out the Associated ones. I just so happen to be bending/flicking the gaskets in my fingers; noticing a different feel between some of them. Weird, 'cause I don't recall ever reading about others with the same findings.
The Mugen gaskets, that I'm installing now, and the one thicker Associated gasket from kit are about the same thickness.
Additional Note: I'm sooo jealous of you guys with newer platforms that incorporate easily accessible front and rear differentials
. That's the one and only feature that I must have on my next eBuggy, truggy, or 4wd SCT.
05-30-2017, 08:04 AM
#38
Join Date: Apr 2016
Location: Tacoma, Wa
Posts: 555
Likes: 0
Received 0 Likes
on
0 Posts
The leaky diff seems to be a pretty normal problem for the 8.2e. Mine was damp out of the box but its such a slow leak that i don't really notice, i just check it every once in awhile. Definitely my current favorite in my rc lineup, puts such a huge smile on my face every time i hit a jump
06-01-2017, 02:22 PM
#39
Thread Starter
The first couple of runs after the rebuild, seem to show me the center diff is not leaking. Front and rear diffs...will just have to wait and see.
Just outta curiosity, anyone else see their buggy's left side wheel nuts loosen a bit? I mean, for me, it's always the left side nuts getting a little loose. Usually I can snug the left side nuts down with an 1/8th ~ 1/4 of a turn. The right side is a non issue. Before every run (any RC) I always check to make sure the wheel nuts are tight. Serrated nuts should be used I guess. I'm still using the FT style nylon lock nuts that came in the kit.
The JConcepts capped wheel nuts (serrated), that I tried to use, bottom out before wheel is secured to hex. The cheap wheels I'm using are 1mm too thin where they mount on axle/hex. I'll order something fix the issue, or serrate current nuts with Dremel.
06-02-2017, 08:54 AM
#40
Join Date: Apr 2016
Location: Tacoma, Wa
Posts: 555
Likes: 0
Received 0 Likes
on
0 Posts
Its funny you mention that as the wheel nut on mine (pretty sure it was left front) went shooting off on a corner not too long ago. Now i just give them a snug when i bring it in for a fresh battery. Also the factory grip tape for the esc fell apart right away so i had to go to something better.
06-04-2017, 07:35 AM
#41
Thread Starter
I've got back from a run and now have the tiniest indication of diff fluid being flung off the center diff. I don't know if there is a leak issue or if it's just excess fluid working it's way off the center gear.
I am thinking back now that I have maybe overfilled the diffs.
Any problems with filling diff housing to maximum, i.e., having excess diff fluid ooze out when tightening down the screws?
Running hard, and really working the diffs out...warming/heating up the fluid...possibly creating internal pressure?
06-06-2017, 05:56 PM
#42
Thread Starter
New issue to work on. CVDs that are delivering the power to the front and rear diffs, have an O-ring that captures the pin. When putting the kit together, I kinda thought uneasy about Associated having a piece of rubber to keep the pin from flying out. After going from 4wd to 0wd, that uneasy feeling was right. The o-ring slipped out of the groove.....I'm going back to using a setscrew and metal ring to retain CVD pin. The o-ring will work fine, for about a year. After that time frame, it seems dry, and has lost it's elasticity. That's the story I'm going with.
06-13-2017, 01:49 PM
#43
Thread Starter
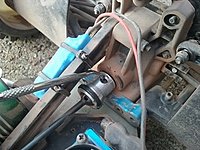
After I thought I had the gearbox input cup's setscrew tightened, I realized setscrew wasn't seated on flat spot on diff pinion gear. Why? Because everytime I would push the CVD/input cup onto the pinion, the gear would move into the gearbox... not enough of the flat spot to tighten down setscrew. I was stumped for a moment, and had contemplated tearing gearbox apart to get to pinion gear. Hook and pick set, that I use mainly for pulling bearings, was used to pull the pinion gear out of gearbox, and into position.
09-07-2017, 05:36 AM
#44
Thread Starter
I determined center diff is the cause of some disturbing "grinding" sounds. Took diff apart and checked things out. 1/2 full of fluid, but 100% full of stink . Yes, stink. Metal being ground down and infused into the fluid has a stink to it. That's my theory anyways.
Looking back at notes, and in manuals (RC8e, RC8Be, RC8.2e, RC8B3), there is all kinds (normally two variations) of shimming going on. The sun/spider gears don't look too bad coming out of diff case. So, my thought is just to add another shim behind each of the spider gears, and go from there. Definitely a notchy feel now. Not bad, but noticeable for sure. I will be filling the diff up and going for broke until the shipment of gears gets here.
. Yes, stink. Metal being ground down and infused into the fluid has a stink to it. That's my theory anyways. Looking back at notes, and in manuals (RC8e, RC8Be, RC8.2e, RC8B3), there is all kinds (normally two variations) of shimming going on. The sun/spider gears don't look too bad coming out of diff case. So, my thought is just to add another shim behind each of the spider gears, and go from there. Definitely a notchy feel now. Not bad, but noticeable for sure. I will be filling the diff up and going for broke until the shipment of gears gets here
.
09-07-2017, 11:09 AM
#45
Thread Starter
The extra shim behind each of the spider gears helped bring back center diff performance. Initial testing with battery pack in buggy felt like I had drag brake on 50% or so. After a lap at mild speeds I let 'er have it! My buggy was breathing again!
As for how long the gears will last in their worn condition, I don't know. This is my first time in two years that I am experiencing grinding noises, and experimenting with shimming on the center diff.
As for how long the gears will last in their worn condition, I don't know. This is my first time in two years that I am experiencing grinding noises, and experimenting with shimming on the center diff.
05-14-2018, 05:31 AM
#46
Thread Starter
Trying to get the sun gear closer to the spider gears was posing an issue when gears are worn/broken-in. Having two shims behind the sun gears already, there is no more room for more shims there. I tried putting a third shim behind the sun gear, but that causes too tight of fitment.
Mugen diff seals are .5mm thick and Associated diff seals are .24mm thick. I'm not a fan of the Associated paper seals, but will use them in a pinch. After sitting back for fifteen minutes, thinking about how to accomplish needed room for proper gear mesh, one of those light bulbs popped over my head 💡. My problem isn't the shims, or seals themselves, it's the diff case that I need to remove material from.
I'll work with rear diff first since it's the one that's giving me a weird notchy feeling when turning outdrives with fingers.
05-18-2018, 03:25 AM
#47
Thread Starter
After putting the Mugen gasket on the sanded-down diff gear housing, the whole thing feels smooth once again, and sitting on table for four days with not one drop of oil leaking... bonus ! If I put on an Associated stock gasket, the gears start feeling notchy, and I have to take out one of the two shims behind the sun gear for everything to feel almost smooth. Taking the second sun gear shim out is not an option as that would leave the sun gear riding on the o-ring.
So, thicker gasket, and two sun gear shims it will be for now when I use broken-in diff gears.
Waiting for diff shims to show up today so I can work on the lateral side-to-side movement of the completed diff inside the gearbox.
! If I put on an Associated stock gasket, the gears start feeling notchy, and I have to take out one of the two shims behind the sun gear for everything to feel almost smooth. Taking the second sun gear shim out is not an option as that would leave the sun gear riding on the o-ring. So, thicker gasket, and two sun gear shims it will be for now when I use broken-in diff gears.
Waiting for diff shims to show up today so I can work on the lateral side-to-side movement of the completed diff inside the gearbox.
05-20-2018, 10:04 AM
#48
Thread Starter
If needed for more room, would it be okay to use no shims behind sun gear?
The sun gear would be riding on the o-ring. I'm not sure it would hurt. My thinking was initially a bad idea, but now I'm thinking not much resistance between the gear and o-ring because of there being oil slung everywhere inside case.
Hopefully I'll not be needing this shimming scenario.
The sun gear would be riding on the o-ring. I'm not sure it would hurt. My thinking was initially a bad idea, but now I'm thinking not much resistance between the gear and o-ring because of there being oil slung everywhere inside case.
Hopefully I'll not be needing this shimming scenario.
05-20-2018, 10:31 AM
#49
Thread Starter
I got my shims in the mail, and I am needing quite a few of them so far. Using one of the 89117 Diff Shims before putting the bearing into the gearbox allows the diff pinion gear to be pulled against the inner bearing...like it was when kit was fresh.
If I don't put a shim in here, the pinion gear will be able to move in and out of gearbox the tiniest bit, and I'll start to get a notchy feeling going on.
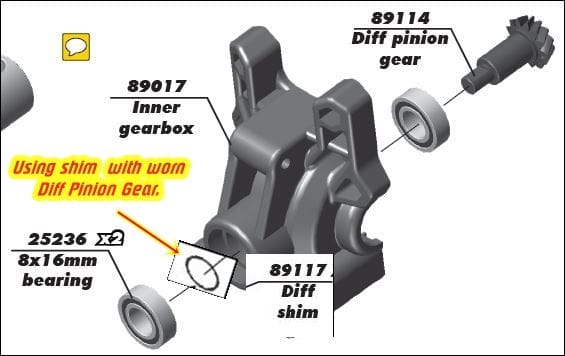
If I don't put a shim in here, the pinion gear will be able to move in and out of gearbox the tiniest bit, and I'll start to get a notchy feeling going on.
05-20-2018, 02:25 PM
#50
Thread Starter
After getting both gearboxes squared away, more play in the buggy was becoming evident.
One additional shim needed at rear diff outdrive bearing.
Two additional shims (one each side) at front diff outdrive bearings.
Three shims for center diff centering.
Two shims for front steering block bearings.
I was not too shocked to see all the slopped that developed over the past three years. During the rebuilding of the diffs this time around, but today I couldn't take it (slop) anymore.
